


高斯溅射教程的第三部分,展示如何将溅射渲染到 2D 图像
欢迎来到雲闪世界。最后,我们到达了高斯溅射过程中最有趣的阶段:渲染!这一步可以说是最关键的,因为它决定了我们模型的真实性。然而,它也可能是最简单的。在本系列的第 1 部分和第 2 部分中,博主文章中找,(完整代码可联系博主)我们演示了如何将原始溅射转换为可渲染的格式,但现在我们实际上必须完成工作并渲染到一组固定的像素上。作者使用 CUDA 开发了一个快速渲染引擎,这可能有点难以理解。因此,我认为首先使用 Python 浏览代码是有益的,使用简单的 for 循环来清晰理解。对于那些渴望深入研究的人,所有必要的代码都可以在我们的 G itHub上找到。
让我们讨论一下如何渲染每个单独的像素。从我们之前的文章中,我们掌握了所有必要的组件:2D 点、相关颜色、协方差、排序的深度顺序、2D 中的逆协方差、每个 splat 的最小和最大 x 和 y 值以及相关的不透明度。有了这些组件,我们可以渲染任何像素。给定特定的像素坐标,我们遍历所有 splat,直到达到饱和度阈值,遵循相对于相机平面的 splat 深度顺序(投影到相机平面,然后按深度排序)。对于每个 splat,我们首先检查像素坐标是否在由最小和最大 x 和 y 值定义的范围内。此检查确定我们是否应该继续渲染或忽略这些坐标的 splat。接下来,我们使用 splat 均值、splat 协方差和像素坐标计算像素坐标处的高斯 splat 强度。
def compute_gaussian_weight(
   pixel_coord: torch.Tensor,  # (1, 2) tensor
   point_mean: torch.Tensor,
   inverse_covariance: torch.Tensor,
) -> torch.Tensor:


   difference = point_mean - pixel_coord
   power = -0.5 * difference @ inverse_covariance @ difference.T
   return torch.exp(power).item()
我们将该权重乘以 splat 的不透明度,以获得一个名为 alpha 的参数。在将这个新值添加到像素之前,我们需要检查是否已经超出了饱和度阈值。如果像素已经饱和,我们不希望其他 splat 后面的 splat 影响像素着色并使用计算资源。因此,我们使用一个阈值,一旦超过该阈值,我们就停止渲染。实际上,我们将饱和度阈值设置为 1,然后将其乘以 min(0.99, (1 — alpha)) 以获得一个新值。如果该值小于我们的阈值 (0.0001),我们将停止渲染该像素并认为它已完成。如果不是,我们将按饱和度 * (1 — alpha) 值加权的颜色相加,并将饱和度更新为 new_saturation = old_saturation * (1 — alpha)。最后,我们循环遍历每个像素(或实际上每个 16x16 图块)并进行渲染。完整代码如下所示。
def render_pixel(
       self,
       pixel_coords: torch.Tensor,
       points_in_tile_mean: torch.Tensor,
       colors: torch.Tensor,
       opacities: torch.Tensor,
       inverse_covariance: torch.Tensor,
       min_weight: float = 0.000001,
   ) -> torch.Tensor:
       total_weight = torch.ones(1).to(points_in_tile_mean.device)
       pixel_color = torch.zeros((1, 1, 3)).to(points_in_tile_mean.device)
       for point_idx in range(points_in_tile_mean.shape[0]):
           point = points_in_tile_mean[point_idx, :].view(1, 2)
           weight = compute_gaussian_weight(
               pixel_coord=pixel_coords,
               point_mean=point,
               inverse_covariance=inverse_covariance[point_idx],
           )
           alpha = weight * torch.sigmoid(opacities[point_idx])
           test_weight = total_weight * (1 - alpha)
           if test_weight < min_weight:
               return pixel_color
           pixel_color += total_weight * alpha * colors[point_idx]
           total_weight = test_weight
       # in case we never reach saturation
       return pixel_color
现在我们可以渲染一个像素,我们就可以渲染图像的一个补丁,或者作者所说的图块!
def render_tile(
     self,
     x_min: int,
     y_min: int,
     points_in_tile_mean: torch.Tensor,
     colors: torch.Tensor,
     opacities: torch.Tensor,
     inverse_covariance: torch.Tensor,
     tile_size: int = 16,
 ) -> torch.Tensor:
     """Points in tile should be arranged in order of depth"""


     tile = torch.zeros((tile_size, tile_size, 3))

     # iterate by tiles for more efficient processing
     for pixel_x in range(x_min, x_min + tile_size):
         for pixel_y in range(y_min, y_min + tile_size):
             tile[pixel_x % tile_size, pixel_y % tile_size] = self.render_pixel(
                 pixel_coords=torch.Tensor([pixel_x, pixel_y])
                 .view(1, 2)
                 .to(points_in_tile_mean.device),
                 points_in_tile_mean=points_in_tile_mean,
                 colors=colors,
                 opacities=opacities,
                 inverse_covariance=inverse_covariance,
             )
     return tile
最后,我们可以使用所有这些图块来渲染整个图像。请注意我们如何检查以确保 splat 确实会影响当前图块(x_in_tile 和 y_in_tile 代码)。
def render_image(self, image_idx: int, tile_size: int = 16) -> torch.Tensor:
    """For each tile have to check if the point is in the tile"""
    preprocessed_scene = self.preprocess(image_idx)
    height = self.images[image_idx].height
    width = self.images[image_idx].width

    image = torch.zeros((width, height, 3))

    for x_min in tqdm(range(0, width, tile_size)):
        x_in_tile = (x_min >= preprocessed_scene.min_x) & (
            x_min + tile_size <= preprocessed_scene.max_x
        )
        if x_in_tile.sum() == 0:
            continue
        for y_min in range(0, height, tile_size):
            y_in_tile = (y_min >= preprocessed_scene.min_y) & (
                y_min + tile_size <= preprocessed_scene.max_y
            )
            points_in_tile = x_in_tile & y_in_tile
            if points_in_tile.sum() == 0:
                continue
            points_in_tile_mean = preprocessed_scene.points[points_in_tile]
            colors_in_tile = preprocessed_scene.colors[points_in_tile]
            opacities_in_tile = preprocessed_scene.sigmoid_opacity[points_in_tile]
            inverse_covariance_in_tile = preprocessed_scene.inverse_covariance_2d[
                points_in_tile
            ]
            image[x_min : x_min + tile_size, y_min : y_min + tile_size] = (
                self.render_tile(
                    x_min=x_min,
                    y_min=y_min,
                    points_in_tile_mean=points_in_tile_mean,
                    colors=colors_in_tile,
                    opacities=opacities_in_tile,
                    inverse_covariance=inverse_covariance_in_tile,
                    tile_size=tile_size,
                )
            )
    return image
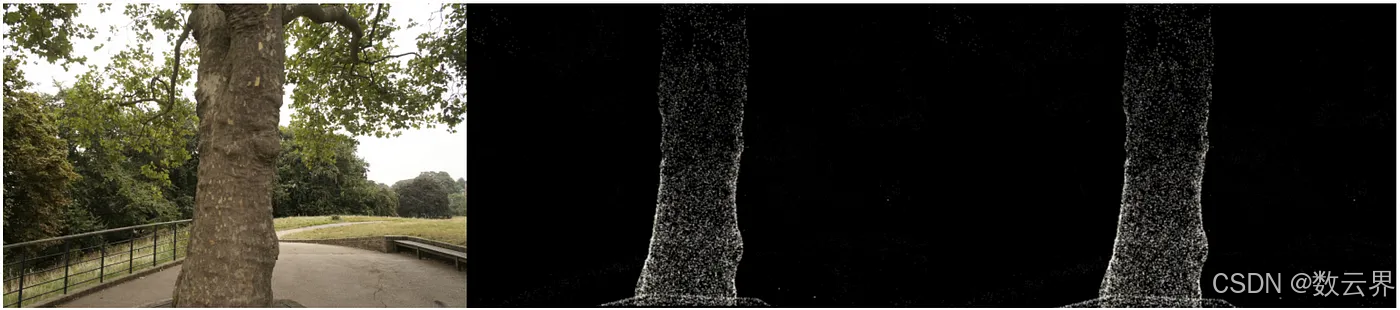
现在我们终于拥有了所有必要的组件,可以渲染图像了。我们从 treehill 数据集中获取所有 3D 点,并将它们初始化为高斯点阵。为了避免代价高昂的最近邻搜索,我们将所有比例变量初始化为 .01(请注意,在方差如此之小的情况下,我们需要在一个点上高度集中的点阵才能可见。方差越大,处理速度越慢。)然后,我们要做的就是使用我们试图模拟的图像编号调用 render_image,正如您所见,我们得到了一组与我们的图像相似的稀疏点云!(查看底部的奖励部分,了解使用 pyTorch 的漂亮工具编译 CUDA 代码的等效 CUDA 内核!)
虽然向后传递不是本教程的一部分,但需要注意的是,虽然我们只从这几个点开始,但很快就会有大多数场景的数十万个 splats。这是由于将大 splats(由轴上的较大方差定义)分解为较小的 splats 并移除不透明度极低的 splats 造成的。例如,如果我们真正将比例初始化为三个最近邻居的平均值,我们将覆盖大部分空间。为了获得精细的细节,我们需要将它们分解为能够捕捉精细细节的更小的 splats。他们还需要用很少的高斯分布填充区域。他们将这两种情况称为过度重建和重建不足,并通过各种 splats 的大梯度值来定义这两种情况。然后,他们根据大小拆分或克隆 splats(见下图)并继续优化过程。
虽然本教程未介绍反向传递,但需要注意的是,我们一开始只有几个点,但很快在大多数场景中就会有数十万个 splats。这种增加是由于将大 splats(轴上方差较大)分割成小 splats 并移除不透明度非常低的 splats。例如,如果我们最初将比例设置为三个最近邻居的平均值,则大部分空间将被覆盖。为了实现精细细节,我们需要将这些大 splats 分割成小得多的 splats。此外,需要填充高斯分布很少的区域。这些场景称为过度重建和重建不足,其特点是各种 splats 的梯度值较大。根据其大小,splats 被分割或克隆(见下图),然后优化过程继续。

这就是高斯 Splatting 的简单介绍!现在您应该对高斯场景渲染的前向传递过程有了一个直观的认识。虽然有点令人生畏,而且不完全是神经网络,但只需要一点线性代数,我们就可以在 2D 中渲染 3D 几何体!
如果您对某些令人困惑的话题或者我所犯的错误有任何疑问,请随时发表评论,您也可以随时在 LinkedIn 或 Twitter 上与我联系!
奖金 — — CUDA 代码
使用 PyTorch 的 CUDA 编译器编写自定义 CUDA 内核!
def load_cuda(cuda_src, cpp_src, funcs, opt=True, verbose=False):
    return load_inline(
        name="inline_ext",
        cpp_sources=[cpp_src],
        cuda_sources=[cuda_src],
        functions=funcs,
        extra_cuda_cflags=["-O1"] if opt else [],
        verbose=verbose,
    )


class GaussianScene(nn.Module):

    # OTHER CODE NOT SHOWN

    def compile_cuda_ext(
        self,
    ) -> torch.jit.ScriptModule:

        cpp_src = """
        torch::Tensor render_image(
            int image_height,
            int image_width,
            int tile_size,
            torch::Tensor point_means,
            torch::Tensor point_colors,
            torch::Tensor inverse_covariance_2d,
            torch::Tensor min_x,
            torch::Tensor max_x,
            torch::Tensor min_y,
            torch::Tensor max_y,
            torch::Tensor opacity);
        """

        cuda_src = Path("splat/c/render.cu").read_text()

        return load_cuda(cuda_src, cpp_src, ["render_image"], opt=True, verbose=True)

    def render_image_cuda(self, image_idx: int, tile_size: int = 16) -> torch.Tensor:
        preprocessed_scene = self.preprocess(image_idx)
        height = self.images[image_idx].height
        width = self.images[image_idx].width
        ext = self.compile_cuda_ext()

        now = time.time()
        image = ext.render_image(
            height,
            width,
            tile_size,
            preprocessed_scene.points.contiguous(),
            preprocessed_scene.colors.contiguous(),
            preprocessed_scene.inverse_covariance_2d.contiguous(),
            preprocessed_scene.min_x.contiguous(),
            preprocessed_scene.max_x.contiguous(),
            preprocessed_scene.min_y.contiguous(),
            preprocessed_scene.max_y.contiguous(),
            preprocessed_scene.sigmoid_opacity.contiguous(),
        )
        torch.cuda.synchronize()
        print("Operation took seconds: ", time.time() - now)
        return image
#include <cstdio>
#include <cmath> // Include this header for expf function
#include <torch/extension.h>

__device__ float compute_pixel_strength(
    int pixel_x,
    int pixel_y,
    int point_x,
    int point_y,
    float inverse_covariance_a,
    float inverse_covariance_b,
    float inverse_covariance_c)
{
    // Compute the distance between the pixel and the point
    float dx = pixel_x - point_x;
    float dy = pixel_y - point_y;
    float power = dx * inverse_covariance_a * dx + 2 * dx * dy * inverse_covariance_b + dy * dy * inverse_covariance_c;
    return expf(-0.5f * power);
}

__global__ void render_tile(
    int image_height,
    int image_width,
    int tile_size,
    int num_points,
    float *point_means,
    float *point_colors,
    float *image,
    float *inverse_covariance_2d,
    float *min_x,
    float *max_x,
    float *min_y,
    float *max_y,
    float *opacity)
{
    // Calculate the pixel's position in the image
    int pixel_x = blockIdx.x * tile_size + threadIdx.x;
    int pixel_y = blockIdx.y * tile_size + threadIdx.y;

    // Ensure the pixel is within the image bounds
    if (pixel_x >= image_width || pixel_y >= image_height)
    {
        return;
    }

    float total_weight = 1.0f;
    float3 color = {0.0f, 0.0f, 0.0f};

    for (int i = 0; i < num_points; i++)
    {
        float point_x = point_means[i * 2];
        float point_y = point_means[i * 2 + 1];

        // checks to make sure we are within the bounding box
        bool x_check = pixel_x >= min_x[i] && pixel_x <= max_x[i];
        bool y_check = pixel_y >= min_y[i] && pixel_y <= max_y[i];
        if (!x_check || !y_check)
        {
            continue;
        }
        float strength = compute_pixel_strength(
            pixel_x,
            pixel_y,
            point_x,
            point_y,
            inverse_covariance_2d[i * 4],
            inverse_covariance_2d[i * 4 + 1],
            inverse_covariance_2d[i * 4 + 3]);

        float initial_alpha = opacity[i] * strength;
        float alpha = min(.99f, initial_alpha);
        float test_weight = total_weight * (1 - alpha);
        if (test_weight < 0.001f)
        {
            break;
        }
        color.x += total_weight * alpha * point_colors[i * 3];
        color.y += total_weight * alpha * point_colors[i * 3 + 1];
        color.z += total_weight * alpha * point_colors[i * 3 + 2];
        total_weight = test_weight;
    }

    image[(pixel_y * image_width + pixel_x) * 3] = color.x;
    image[(pixel_y * image_width + pixel_x) * 3 + 1] = color.y;
    image[(pixel_y * image_width + pixel_x) * 3 + 2] = color.z;

}


torch::Tensor render_image(
    int image_height,
    int image_width,
    int tile_size,
    torch::Tensor point_means,
    torch::Tensor point_colors,
    torch::Tensor inverse_covariance_2d,
    torch::Tensor min_x,
    torch::Tensor max_x,
    torch::Tensor min_y,
    torch::Tensor max_y,
    torch::Tensor opacity)
{
    // Ensure the input tensors are on the same device
    torch::TensorArg point_means_t{point_means, "point_means", 1},
        point_colors_t{point_colors, "point_colors", 2},
        inverse_covariance_2d_t{inverse_covariance_2d, "inverse_covariance_2d", 3},
        min_x_t{min_x, "min_x", 4},
        max_x_t{max_x, "max_x", 5},
        min_y_t{min_y, "min_y", 6},
        max_y_t{max_y, "max_y", 7},
        opacity_t{opacity, "opacity", 8};
    torch::checkAllSameGPU("render_image", {point_means_t, point_colors_t, inverse_covariance_2d_t, min_x_t, max_x_t, min_y_t, max_y_t, opacity_t});


    // Create an output tensor for the image
    torch::Tensor image = torch::zeros({image_height, image_width, 3}, point_means.options());

    // Calculate the number of tiles in the image
    int num_tiles_x = (image_width + tile_size - 1) / tile_size;
    int num_tiles_y = (image_height + tile_size - 1) / tile_size;

    // Launch a CUDA kernel to render the image
    dim3 block(tile_size, tile_size);
    dim3 grid(num_tiles_x, num_tiles_y);
    render_tile<<<grid, block>>>(
        image_height,
        image_width,
        tile_size,
        point_means.size(0),
        point_means.data_ptr<float>(),
        point_colors.data_ptr<float>(),
        image.data_ptr<float>(),
        inverse_covariance_2d.data_ptr<float>(),
        min_x.data_ptr<float>(),
        max_x.data_ptr<float>(),
        min_y.data_ptr<float>(),
        max_y.data_ptr<float>(),
        opacity.data_ptr<float>());

    return image;
}
感谢关注雲闪世界。(亚马逊aws和谷歌GCP服务协助解决云计算及产业相关解决方案)
感兴趣的可以阅读:用AWS超强算力挖掘比特币和以太坊
Telegram客服: @Fieeai (https://t.me/Fieeai)
订阅频道(https://t.me/awsgoogvps_Host)
TG交流群(t.me/awsgoogvpsHost)


 被折叠的 条评论
为什么被折叠?
被折叠的 条评论
为什么被折叠?
 到【灌水乐园】发言


