


最近都在研究和学习stable diffusion和langchain的相关知识,并且看到stable diffusion也是有类似于ChatGLM的api调用方式,那在想有没有可能将stable diffusion也集成到langchain中来呢?看到网上资料比较多的是可以借助chatgpt来辅助stable diffusion提示词的生成,本文就基于此思路来尝试利用LLM+LangChain+stable diffusion实现一句话自动生成图片的功能。
步骤
扩充提示词
使用OpenAI来生成提示词
参照“[AI协同打工,ChatGPT生成提示词+AI作图]”文中的方式生成stable diffusion的提示词
from langchain.prompts import PromptTemplate
from langchain.llms import OpenAI
from langchain.chains import LLMChain

_template = """
以下提示用于指导Al绘画模型创建图像。它们包括人物外观、背景、颜色和光影效果,以及图像的主题和风格等各种细节。这些提示的格式通常包括带权重的数字括号,用于指定某些细节的重要性或强调。例如,"(masterpiece:1.4)"表示作品的质量非常重要。以下是一些示例:
1. (8k, RAW photo, best quality, masterpiece:1.2),(realistic, photo-realistic:1.37), ultra-detailed, 1girl, cute, solo, beautiful detailed sky, detailed cafe, night, sitting, dating, (nose blush), (smile:1.1),(closed mouth), medium breasts, beautiful detailed eyes, (collared shirt:1.1), bowtie, pleated skirt, (short hair:1.2), floating hair, ((masterpiece)), ((best quality)),
2. (masterpiece, finely detailed beautiful eyes: 1.2), ultra-detailed, illustration, 1 girl, blue hair black hair, japanese clothes, cherry blossoms, tori, street full of cherry blossoms, detailed background, realistic, volumetric light, sunbeam, light rays, sky, cloud,
3. highres, highest quallity, illustration, cinematic light, ultra detailed, detailed face, (detailed eyes, best quality, hyper detailed, masterpiece, (detailed face), blue hairlwhite hair, purple eyes, highest details, luminous eyes, medium breats, black halo, white clothes, backlighting, (midriff:1.4), light rays, (high contrast), (colorful)

"""

llm = OpenAI(temperature=0)
prompt = PromptTemplate(
    input_variables=["desc"],
    template=_template3,
)

chain = LLMChain(prompt=prompt,llm=llm)

res = chain.run("湖人总冠军")

print(res)
- 生成的提示词如下:
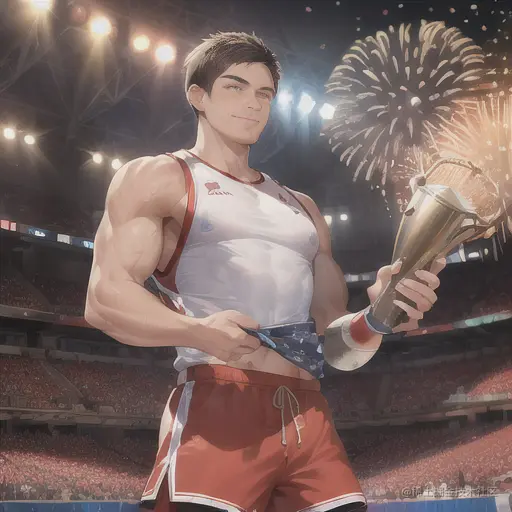
(masterpiece:1.4), ultra-detailed, 1man, strong, solo, detailed basketball court, detailed stadium, night, standing, celebrating, (fist pump), (smile:1.1), (closed mouth), muscular body, beautiful detailed eyes, (jersey:1.1), shorts, (short hair:1.2), floating hair, (trophy:1.3), (confetti:1.2), (fireworks:1.2), (crowd cheering:1.2), (high contrast), (colorful)
将提示词直接输入到stable diffusion webui中得到结果如下:
格式化输出
为了确保输出的结果可以方便解析,可以再加入一些引导,最终的提示词如下:
_template = """
以下提示用于指导Al绘画模型创建图像。它们包括人物外观、背景、颜色和光影效果,以及图像的主题和风格等各种细节。这些提示的格式通常包括带权重的数字括号,用于指定某些细节的重要性或强调。例如,"(masterpiece:1.4)"表示作品的质量非常重要。以下是一些示例:
1. (8k, RAW photo, best quality, masterpiece:1.2),(realistic, photo-realistic:1.37), ultra-detailed, 1girl, cute, solo, beautiful detailed sky, detailed cafe, night, sitting, dating, (nose blush), (smile:1.1),(closed mouth), medium breasts, beautiful detailed eyes, (collared shirt:1.1), bowtie, pleated skirt, (short hair:1.2), floating hair, ((masterpiece)), ((best quality)),
2. (masterpiece, finely detailed beautiful eyes: 1.2), ultra-detailed, illustration, 1 girl, blue hair black hair, japanese clothes, cherry blossoms, tori, street full of cherry blossoms, detailed background, realistic, volumetric light, sunbeam, light rays, sky, cloud,
3. highres, highest quallity, illustration, cinematic light, ultra detailed, detailed face, (detailed eyes, best quality, hyper detailed, masterpiece, (detailed face), blue hairlwhite hair, purple eyes, highest details, luminous eyes, medium breats, black halo, white clothes, backlighting, (midriff:1.4), light rays, (high contrast), (colorful)

仿照之前的提示,写一段描写如下要素的提示:
{desc}

你应该仅以 JSON 格式响应,如下所述:
返回格式如下:
{{
  "question":"$YOUR_QUESTION_HERE",
  "answer": "$YOUR_ANSWER_HERE"
}}
确保响应可以被 Python json.loads 解析。
"""
最终生成的结果如下:
{
  "question":"湖人总冠军",
  "answer": "(masterpiece:1.4), ultra-detailed, 1man, strong, solo, detailed basketball court, detailed stadium, night, standing, celebrating, (fist pump), (smile:1.1), (closed mouth), muscular body, beautiful detailed eyes, (jersey:1.1), shorts, (short hair:1.2), floating hair, (trophy:1.3), (confetti:1.2), (fireworks:1.2), (crowd cheering:1.2), (high contrast), (colorful)"
}
这样我们就可以比较方便的解析数据了
# 解析json
import json
result = json.loads(res)
print("result:",result)
result["answer"]
使用ChatGLM来生成提示词
llm = ChatGLM(temperature=0.1,history=prompt_history)
prompt = PromptTemplate(
    input_variables=["desc"],
    template=_template,
)

chain = LLMChain(prompt=prompt,llm=llm)
ChatGLM基于[ChatGLM 集成进LangChain工具]的封装
最终生成的效果不是很好,这里就不展示了。主要问题包括:1.没有按照指令生成json格式;2.生成的描述很多都是中文形式的。
[MagicPrompt]自动续写SD提示词
from transformers import AutoModelForCausalLM, AutoTokenizer,pipeline

text_refine_tokenizer = AutoTokenizer.from_pretrained("Gustavosta/MagicPrompt-Stable-Diffusion")
text_refine_model = AutoModelForCausalLM.from_pretrained("Gustavosta/MagicPrompt-Stable-Diffusion")
text_refine_gpt2_pipe = pipeline("text-generation", model=text_refine_model, tokenizer=text_refine_tokenizer, device="cpu")

text = "湖人总冠军"

refined_text = text_refine_gpt2_pipe(text)[0]["generated_text"]

print(refined_text)
输出如下:
湖人总冠军 港子 Imoko Ikeda, Minaba hideo, Yoshitaka Amano, Ruan Jia, Kentaro Miura, Artgerm, post processed, concept
纯英文输入,最终的输出如下:
lakers championship winner trending on artstation, painted by greg rutkowski
可见MagicPrompt对于中文输入不是很友好,如果想使用的话,需要将输入先翻译成英文。
调用stable diffusion的api生成图片
参考:[Mikubill/sd-webui-controlnet]。主要代码如下:
import cv2
import requests
import base64
import re

ENDPOINT = "http://localhost:7860"

def do_webui_request(url, **kwargs):
    reqbody = {
        "prompt": "best quality, extremely detailed",
        "negative_prompt": "longbody, lowres, bad anatomy, bad hands, missing fingers, extra digit, fewer digits, cropped, worst quality, low quality",
        "seed": -1,
        "subseed": -1,
        "subseed_strength": 0,
        "batch_size": 1,
        "n_iter": 1,
        "steps": 15,
        "cfg_scale": 7,
        "width": 512,
        "height": 768,
        "restore_faces": True,
        "eta": 0,
        "sampler_index": "Euler a",
        "controlnet_input_images": [],
        "controlnet_module": 'canny',
        "controlnet_model": 'control_canny-fp16 [e3fe7712]',
        "controlnet_guidance": 1.0,

    }
    reqbody.update(kwargs)
    print("reqbody:",reqbody)
    r = requests.post(url, json=reqbody)
    return r.json()
- 调用api
import io
from PIL import Image

prompt = "a cute cat"
resp = do_webui_request(
    url=ENDPOINT + "/sdapi/v1/txt2img",
    prompt=prompt,
)

image = Image.open(io.BytesIO(base64.b64decode(resp["images"][0])))
display(image)
如果需要使用api功能,stable diffusion 需要开启api功能,启动时需要加上
--api
结合stable diffusion+LangChain+LLM自动生成图片
stable diffusion+LangChain+OpenAI
- 封装实现
import io, base64
import uuid
from PIL import Image

class RefinePrompt:

    llm = OpenAI(temperature=0)
    prompt = PromptTemplate(
        input_variables=["desc"],
        template=_template,
    )

    chain = LLMChain(prompt=prompt,llm=llm)
    def run(self,text):
        res = self.chain.run(text)
        # 解析json
        result = json.loads(res)
        return result["answer"]

class T2I:
    def __init__(self):
        self.text_refine = RefinePrompt()

    def inference(self, text):
        image_filename = os.path.join('output/image', str(uuid.uuid4())[0:8] + ".png")
        refined_text = self.text_refine.run(text)
        print(f'{text} refined to {refined_text}')
        resp = do_webui_request(
            url=ENDPOINT + "/sdapi/v1/txt2img",
            prompt=refined_text,
        )
        image = Image.open(io.BytesIO(base64.b64decode(resp["images"][0])))
        image.save(image_filename)
        print(f"Processed T2I.run, text: {text}, image_filename: {image_filename}")
        return image_filename,image
- 使用封装的类,并且展示图片(在python的
notebook中展示)
t2i = T2I()
image_filename,image = t2i.inference("湖人总冠军")
print("filename:",image_filename)
display(image)

stable diffusion+MagicPrompt
- 封装实现
from transformers import AutoModelForCausalLM, AutoTokenizer, CLIPSegProcessor, CLIPSegForImageSegmentation
from transformers import pipeline, BlipProcessor, BlipForConditionalGeneration, BlipForQuestionAnswering
import io, base64
import uuid
from PIL import Image

class T2I:
    def __init__(self, device):
        print("Initializing T2I to %s" % device)
        self.device = device
        self.text_refine_tokenizer = AutoTokenizer.from_pretrained("Gustavosta/MagicPrompt-Stable-Diffusion")
        self.text_refine_model = AutoModelForCausalLM.from_pretrained("Gustavosta/MagicPrompt-Stable-Diffusion")
        self.text_refine_gpt2_pipe = pipeline("text-generation", model=self.text_refine_model, tokenizer=self.text_refine_tokenizer, device=self.device)

    def inference(self, text,image_path=None):
        image_filename = os.path.join('output/image', str(uuid.uuid4())[0:8] + ".png")
        refined_text = self.text_refine_gpt2_pipe(text)[0]["generated_text"]
        print(f'{text} refined to {refined_text}')
        resp = do_webui_request(
            url=ENDPOINT + "/sdapi/v1/txt2img",
            prompt=refined_text,
            controlnet_input_images=[readImage(image_path) if image_path else None],
        )
        image = Image.open(io.BytesIO(base64.b64decode(resp["images"][0])))
        image.save(image_filename)
        print(f"Processed T2I.run, text: {text}, image_filename: {image_filename}")
        return image_filename,image
- 使用封装的类,并且展示图片(在python的
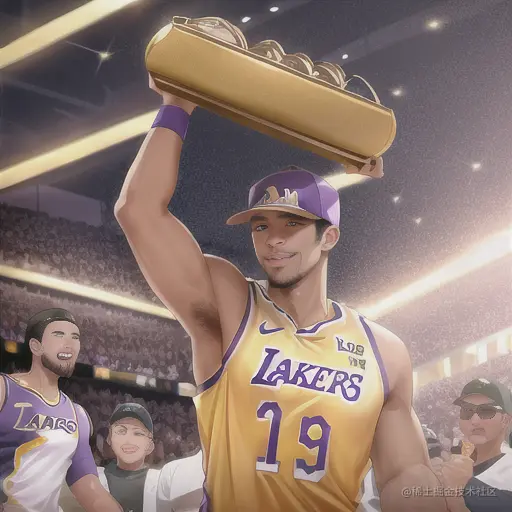
notebook中展示)
t2i = T2I("cpu")
image_filename,image = t2i.inference("lakers championship")
print("filename:",image_filename)
display(image)
总结
本文使用了stable diffusion+LangChain+LLM来实现一句话自动生成图片的功能,虽然最终的效果还不是很满意,但是可以看出来方案可行的。如果还需要优化效果的话,可以尝试:1.针对特不同模型需要输入该模型的更多的示例来辅助和优化最终模型的生成;2.尝试结合controlnet来更好的控制最终图片的生成。
ps:在学习和参考[Mikubill/sd-webui-controlnet]的代码时,发现了其中有一个模仿“Visual ChatGPT”的示例代码,还挺有意思的,接下来也会进一步分析其实现,敬请期待。
最后的最后
感谢你们的阅读和喜欢,我收藏了很多技术干货,可以共享给喜欢我文章的朋友们,如果你肯花时间沉下心去学习,它们一定能帮到你。
因为这个行业不同于其他行业,知识体系实在是过于庞大,知识更新也非常快。作为一个普通人,无法全部学完,所以我们在提升技术的时候,首先需要明确一个目标,然后制定好完整的计划,同时找到好的学习方法,这样才能更快的提升自己。
这份完整版的大模型 AI 学习资料已经上传CSDN,朋友们如果需要可以微信扫描下方CSDN官方认证二维码免费领取【保证100%免费】

大模型知识脑图
为了成为更好的 AI大模型 开发者,这里为大家提供了总的路线图。它的用处就在于,你可以按照上面的知识点去找对应的学习资源,保证自己学得较为全面。

经典书籍阅读
阅读AI大模型经典书籍可以帮助读者提高技术水平,开拓视野,掌握核心技术,提高解决问题的能力,同时也可以借鉴他人的经验。对于想要深入学习AI大模型开发的读者来说,阅读经典书籍是非常有必要的。

实战案例
光学理论是没用的,要学会跟着一起敲,要动手实操,才能将自己的所学运用到实际当中去,这时候可以搞点实战案例来学习。

面试资料
我们学习AI大模型必然是想找到高薪的工作,下面这些面试题都是总结当前最新、最热、最高频的面试题,并且每道题都有详细的答案,面试前刷完这套面试题资料,小小offer,不在话下

640套AI大模型报告合集
这套包含640份报告的合集,涵盖了AI大模型的理论研究、技术实现、行业应用等多个方面。无论您是科研人员、工程师,还是对AI大模型感兴趣的爱好者,这套报告合集都将为您提供宝贵的信息和启示。

这份完整版的大模型 AI 学习资料已经上传CSDN,朋友们如果需要可以微信扫描下方CSDN官方认证二维码免费领取【保证100%免费】


 960
960

 被折叠的 条评论
为什么被折叠?
被折叠的 条评论
为什么被折叠?
 到【灌水乐园】发言


