


前言:
YOLOv5-Lite模型相较于YOLOv5的优点主要体现在以下几个方面:
- 轻量级:YOLOv5-Lite模型通过一系列消融实验,使得模型更轻,具有更小的Flops,更低的内存占用和更少的参数。这意味着它更适合在资源受限的设备上运行,如树莓派。
- 速度快:YOLOv5-Lite模型在保持较高精度的同时,推理速度更快。通过加入shuffle channel,对yolov5 head进行通道裁剪等优化,使得在相同的硬件环境下,YOLOv5-Lite的推理速度可以更高。
- 易于部署:YOLOv5-Lite模型针对树莓派等嵌入式设备进行了优化,通过摘除Focus层和减少slice操作,使得模型更易部署,并且量化精度下降在可接受范围内。
将YOLOv5-Lite模型部署到树莓派上的优点主要包括:
- 实时性:由于YOLOv5-Lite模型轻量级和速度快的特点,它可以在树莓派上实现实时目标检测,适用于需要实时反馈的应用场景。
- 节约成本:使用树莓派等嵌入式设备部署模型可以节约服务器成本,同时降低能源消耗。
- 便携性:树莓派等嵌入式设备体积小巧,便于携带,可以灵活地应用于各种场景中。
总之,YOLOv5-Lite模型相较于YOLOv5更轻、更快、更易部署,将其部署到树莓派上可以实现实时目标检测,并节约成本和提供便携性。
具体过程
1.将yolov5-lite训练好的best.pt模型转化为best.onnx直接用yolov5-训练文件中的export.py转化文件即可。修改为自己的参数即可得到onnx文件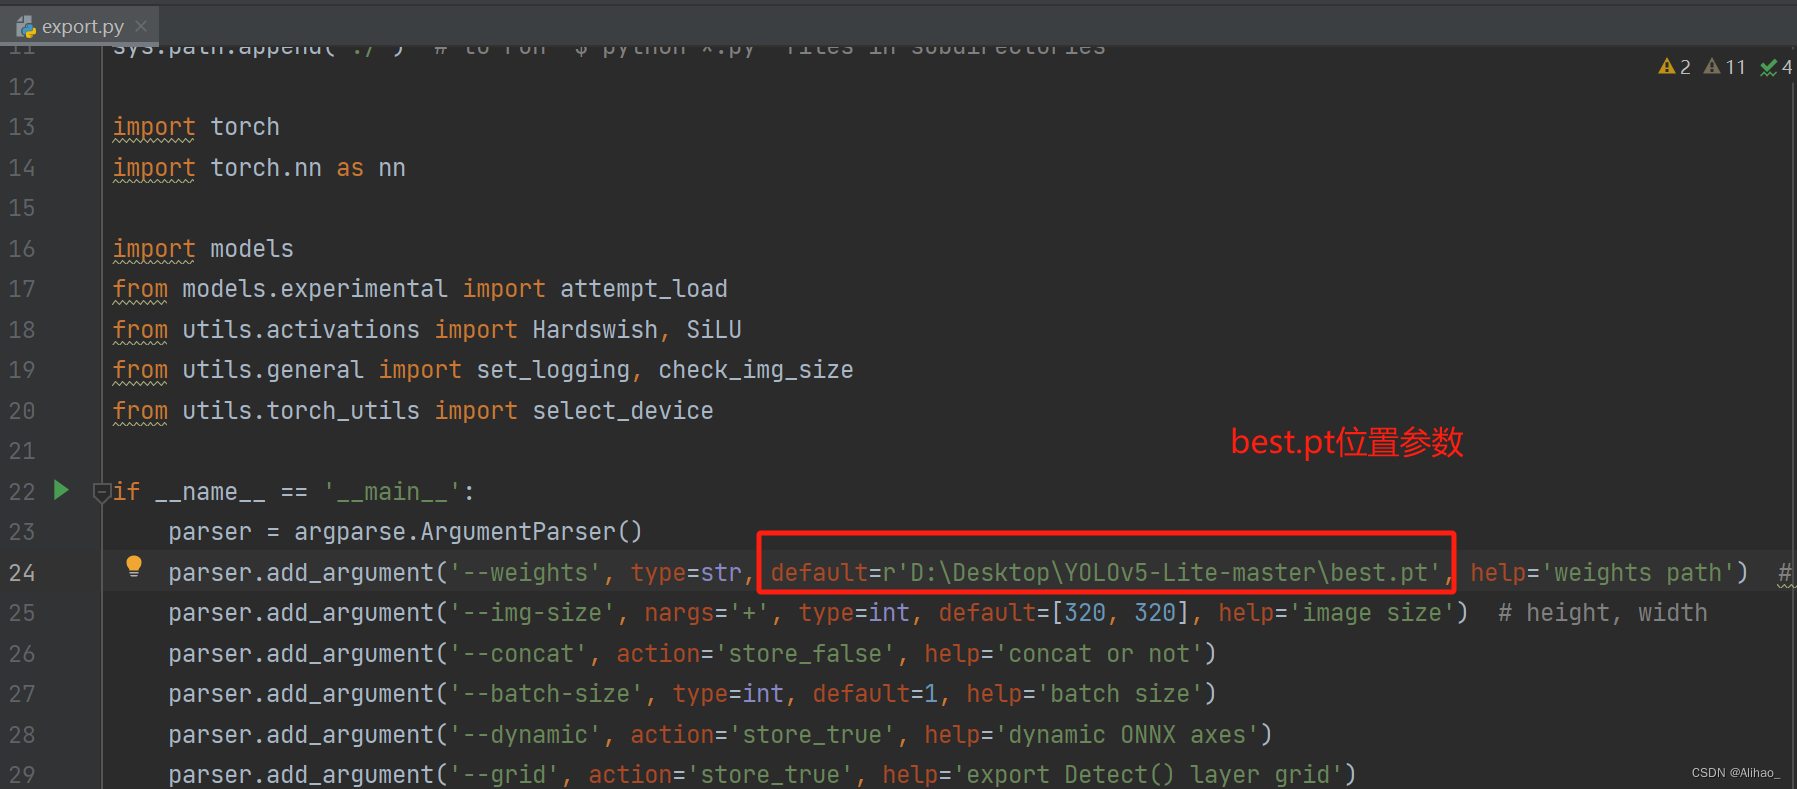
进入到树莓派开发环境中查询
1.系统架构
2.位数:
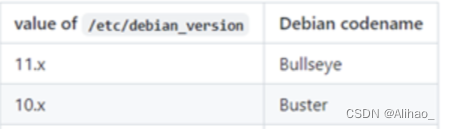
3.Debian版本编号
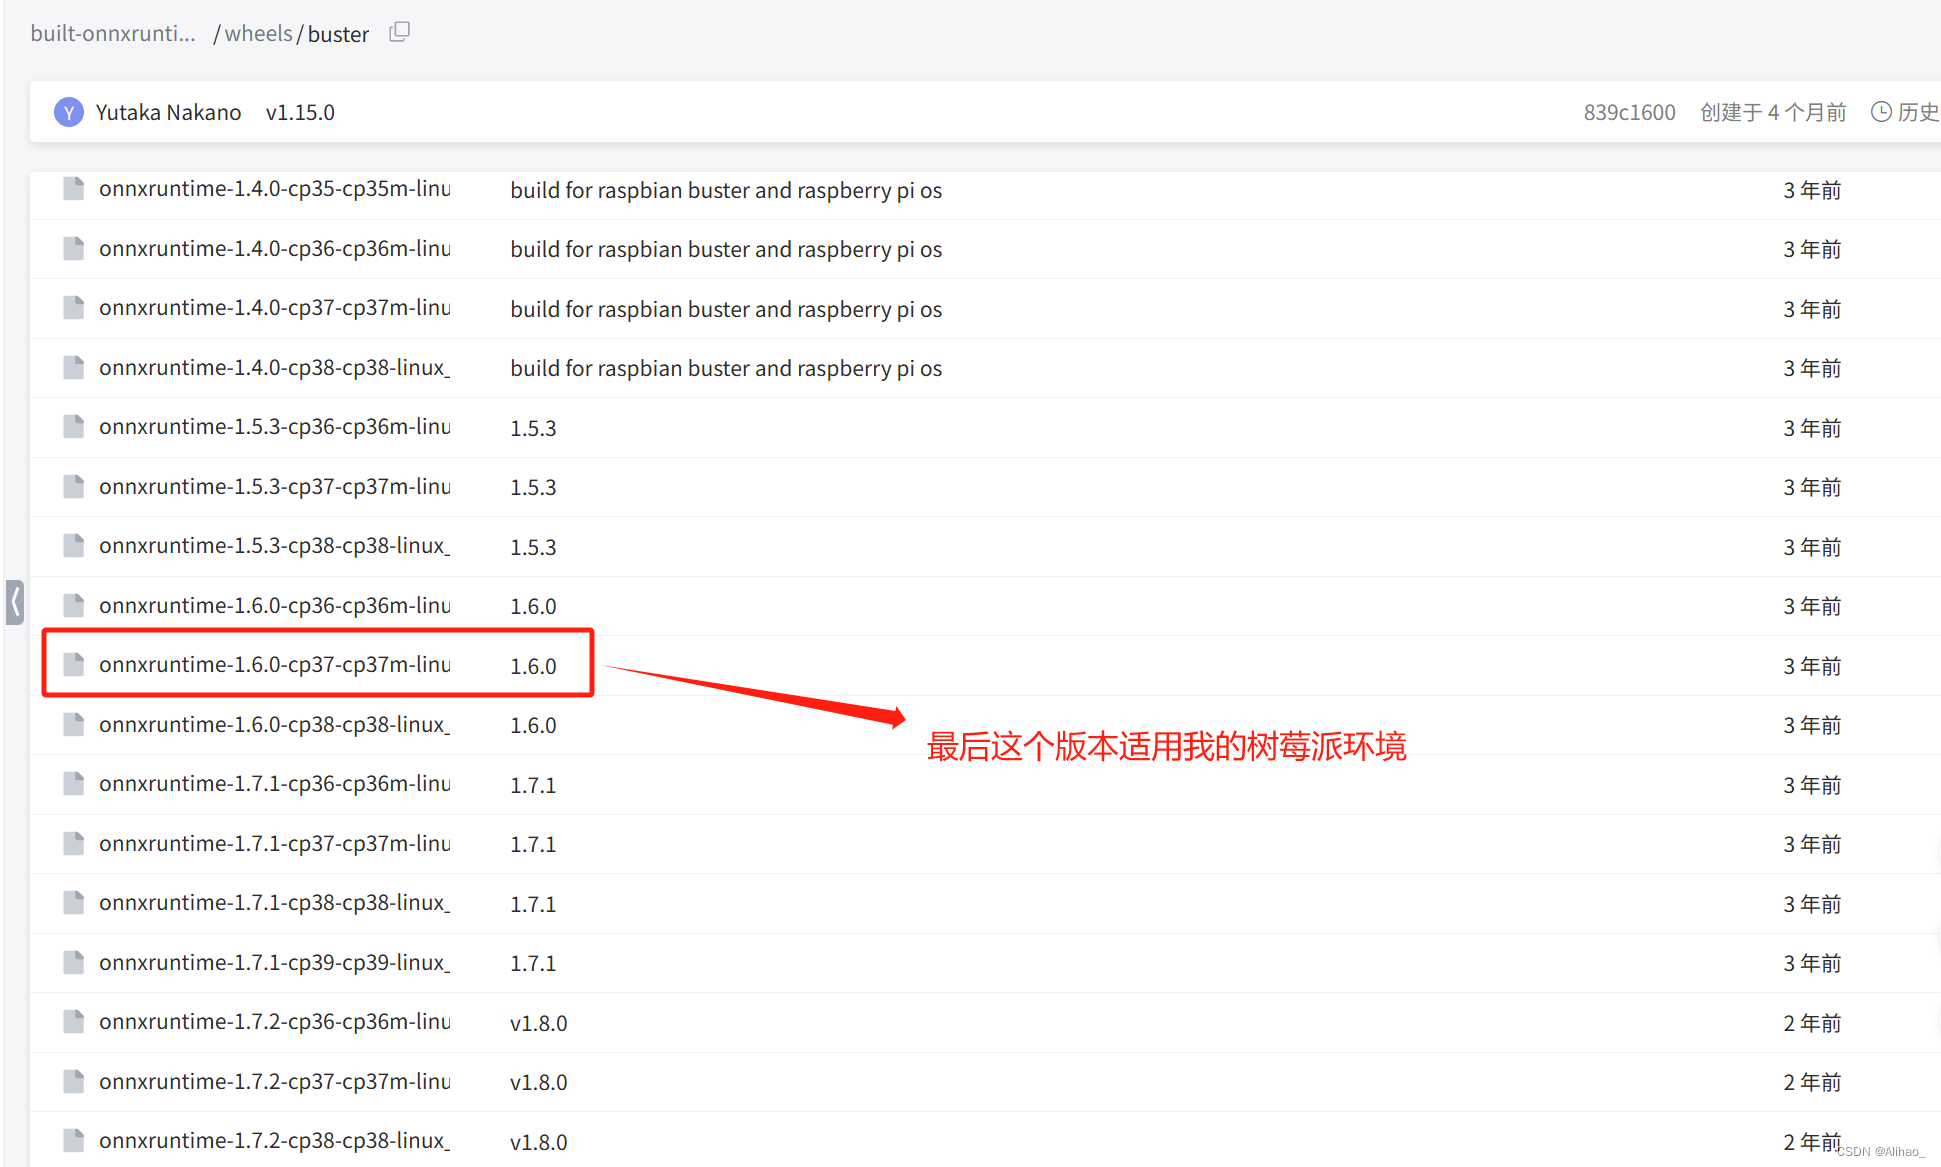
根据下面链接下载相应的轮子(xxx.whl文件)
https://github.com/nknytk/built-onnxruntime-for-raspberrypi-linux
在树莓派中创建模型检测文件夹,将onnx模型和模型应用程序放在一个文件夹下
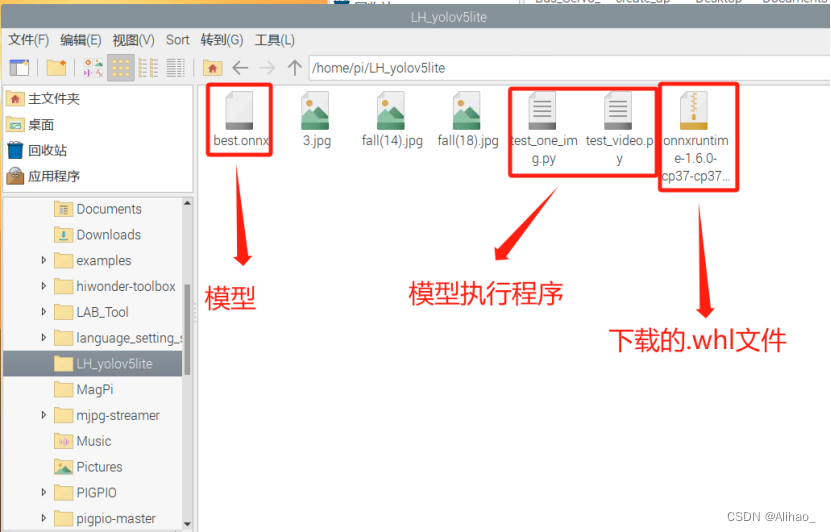
然后 pip install onnxxxxxxx.whl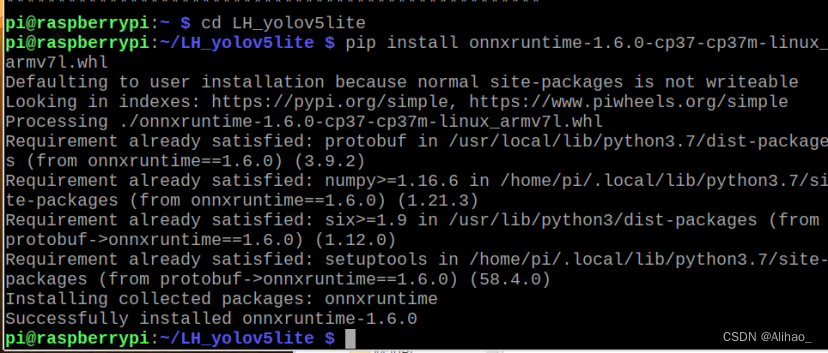
安装好后,应用模型执行程序
视频检测test_video.py
import cv2
import numpy as np
import onnxruntime as ort
import time

def plot_one_box(x, img, color=None, label=None, line_thickness=None):
    """
    description: Plots one bounding box on image img,
                 this function comes from YoLov5 project.
    param:
        x:      a box likes [x1,y1,x2,y2]
        img:    a opencv image object
        color:  color to draw rectangle, such as (0,255,0)
        label:  str
        line_thickness: int
    return:
        no return
    """
    tl = (
        line_thickness or round(0.002 * (img.shape[0] + img.shape[1]) / 2) + 1
    )  # line/font thickness
    color = color or [random.randint(0, 255) for _ in range(3)]
    x = x.squeeze()
    c1, c2 = (int(x[0]), int(x[1])), (int(x[2]), int(x[3]))
    cv2.rectangle(img, c1, c2, color, thickness=tl, lineType=cv2.LINE_AA)
    if label:
        tf = max(tl - 1, 1)  # font thickness
        t_size = cv2.getTextSize(label, 0, fontScale=tl / 3, thickness=tf)[0]
        c2 = c1[0] + t_size[0], c1[1] - t_size[1] - 3
        cv2.rectangle(img, c1, c2, color, -1, cv2.LINE_AA)  # filled
        cv2.putText(
            img,
            label,
            (c1[0], c1[1] - 2),
            0,
            tl / 3,
            [225, 255, 255],
            thickness=tf,
            lineType=cv2.LINE_AA,
        )

def _make_grid( nx, ny):
        xv, yv = np.meshgrid(np.arange(ny), np.arange(nx))
        return np.stack((xv, yv), 2).reshape((-1, 2)).astype(np.float32)

def cal_outputs(outs,nl,na,model_w,model_h,anchor_grid,stride):

    row_ind = 0
    grid = [np.zeros(1)] * nl
    for i in range(nl):
        h, w = int(model_w/ stride[i]), int(model_h / stride[i])
        length = int(na * h * w)
        if grid[i].shape[2:4] != (h, w):
            grid[i] = _make_grid(w, h)

        outs[row_ind:row_ind + length, 0:2] = (outs[row_ind:row_ind + length, 0:2] * 2. - 0.5 + np.tile(
            grid[i], (na, 1))) * int(stride[i])
        outs[row_ind:row_ind + length, 2:4] = (outs[row_ind:row_ind + length, 2:4] * 2) ** 2 * np.repeat(
            anchor_grid[i], h * w, axis=0)
        row_ind += length
    return outs


def post_process_opencv(outputs,model_h,model_w,img_h,img_w,thred_nms,thred_cond):
    conf = outputs[:,4].tolist()
    c_x = outputs[:,0]/model_w*img_w
    c_y = outputs[:,1]/model_h*img_h
    w  = outputs[:,2]/model_w*img_w
    h  = outputs[:,3]/model_h*img_h
    p_cls = outputs[:,5:]
    if len(p_cls.shape)==1:
        p_cls = np.expand_dims(p_cls,1)
    cls_id = np.argmax(p_cls,axis=1)

    p_x1 = np.expand_dims(c_x-w/2,-1)
    p_y1 = np.expand_dims(c_y-h/2,-1)
    p_x2 = np.expand_dims(c_x+w/2,-1)
    p_y2 = np.expand_dims(c_y+h/2,-1)
    areas = np.concatenate((p_x1,p_y1,p_x2,p_y2),axis=-1)

    areas = areas.tolist()
    ids = cv2.dnn.NMSBoxes(areas,conf,thred_cond,thred_nms)
    if len(ids)>0:
        return  np.array(areas)[ids],np.array(conf)[ids],cls_id[ids]
    else:
        return [],[],[]
def infer_img(img0,net,model_h,model_w,nl,na,stride,anchor_grid,thred_nms=0.4,thred_cond=0.5):
    # 图像预处理
    img = cv2.resize(img0, [model_w,model_h], interpolation=cv2.INTER_AREA)
    img = cv2.cvtColor(img, cv2.COLOR_BGR2RGB)
    img = img.astype(np.float32) / 255.0
    blob = np.expand_dims(np.transpose(img, (2, 0, 1)), axis=0)

    # 模型推理
    outs = net.run(None, {net.get_inputs()[0].name: blob})[0].squeeze(axis=0)

    # 输出坐标矫正
    outs = cal_outputs(outs,nl,na,model_w,model_h,anchor_grid,stride)

    # 检测框计算
    img_h,img_w,_ = np.shape(img0)
    boxes,confs,ids = post_process_opencv(outs,model_h,model_w,img_h,img_w,thred_nms,thred_cond)

    return  boxes,confs,ids


if __name__ == "__main__":

    # 模型加载
    model_pb_path = "best.onnx"
    so = ort.SessionOptions()
    net = ort.InferenceSession(model_pb_path, so)

    # 标签字典
    dic_labels= {0:'fall',
            1:'fight'}

    # 模型参数
    model_h = 320
    model_w = 320
    nl = 3
    na = 3
    stride=[8.,16.,32.]
    anchors = [[10, 13, 16, 30, 33, 23], [30, 61, 62, 45, 59, 119], [116, 90, 156, 198, 373, 326]]
    anchor_grid = np.asarray(anchors, dtype=np.float32).reshape(nl, -1, 2)

    video = 0
    cap = cv2.VideoCapture(video)
    flag_det = False
    while True:
        success, img0 = cap.read()
        if success:

            if flag_det:
                t1 = time.time()
                det_boxes,scores,ids = infer_img(img0,net,model_h,model_w,nl,na,stride,anchor_grid,thred_nms=0.4,thred_cond=0.5)
                t2 = time.time()


                for box,score,id in zip(det_boxes,scores,ids):
                    label = '%s:%.2f'%(dic_labels[id.item()],score)

                    plot_one_box(box.astype(np.int16), img0, color=(255,0,0), label=label, line_thickness=None)

                str_FPS = "FPS: %.2f"%(1./(t2-t1))

                cv2.putText(img0,str_FPS,(50,50),cv2.FONT_HERSHEY_COMPLEX,1,(0,255,0),3)


            cv2.imshow("video",img0)
        key=cv2.waitKey(1) & 0xFF
        if key == ord('q'):

            break
        elif key & 0xFF == ord('s'):
            flag_det = not flag_det
            print(flag_det)

    cap.release()
图片检测 test_one_img.py
import cv2
import numpy as np

import onnxruntime as ort
import math
import time

def plot_one_box(x, img, color=None, label=None, line_thickness=None):
    """
    description: Plots one bounding box on image img,
                 this function comes from YoLov5 project.
    param:
        x:      a box likes [x1,y1,x2,y2]
        img:    a opencv image object
        color:  color to draw rectangle, such as (0,255,0)
        label:  str
        line_thickness: int
    return:
        no return
    """
    tl = (
        line_thickness or round(0.002 * (img.shape[0] + img.shape[1]) / 2) + 1
    )  # line/font thickness
    color = color or [random.randint(0, 255) for _ in range(3)]
    x = x.squeeze()
    c1, c2 = (int(x[0]), int(x[1])), (int(x[2]), int(x[3]))
    cv2.rectangle(img, c1, c2, color, thickness=tl, lineType=cv2.LINE_AA)
    if label:
        tf = max(tl - 1, 1)  # font thickness
        t_size = cv2.getTextSize(label, 0, fontScale=tl / 3, thickness=tf)[0]
        c2 = c1[0] + t_size[0], c1[1] - t_size[1] - 3
        cv2.rectangle(img, c1, c2, color, -1, cv2.LINE_AA)  # filled
        cv2.putText(
            img,
            label,
            (c1[0], c1[1] - 2),
            0,
            tl / 3,
            [225, 255, 255],
            thickness=tf,
            lineType=cv2.LINE_AA,
        )

def _make_grid( nx, ny):
        xv, yv = np.meshgrid(np.arange(ny), np.arange(nx))
        return np.stack((xv, yv), 2).reshape((-1, 2)).astype(np.float32)

def cal_outputs(outs,nl,na,model_w,model_h,anchor_grid,stride):

    row_ind = 0
    grid = [np.zeros(1)] * nl
    for i in range(nl):
        h, w = int(model_w/ stride[i]), int(model_h / stride[i])
        length = int(na * h * w)
        if grid[i].shape[2:4] != (h, w):
            grid[i] = _make_grid(w, h)

        outs[row_ind:row_ind + length, 0:2] = (outs[row_ind:row_ind + length, 0:2] * 2. - 0.5 + np.tile(
            grid[i], (na, 1))) * int(stride[i])
        outs[row_ind:row_ind + length, 2:4] = (outs[row_ind:row_ind + length, 2:4] * 2) ** 2 * np.repeat(
            anchor_grid[i], h * w, axis=0)
        row_ind += length
    return outs


def post_process_opencv(outputs,model_h,model_w,img_h,img_w,thred_nms,thred_cond):
    conf = outputs[:,4].tolist()
    c_x = outputs[:,0]/model_w*img_w
    c_y = outputs[:,1]/model_h*img_h
    w  = outputs[:,2]/model_w*img_w
    h  = outputs[:,3]/model_h*img_h
    p_cls = outputs[:,5:]
    if len(p_cls.shape)==1:
        p_cls = np.expand_dims(p_cls,1)
    cls_id = np.argmax(p_cls,axis=1)

    p_x1 = np.expand_dims(c_x-w/2,-1)
    p_y1 = np.expand_dims(c_y-h/2,-1)
    p_x2 = np.expand_dims(c_x+w/2,-1)
    p_y2 = np.expand_dims(c_y+h/2,-1)
    areas = np.concatenate((p_x1,p_y1,p_x2,p_y2),axis=-1)

    areas = areas.tolist()
    ids = cv2.dnn.NMSBoxes(areas,conf,thred_cond,thred_nms)
    return  np.array(areas)[ids],np.array(conf)[ids],cls_id[ids]

def infer_img(img0,net,model_h,model_w,nl,na,stride,anchor_grid,thred_nms=0.4,thred_cond=0.5):
    # 图像预处理
    img = cv2.resize(img0, [model_w,model_h], interpolation=cv2.INTER_AREA)
    img = cv2.cvtColor(img, cv2.COLOR_BGR2RGB)
    img = img.astype(np.float32) / 255.0
    blob = np.expand_dims(np.transpose(img, (2, 0, 1)), axis=0)

    # 模型推理
    outs = net.run(None, {net.get_inputs()[0].name: blob})[0].squeeze(axis=0)

    # 输出坐标矫正
    outs = cal_outputs(outs,nl,na,model_w,model_h,anchor_grid,stride)

    # 检测框计算
    img_h,img_w,_ = np.shape(img0)
    boxes,confs,ids = post_process_opencv(outs,model_h,model_w,img_h,img_w,thred_nms,thred_cond)

    return  boxes,confs,ids


if __name__ == "__main__":

    # 模型加载
    model_pb_path = "best_lite_led.onnx"
    so = ort.SessionOptions()
    net = ort.InferenceSession(model_pb_path, so)

    # 标签字典
    dic_labels= {0:'led',
            1:'buzzer',
            2:'teeth'}

    # 模型参数
    model_h = 320
    model_w = 320
    nl = 3
    na = 3
    stride=[8.,16.,32.]
    anchors = [[10, 13, 16, 30, 33, 23], [30, 61, 62, 45, 59, 119], [116, 90, 156, 198, 373, 326]]
    anchor_grid = np.asarray(anchors, dtype=np.float32).reshape(nl, -1, 2)

    # 进行推理
    img0 = cv2.imread('3.jpg')
    t1 = time.time()
    det_boxes,scores,ids = infer_img(img0,net,model_h,model_w,nl,na,stride,anchor_grid,thred_nms=0.4,thred_cond=0.5)
    t2 = time.time()
    print("%.2f"%(t2-t1))
    # 结果绘图
    for box,score,id in zip(det_boxes,scores,ids):
        label = '%s:%.2f'%(dic_labels[id.item()],score)

        plot_one_box(box.astype(np.int), img0, color=(255,0,0), label=label, line_thickness=None)
    cv2.imshow('img',img0)

    cv2.waitKey(0)
运行test_video.py程序,按下s键开始实时检测
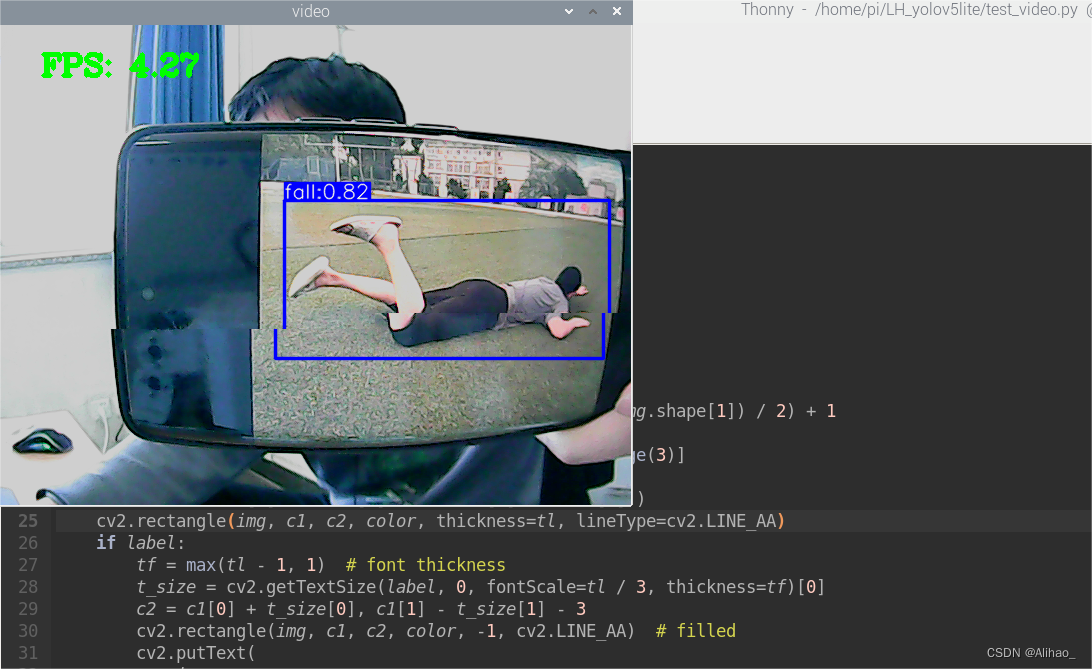
成功运行,帧数在4左右。ps:如果你发现摄像头很模糊,记得手动调焦距,转动摄像头的旋钮即可。
遇到问题
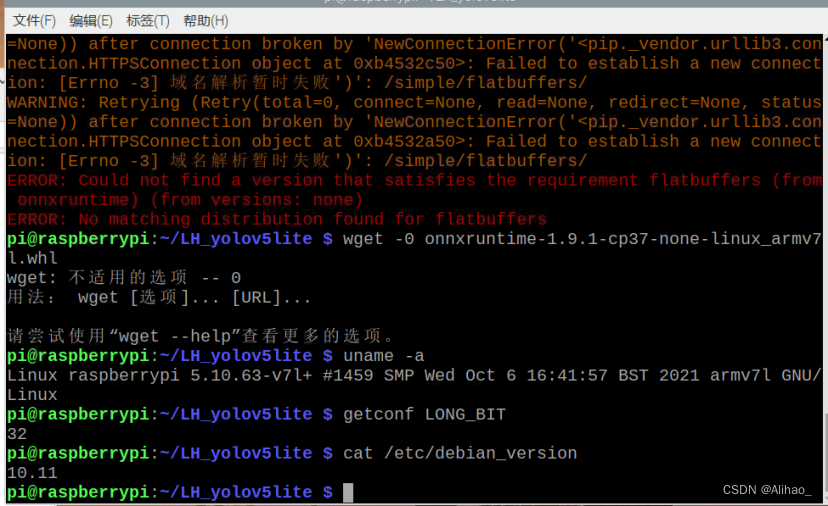
1.onnxruntime安装
首先是转换onnx模型。之后在树莓派上进行部署时发生了问题
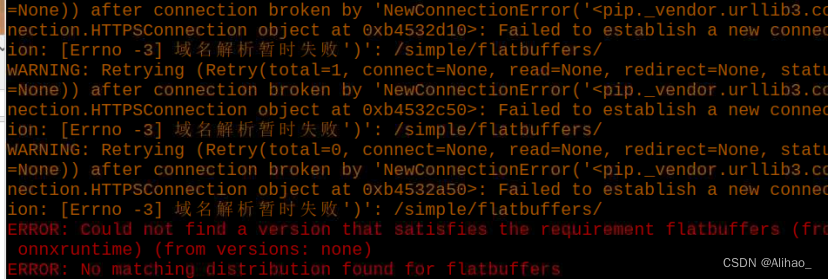
于是查找资料,查询自己树莓派的
1.系统架构
2.位数:
3.Debian版本编号
根据下面链接下载相应的轮子
https://github.com/nknytk/built-onnxruntime-for-raspberrypi-linux
根据上面只能大概知道要下载轮子,但是具体型号我是最后试出来的.
我尝试了好几个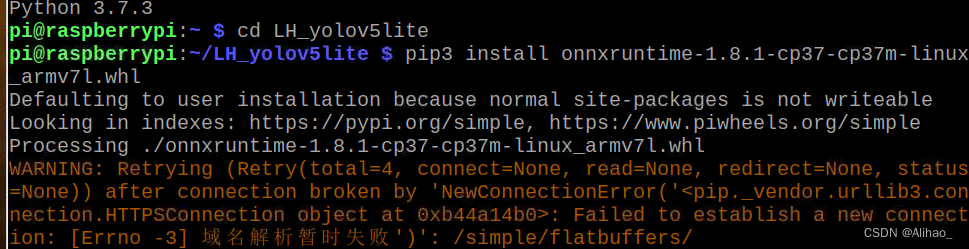
2.关于树莓派中python版本切换的问题
一般树莓派中会有两个python版本,我的树莓派是一个python2.7,一个python3.7,一开始默认的是python2.7,需要改为3.7再去安装onnxruntime,因为安装onnxruntime需要pytho3.xx以上版本
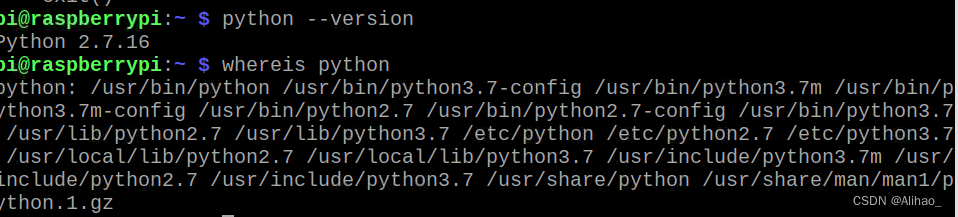
通过whereis python命令可以看到,我的树莓派中还有python3,.7的版本,
其实系统中是都安装了python2.7和python3.7版本的,我们只需要切换一下python版本即可
先将python的链接删了
Sudo rm /usr/bin/python
将python3软链接接上去
Sudo ln -s /usr/bin/python3.7 /usr/bin/python
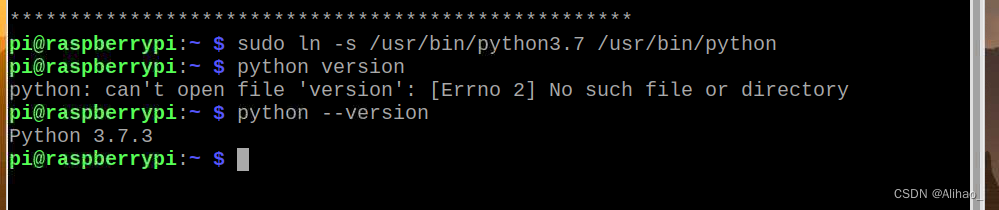
这样就可以了,成功切换了python版本.
3.检测程序遇到问题
1.运行test_video.py程序出错

修改后如下图,在红色框中的id后面加了 .item()
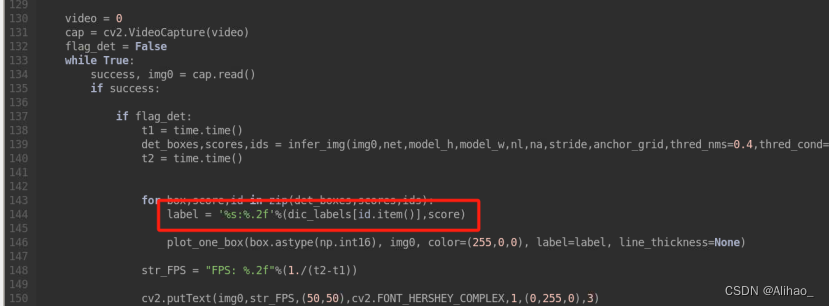
2.另外的报错

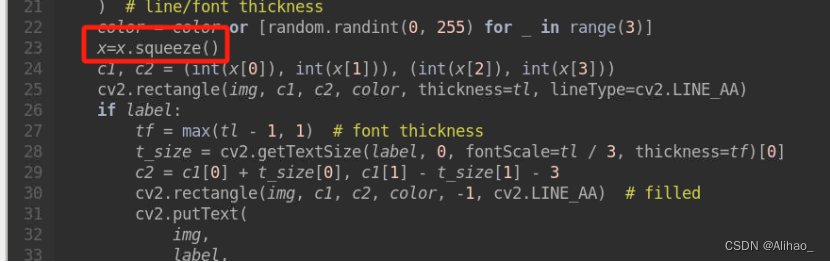
修改后如下图,多加了一段程序 x = x.squeeze() 在c1,c2前面。


 508
508


 被折叠的 条评论
为什么被折叠?
被折叠的 条评论
为什么被折叠?
 到【灌水乐园】发言


