


前言
本文为9月13日OpenCV学习笔记——Dlib 库选定目标跟踪、人脸识别、基于 face_recognition 人脸识别:
- 基于 Dlib 库选定目标跟踪;
- 基于 Dlib 库人脸识别;
- 基于 face_recognition 进行人脸识别(摄像头)。
一、基于 Dlib 库选定目标跟踪
import cv2 as cv
import dlib

# 方法:显示信息
def show_info(frame, tracking_state):
    pos1 = (10, 20)
    pos2 = (10, 40)
    pos3 = (10, 60)

    info1 = "put left button, select an area, start tracking"
    info2 = "'1': start tracking, '2': stop tracking, 'q': exit"
    cv.putText(frame, info1, pos1, cv.FONT_HERSHEY_COMPLEX, 0.5, (255, 255, 255))
    cv.putText(frame, info2, pos2, cv.FONT_HERSHEY_COMPLEX, 0.5, (255, 255, 255))
    if tracking_state:
        cv.putText(frame, "tracking now ……", pos3, cv.FONT_HERSHEY_COMPLEX, 0.5, (255, 0, 0))
    else:
        cv.putText(frame, "stop tracking ……", pos3, cv.FONT_HERSHEY_COMPLEX, 0.5, (0, 255, 0))

# 存放鼠标事件的坐标点
points = []

# 方法:鼠标点击的事件
def mouse_event_handler(event, x, y, flags, params):   # flags, params:默认(不能省略)
    global points  # 全局调用
    if event == cv.EVENT_LBUTTONDOWN:  # 左键按下
        points = [(x, y)]
    elif event == cv.EVENT_LBUTTONUP:  # 左键松开
        points.append((x, y))

# 打开摄像头
capture = cv.VideoCapture(0)

# 设定窗口名称
nameWindow = "Object Tracking"

# 将鼠标事件绑定到窗口上去

cv.namedWindow(nameWindow)
cv.setMouseCallback(nameWindow, mouse_event_handler)

# 启动跟踪器 dlib.correlation_tracker()
tracker = dlib.correlation_tracker()

# 假设跟踪状态
tracking_state = False

# 循环读取视频流
while True:
    # 获取每一帧
    ret, frame = capture.read()
    # 显示提示信息:调用方法
    show_info(frame, tracking_state)
    # 如果获取到的坐标点为 2个,绘制矩形框,并让 dlib 的 rectangle() 知道在哪里
    if len(points) == 2:
        cv.rectangle(frame, points[0], points[1], (0, 255, 0), 3)  # points[0]: (x, y)  points[1]:(x, y)
        dlib_rect = dlib.rectangle(points[0][0], points[0][1], points[1][0], points[1][1])
    # 判断:若跟踪状态为 True,更新跟踪、获取位置、绘制矩形框
    if tracking_state is True:
        tracker.update(frame)  # 更新画面
        pos = tracker.get_position()  # 获取位置的坐标
        cv.rectangle(frame, (int(pos.left()), int(pos.top())), (int(pos.right()), int(pos.bottom())), (255, 0, 0), 3)

    # 事件判断,'1', '2', 'q'
    key = cv.waitKey(1) & 0xFF

    if key == ord('1'):
        if len(points) == 2:
            tracker.start_track(frame, dlib_rect)
            tracking_state =True
            points =[]

    if key == ord('2'):
        points = []
        tracking_state = False

    if key == ord('q'):
        break
    # 显示整体效果
    cv.imshow(nameWindow, frame)

capture.release()
cv.destroyAllWindows()


二、基于 Dlib 库人脸识别
- 流程如下:
- ResNet-34最终输出一个128D的描述子;
- 核心步骤:Triplets(三元组):
- 每个triplet在训练的时候会读入3张图片(2张是同一人,1张是另一人),分别计算出各自人脸的128D描述子;
- 不断调整网络模型权重,使得同一人的向量更近,不同人之间的向量更远。
# 1 导入库
import cv2
import dlib
import numpy as np

# 定义:关键点编码为128D
def encoder_face(image, detector, predictor, encoder, upsample=1, jet=1):
    # 检测人脸
    faces = detector(image, upsample)
    # 对每张人脸进行关键点检测
    faces_keypoints = [ predictor(image, face) for face in faces ] # 每张人脸的关键点
    return [ np.array(encoder.compute_face_descriptor(image, face_keypoint, jet)) for face_keypoint in faces_keypoints ]


# 定义:人脸比较,通过欧氏距离
def compare_faces(face_encoding, test_encoding):
    return list(np.linalg.norm(np.array(face_encoding) - np.array(test_encoding), axis=1))

# 定义:人脸比较,输出对应的名称
def comapre_faces_order(face_encoding, test_encoding, names):
    distance = list(np.linalg.norm(np.array(face_encoding) - np.array(test_encoding), axis=1))
    return zip(*sorted(zip(distance, names)))

def main():
    # 2 读取4张图片
    img1 = cv2.imread("guo.jpg")
    img2 = cv2.imread("liu1.jpg")
    img3 = cv2.imread("liu2.jpg")
    img4 = cv2.imread("liu3.jpg")
    test = cv2.imread("liu4.jpg")
    # BGR to RGB
    img1 = img1[:, :, ::-1]
    img2 = img2[:, :, ::-1]
    img3 = img3[:, :, ::-1]
    img4 = img4[:, :, ::-1]
    test = test[:, :, ::-1]

    img_names = ["guo,jpg", "liu1.jpg", "liu2.jpg", "liu3.jpg"]

    # 3  加载人脸检测器
    detector = dlib.get_frontal_face_detector()

    # 4 加载关键点的检测器
    predictor = dlib.shape_predictor("shape_predictor_68_face_landmarks.dat")

    # 5 加载人脸特征编码模型
    encoder = dlib.face_recognition_model_v1("dlib_face_recognition_resnet_model_v1.dat")

    # 6 调用方法:128D特征向量输出
    img1_128D = encoder_face(img1, detector, predictor, encoder)[0]
    img2_128D = encoder_face(img2, detector, predictor, encoder)[0]
    img3_128D = encoder_face(img3, detector, predictor, encoder)[0]
    img4_128D = encoder_face(img4, detector, predictor, encoder)[0]
    test_128D = encoder_face(test, detector, predictor, encoder)[0]

    four_images_128D = [img1_128D, img2_128D, img3_128D, img4_128D]

    # 7 调用方法:比较人脸,计算特征向量之间的距离,判断是否为同一人
    distance = compare_faces(four_images_128D, test_128D)
    print(distance)

    distance, name = comapre_faces_order(four_images_128D, test_128D, img_names)

    print("\n")
    print("distance: {}, \n names: {} ".format(distance, name))

if __name__ == '__main__':
    main()
三、基于 face_recognition 进行人脸识别(摄像头)
- 用到的方法:
- 计算距离:face_distance(face_encodings, face_to_compare);
- 查找一张图片中人脸的位置:face_locations(img, number_of_times_to_upsample=1, model=“hog”)
- 检索人脸的关键点:face_landmarks(face_image, face_locations=None, model=“large”);
- 编码:face_encodings(face_image, known_face_locations=None, num_jitters=1, model=“small”);
- 比较:compare_faces(known_face_encodings, face_encoding_to_check, tolerance=0.6)。
完整代码如下:
import cv2 as cv
import numpy as np
import face_recognition
# 加载图片
liu = cv.imread("liu.jpeg")
guo = cv.imread("guo.jpg")
# BGR to RGB
liu_RGB = liu[:, :, ::-1]
guo_RGB = guo[:, :, ::-1]
# 检测人脸的位置
liu_face = face_recognition.face_locations(liu_RGB, model='cnn')
guo_face = face_recognition.face_locations(guo_RGB, model='cnn')
# 人脸特征编码
liu_encoding = face_recognition.face_encodings(liu_RGB, liu_face)[0]
guo_encoding = face_recognition.face_encodings(guo_RGB, guo_face)[0]
# 将所有人脸放在一起,作为数据库
encodings = [liu_encoding, guo_encoding]
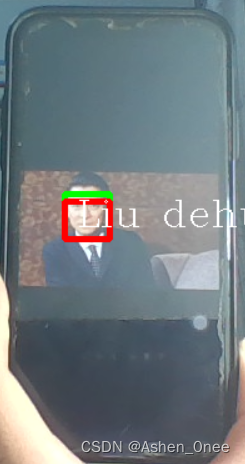
names = ["Liu dehua", "Guo fucheng"]
# 打开摄像头,读取视频流
cap = cv.VideoCapture(0)
if not cap.isOpened():
print("Camera Error!")
while True:
ret, frame = cap.read()
frame = cv.resize(frame, (0, 0), fx=0.5, fy=0.5)
print(ret)
# BGR to RGB
frame_RGB = frame[:, :, ::-1]
# 人脸检测
faces_locs = face_recognition.face_locations(frame)
# 人脸特征编码
faces_encodings = face_recognition.face_encodings(frame_RGB, faces_locs)
# 与数据库中的所有人脸进行比对
for (top, right, bottom, left), faces_encoding in zip(faces_locs, faces_encodings):
# 进行匹配
matches = face_recognition.compare_faces(encodings, faces_encoding)
# 计算欧式距离
distances = face_recognition.face_distance(encodings, faces_encoding)
min_distance_index = np.argmin(distances)
# 判断:如果匹配,获取名字
name = "Unknown"
if matches[min_distance_index]:
name = names[min_distance_index]
# 绘制人脸的矩形框
cv.rectangle(frame, (left, top), (right, bottom), (0, 255, 0), 3)
# 绘制、显示对应人脸的名字
cv.rectangle(frame, (left, bottom - 30), (right, bottom), (0, 0, 255), 3)
# 显示名字
cv.putText(frame, name, (left + 10, bottom - 10), cv.FONT_HERSHEY_COMPLEX, 1, (255, 255, 255), 1)
# 显示整个效果
cv.imshow("Face recognition", frame)
# 判断按键:q 退出
if cv.waitKey(1) & 0xFF == ord('q'):
break
# 释放资源
cap.release()
cv.destroyAllWindows()
- 测试:
测试内容为3张图片:郭富城、刘德华、卜凡。前两张图片能被正确识别,而最后一张不能。可见,舞台上的刘德华并不是真的刘德华。


 4046
4046


 被折叠的 条评论
为什么被折叠?
被折叠的 条评论
为什么被折叠?
 到【灌水乐园】发言


