


传统的做图像分割的方式大概是这样的:
以某个像素点中心取一个区域,取图像块的特征做样本训练分类器,分类结果作为此像素点的结果
这样做缺点很明显,比如:
如何确定图像块的大小
从小的图像块(patch)中获得的上下文信息(contex)较少,且极端耗时
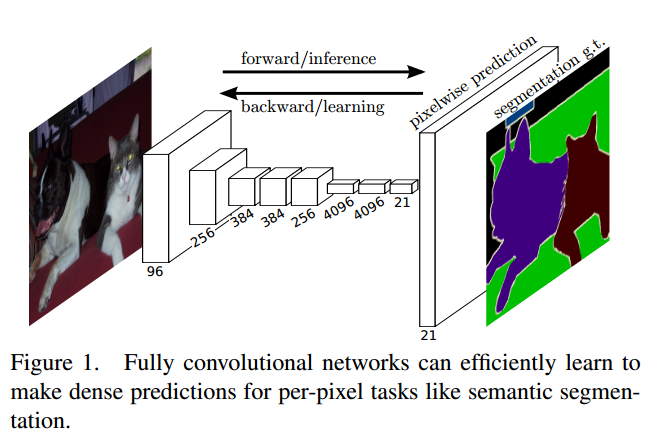
FCN的做法是训练一个end-to-end的网络,做pixel-wise的prediction,使用ground-truth作为监督信息,预测label map,实现semantic segmentation的任务,荣获CVPR2015的Best Paper
主要的改进是对传统的分类网络,比如googlenet,VGG16等,将其改造成fully convolutional network,原文如是说:
We adapt contemporary classification networks (AlexNet, the VGG net, and GoogLeNet) into fully convolutional networks and transfer their learned representations by fine-tuning to the segmentation task.
网络的修改
FCN的关键就是如何将传统的分类网络改造为全卷积的网络,FCN有个最大的好处就是输入图像的尺寸是任意的,输出和原图像相同尺寸的predict map
An FCN naturally operates on an input of any size, and produces an output of corresponding (possibly resampled) spatial dimensions
其它我总结的几个特点如下:
- Extend deep classification architecture(AlexNet, VGG, GoogLeNet)
- fine-tune, pixel-to-pixel
- input of any size, output classification maps(heatmap)
- deconvolution(upsample), can be learned
- For pixelwise prediction, connect coarse output back to pixels
对于一个原始图像,将其放入FCN中,得到多个coarse output map,之后对得到的output map“映射”到原图,即得到最终的segmentation结果
convert classification nets into fully convolutional nets that produce coarse output maps. For pixelwise prediction, we need to connect these coarse outputs back to the pixels
那么具体是如何操作的呢?
将传统分类网络的最后的全连接层变为卷积层
这里比较难以理解,我举个具体的例子来说明,比如对于经典的分类网络AlexNet来说,其结构如下所示:
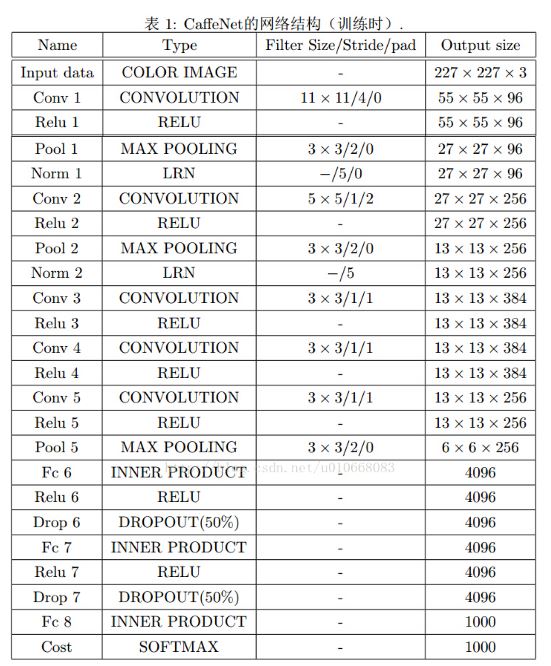
我们可以看到最后接着三个全连接层(FC6,FC7,FC8),假如要将此网络转换为FCN,可以如下这么做:
对于FC6(4096),使用4096个filter,filter的大小是6*6,做完以后大小为1*1*4096
对于FC7(4096),使用4096个filter,filter的大小是1*1,做完以后大小为1*1*4096
对于FC8(1000),使用1000个filter,filter的大小是1*1,做完以后大小为1*1*1000
我们其实可以看到,其实就是将全连接看成是卷积,和自身大小一样的filter去卷积则卷积之后的大小是1*1
示意图如下:
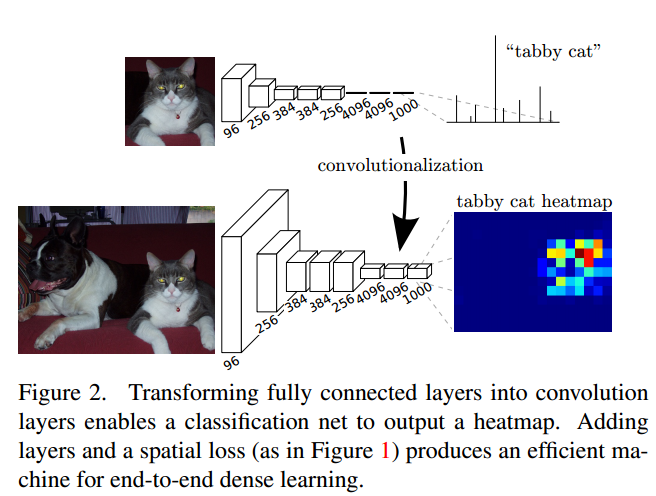
之后对得到的1*1*1000的输出,做upsampling(deconvolution)得到和原图一样大小的输出,所有输出合并之后得到如上图所示的heat map
当然这里作者的deconvolution做的很简单,就只是简单的双线性插值而已,这是个改进点
合并dense prediction
这里通过upsampling得到dense prediction,作者研究过3种方案:
shift-and-stitch
设原图与FCN所得输出图之间的降采样因子是f,那么对于原图的每个f*f 的区域(不重叠),”shift the input x pixels to the right and y pixels down for every (x,y) ,0 < x,y < f.” 把这个f*f区域对应的output作为此时区域中心点像素对应的output,这样就对每个f*f的区域得到了f^2个output,也就是每个像素都能对应一个output,所以成为了dense prediction
filter rarefaction
就是放大CNN网络中的subsampling层的filter的尺寸,得到新的filter:

其中s是subsampling的滑动步长,这个新filter的滑动步长要是为1的话,这样subsampling就没有缩小图像尺寸,最后可以得到dense prediction
以上两种方法作者都没有采用,主要是因为这两种方法都是trad-off的,原因是:
- 对于第二种方法, 下采样的功能被减弱,使得更细节的信息能被filter看到,但是receptive fileds会相对变小,可能会损失全局信息,且会对卷积层引入更多运算
- 对于第一种方法,虽然receptive fileds没有变小,但是由于原图被划分成f*f的区域输入网络,使得filters无法感受更精细的信息
deconvolution
upsampling的操作可以看成是反卷积(deconvolutional),卷积运算的参数和CNN的参数一样是在训练FCN模型的过程中通过bp算法学习得到
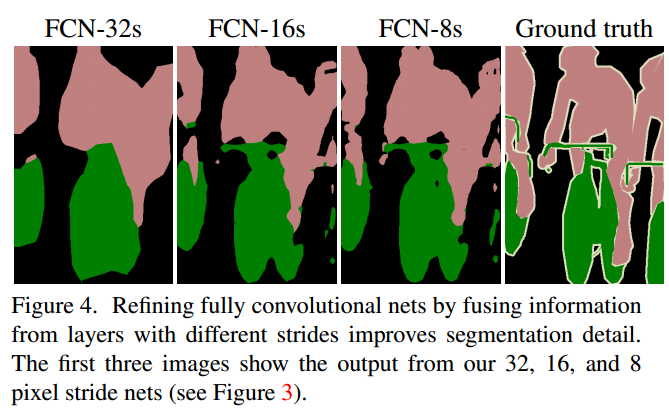
以上是对CNN的结果做处理,得到了dense prediction,而作者在试验中发现,得到的分割结果比较粗糙,所以考虑加入更多前层的细节信息,也就是把倒数第几层的输出和最后的输出做一个fusion,实际上也就是加和:
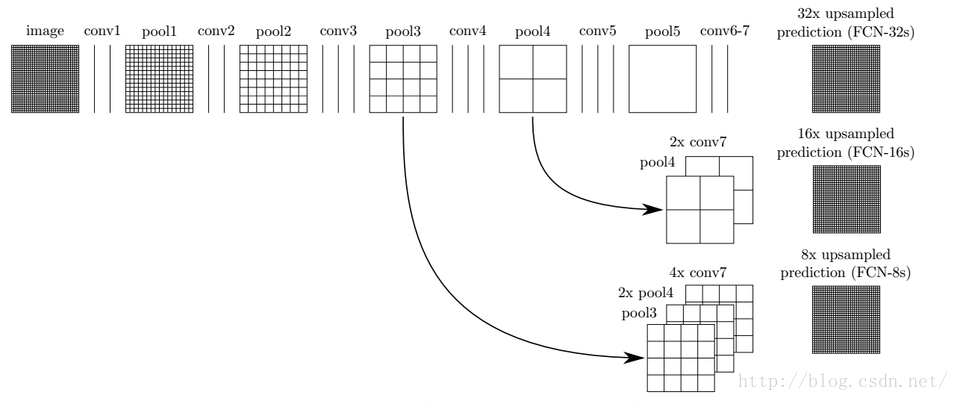
这样就得到第二行和第三行的结果,实验表明,这样的分割结果更细致更准确。在逐层fusion的过程中,做到第三行再往下,结果又会变差,所以作者做到这里就停了。可以看到如上对应的结果:
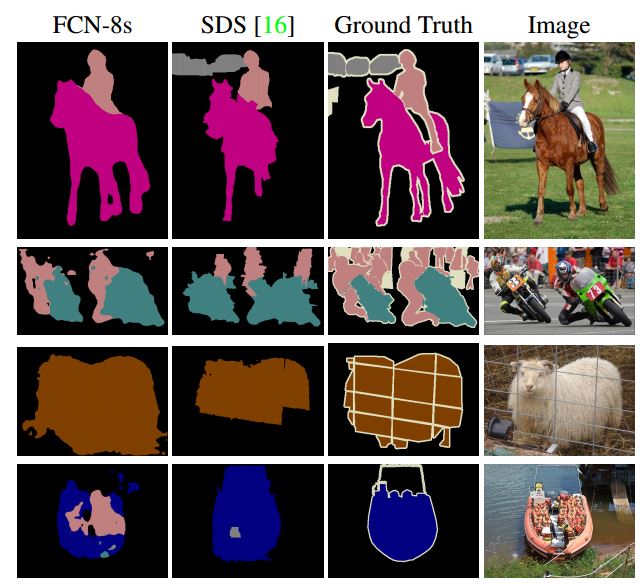
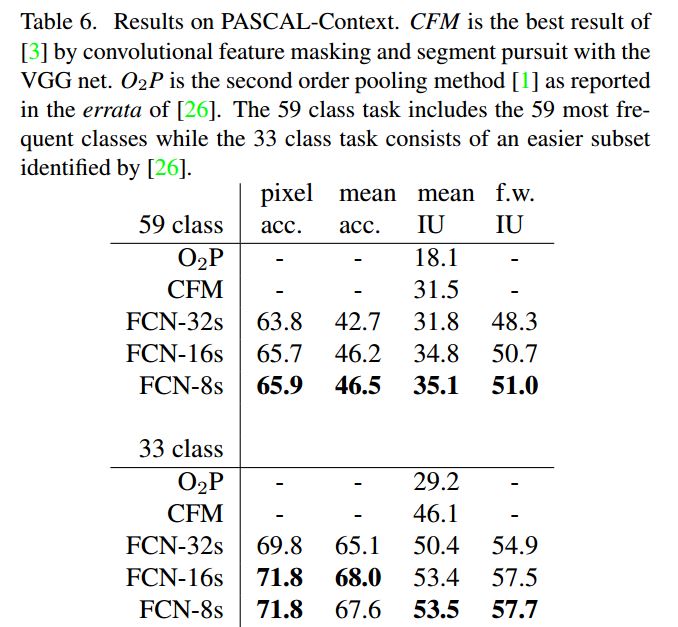
实验结果
资源
FCN原理
原理我已经在上篇博客说过,大家可以参考FCN原理篇
代码
FCN有官方的代码,具体地址是FCN官方代码
不过我用的不是这个代码,我用的是别人修改官方的版本的代码,使用Chainer框架实现的,Chainer的源码链接:
Chainer框架源码,如果大家使用过Keras的话,应该对它不会感到特别的陌生,Chainer: a neural network framework
好了,我使用的代码是FCN的Chainer implementation, 具体地址是FCN Chainer implementation
安装
安装很简单,直接pip或者源码安装都可以,但是我在我的机器上装过几次,发现使用pip的方式最后fcn.data_dir这个变量的值会指向到你系统的Python下的dist-packages这个目录,但是这个目录需要root权限,所以不推荐使用pip直接安装的方式; 关于此问题的说明见:
fcn.data_dir的问题
所以我最后使用的是源码安装的方式,这里推荐使用virtualenv工具建立虚拟环境,实践中发现这是最不会出错的方式,推荐使用!
clone代码
Git clone https://github.com/wkentaro/fcn.git –recursive
使用virtualenv安装
sudo pip install virtualenv #安装virtualenv
创建虚拟目录
virtualenv test-fcn
cd test-fcn
激活虚拟环境
source ./bin/activate
克隆fcn代码
git clone https://github.com/wkentaro/fcn.git –recursive
cd fcn
安装fcn
python setup.py develop
demo
下载VOC2012数据集,放入fcn-data-pascal-VOC2012路径下
1. 转换caffe model为Chainer model
./scripts/caffe_to_chainermodel.py
2. load model,进行分割
./scripts/fcn_forward.py –img-files data/pascal/VOC2012/JPEGImages/2007_000129.jpg
训练自己的数据
这个前后搞了快一个月,才把最终的训练搞定,其中艰辛很多,在这里写出来供大家参考
准备自己的数据集
数据集做成VOC2012的segementClass的样子,下图是示例,上面一张是原图,下面一张是分割图
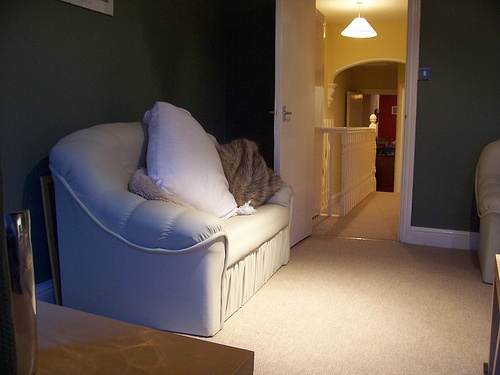
但是每一种label指定的物体都有对应的具体的颜色,这个我们犯了很多错,最后跟踪代码找出来的,具体的每一类的RGB值如下:
| Index | RGB值 |
|---|---|
| 0 | (0,0,0) |
| 1 | (0,128,0) |
| 2 | (128,128,0) |
| 3 | (0,0,128) |
| 4 | (128,0,128) |
| 5 | (0,128,128) |
| 6 | (128,128,128) |
| 7 | (64,0,0) |
| 8 | (192,0,0) |
| 9 | (62,128,0) |
| 10 | (192,128,0 |
这里只列出10类的值,更多类的可以看下面这段代码:
- 1
- 2
- 3
- 4
- 5
- 6
- 7
- 8
- 9
- 10
- 11
- 12
- 13
- 14
- 15
- 16
- 17
- 18
- 19
- 20
- 21
- 22
- 23
- 24
- 25
- 26
- 27
- 28
- 29
- 30
- 1
- 2
- 3
- 4
- 5
- 6
- 7
- 8
- 9
- 10
- 11
- 12
- 13
- 14
- 15
- 16
- 17
- 18
- 19
- 20
- 21
- 22
- 23
- 24
- 25
- 26
- 27
- 28
- 29
- 30
按照此颜色表做图就没有问题,代码可以正确的读取分割的ground-truth结果
原始的图像放在fcn/data/pascal/VOC2012/JPEGImages
分割的图像放在fcn/data/pascal/VOC2012/SegmentationClass
之后在fcn/data/pascal/VOC2012/ImageSets/Segmentation写train.txt,trainval.txt,val.txt,写入需要进行相应任务的图片的编号
修改代码
fcn/scripts/fcn_train.py
- 1
- 2
- 3
- 4
- 5
- 6
- 7
- 8
- 9
- 10
- 11
- 12
- 13
- 14
- 15
- 1
- 2
- 3
- 4
- 5
- 6
- 7
- 8
- 9
- 10
- 11
- 12
- 13
- 14
- 15
fcn/fcn/pascal.py
- 1
- 2
- 3
- 4
- 5
- 6
- 7
- 8
- 9
- 10
- 11
- 12
- 13
- 14
- 15
- 16
- 17
- 18
- 19
- 20
- 21
- 22
- 23
- 24
- 1
- 2
- 3
- 4
- 5
- 6
- 7
- 8
- 9
- 10
- 11
- 12
- 13
- 14
- 15
- 16
- 17
- 18
- 19
- 20
- 21
- 22
- 23
- 24
fcn/fcn/util.py
- 1
- 2
- 3
- 4
- 5
- 6
- 7
- 8
- 9
- 10
- 11
- 1
- 2
- 3
- 4
- 5
- 6
- 7
- 8
- 9
- 10
- 11
fcn/fcn/models/fcn32s.py
- 1
- 2
- 3
- 4
- 5
- 6
- 7
- 8
- 9
- 10
- 11
- 12
- 13
- 14
- 15
- 16
- 17
- 18
- 19
- 20
- 21
- 22
- 23
- 24
- 25
- 26
- 27
- 28
- 29
- 30
- 1
- 2
- 3
- 4
- 5
- 6
- 7
- 8
- 9
- 10
- 11
- 12
- 13
- 14
- 15
- 16
- 17
- 18
- 19
- 20
- 21
- 22
- 23
- 24
- 25
- 26
- 27
- 28
- 29
- 30
训练
./scripts/fcn_train.py
-
其会在
fcn/data/下创建一个目录叫做SegmentationClassDataset_db,里面存放训练的图片的pickle数据,如果需要修改原始的训练图片则需要将此目录删除,否则默认读取此目录内的pickle数据作为图像的原始数据 -
会在
fcn下创建snapshot这个目录,里面有训练保存的model,日志文件等,重新训练的话,建议删除此目录
使用自己训练的model
./scripts/fcn_forward.py -c path/to/your/model -i path/to/your/image
结果存放在fcn/data/forward_out下


 3万+
3万+

 被折叠的 条评论
为什么被折叠?
被折叠的 条评论
为什么被折叠?
 到【灌水乐园】发言


