


在研究yolo v1的时候碰到的GoogleNet,虽然都是过时的东西,还是记录一下
下面是GoogleNET的结构。有3个conv层和9个inception module以及1个FC层,因为提出了inception module,所以GoogleNet又称为inception net。
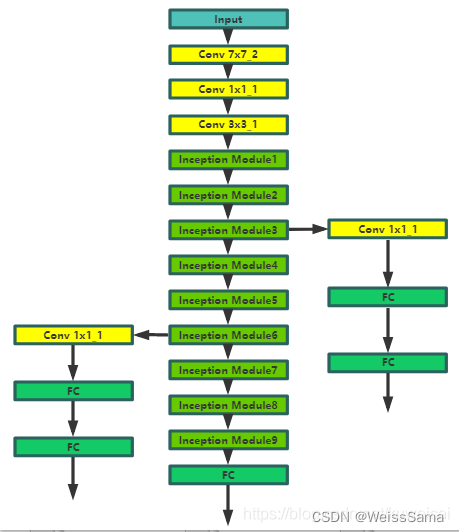
GoogleNet的特殊性在于inception module,就是四个操作并行的层。这个层叫做inception module

直观来看,inception module相对于VGG 系列有如下优点:
- 不同感受野的feature进行融合,增加了网络的多尺度能力。
- 模块穿插1x1卷积了,通过降维【减少channel数目】,有减少计算量的作用。
可以看一下这里的实现:
import torch
from torch import nn
# 定义一个卷积加一个 relu 激活函数和一个 batchnorm 作为一个基本的层结构
def conv_relu(in_channel, out_channel, kernel, stride=1, padding=0):
    layer = nn.Sequential(
        nn.Conv2d(in_channel, out_channel, kernel, stride, padding),
        nn.BatchNorm2d(out_channel, eps=1e-3),
        nn.ReLU(True)
    )
    return layer
class inception(nn.Module):
    def __init__(self, in_channel, out1_1, out2_1, out2_3, out3_1, out3_5, out4_1):
    #out1_1是最左边的通道,
    #out2_1是从左往右第二个通道的第一个卷积, out2_3第二个通道的第二个卷积,
    #out3_1第三个通道第一个卷积, out3_5第三个通道第二个卷积,
    #out4_1第四个通道
        super(inception, self).__init__()
        # 第一条线路
        self.branch1x1 = conv_relu(in_channel, out1_1, 1)

        # 第二条线路
        self.branch3x3 = nn.Sequential(
            conv_relu(in_channel, out2_1, 1),
            conv_relu(out2_1, out2_3, 3, padding=1)
        )

        # 第三条线路
        self.branch5x5 = nn.Sequential(
            conv_relu(in_channel, out3_1, 1),
            conv_relu(out3_1, out3_5, 5, padding=2)
        )

        # 第四条线路
        self.branch_pool = nn.Sequential(
            nn.MaxPool2d(3, stride=1, padding=1),
            conv_relu(in_channel, out4_1, 1)
        )

    def forward(self, x):
        f1 = self.branch1x1(x)
        f2 = self.branch3x3(x)
        f3 = self.branch5x5(x)
        f4 = self.branch_pool(x)
        output = torch.cat((f1, f2, f3, f4), dim=1)
        return output
test_net = inception(3, 64, 48, 64, 64, 96, 32)
#in_channel=3 out1_1=64, out2_1, out2_3, out3_1, out3_5, out4_1
test_x = Variable(torch.zeros(1, 3, 96, 96))
print('input shape: {} x {} x {}'.format(test_x.shape[1], test_x.shape[2], test_x.shape[3]))
test_y = test_net(test_x)
print('output shape: {} x {} x {}'.format(test_y.shape[1], test_y.shape[2], test_y.shape[3]))
输入是3x96x96,第一条通道是64x96x96,第二条通道分别是48x96x96,64x96x96,第三条通道64x96x96, 96x96x96,第四条通道32x96x96
64 64 96 32 concate起来就是256
所以输出是 256 x 96 x 96。
1 x 1 的卷积是为了降低输入的特征通道,减少参数计算量。通过融合不一样的感受野,增强模型的表达和学习能力。
参考
https://blog.csdn.net/kuweicai/article/details/114993693


 2万+
2万+


 被折叠的 条评论
为什么被折叠?
被折叠的 条评论
为什么被折叠?
 到【灌水乐园】发言


