


前言
Android中应用加载Unity3D来显示3D效果参考上一篇博文:Unity3D导出Android工程(Android中应用Unity3D)
透明背景实现参考另一篇博文:
在Android中Unity3D透明背景的实现
此篇围绕上篇章来打造Andorid车载3D桌面,实现不一样的系统主界面效果。
Unity车模脚本定义与绑定
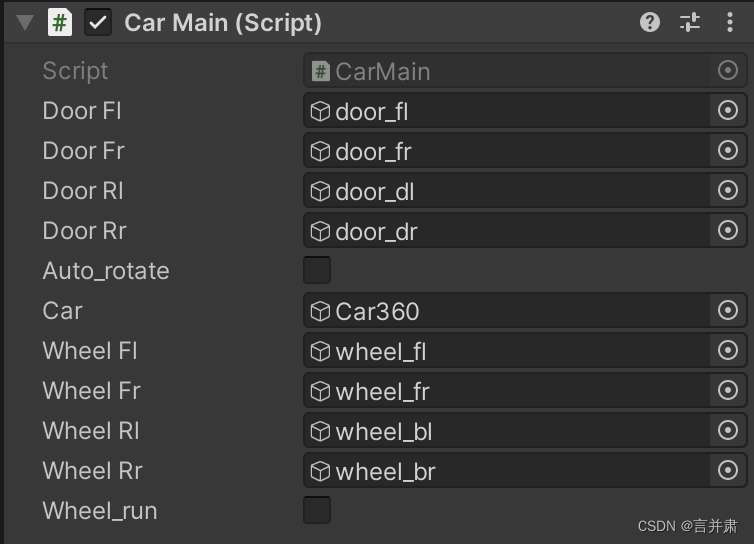
在Unity中,Assets下新建C#脚本,下面为车模控制的脚本,包含四个车门、四个车轮、车身旋转的控制:
using UnityEngine;

public class CarMain : MonoBehaviour
{
	 //车门对象
    public GameObject doorFl;
    public GameObject doorFr;
    public GameObject doorRl;
    public GameObject doorRr;

    private bool door_fl_open;
    private bool door_fr_open;
    private bool door_rl_open;
    private bool door_rr_open;

    //车模自动旋转
    public bool auto_rotate;

    //车模对象
    public GameObject car;

    //车轮对象
    public GameObject wheelFl;
    public GameObject wheelFr;
    public GameObject wheelRl;
    public GameObject wheelRr;

     //车轮转动
    public bool wheel_run;

    // Start is called before the first frame update
    void Start()
    {
    }

    // Update is called once per frame
    void Update()
    {
        if(auto_rotate)
        {
            car.transform.Rotate(Vector3.up * 1);
        }
        if(wheel_run)
        {
            wheelFl.transform.Rotate(Vector3.up * 2);
            wheelFr.transform.Rotate(Vector3.up * 2);
            wheelRl.transform.Rotate(Vector3.up * 2);
            wheelRr.transform.Rotate(Vector3.up * 2);
        }
    }

    //以下为Android调用Unity方法
    public void AutoRotate()
    {
        auto_rotate = !auto_rotate;
    }
    public void OpenDoorFl()
    {
        if(door_fl_open) return;
        door_fl_open = true;
        doorFl.transform.Rotate(new Vector3(0,90,0));
    }

    public void CloseDoorFl()
    {
        if(!door_fl_open) return;
        door_fl_open = false;
        doorFl.transform.Rotate(new Vector3(0,-90,0));
    }

    public void OpenDoorFr()
    {
        if(door_fr_open) return;
        door_fr_open = true;
        doorFr.transform.Rotate(new Vector3(0,-90,0));
    }

    public void CloseDoorFr()
    {
        if(!door_fr_open) return;
        door_fr_open = false;
        doorFr.transform.Rotate(new Vector3(0,90,0));
    }

    public void OpenDoorRl()
    {
        if(door_rl_open) return;
        door_rl_open = true;
        doorRl.transform.Rotate(new Vector3(0,90,0));
    }

    public void CloseDoorRl()
    {
        if(!door_rl_open) return;
        door_rl_open = false;
        doorRl.transform.Rotate(new Vector3(0,-90,0));
    }

    public void OpenDoorRr()
    {
        if(door_rr_open) return;
        door_rr_open = true;
        doorRr.transform.Rotate(new Vector3(0,-90,0));
    }

    public void CloseDoorRr()
    {
        if(!door_rr_open) return;
        door_rr_open = false;
        doorRr.transform.Rotate(new Vector3(0,90,0));
    }

    public void WheelRun()
    {
        wheel_run = !wheel_run;
    }
}
此脚本仅供参考,根据模型来定制,定义了Android调用Unity方法来控制模型旋转。主要通过.transform.Rotate()方法来控制车模部件的旋转来实现预期效果。Vector3.up代表绕Y轴旋转,new Vector3(x, y, z)代表x,Y,z轴的旋转角度,new Vector3(0,90,0)代表绕Y轴顺时针旋转90度。
定义了此脚本后,拖拽绑定到主车模,接着给各个对象选择对应到实际的车模部件上。
绑定成功后,生成android模块应用到android工程中,即可调用UnityPlayer的接口来调用Unity的脚本方法。
一个注意点:
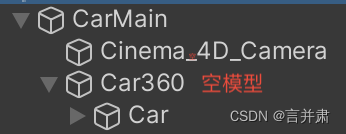
车模旋转时由于坐标轴中心点不在车模中间,C#脚本中绑定了车模会使车模不是绕着中心旋转。此时需要右键create Empty创建一个空的模型(Car360),把它移动到车模中间位置,然后把车模移动嵌套到空模型(Car360)下,将C#脚本中的车模对象绑定到空模型(Car360),这样就以空模型(Car360)为中心点
360度旋转。
Android端的定制
接下来将生成android模块导入AndroidStudio,修改UnityPlayerActivity,新增自定义布局的适配。
    @Override
    protected void onCreate(Bundle savedInstanceState) {
        requestWindowFeature(Window.FEATURE_NO_TITLE);
        super.onCreate(savedInstanceState);
        String cmdLine = updateUnityCommandLineArguments(getIntent().getStringExtra("unity"));
        getIntent().putExtra("unity", cmdLine);

        mUnityPlayer = new UnityPlayer(this, mLifecycleEvents);
        if (getLayoutId() > 0) {
            mContentView = LayoutInflater.from(this).inflate(getLayoutId(), null, false);
            setContentView(mContentView);
            int res_id = getResources().getIdentifier("layout_unity_content", "id", getPackageName());
            ViewGroup contentUnityLayout = mContentView.findViewById(res_id);
            if (contentUnityLayout != null) {
                contentUnityLayout.addView(mUnityPlayer);
            } else if (mContentView instanceof ViewGroup) {
                ((ViewGroup) mContentView).addView(mUnityPlayer);
            } else {
                mContentView = mUnityPlayer;
            }
            setContentView(mContentView);
        } else {
            mContentView = mUnityPlayer;
            setContentView(mUnityPlayer);
        }
        mUnityPlayer.requestFocus();
        init();
    }
主app通过继承UnityPlayerActivity重写getLayoutId()方法来加载自定义布局,重写init()方法来进行初始化操作,通过getContentView()来获取Activity的布局。
    protected View getContentView() {
        return mContentView;
    }

    protected int getLayoutId() {
        return -1;
    }

    protected void init() {
    }
可视情况增加一个方法addCustomView()来添加布局:
    protected void addCustomView(View view) {
        ((ViewGroup) mContentView).addView(view);
    }
MainActivity主入口继承UnityPlayerActivity,具体参考上一篇博客。
public class MainActivity extends UnityPlayerActivity implements View.OnClickListener
重写getLayoutId()和init()方法,实现自定义布局。
自定义布局如下:
<?xml version="1.0" encoding="utf-8"?>
<FrameLayout xmlns:android="http://schemas.android.com/apk/res/android"
    android:orientation="vertical"
    android:layout_width="match_parent"
    android:layout_height="match_parent">

    <ImageView
        android:id="@+id/iv_background"
        android:layout_width="match_parent"
        android:layout_height="match_parent"
        android:background="@android:color/black"/>

    <FrameLayout
        android:id="@+id/layout_unity_content"
        android:layout_width="match_parent"
        android:layout_height="match_parent"/>

    <Button
        android:id="@+id/btn_switch_background"
        android:layout_width="wrap_content"
        android:layout_height="wrap_content"
        android:text="切换背景"
        android:layout_gravity="end"/>

    <TextView
        android:layout_width="wrap_content"
        android:layout_height="wrap_content"
        android:text="车辆信息:我的小车"
        android:textColor="@android:color/holo_red_dark"
        android:layout_marginBottom="20dp"
        android:layout_gravity="center_horizontal|bottom"/>

</FrameLayout>
其中layout_unity_content为添加UnityPlayer的容器,可以在容器前或后添加自定义控件或布局。
android调用Unity
为控件添加点击事件来控制车模:
       if (id == R.id.btn_open_door_fl) {
            sendUnityMessage("OpenDoorFl");
        } else if (id == R.id.btn_close_door_fl) {
            sendUnityMessage("CloseDoorFl");
        } else if (id == R.id.btn_open_door_fr) {
            sendUnityMessage("OpenDoorFr");
        } else if (id == R.id.btn_close_door_fr) {
            sendUnityMessage("CloseDoorFr");
        } else if (id == R.id.btn_open_door_rl) {
            sendUnityMessage("OpenDoorRl");
        } else if (id == R.id.btn_close_door_rl) {
            sendUnityMessage("CloseDoorRl");
        } else if (id == R.id.btn_open_door_rr) {
            sendUnityMessage("OpenDoorRr");
        } else if (id == R.id.btn_close_door_rr) {
            sendUnityMessage("CloseDoorRr");
        } else if (id == R.id.btn_auto_rotate) {
            sendUnityMessage("AutoRotate");
        } else if (id == R.id.btn_wheel_run) {
            sendUnityMessage("WheelRun");
        }
sendUnityMessage方法是对UnityPlayer.UnitySendMessage(s1, s2, s3)的封装。
    private void sendUnityMessage(String s) {
        sendUnityMessage("CarMain", s, "");
    }

    protected void sendUnityMessage(String s1, String s2, String s3) {
        UnityPlayer.UnitySendMessage(s1, s2, s3);
    }
来看下效果
打开车门效果:

自动旋转效果:

车轮转动效果:

额外增加切换背景,可以通过切换背景实现不同的场景效果。
        else if (id == R.id.btn_switch_background) {
            mColorStatus++;
            if (mColorStatus > 4) {
                mColorStatus = 0;
            }
            mIvBackground.setBackgroundColor(getColorRes(mColorStatus));
        }
切换背景效果:

其中透明背景参考另一篇博文:
在Android中Unity3D透明背景的实现
触摸360度旋转的实现
触摸选装的C#脚本如下:
using UnityEngine;
using System.Collections;

public class TouchRotate : MonoBehaviour {
    private bool isRotating=false;
    public float rotateSpeed=1;
    // Use this for initialization
    void Start() {

    }

    // Update is called once per frame
    void Update() {
        RotateView();
    }
    void RotateView()
    {
        //Input.GetAxis("Mouse X");得到鼠标/触摸点在水平方向的滑动
        //Input.GetAxis("Mouse Y");得到鼠标/触摸点在垂直方向的滑动
        if (Input.GetMouseButtonDown(0)) {//0代表鼠标左键,1代表鼠标右键2代表鼠标中键 ,触摸时为0
            isRotating=true;
        }
        if (Input.GetMouseButtonUp(0)) {
            isRotating=false ;
        }
        if (isRotating) {
            transform.RotateAround(transform.position ,Vector3.up,rotateSpeed*Input.GetAxis("Mouse X"));
        }
    }
}
主要通过Input事件输入来监听触碰点,GetMouseButtonDown()和GetMouseButtonUp()方法监听输入事件的DOWN和UP按下释放状态,GetAxis()方法来获取坐标值移动。
编写好脚本绑定到车模(Car360)上,运行后鼠标滑动就可实现360度选装了。再导出到android工程,Unity的相关库已实现android端事件的监听,滑动车模即可实现控制车模选装。
以上为打造Android车载3D车模桌面的全部内容,应用于车载主界面的开发,实现与众不同的车机效果。结合汽车网络,获取汽车数据可实现各种状态的同步显示效果,比如车速、车灯、车窗等。
完整效果看如下视频
打造车载3D车模桌面


 4126
4126

 被折叠的 条评论
为什么被折叠?
被折叠的 条评论
为什么被折叠?
 到【灌水乐园】发言


