


总结
在前面的教程中,我们将模型空间中的立方体渲染到屏幕上。在这个教程中,我们将扩展变换的概念,并使用这些变换展示简单的动画。
变换
在3D图形学中,变换经常用来操作顶点和向量。也用来将一个对象从一个空间变换到另一个空间。变换能够能够用矩阵进行多种操作。这里有3个典型的原始变换:平移(与原点的位置关系),旋转(与X,Y,Z轴的方向关系),缩放(与原点的距离关系)。除此之外,投影变换是用来将对象从观察空间变换到投影空间。在XNA Math库中包含了这些API方便地创建应用于不同目的的变换矩阵,比如:平移,旋转,缩放,世界空间-观察空间变换,观察空间-投影空间变换等等。一个应用程序能够在场景中使用这些矩阵来变换顶点。我们需要了解基础的矩阵操作。接下来,我们来看看简要的例子。
平移
在空间中,平移指的是移动一定距离或取代当前位置。在3D中,下面的矩阵是用来平移
1 0 0 0
0 1 0 0
0 0 1 0
a b c 1
其中(a,b,c)包含方向和距离的向量用来移动,比如,将一个点沿着X轴负方向移动5个单位。则我们将有下面这个矩阵:
1 0 0 0
0 1 0 0
0 0 1 0
-5 0 0 1
如果我们将这个矩阵应用于一个中心在原定的立方体,运算的结果将是整个立方体想X轴负方向平移5个单位。如下图所示:

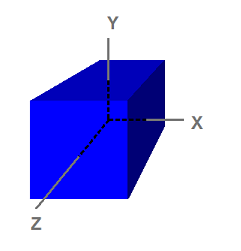
在3D中,一个空间一般由一个原点和X,Y,Z三个相互垂直的坐标轴定义。一下计算机图形学中使用几个空间与之类似:对象空间,世界空间,观察空间,投影空间,屏幕空间。下图是立方体的对象空间:
旋转
旋转是对顶点绕一个过原点的轴进行旋转。比如:X,Y,Z轴。举个例子,在2D世界中,点(1,0)沿顺时针旋转90°。那么旋转的结果就是点(0,1)。下面的矩阵使用来绕Y轴旋转 ΐ°。
cosΐ 0 -sinΐ 0
0 1 0 0
sinΐ 0 cosΐ 0
0 0 0 1
如下图,绕Y轴旋转45°

缩放
缩放是指将向量沿着一个轴的方向放到足够大,或缩到足够小。比如,一个向量能够按着所有方向放大或者只沿着X轴方向缩小。通用矩阵如下:
p 0 0 0
0 q 0 0
0 0 r 0
0 0 0 1
p,q,r分别为X,Y,Z轴方向的缩放比例。下图的效果是沿着X轴方向放大为原来的2倍,Y轴方向缩小为原来的0.5倍。

多重变换
为了对一个向量进行多重变换。我们可以简单的将一个一个的矩阵乘以向量。因为向量和多个矩阵的连乘具有结合性,我们可以把所有矩阵都先乘起来,然后再将向量乘以这个矩阵而得到最后的结果。下图是旋转和平移的变换结合之后对向量的作用结果:

创建轨道
在这个教程,我们将变换两个立方体。第一个自转,二第二个绕着第一个转。这两个立方体都会有自己的世界变换矩阵,并且在每帧的渲染中都会使用到。
在XNA Math中,有一些函数帮助我们创建旋转,平移,缩放矩阵
1.旋转可以调用XMMatrixRotationX(), XMMatrixRotationY(), 和XMMatrixRotationZ()函数,来创建分别绕X,Y,Z轴旋转的矩阵。我们创建的选装矩阵只能绕这三个轴的其中一个旋转。至于绕任意轴旋转可以对这三个基本旋转进行复合计算而得到。
2.平移可以调用XMMatrixTranslation()函数,这个函数根据指定的参数创建一个矩阵来平移点。
3.缩放可以调用XMMatrixScaling()函数,它只能在X,Y,Z轴进行缩放。如果需要绕着任意轴缩放,可以设置多个适当角度的旋转矩阵,把它们跟缩放矩阵连乘来达到这种效果。
第一个立方体以一个点为中心进行公转。这个立方体使用世界变换矩阵惊醒沿着Y轴进行旋转。我们可以调用XMMatrixRotationY()函数,代码如下,这个立方体每帧只旋转一点。既然这个立方体能够持续旋转。每帧旋转的角度将以一定的速度变化。
// 1st Cube: Rotate around the origin
g_World1 = XMMatrixRotationY( t );
第二个立方体将绕着第一个矩阵旋转,为了展示多重变换,我们添加缩放比例和沿各自的轴旋转。公式表现在代码中,如下。第一个立方体将缩小为原来的0.3倍,并且它会绕着自己的轴进行旋转(在这个例子中,绕Z轴旋转)。为了模拟这个轨道,它将离原点有一定距离,并且轨道是绕Y轴旋转的结果。想实现这个效果必须依靠4个矩阵(mScale,mSpin,mTranslate,mOrbit)连乘的结果。
// 2nd Cube: Rotate around origin
XMMATRIX mSpin = XMMatrixRotationZ( -t );
XMMATRIX mOrbit = XMMatrixRotationY( -t * 2.0f );
XMMATRIX mTranslate = XMMatrixTranslation( -4.0f, 0.0f, 0.0f );
XMMATRIX mScale = XMMatrixScaling( 0.3f, 0.3f, 0.3f );
g_World2 = mScale * mSpin * mTranslate * mOrbit;
一个非常值得注意的就是:这些矩阵相乘的顺序是不能交换的。根据这个矩阵变换就可以看到这个结果。
// Update our time
t += XM_PI * 0.0125f;
在渲染之前,我们必须用更新渲染器中静态缓冲区。注意,每个立方体都有自己的世界矩阵,所以在绘制它们的时候要注意改变世界变换矩阵。
//
// Update variables for the first cube
//
ConstantBuffer cb1;
cb1.mWorld = XMMatrixTranspose( g_World1 );
cb1.mView = XMMatrixTranspose( g_View );
cb1.mProjection = XMMatrixTranspose( g_Projection );
g_pImmediateContext->UpdateSubresource( g_pConstantBuffer, 0, NULL, &cb1, 0, 0 );
//
// Render the first cube
//
g_pImmediateContext->VSSetShader( g_pVertexShader, NULL, 0 );
g_pImmediateContext->VSSetConstantBuffers( 0, 1, &g_pConstantBuffer );
g_pImmediateContext->PSSetShader( g_pPixelShader, NULL, 0 );
g_pImmediateContext->DrawIndexed( 36, 0, 0 );
//
// Update variables for the second cube
//
ConstantBuffer cb2;
cb2.mWorld = XMMatrixTranspose( g_World2 );
cb2.mView = XMMatrixTranspose( g_View );
cb2.mProjection = XMMatrixTranspose( g_Projection );
g_pImmediateContext->UpdateSubresource( g_pConstantBuffer, 0, NULL, &cb2, 0, 0 );
//
// Render the second cube
//
g_pImmediateContext->DrawIndexed( 36, 0, 0 );
深度缓存
深度缓存也是这个教程的一个看点。没有它的话,在比较小的轨道中,第二个立方体将总是绘制在第一个立方体的上面,即使当它旋转到第一个立方体的后面的时候。深度缓冲区允许Direct3D检测画在屏幕上每个像素的深度。在Direct3D 11中的默认操作是将要画的每个像素和已经在屏幕上的对应像素的深度进行比较。如果当前像素深度小于等于对应像素的深度,当前像素将覆盖原来的像素。另一方面,如果当前像素深度大于对应像素的深度,当前像素将被丢弃,原来像素保持不变。
下列代码创建一个深度缓冲区(一个深度模板)。它也是创建一个深度缓存DepthStencilView,以至于让Direct3D知道把它作为深度模板来用。
// Create depth stencil texture
D3D11_TEXTURE2D_DESC descDepth;
ZeroMemory( &descDepth, sizeof(descDepth) );
descDepth.Width = width;
descDepth.Height = height;
descDepth.MipLevels = 1;
descDepth.ArraySize = 1;
descDepth.Format = DXGI_FORMAT_D24_UNORM_S8_UINT;
descDepth.SampleDesc.Count = 1;
descDepth.SampleDesc.Quality = 0;
descDepth.Usage = D3D11_USAGE_DEFAULT;
descDepth.BindFlags = D3D11_BIND_DEPTH_STENCIL;
descDepth.CPUAccessFlags = 0;
descDepth.MiscFlags = 0;
hr = g_pd3dDevice->CreateTexture2D( &descDepth, NULL, &g_pDepthStencil );
if( FAILED(hr) )
return hr;
// Create the depth stencil view
D3D11_DEPTH_STENCIL_VIEW_DESC descDSV;
ZeroMemory( &descDSV, sizeof(descDSV) );
descDSV.Format = descDepth.Format;
descDSV.ViewDimension = D3D11_DSV_DIMENSION_TEXTURE2D;
descDSV.Texture2D.MipSlice = 0;
hr = g_pd3dDevice->CreateDepthStencilView( g_pDepthStencil, &descDSV, &g_pDepthStencilView );
if( FAILED(hr) )
return hr;
为了使用新创建的深度模板缓冲,这个教程必须把它绑定到device。我们可以调用OMSetRenderTargets(),把DepthStencilView当做参数传给这个函数。
g_pImmediateContext->OMSetRenderTargets( 1, &g_pRenderTargetView, g_pDepthStencilView );
与渲染目标类似,在渲染之前必须清空深度缓冲区。它确保之前的像素深度不会影响到当前帧的绘制,因为相对于当前帧,上一帧遗留的深度是无效的,必须被丢弃。代码如下:
//
// Clear the depth buffer to 1.0 (max depth)
//
g_pImmediateContext->ClearDepthStencilView( g_pDepthStencilView, D3D11_CLEAR_DEPTH, 1.0f, 0 );(注意这里SDK文档漏泄了,现在补上)


 5285
5285

 被折叠的 条评论
为什么被折叠?
被折叠的 条评论
为什么被折叠?
 到【灌水乐园】发言


