


往期知识点整理
- 鸿蒙(HarmonyOS)北向开发知识点记录~
- 鸿蒙(HarmonyOS)应用开发之性能优化实战-组件复用
- 鸿蒙(HarmonyOS)应用性能优化实战-组件复用四板斧
- 鸿蒙(HarmonyOS)应用开发性能优化实战-WaterFlow高性能开发
- 鸿蒙(HarmonyOS)性能优化实战-Swiper高性能开发
- 鸿蒙(HarmonyOS)性能优化实战-合理使用renderGroup
- 鸿蒙(HarmonyOS)性能优化实战-减少动画丢帧
- 鸿蒙(HarmonyOS)性能优化实战-多线程共享内存
- 鸿蒙(HarmonyOS)性能优化实战-Grid高性能开发
- 鸿蒙(HarmonyOS)性能优化实战-状态管理
- 持续更新中……
为了帮助应用程序开发人员提高其应用程序质量,特别是在高效的状态管理方面。本章节面向开发者提供了多个在开发ArkUI应用中常见的低效开发的场景,并给出了对应的解决方案。此外,还提供了同一场景下,推荐用法和不推荐用法的对比和解释说明,更直观地展示两者区别,从而帮助开发者学习如何正确地在应用开发中使用状态变量,进行高性能开发。
使用@ObjectLink代替@Prop减少不必要的深拷贝
在应用开发中,开发者经常会进行父子组件的数值传递,而在不会改变子组件内状态变量值的情况下,使用@Prop装饰状态变量会导致组件创建的耗时增加,从而影响一部分性能。
【反例】
@Observed
class ClassA {
  public c: number = 0;

  constructor(c: number) {
    this.c = c;
  }
}

@Component
struct PropChild {
  @Prop testNum: ClassA; // @Prop 装饰状态变量会深拷贝

  build() {
    Text(`PropChild testNum ${this.testNum.c}`)
  }
}

@Entry
@Component
struct Parent {
  @State testNum: ClassA[] = [new ClassA(1)];

  build() {
    Column() {
      Text(`Parent testNum ${this.testNum[0].c}`)
        .onClick(() => {
          this.testNum[0].c += 1;
        })

      // PropChild没有改变@Prop testNum: ClassA的值,所以这时最优的选择是使用@ObjectLink
      PropChild({ testNum: this.testNum[0] })
    }
  }
}
在上文的示例中,PropChild组件没有改变@Prop testNum: ClassA的值,所以这时较优的选择是使用@ObjectLink,因为@Prop是会深拷贝数据,具有拷贝的性能开销,所以这个时候@ObjectLink是比@Link和@Prop更优的选择。
【正例】
@Observed
class ClassA {
  public c: number = 0;

  constructor(c: number) {
    this.c = c;
  }
}

@Component
struct PropChild {
  @ObjectLink testNum: ClassA; // @ObjectLink 装饰状态变量不会深拷贝

  build() {
    Text(`PropChild testNum ${this.testNum.c}`)
  }
}

@Entry
@Component
struct Parent {
  @State testNum: ClassA[] = [new ClassA(1)];

  build() {
    Column() {
      Text(`Parent testNum ${this.testNum[0].c}`)
        .onClick(() => {
          this.testNum[0].c += 1;
        })

      // 当子组件不需要发生本地改变时,优先使用@ObjectLink,因为@Prop是会深拷贝数据,具有拷贝的性能开销,所以这个时候@ObjectLink是比@Link和@Prop更优的选择
      PropChild({ testNum: this.testNum[0] })
    }
  }
}
不使用状态变量强行更新非状态变量关联组件
【反例】
@Entry
@Component
struct CompA {
  @State needsUpdate: boolean = true;
  realState1: Array<number> = [4, 1, 3, 2]; // 未使用状态变量装饰器
  realState2: Color = Color.Yellow;

  updateUI1(param: Array<number>): Array<number> {
    const triggerAGet = this.needsUpdate;
    return param;
  }
  updateUI2(param: Color): Color {
    const triggerAGet = this.needsUpdate;
    return param;
  }
  build() {
    Column({ space: 20 }) {
      ForEach(this.updateUI1(this.realState1),
        (item: Array<number>) => {
          Text(`${item}`)
        })
      Text("add item")
        .onClick(() => {
          // 改变realState1不会触发UI视图更新
          this.realState1.push(this.realState1[this.realState1.length-1] + 1);

          // 触发UI视图更新
          this.needsUpdate = !this.needsUpdate;
        })
      Text("chg color")
        .onClick(() => {
          // 改变realState2不会触发UI视图更新
          this.realState2 = this.realState2 == Color.Yellow ? Color.Red : Color.Yellow;

          // 触发UI视图更新
          this.needsUpdate = !this.needsUpdate;
        })
    }.backgroundColor(this.updateUI2(this.realState2))
    .width(200).height(500)
  }
}
上述示例存在以下问题:
-
应用程序希望控制UI更新逻辑,但在ArkUI中,UI更新的逻辑应该是由框架来检测应用程序状态变量的更改去实现。
-
this.needsUpdate是一个自定义的UI状态变量,应该仅应用于其绑定的UI组件。变量this.realState1、this.realState2没有被装饰,他们的变化将不会触发UI刷新。
-
但是在该应用中,用户试图通过this.needsUpdate的更新来带动常规变量this.realState1、this.realState2的更新,此方法不合理且更新性能较差。
【正例】
要解决此问题,应将realState1和realState2成员变量用@State装饰。一旦完成此操作,就不再需要变量needsUpdate。
@Entry
@Component
struct CompA {
  @State realState1: Array<number> = [4, 1, 3, 2];
  @State realState2: Color = Color.Yellow;
  build() {
    Column({ space: 20 }) {
      ForEach(this.realState1,
        (item: Array<number>) => {
          Text(`${item}`)
        })
      Text("add item")
        .onClick(() => {
          // 改变realState1触发UI视图更新
          this.realState1.push(this.realState1[this.realState1.length-1] + 1);
        })
      Text("chg color")
        .onClick(() => {
          // 改变realState2触发UI视图更新
          this.realState2 = this.realState2 == Color.Yellow ? Color.Red : Color.Yellow;
        })
    }.backgroundColor(this.realState2)
    .width(200).height(500)
  }
}
精准控制状态变量关联的组件数
建议每个状态变量关联的组件数应该少于20个。精准控制状态变量关联的组件数能减少不必要的组件刷新,提高组件的刷新效率。有时开发者会将同一个状态变量绑定多个同级组件的属性,当状态变量改变时,会让这些组件做出相同的改变,这有时会造成组件的不必要刷新,如果存在某些比较复杂的组件,则会大大影响整体的性能。但是如果将这个状态变量绑定在这些同级组件的父组件上,则可以减少需要刷新的组件数,从而提高刷新的性能。
【反例】
@Observed
class Translate {
  translateX: number = 20;
}
@Component
struct Title {
  @ObjectLink translateObj: Translate;
  build() {
    Row() {
      Image($r('app.media.icon'))
        .width(50)
        .height(50)
        .translate({
          x:this.translateObj.translateX // this.translateObj.translateX used in two component both in Row
        })
      Text("Title")
        .fontSize(20)
        .translate({
          x: this.translateObj.translateX
        })
    }
  }
}
@Entry
@Component
struct Page {
  @State translateObj: Translate = new Translate();
  build() {
    Column() {
      Title({
        translateObj: this.translateObj
      })
      Stack() {
      }
      .backgroundColor("black")
      .width(200)
      .height(400)
      .translate({
        x:this.translateObj.translateX //this.translateObj.translateX used in two components both in Column
      })
      Button("move")
        .translate({
          x:this.translateObj.translateX
        })
        .onClick(() => {
          animateTo({
            duration: 50
          },()=>{
            this.translateObj.translateX = (this.translateObj.translateX + 50) % 150;
          })
        })
    }
  }
}
在上面的示例中,状态变量this.translateObj.translateX被用在多个同级的子组件下,当this.translateObj.translateX变化时,会导致所有关联它的组件一起刷新,但实际上由于这些组件的变化是相同的,因此可以将这个属性绑定到他们共同的父组件上,来实现减少组件的刷新数量。经过分析,所有的子组件其实都处于Page下的Column中,因此将所有子组件相同的translate属性统一到Column上,来实现精准控制状态变量关联的组件数。
【正例】
@Observed
class Translate {
  translateX: number = 20;
}
@Component
struct Title {
  build() {
    Row() {
      Image($r('app.media.icon'))
        .width(50)
        .height(50)
      Text("Title")
        .fontSize(20)
    }
  }
}
@Entry
@Component
struct Page1 {
  @State translateObj: Translate = new Translate();
  build() {
    Column() {
      Title()
      Stack() {
      }
      .backgroundColor("black")
      .width(200)
      .height(400)
      Button("move")
        .onClick(() => {
          animateTo({
            duration: 50
          },()=>{
            this.translateObj.translateX = (this.translateObj.translateX + 50) % 150;
          })
        })
    }
    .translate({ // the component in Column shares the same property translate
      x: this.translateObj.translateX
    })
  }
}
合理控制对象类型状态变量关联的组件数量
如果将一个复杂对象定义为状态变量,需要合理控制其关联的组件数。当对象中某一个成员属性发生变化时,会导致该对象关联的所有组件刷新,尽管这些组件可能并没有直接使用到该改变的属性。为了避免这种“冗余刷新”对性能产生影响,建议合理拆分该复杂对象,控制对象关联的组件数量。
查询状态变量关联的组件数
在应用开发中,可以通过HiDumper查看状态变量关联的组件数,进行性能优化。
避免在for、while等循环逻辑中频繁读取状态变量
在应用开发中,应避免在循环逻辑中频繁读取状态变量,而是应该放在循环外面读取。
【反例】
@Entry
@Component
struct Index {
  @State message: string = '';

  build() {
    Column() {
      Button('点击打印日志')
        .onClick(() => {
          for (let i = 0; i < 10; i++) {
            hilog.info(0x0000, 'TAG', '%{public}s', this.message);
          }
        })
        .width('90%')
        .backgroundColor(Color.Blue)
        .fontColor(Color.White)
        .margin({
          top: 10
        })
    }
    .justifyContent(FlexAlign.Start)
    .alignItems(HorizontalAlign.Center)
    .margin({
      top: 15
    })
  }
}
【正例】
@Entry
@Component
struct Index {
  @State message: string = '';

  build() {
    Column() {
      Button('点击打印日志')
        .onClick(() => {
          let logMessage: string = this.message;
          for (let i = 0; i < 10; i++) {
            hilog.info(0x0000, 'TAG', '%{public}s', logMessage);
          }
        })
        .width('90%')
        .backgroundColor(Color.Blue)
        .fontColor(Color.White)
        .margin({
          top: 10
        })
    }
    .justifyContent(FlexAlign.Start)
    .alignItems(HorizontalAlign.Center)
    .margin({
      top: 15
    })
  }
}
总是有很多小伙伴反馈说:鸿蒙开发不知道学习哪些技术?不知道需要重点掌握哪些鸿蒙开发知识点? 为了解决大家这些学习烦恼。在这准备了一份很实用的鸿蒙全栈开发学习路线与学习文档给大家用来跟着学习。
针对一些列因素,整理了一套纯血版鸿蒙(HarmonyOS Next)全栈开发技术的学习路线,包含了鸿蒙开发必掌握的核心知识要点,内容有(OpenHarmony多媒体技术、Napi组件、OpenHarmony内核、OpenHarmony驱动开发、系统定制移植……等)技术知识点。

《鸿蒙 (Harmony OS)开发学习手册》(共计892页):https://gitcode.com/HarmonyOS_MN/733GH/overview
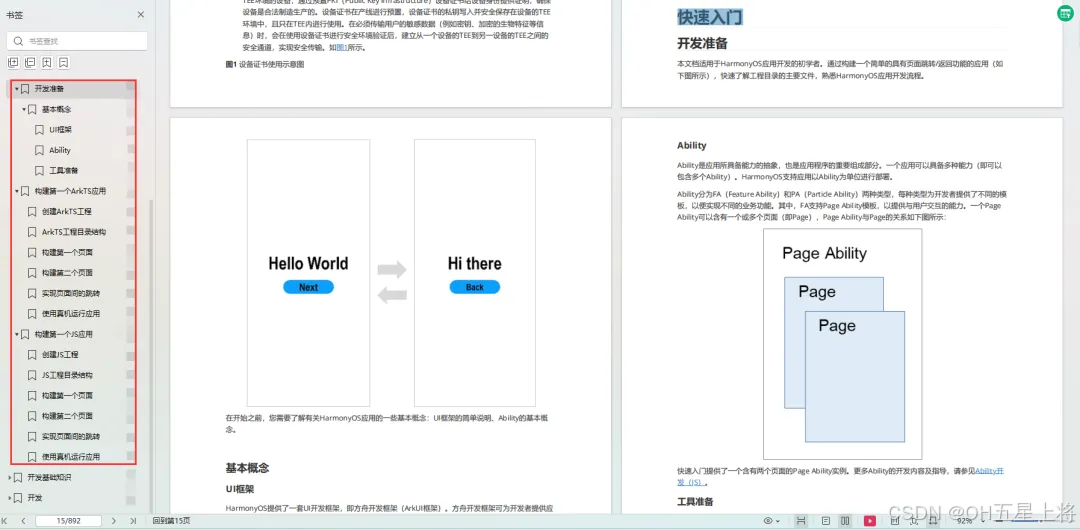
如何快速入门?
1.基本概念
2.构建第一个ArkTS应用
3.……
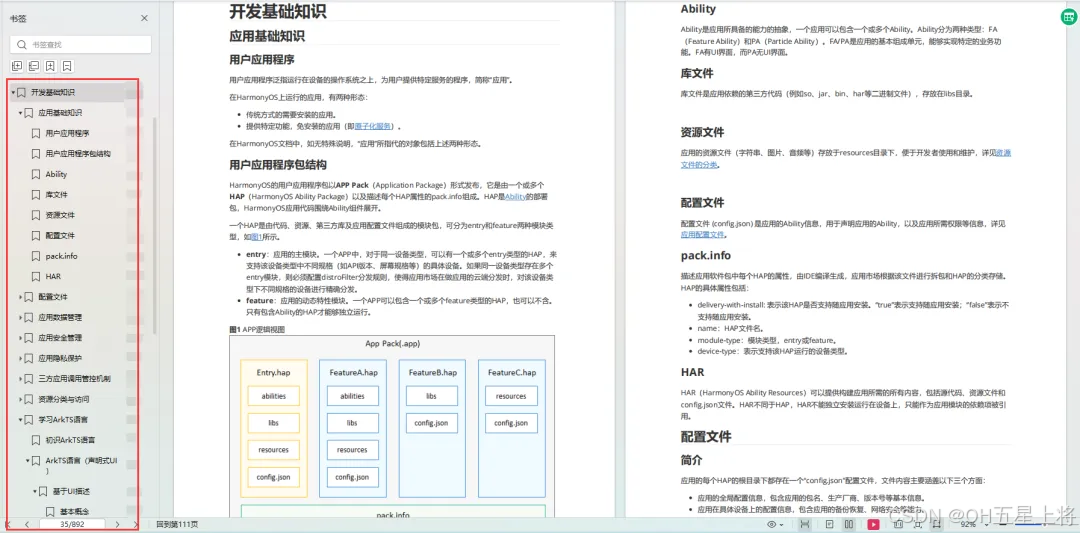
开发基础知识:
1.应用基础知识
2.配置文件
3.应用数据管理
4.应用安全管理
5.应用隐私保护
6.三方应用调用管控机制
7.资源分类与访问
8.学习ArkTS语言
9.……
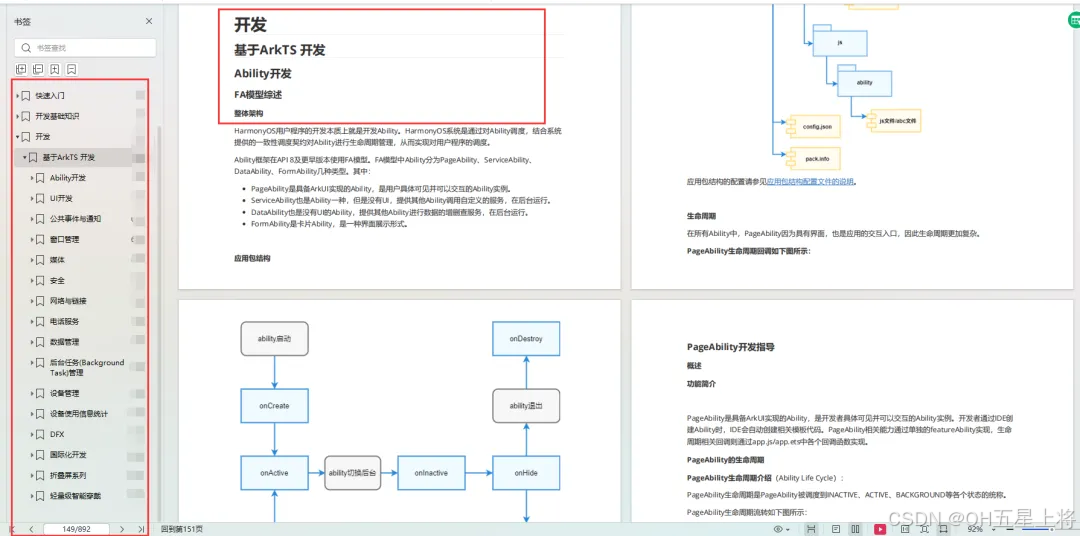
基于ArkTS 开发
1.Ability开发
2.UI开发
3.公共事件与通知
4.窗口管理
5.媒体
6.安全
7.网络与链接
8.电话服务
9.数据管理
10.后台任务(Background Task)管理
11.设备管理
12.设备使用信息统计
13.DFX
14.国际化开发
15.折叠屏系列
16.……
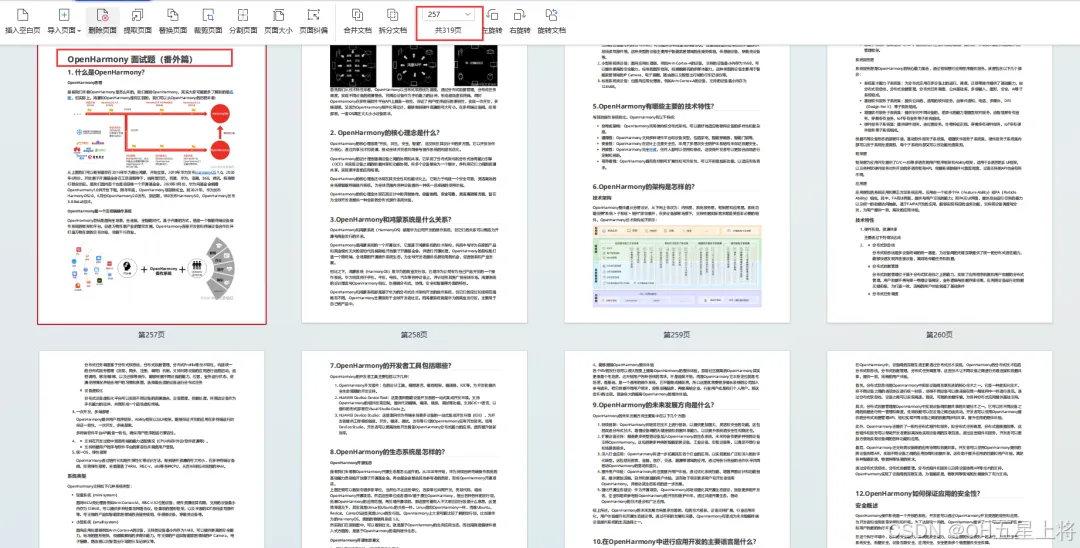
鸿蒙开发面试真题(含参考答案):https://gitcode.com/HarmonyOS_MN/733GH/overview
OpenHarmony 开发环境搭建
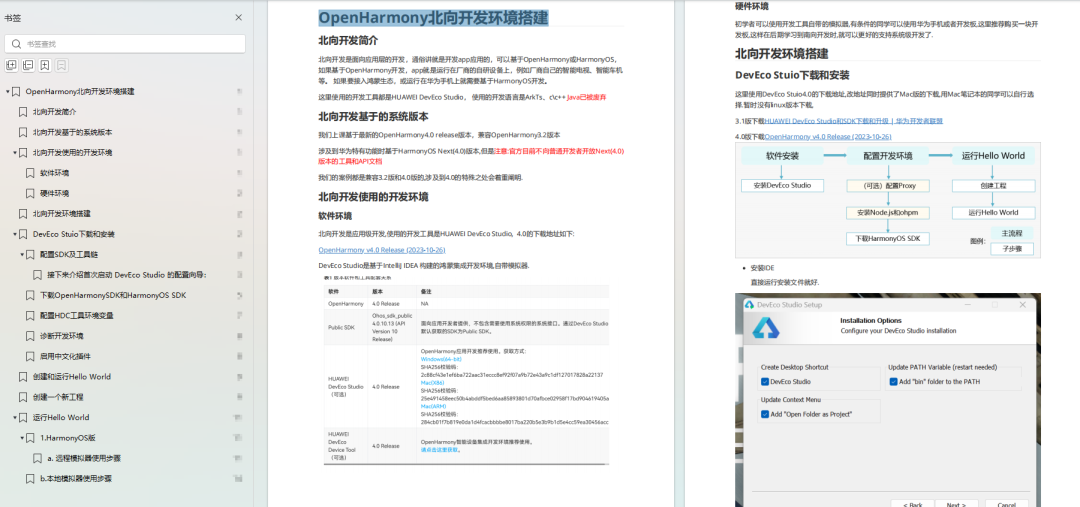
《OpenHarmony源码解析》:https://gitcode.com/HarmonyOS_MN/733GH/overview
- 搭建开发环境
- Windows 开发环境的搭建
- Ubuntu 开发环境搭建
- Linux 与 Windows 之间的文件共享
- ……
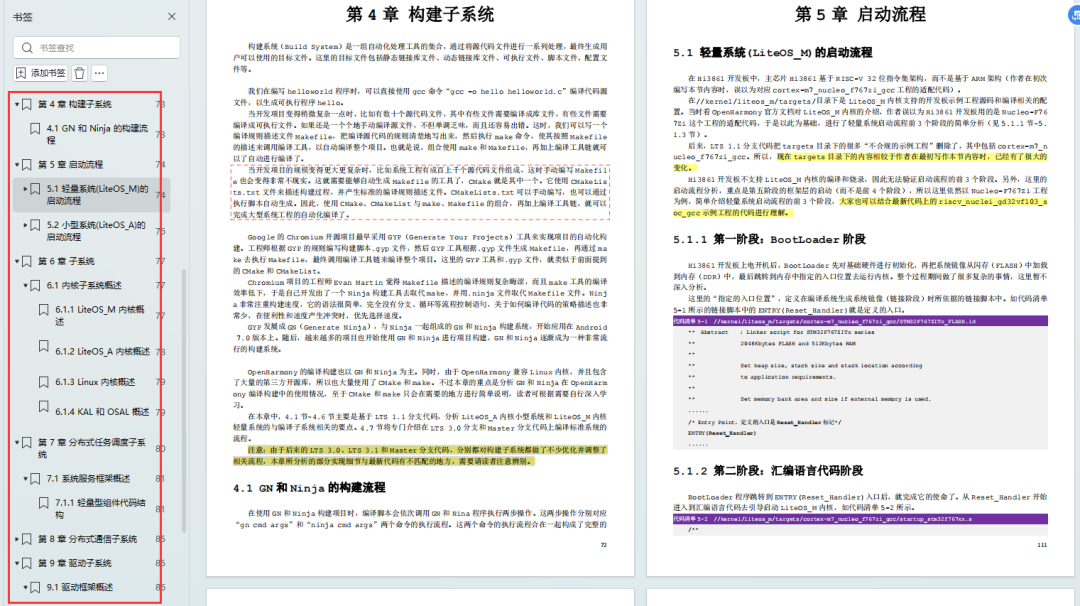
- 系统架构分析
- 构建子系统
- 启动流程
- 子系统
- 分布式任务调度子系统
- 分布式通信子系统
- 驱动子系统
- ……
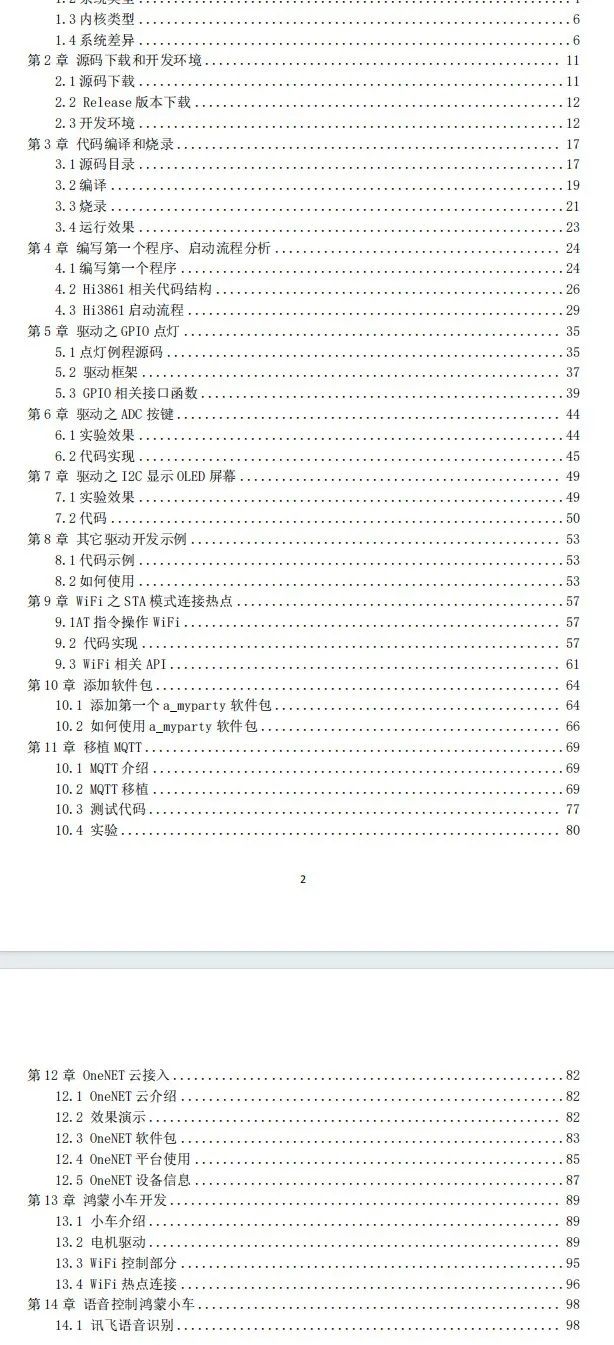
OpenHarmony 设备开发学习手册:https://gitcode.com/HarmonyOS_MN/733GH/overview


 13万+
13万+

 被折叠的 条评论
为什么被折叠?
被折叠的 条评论
为什么被折叠?
 到【灌水乐园】发言


