


作者 | 汇智网 编辑 | 汽车人
原文链接:https://zhuanlan.zhihu.com/p/666887062
点击下方卡片,关注“自动驾驶之心”公众号
ADAS巨卷干货,即可获取
点击进入→自动驾驶之心【仿真测试】技术交流群
本文只做学术分享,如有侵权,联系删文
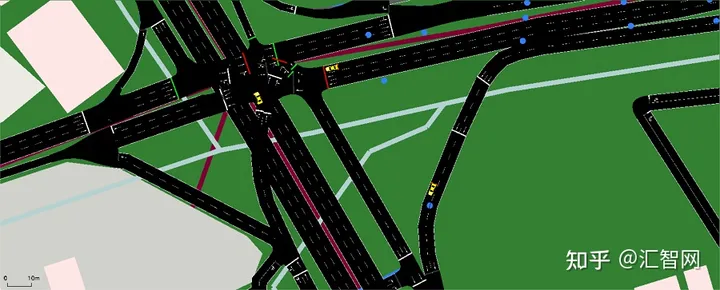
本文将介绍如何在 SUMO 交通模拟中动态选择车辆绕行指定道路。
绕道是城市驾驶中的常见现象,造成原因有很多,包括建筑和交通事故等。 无论出于何种原因,并非所有车辆都会选择避开这些道路; 有些人可能会毫不犹豫地直接开车过去,而另一些人可能会走小巷。 我们将模拟这两种行为。
“在线工具推荐:Three.js AI纹理开发包-YOLO合成数据生成器-GLTF/GLB在线编辑-3D模型格式在线转换-可编程3D场景编辑器
”
1、准备环境
我假设你已经在计算机上安装了 SUMO 并配置了 PATH 和 SUMO_HOME 环境变量。 阅读文档以了解如何设置。 要测试你的机器是否准备就绪,应该能够在终端中执行以下命令:
sumo --version
sumo-gui
python --version
netedit
2、SUMO快速入门
如果你熟悉 SUMO 交通模拟或阅读过我的其他教程,那么可能已经知道在 SUMO 中运行模拟的基本组件包括:
道路网络
交通需求
在 SUMO 中,默认情况下模拟是确定性的,但有多种方法可以引入随机性。 出于我们的目的,我们将利用 SUMO 提供的名为交通控制接口(简称 TraCI)的工具来实时修改模拟。
TraCI 使我们能够引入自定义逻辑(以 Python 代码的形式)来跟踪和操作模拟的许多方面,包括单个车辆的路线。 本文提供了各种源代码示例来帮助你跟进。 三个配置文件分组在一个 config 文件夹中,一个 Python 脚本(称为 main.py)包含运行和操作模拟的所有逻辑。
首先,请在你的计算机上模仿此文件夹结构:

2.1 创建道路网络
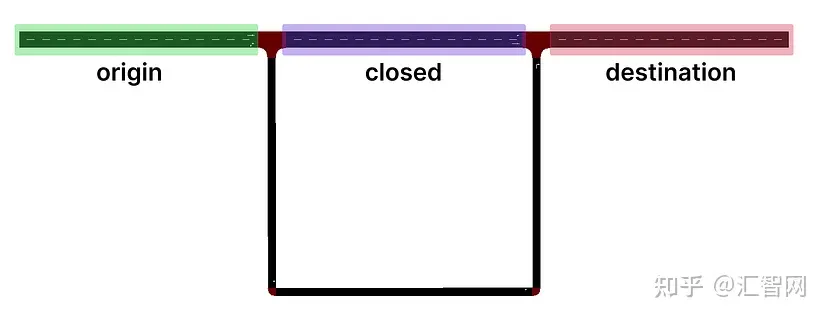
本节重点介绍道路网络。 网络的形状和复杂性无关紧要。 重要的是确定你希望车辆在模拟中避开的边的名称 (id)。 为了清楚起见,我将编辑网络以重命名三个边:
所有车辆出发的起始边(称为“起始点”);
所有车辆的目的边(作为“目的地”);
以及一些车辆会避开的边(称为“封闭”)。
如果你不熟悉创建网络,请查看我的有关使用 netedit 设计自己的网络的教程。
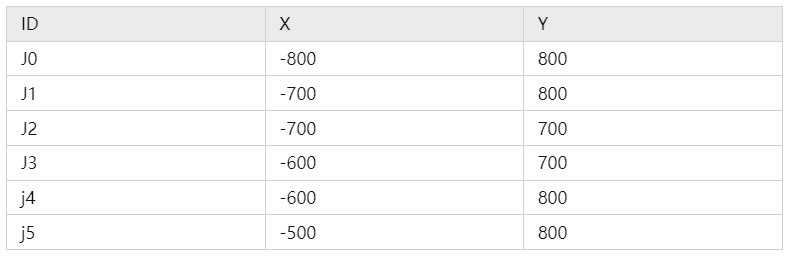
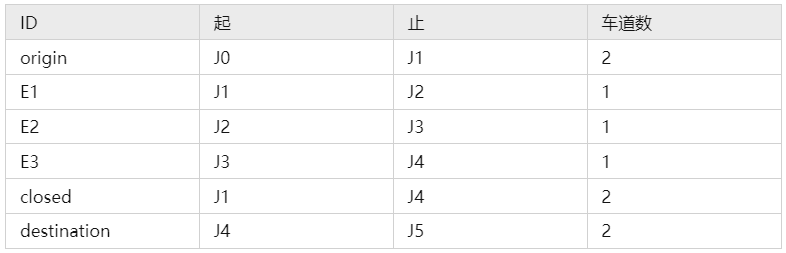
对于后续操作并希望更多练习使用 netedit 的人,我提供了下面两个表,其中列出了交汇点(junction)和边(edge)的列表,你可以在重新创建示例网络时用作参考。
交汇点列表:
边列表:
对于那些懒得绘制自己的网络的人,这里是上面所示的示例网络的源代码。 只需将其粘贴到 config 文件夹中名为 network.net.xml 的文件中即可:
<?xml version="1.0" encoding="UTF-8"?>

<net version="1.9" junctionCornerDetail="5" limitTurnSpeed="5.50" xmlns:xsi="http://www.w3.org/2001/XMLSchema-instance" xsi:noNamespaceSchemaLocation="http://sumo.dlr.de/xsd/net_file.xsd">

    <location netOffset="0.00,0.00" convBoundary="-800.00,700.00,300.00,800.10" origBoundary="-10000000000.00,-10000000000.00,10000000000.00,10000000000.00" projParameter="!"/>

    <edge id=":J1_0" function="internal">
        <lane id=":J1_0_0" index="0" speed="6.53" length="9.11" shape="-707.20,795.29 -704.74,794.94 -702.99,793.87 -701.94,792.09 -701.59,789.60"/>
    </edge>
    <edge id=":J1_1" function="internal">
        <lane id=":J1_1_0" index="0" speed="13.89" length="11.20" shape="-707.20,795.29 -695.99,795.20"/>
        <lane id=":J1_1_1" index="1" speed="13.89" length="11.20" shape="-707.20,798.49 -695.99,798.40"/>
    </edge>
    <edge id=":J2_0" function="internal">
        <lane id=":J2_0_0" index="0" speed="3.95" length="2.66" shape="-701.50,700.10 -701.40,699.35 -701.10,698.82 -700.60,698.51 -699.90,698.40"/>
    </edge>
    <edge id=":J3_0" function="internal">
        <lane id=":J3_0_0" index="0" speed="3.86" length="2.50" shape="-600.00,698.50 -599.30,698.59 -598.80,698.88 -598.50,699.34 -598.40,700.00"/>
    </edge>
    <edge id=":J4_0" function="internal">
        <lane id=":J4_0_0" index="0" speed="6.51" length="9.03" shape="-598.40,789.60 -598.05,792.05 -597.00,793.80 -595.25,794.85 -592.80,795.20"/>
    </edge>
    <edge id=":J4_1" function="internal">
        <lane id=":J4_1_0" index="0" speed="13.89" length="11.20" shape="-604.00,795.20 -592.80,795.20"/>
        <lane id=":J4_1_1" index="1" speed="13.89" length="11.20" shape="-604.00,798.40 -592.80,798.40"/>
    </edge>

    <edge id="E1" from="J1" to="J2" priority="-1" shape="-700.00,800.00 -699.90,700.10">
        <lane id="E1_0" index="0" speed="13.89" length="89.50" shape="-701.59,789.60 -701.50,700.10"/>
    </edge>
    <edge id="E2" from="J2" to="J3" priority="-1" shape="-700.00,700.00 -599.90,700.10">
        <lane id="E2_0" index="0" speed="13.89" length="99.90" shape="-699.90,698.40 -600.00,698.50"/>
    </edge>
    <edge id="E3" from="J3" to="J4" priority="-1">
        <lane id="E3_0" index="0" speed="13.89" length="89.60" shape="-598.40,700.00 -598.40,789.60"/>
    </edge>
    <edge id="closed" from="J1" to="J4" priority="-1">
        <lane id="closed_0" index="0" speed="13.89" length="91.99" shape="-695.99,795.20 -604.00,795.20"/>
        <lane id="closed_1" index="1" speed="13.89" length="91.99" shape="-695.99,798.40 -604.00,798.40"/>
    </edge>
    <edge id="destination" from="J4" to="J5" priority="-1" shape="-600.00,800.00 -400.00,800.00 300.00,800.00 -500.00,800.00">
        <lane id="destination_0" index="0" speed="13.89" length="92.80" shape="-592.80,795.20 -500.00,795.20"/>
        <lane id="destination_1" index="1" speed="13.89" length="92.80" shape="-592.80,798.40 -500.00,798.40"/>
    </edge>
    <edge id="origin" from="J0" to="J1" priority="-1" shape="-800.00,800.00 -699.90,800.10">
        <lane id="origin_0" index="0" speed="13.89" length="92.80" shape="-800.00,795.20 -707.20,795.29"/>
        <lane id="origin_1" index="1" speed="13.89" length="92.80" shape="-800.00,798.40 -707.20,798.49"/>
    </edge>

    <junction id="J0" type="dead_end" x="-800.00" y="800.00" incLanes="" intLanes="" shape="-800.00,800.00 -799.99,793.60"/>
    <junction id="J1" type="traffic_light" x="-700.00" y="800.00" incLanes="origin_0 origin_1" intLanes=":J1_0_0 :J1_1_0 :J1_1_1" shape="-695.99,800.00 -695.99,793.60 -698.22,793.16 -698.99,792.60 -699.55,791.82 -699.88,790.82 -699.99,789.60 -703.19,789.60 -703.64,791.87 -704.19,792.67 -704.97,793.24 -705.97,793.58 -707.19,793.69 -707.20,800.09" rightOfWay="edgePriority">
        <request index="0" response="000" foes="000" cont="0"/>
        <request index="1" response="000" foes="000" cont="0"/>
        <request index="2" response="000" foes="000" cont="0"/>
    </junction>
    <junction id="J2" type="priority" x="-700.00" y="700.00" incLanes="E1_0" intLanes=":J2_0_0" shape="-703.10,700.10 -699.90,700.10 -699.90,696.80 -701.67,697.16 -702.30,697.62 -702.74,698.26 -703.01,699.09">
        <request index="0" response="0" foes="0" cont="0"/>
    </junction>
    <junction id="J3" type="priority" x="-600.00" y="700.00" incLanes="E2_0" intLanes=":J3_0_0" shape="-600.00,700.10 -596.80,700.10 -597.16,698.32 -597.60,697.70 -598.22,697.26 -599.02,696.99 -600.00,696.90">
        <request index="0" response="0" foes="0" cont="0"/>
    </junction>
    <junction id="J4" type="priority" x="-600.00" y="800.00" incLanes="E3_0 closed_0 closed_1" intLanes=":J4_0_0 :J4_1_0 :J4_1_1" shape="-592.80,800.00 -592.80,793.60 -595.02,793.16 -595.80,792.60 -596.36,791.82 -596.69,790.82 -596.80,789.60 -600.00,789.60 -600.44,791.82 -601.00,792.60 -601.78,793.16 -602.78,793.49 -604.00,793.60 -604.00,800.00">
        <request index="0" response="110" foes="110" cont="0"/>
        <request index="1" response="000" foes="001" cont="0"/>
        <request index="2" response="000" foes="001" cont="0"/>
    </junction>
    <junction id="J5" type="dead_end" x="-500.00" y="800.00" incLanes="destination_0 destination_1" intLanes="" shape="-500.00,793.60 -500.00,800.00"/>

    <connection from="E1" to="E2" fromLane="0" toLane="0" via=":J2_0_0" dir="l" state="M"/>
    <connection from="E2" to="E3" fromLane="0" toLane="0" via=":J3_0_0" dir="l" state="M"/>
    <connection from="E3" to="destination" fromLane="0" toLane="0" via=":J4_0_0" dir="r" state="m"/>
    <connection from="closed" to="destination" fromLane="0" toLane="0" via=":J4_1_0" dir="s" state="M"/>
    <connection from="closed" to="destination" fromLane="1" toLane="1" via=":J4_1_1" dir="s" state="M"/>
    <connection from="origin" to="E1" fromLane="0" toLane="0" uncontrolled="1" via=":J1_0_0" dir="r" state="M"/>
    <connection from="origin" to="closed" fromLane="0" toLane="0" uncontrolled="1" via=":J1_1_0" dir="s" state="M"/>
    <connection from="origin" to="closed" fromLane="1" toLane="1" uncontrolled="1" via=":J1_1_1" dir="s" state="M"/>

    <connection from=":J1_0" to="E1" fromLane="0" toLane="0" dir="r" state="M"/>
    <connection from=":J1_1" to="closed" fromLane="0" toLane="0" dir="s" state="M"/>
    <connection from=":J1_1" to="closed" fromLane="1" toLane="1" dir="s" state="M"/>
    <connection from=":J2_0" to="E2" fromLane="0" toLane="0" dir="l" state="M"/>
    <connection from=":J3_0" to="E3" fromLane="0" toLane="0" dir="l" state="M"/>
    <connection from=":J4_0" to="destination" fromLane="0" toLane="0" dir="r" state="M"/>
    <connection from=":J4_1" to="destination" fromLane="0" toLane="0" dir="s" state="M"/>
    <connection from=":J4_1" to="destination" fromLane="1" toLane="1" dir="s" state="M"/>

</net>
2.2 创建交通需求
本节介绍交通需求(Traffic Demand),这是交通模拟的另一个基本组成部分。 出于我们的目的,我们可以使用最初沿着相同路线行驶的少量相同车辆来使事情变得简单。 稍后我们将引入自定义逻辑来动态修改这些路由。
路线(route) ⇒ 扩展的行程(trip),包括出发边和目的边以及其间的所有边。
行程(Trip) ⇒ 车辆从一个地方到另一个地方的运动。
在 SUMO 中生成路线的方法有很多种,具体选择取决于你的可用输入。 为了满足我们的需求,我们知道起始边和目的边。 尽管如此,我们可以通过省略中间边并让 SUMO 找出最佳路径来节省时间。 要了解有关交通需求建模的更多信息,请阅读文档。
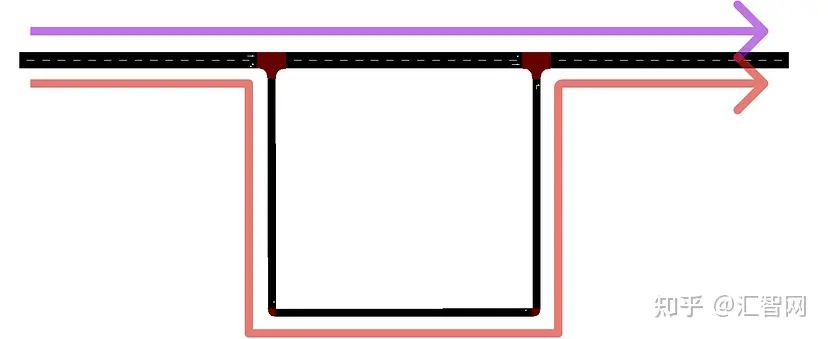
对于示例网络,车辆从出发地到目的地只有两条可能的路线。 在下图中,这些路线用彩色箭头表示。 默认情况下,SUMO 根据边的速度限制和距离来估计行驶时间,并为各个车辆选择最佳路径(又称路线)。
我们先来描述一下行程。 虽然可以使用netedit等工具配置流量需求,但在这种情况下直接编写源代码要容易得多。 首先在 config 文件夹中创建一个文件,将其命名为 trips.trips.xml。
行程的基本描述只需要标识符(id)、起始边(from)和目的边(to),以及车辆进入网络(出发)的时间。 如前所述,我们利用自动路由在运行时生成路由。 要了解有关自动路由的更多信息,请查看文档。
<routes xmlns:xsi="http://www.w3.org/2001/XMLSchema-instance" xsi:noNamespaceSchemaLocation="http://sumo.dlr.de/xsd/routes_file.xsd">
  <trip id="0" depart="0" from="origin" to="destination" />
  <trip id="1" depart="2" from="origin" to="destination" />
  <trip id="2" depart="3" from="origin" to="destination" />
  <trip id="3" depart="5" from="origin" to="destination" />
  <trip id="4" depart="7" from="origin" to="destination" />
  <trip id="5" depart="8" from="origin" to="destination" />
  <trip id="6" depart="9" from="origin" to="destination" />
  <trip id="7" depart="10" from="origin" to="destination" />
  <trip id="8" depart="11" from="origin" to="destination" />
  <trip id="9" depart="12" from="origin" to="destination" />
</routes>
2.3 可选的可视化
默认情况下,SUMO GUI 使用“标准”视图设置,将车辆表示为三角形并将网络着色为灰色。 我更喜欢使用“真实世界”视图设置,顾名思义,它为模拟中的元素添加了更真实的视觉表示。
打开 SUMO GUI 后,你可以在可用视图设置之间切换,但要在应用程序加载时更改默认设置,需要配置文件 viewSettings.xml:
<viewsettings xmlns:xsi="http://www.w3.org/2001/XMLSchema-instance" xsi:noNamespaceSchemaLocation="http://sumo.dlr.de/xsd/viewsettings_file.xsd">
  <scheme name="real world" />
</viewsettings>
3、运行模拟
此时,你应该拥有一个类似于简介中所示的项目结构,并在 config 文件夹中包含两个(可选三个)配置文件。 缺少的是编排模拟的运行程序脚本 - 以及随后处理我们的绕道(detour)逻辑。 本节重点介绍运行脚本,所以让我们开始吧!
至少,运行程序脚本将启动模拟,将时钟向前移动,并在所有车辆退出后关闭模拟。
3.1 开始模拟
为了简单地运行模拟,我们需要 TraCI 将我们的网络和行程文件传输到 SUMO GUI(SUMO 的图形界面)中。 我们将定义一个函数 startSim() 来处理此操作。 以下两个过程包括向前移动模拟时间和停止模拟。
def startSim():
    """Starts the simulation."""
    traci.start(
        [
            sumoBinary,
            '--net-file', './config/network.net.xml',
            '--route-files', './config/trips.trips.xml',
            '--delay', '200',
            '--gui-settings-file', './config/viewSettings.xml',
            '--start'
        ])
要使用 TraCI,我们必须为其提供应用程序和执行选项的二进制文件。 该二进制文件将是 SUMO-GUI,我们将使用 sumolib 库中的 checkBinary 函数获取其二进制文件。 执行选项取决于应用程序。 出于我们的目的,我们需要使用以下选项:
--net-file [FILE]→ 读取网络文件。--route-files [FILES]→ 读取路线/行程文件。
虽然以下选项是可选的:
--delay [FLOAT]→ 在模拟步骤之间添加 [FLOAT] 延迟,我们将使用它来本质上减慢速度,以便人眼可以观看。--gui-settings-file [FILE]→ 从文件中读取可视化设置,我们将使用该设置将“真实世界”皮肤应用于道路和车辆。--start→ 加载后自动启动模拟,省去了我们手动按启动按钮的麻烦。
要查看可用执行选项的列表,通常的做法是直接在终端中执行应用程序,后跟选项 --help。
3.2 增加模拟时钟
如果不指示 TraCI 何时或如何增加模拟时钟,模拟将保持时间冻结状态。 我们可以通过调用 traci.simulationStep() 方法轻松增加时钟。 但是,此方法仅将时钟移动一秒,因此我们需要将其包装在循环中以连续增加时间。
为了防止模拟永远运行,我们将创建一个新函数 shouldContinueSim()来检查行程中的所有车辆是否已进入和退出网络。
def shouldContinueSim():
    """Checks that the simulation should continue running.
    Returns:
        bool: `True` if vehicles exist on network. `False` otherwise.
    """
    numVehicles = traci.simulation.getMinExpectedNumber()
    return True if numVehicles > 0 else False
3.3 关闭模拟
最后,为了阻止 TraCI 运行,我们将使用它的 traci.close() 方法。
3.4 整合在一起
让我们将所有内容放在 main.py 文件中。
import traci
from sumolib import checkBinary

sumoBinary = checkBinary('sumo-gui')

def main():
 startSim()

 while shouldContinueSim():
    traci.simulationStep()

 traci.close()

def startSim():
    """Starts the simulation."""
    traci.start(
        [
            sumoBinary,
            '--net-file', './config/network.net.xml',
            '--route-files', './config/trips.trips.xml',
            '--delay', '200',
            '--gui-settings-file', './config/viewSettings.xml',
            '--start'
        ])

def shouldContinueSim():
    """Checks that the simulation should continue running.
    Returns:
        bool: `True` if there are any vehicles on or waiting to enter the network. `False` otherwise.
    """
    numVehicles = traci.simulation.getMinExpectedNumber()
    return True if numVehicles > 0 else False

if __name__ == "__main__":
    main()
3.5 运行模拟
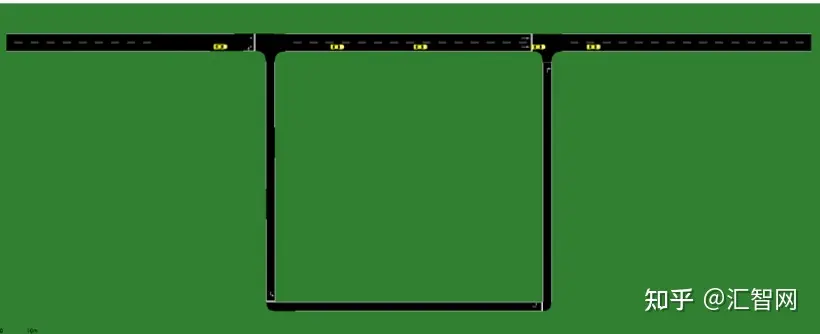
让我们运行模拟。 在终端中,使用命令 python main.py 执行运行程序脚本。 你将看到我们所有的车辆从最左边的边进入网络,并朝着最右边的边行驶其最佳路线。 瞧! 接下来介绍一下绕行(detour)逻辑。
4、绕行介绍
我们已经根据行程描述获得了模拟生成车辆及其各自的路线。 现在是时候介绍绕行逻辑了。 在本节中,我们将选择一些车辆绕道并更改其颜色,以帮助在视觉上将它们与未受影响的车辆区分开来。
4.1 绕行逻辑
我们阻止车辆行驶通过特定边的方法是告诉车辆其通过边的行驶时间将无限大。 如果 SUMO 使用的路由算法在计算中考虑行程时间(默认情况下),则此方法有效。 每辆车单独考虑边行程时间,为了改变对这些估计行程时间的看法,TraCI 提供了 traci.vehicle.setAdaptedTraveltime() 方法。
仅改变车辆对边行驶时间的看法不会起作用,因为车辆在最初进入网络时就决定了其路线,并且不会自动改变它。 我们需要使用 traci.vehicle.rerouteTraveltime() 方法强制它重新计算路线。 这两种方法一起将说服车辆选择替代路线来避开目标边缘。 我们将创建一个函数 avoidEdge()来处理此操作。
def avoidEdge(vehId, edgeId):
    """Sets an edge's travel time for a vehicle infinitely high, and reroutes the vehicle based on travel time.
    Args:
        vehId (Str): The ID of the vehicle to reroute.
        edgeId (Str): The ID of the edge to avoid.
    """
    traci.vehicle.setAdaptedTraveltime(
        vehId, edgeId, float('inf'))
    traci.vehicle.rerouteTraveltime(vehId)
4.2 将逻辑应用于车辆
现在我们有了逻辑,需要选择并将其应用于车辆和要避免的边。
选择车辆的方法有很多,但我们将采用最直接的方法,并从我们的行程文件中手动记录名称。 此步骤需要了解车辆和边的 ID。 我将使用全局变量数组 VEHICLES 来包含这些车辆的名称,并使用另一个变量 EDGE_ID 来包含边的名称。
不幸的是,如果在车辆不在网络上时尝试访问特定车辆属性,SUMO 可能会抛出错误。 因此,在尝试更改任何内容之前,我们需要确保车辆存在,但没有直接的方法可以做到这一点。 一种技术是使用 traci.simulation.getDepartedIDList() 方法检查其名称是否在这段时间内进入网络的车辆列表中。 我们将创建一个函数 getOurDeparted() 来处理此操作。
def getOurDeparted(filterIds=[]):
    """Returns a set of filtered vehicle IDs that departed onto the network during this simulation step.
    Args:
        filterIds ([String]): The set of vehicle IDs to filter for.
    Returns:
        [String]: A set of vehicle IDs.
    """
    newlyDepartedIds = traci.simulation.getDepartedIDList()
    filteredDepartedIds = newlyDepartedIds if len(
        filterIds) == 0 else set(newlyDepartedIds).intersection(filterIds)
    return filteredDepartedIds
4.3 改变车辆颜色
接下来,但可选的是,使用 traci.vehicle.setColor() 方法将车辆的颜色更改为红色。 这将帮助我们在其他车辆中直观地识别它。 我们将创建一个函数 setVehColor() 来处理此操作。
def setVehColor(vehId, color):
    """Changes a vehicle's color.
    Args:
        vehId (String): The vehicle to color.
        color ([Int, Int, Int]): The RGB color to apply.
    """
    traci.vehicle.setColor(vehId, color)
4.4 整合在一起
有了上述所有组件,我们就可以启动和停止模拟、增加时钟并更改车辆颜色和路线。 有了这些,你的 main.py 文件应如下所示:
from sumolib import checkBinary
import traci

sumoBinary = checkBinary('sumo-gui')

RED = [255, 0, 0]
EDGE_ID = 'closed'
VEHICLES = ['1', '4', '8']


def main():
    startSim()

    while shouldContinueSim():
        for vehId in getOurDeparted(VEHICLES):
            setVehColor(vehId, RED)
            avoidEdge(vehId, EDGE_ID)

        traci.simulationStep()

    traci.close()


def startSim():
    """Starts the simulation."""
    traci.start(
        [
            sumoBinary,
            '--net-file', './config/network.net.xml',
            '--route-files', './config/trips.trips.xml',
            '--delay', '200',
            '--gui-settings-file', './config/viewSettings.xml',
            '--start'

        ])


def shouldContinueSim():
    """Checks that the simulation should continue running.
    Returns:
        bool: `True` if vehicles exist on network. `False` otherwise.
    """
    numVehicles = traci.simulation.getMinExpectedNumber()
    return True if numVehicles > 0 else False


def setVehColor(vehId, color):
    """Changes a vehicle's color.
    Args:
        vehId (String): The vehicle to color.
        color ([Int, Int, Int]): The RGB color to apply.
    """
    traci.vehicle.setColor(vehId, color)


def avoidEdge(vehId, edgeId):
    """Sets an edge's travel time for a vehicle infinitely high, and reroutes the vehicle based on travel time.
    Args:
        vehId (Str): The ID of the vehicle to reroute.
        edgeId (Str): The ID of the edge to avoid.
    """
    traci.vehicle.setAdaptedTraveltime(
        vehId, edgeId, float('inf'))
    traci.vehicle.rerouteTraveltime(vehId)


def getOurDeparted(filterIds=[]):
    """Returns a set of filtered vehicle IDs that departed onto the network during this simulation step.
    Args:
        filterIds ([String]): The set of vehicle IDs to filter for.
    Returns:
        [String]: A set of vehicle IDs.
    """
    newlyDepartedIds = traci.simulation.getDepartedIDList()
    filteredDepartedIds = newlyDepartedIds if len(
        filterIds) == 0 else set(newlyDepartedIds).intersection(filterIds)
    return filteredDepartedIds


if __name__ == "__main__":
    main()
5、最终结果
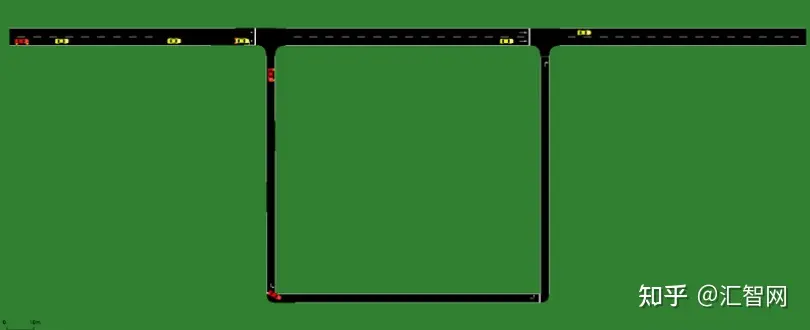
假设你现在运行模拟 (python main.py)。 在这种情况下,你会注意到我们之前选择的车辆进入网络后会显示为红色。 此外,当他们接近第一个十字路口时,他们会减速、打信号灯并右转沿小街行驶。 与此同时,所有其他黄色车辆继续直行(或变道以避免碰撞)。
你会记得我们在行程(trip)描述中没有指定任何中间边; 这一切都由 SUMO 处理。 事实上,这种行为是动态的,并且基于网络和流量的各个方面。 例如,通过增加更多的小巷或引入交通信号灯,车辆可能会选择单独的路线以避免造成交通拥堵。
恭喜! 通过本文,你设计了一个网络,描述了流量需求,配置了可视化设置,设置了 TraCI 来管理模拟,并引入了动态绕行逻辑。
原文链接:SUMO车辆绕行模拟 - BimAnt
① 全网独家视频课程
BEV感知、毫米波雷达视觉融合、多传感器标定、多传感器融合、多模态3D目标检测、点云3D目标检测、目标跟踪、Occupancy、cuda与TensorRT模型部署、协同感知、语义分割、自动驾驶仿真、传感器部署、决策规划、轨迹预测等多个方向学习视频(扫码即可学习)
 视频官网:www.zdjszx.com
② 国内首个自动驾驶学习社区
近2000人的交流社区,涉及30+自动驾驶技术栈学习路线,想要了解更多自动驾驶感知(2D检测、分割、2D/3D车道线、BEV感知、3D目标检测、Occupancy、多传感器融合、多传感器标定、目标跟踪、光流估计)、自动驾驶定位建图(SLAM、高精地图、局部在线地图)、自动驾驶规划控制/轨迹预测等领域技术方案、AI模型部署落地实战、行业动态、岗位发布,欢迎扫描下方二维码,加入自动驾驶之心知识星球,这是一个真正有干货的地方,与领域大佬交流入门、学习、工作、跳槽上的各类难题,日常分享论文+代码+视频,期待交流!

③【自动驾驶之心】技术交流群
自动驾驶之心是首个自动驾驶开发者社区,聚焦目标检测、语义分割、全景分割、实例分割、关键点检测、车道线、目标跟踪、3D目标检测、BEV感知、多模态感知、Occupancy、多传感器融合、transformer、大模型、点云处理、端到端自动驾驶、SLAM、光流估计、深度估计、轨迹预测、高精地图、NeRF、规划控制、模型部署落地、自动驾驶仿真测试、产品经理、硬件配置、AI求职交流等方向。扫码添加汽车人助理微信邀请入群,备注:学校/公司+方向+昵称(快速入群方式)

④【自动驾驶之心】平台矩阵,欢迎联系我们!


 1942
1942

 被折叠的 条评论
为什么被折叠?
被折叠的 条评论
为什么被折叠?
 到【灌水乐园】发言


