


在前端开发中,实现一个聊天框是一个非常常见的需求。无论是社交应用、客服系统,还是在线聊天工具,聊天框的设计都是核心功能之一。我们将通过HTML和CSS,从零开始实现一个高颜值的聊天框,并逐步优化其布局和交互体验。本文将详细介绍代码的每一部分,帮助你更好地理解实现原理。
1. 项目概述
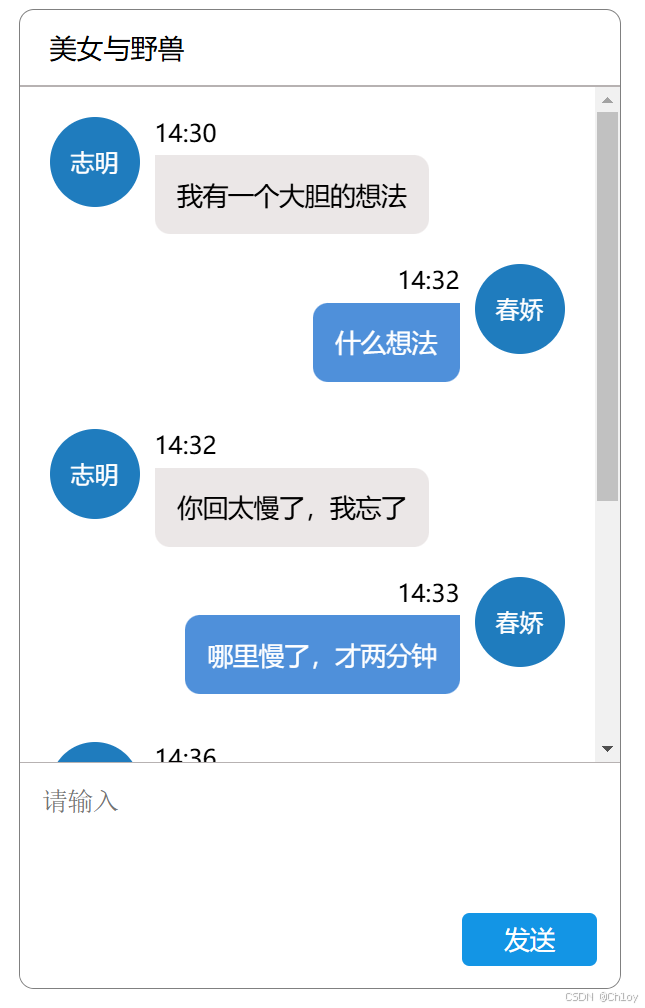
我们将实现一个包含以下功能的聊天框:
-
顶部标题栏:显示聊天标题。
-
聊天内容区域:支持左右两侧对话布局,左侧为用户消息,右侧为对方消息。
-
底部输入框和发送按钮:用户可以输入消息并发送。
-
滚动条:当聊天内容超出区域时,自动显示滚动条。
最终效果如下:
2. HTML结构
首先,我们构建聊天框的基本HTML结构。整个聊天框分为三个部分:顶部标题栏、聊天内容区域和底部输入框。
<div class="dataDiv">
  <!-- 顶部标题栏 -->
  <div class="topDiv">美女与野兽</div>
  <div class="line"></div>

  <!-- 聊天内容区域 -->
  <div class="bodyDiv">
    <!-- 左侧对话 -->
    <div class="leftDiv">
      <div class="left1">志明</div>
      <div class="left2">
        <div>14:30</div>
        <div class="leftContent">我有一个大胆的想法</div>
      </div>
    </div>

    <!-- 右侧对话 -->
    <div class="rightDiv">
      <div class="right1">春娇</div>
      <div class="right2">
        <div>14:32</div>
        <div class="rightContent">什么想法</div>
      </div>
    </div>

    <!-- 更多对话内容 -->
    <div class="leftDiv">
      <div class="left1">志明</div>
      <div class="left2">
        <div>14:32</div>
        <div class="leftContent">你回太慢了,我忘了</div>
      </div>
    </div>

    <div class="rightDiv">
      <div class="right1">春娇</div>
      <div class="right2">
        <div>14:33</div>
        <div class="rightContent">哪里慢了,才两分钟</div>
      </div>
    </div>

    <!-- 更多对话内容 -->
    <div class="leftDiv">
      <div class="left1">志明</div>
      <div class="left2">
        <div>14:36</div>
        <div class="leftContent">我还有另一个大胆的想法</div>
      </div>
    </div>

    <div class="rightDiv">
      <div class="right1">春娇</div>
      <div class="right2">
        <div>14:37</div>
        <div class="rightContent">快说快说</div>
      </div>
    </div>

    <div class="leftDiv">
      <div class="left1">志明</div>
      <div class="left2">
        <div>14:37</div>
        <div class="leftContent">你回太快了,我还没想好</div>
      </div>
    </div>
  </div>

  <!-- 底部输入框 -->
  <div class="line"></div>
  <div class="bottomDiv">
    <textarea class="text" placeholder="请输入"></textarea>
    <button class="commit">发送</button>
  </div>
</div>
3. CSS样式设计
接下来,我们通过CSS为聊天框添加样式,并优化布局和交互体验。
3.1 整体布局
为整个聊天框设置样式。
.dataDiv {
  width: 400px;
  border: solid 1px grey;
  margin: auto;
  border-radius: 10px;
}
3.2 顶部标题栏
.topDiv {
  height: 50px;
  width: 100%;
  border-top-left-radius: 10px;
  border-top-right-radius: 10px;
  line-height: 50px; /* 文字垂直居中 */
  font-size: 18px;
  font-weight: 500;
  padding-left: 20px;
  box-sizing: border-box;
}
3.3 分割线
.line {
  width: 100%;
  height: 1px;
  background-color: rgb(183, 178, 178);
}
3.4聊天内容区域
.bodyDiv {
  height: 450px;
  width: 100%;
  overflow: auto; /* 内容超出时显示滚动条 */
}
3.5左侧对话样式
.leftDiv {
  width: 100%;
}

.leftDiv:after {
  content: '';
  display: block;
  clear: both; /* 清除浮动 */
}

.left1 {
  width: 60px;
  height: 60px;
  background-color: rgba(24, 120, 188, 0.968);
  float: left;
  margin-top: 20px;
  margin-left: 20px;
  margin-right: 10px;
  border-radius: 30px;
  text-align: center;
  line-height: 60px;
  color: white;
}

.left2 {
  width: 60%;
  float: left;
  margin-top: 20px;
}

.leftContent {
  background-color: rgb(235, 231, 231);
  font-size: 17px;
  padding: 15px;
  border-top-right-radius: 10px;
  border-bottom-right-radius: 10px;
  border-bottom-left-radius: 10px;
  margin-top: 5px;
  display: inline-block;
  word-break: break-all; /* 允许长单词换行 */
}
3.6右侧对话样式
.rightDiv {
  width: 100%;
}

.rightDiv:after {
  content: '';
  display: block;
  clear: both; /* 清除浮动 */
}

.right1 {
  width: 60px;
  height: 60px;
  background-color: rgba(24, 120, 188, 0.968);
  float: right;
  margin-top: 20px;
  margin-left: 10px;
  margin-right: 20px;
  border-radius: 30px;
  text-align: center;
  line-height: 60px;
  color: white;
}

.right2 {
  width: 60%;
  float: right;
  margin-top: 20px;
  text-align: right;
}

.rightContent {
  background-color: rgb(79, 144, 218);
  color: white;
  font-size: 17px;
  padding: 15px;
  border-top-left-radius: 10px;
  border-bottom-right-radius: 10px;
  border-bottom-left-radius: 10px;
  margin-top: 5px;
  display: inline-block;
  word-break: break-all; /* 允许长单词换行 */
}
3.7 底部输入框和发送按钮
.bottomDiv {
  height: 150px;
  width: 100%;
  border-bottom-left-radius: 10px;
  border-bottom-right-radius: 10px;
  position: relative;
}

.text {
  width: 100%;
  height: 100%;
  box-sizing: border-box;
  border-width: 0px;
  border-bottom-left-radius: 10px;
  border-bottom-right-radius: 10px;
  outline: none;
  padding: 15px;
  resize: none;
  font-size: 17px;
}

.commit {
  width: 90px;
  height: 35px;
  background-color: rgb(19, 149, 229);
  color: white;
  font-size: 17px;
  border-radius: 5px;
  position: absolute;
  bottom: 15px;
  right: 15px;
  border: none;
}
4. 关键点解析
-
浮动布局:通过
float属性实现左右对话布局,并使用clear: both清除浮动。 -
滚动条:通过
overflow: auto实现聊天内容区域的滚动功能。 -
圆角设计:使用
border-radius为头像和对话框添加圆角效果。 -
文本换行:通过
word-break: break-all确保长单词和URL自动换行。
5. 总结
通过这个项目,我们学习了如何使用HTML和CSS实现一个高颜值的聊天框,并优化了布局和交互体验。你可以在此基础上进一步扩展功能,例如添加动态消息加载、实现消息发送逻辑等。希望这篇博客能帮助你掌握CSS布局的技巧,并激发你更多的创意!


 833
833

 被折叠的 条评论
为什么被折叠?
被折叠的 条评论
为什么被折叠?
 到【灌水乐园】发言


