


Step one
熟悉HDLBits使用的接口。
Q:构建一个没有输入和一个输出的电路。该输出应始终驱动 1(或逻辑高电平)。
module top_module( output one );

// Insert your code here
    assign one = 1'b1;

endmodule
A:简单的一个输出电路。已经给出端口定义,输出one。采用assign定义,赋值1’b1的书写,一位的1。
Zero
Q:构建一个没有输入和一个输出常数 0 的输出的电路。
module top_module(
    output zero
);// Module body starts after semicolon
    assign zero = 1'b0;

endmodule
A:和Step one一样,没什么好说的。这里提示了两种端口定义代码的写法
module top_module ( zero );
    output zero;
    // Verilog-1995
endmodule

module top_module ( output zero );
    // Verilog-2001
endmodule
Wire
Q:连续赋值
module top_module( input in, output out );
    assign out = in ;
endmodule
A:输入等于输出,assign连接。
Wire4
Q:四根线的连接
module top_module(
    input a,b,c,
    output w,x,y,z );
assign w =a;
    assign x=b;
    assign y=b;
    assign z=c;
endmodule
Notgate
Q:非门

module top_module( input in, output out );
    assign out = ~in;
endmodule
A:基础的非门,assign 输出取反。
Andgate
Q:与门
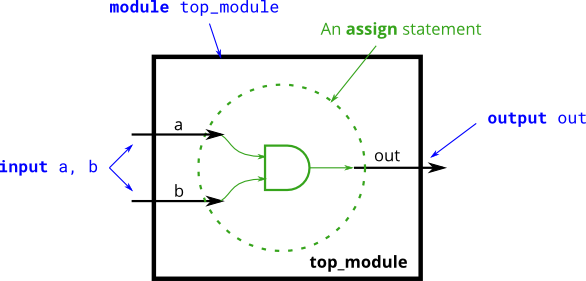
module top_module(
    input a,
    input b,
    output out );
    assign out = a && b;
endmodule
A:与门,与运算符
。。。
Declaring wires
Q:复杂电路,需要电线将内部组件连接在一起。使用电线时,应在模块的主体中声明,在首次使用之前的某个地方。 wire 类型的信号。
例:
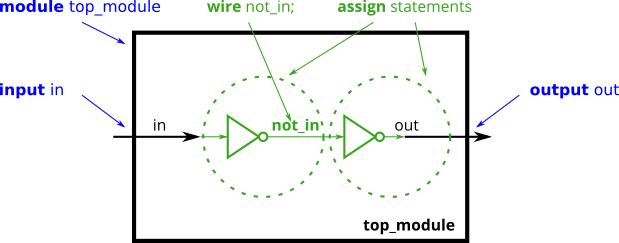
module top_module (
    input in,              // Declare an input wire named "in"
    output out             // Declare an output wire named "out"
);

    wire not_in;           // Declare a wire named "not_in"

    assign out = ~not_in;  // Assign a value to out (create a NOT gate).
    assign not_in = ~in;   // Assign a value to not_in (create another NOT gate).

endmodule   // End of module "top_module"
Q:定义wire型信号,并连接。

`default_nettype none
module top_module(
    input a,
    input b,
    input c,
    input d,
    output out,
    output out_n   );

    wire in1,in2;
    assign in1 = a && b ;
    assign in2 = c && d ;
    assign out = in1 || in2;
    assign out_n = ~out;

endmodule
A:例子给的比较明确了。端口定义好输入输出,端口外内部信号说明,这里是wire信号。在功能语句部分直接用到。
7458
7458 是具有四个 AND 门和两个 OR 门的芯片。
创建与 7458 芯片具有相同功能的模块。它有 10 个输入和 2 个输出。
方法一:使用语句来驱动每根输出导线,
方法二:选择声明4根导线用作中间信号。

module top_module (
    input p1a, p1b, p1c, p1d, p1e, p1f,
    output p1y,
    input p2a, p2b, p2c, p2d,
    output p2y );

    wire w1,w2,w3,w4;

    assign w1 = p2a && p2b;
    assign w2 = p1a && p1b && p1c;
    assign w3 = p2c && p2d;
    assign w4 = p1f && p1e && p1d;

    assign p2y = w1 || w3;
    assign p1y = w4 || w2;
endmodule
A:这里用到定义内部连线的方法。如果不进行内部连线定义,功能描述语句将变得非常长且复杂。
——————————————————————————————————————————
基本的一些语句,其他的改天再整理。


 3950
3950


 被折叠的 条评论
为什么被折叠?
被折叠的 条评论
为什么被折叠?
 到【灌水乐园】发言


