


一、根据点跟角度计算另一点坐标(三维球体)
export const getAnotherPoint = (lon: number, lat: number, angle: number, distance: number) => {
    // WGS84坐标系
    var a = 6378137;	// 赤道半径
    var b = 6356752.3142;	// 短半径
    var f = 1 / 298.257223563;	// 扁率

    var alpha1 = angle * (Math.PI / 180)
    var sinAlpha1 = Math.sin(alpha1);
    var cosAlpha1 = Math.cos(alpha1);
    var tanU1 = (1 - f) * Math.tan(lat * (Math.PI / 180));
    var cosU1 = 1 / Math.sqrt((1 + tanU1 * tanU1)), sinU1 = tanU1 * cosU1;
    var sigma1 = Math.atan2(tanU1, cosAlpha1);
    var sinAlpha = cosU1 * sinAlpha1;
    var cosSqAlpha = 1 - sinAlpha * sinAlpha;
    var uSq = cosSqAlpha * (a * a - b * b) / (b * b);
    var A = 1 + uSq / 16384 * (4096 + uSq * (-768 + uSq * (320 - 175 * uSq)));
    var B = uSq / 1024 * (256 + uSq * (-128 + uSq * (74 - 47 * uSq)));
    var sigma = distance / (b * A), sigmaP = 2 * Math.PI;
    let sinSigma = 0
    let cosSigma = 0
    let cos2SigmaM = 0
    while (Math.abs(sigma - sigmaP) > 1e-12) {
        cos2SigmaM = Math.cos(2 * sigma1 + sigma);
        sinSigma = Math.sin(sigma);
        cosSigma = Math.cos(sigma);
        var deltaSigma = B * sinSigma * (cos2SigmaM + B / 4 * (cosSigma * (-1 + 2 * cos2SigmaM * cos2SigmaM) -
            B / 6 * cos2SigmaM * (-3 + 4 * sinSigma * sinSigma) * (-3 + 4 * cos2SigmaM * cos2SigmaM)));
        sigmaP = sigma;
        sigma = distance / (b * A) + deltaSigma;
    }

    var tmp = sinU1 * sinSigma - cosU1 * cosSigma * cosAlpha1;
    var lat2 = Math.atan2(sinU1 * cosSigma + cosU1 * sinSigma * cosAlpha1,
        (1 - f) * Math.sqrt(sinAlpha * sinAlpha + tmp * tmp));
    var lambda = Math.atan2(sinSigma * sinAlpha1, cosU1 * cosSigma - sinU1 * sinSigma * cosAlpha1);
    var C = f / 16 * cosSqAlpha * (4 + f * (4 - 3 * cosSqAlpha));
    var L = lambda - (1 - C) * f * sinAlpha *
        (sigma + C * sinSigma * (cos2SigmaM + C * cosSigma * (-1 + 2 * cos2SigmaM * cos2SigmaM)));
    return { lon: Number(lon) + L * (180 / Math.PI), lat: lat2 * (180 / Math.PI) };
}
二、渐变材质
export const getMaterial = () => {
    let appearance = new Cesium.MaterialAppearance({
        vertexShaderSource: `
            attribute vec3 position3DHigh;
            attribute vec3 position3DLow;
            attribute float batchId;
            varying vec4 v_positionEC;
            attribute vec4 color;
            varying vec4 v_color;
            void main(){
                v_color = color;
                vec4 p = czm_computePosition(); // 获取模型相对于视点位置
                vec4 eyePosition = czm_modelViewRelativeToEye * p; // 由模型坐标 得到视点坐标
                v_positionEC =  czm_inverseModelView * eyePosition;   // 视点在 模型坐标系中的位置
                gl_Position = czm_modelViewProjectionRelativeToEye * p;  // 视点坐标转为屏幕坐标
            }`,
        fragmentShaderSource: `
            varying vec4 v_positionEC;
            varying vec3 v_normalEC;
            varying vec4 v_color;
            void main() {
                float l = sqrt(pow(v_positionEC.x,2.0) + pow(v_positionEC.y,2.0) + pow(v_positionEC.z,2.0)); // 距离模型坐标系原点的距离
                float cy3 = fract((abs(l-27.0))/40.0);
                // 修改渐变方向 float cy3 = 1- fract((abs(l-27.0))/40.0);
                gl_FragColor = vec4(v_color.rgb,cy3);
            }
            `,
    })
    return appearance
}
三、根据两点坐标获取偏航角和俯仰角
function getHeadingPitch(fromPosition, toPosition) {
    let finalPosition = new Cesium.Cartesian3();
    let matrix4 = Cesium.Transforms.eastNorthUpToFixedFrame(fromPosition);
    Cesium.Matrix4.inverse(matrix4, matrix4);
    Cesium.Matrix4.multiplyByPoint(matrix4, toPosition, finalPosition);
    Cesium.Cartesian3.normalize(finalPosition, finalPosition);
    const resultHead = Cesium.Math.toDegrees(Math.atan2(finalPosition.x, finalPosition.y))
    const resultPitch = Cesium.Math.toDegrees(Math.asin(finalPosition.z))
    return {resultHead ,resultPitch };
}
四、添加实体
(一)点
//entities.add(entity)
viewer.entities.add({
  // fromDegrees(经度,纬度,高度,椭球,结果)从以度为单位的经度和纬度值返回Cartesian3位置
     position: Cesium.Cartesian3.fromDegrees(108, 34, 10),
     point: {
       // 点的大小(像素)
       pixelSize: 5,
       // 点位颜色,fromCssColorString 可以直接使用CSS颜色
       color: Cesium.Color.fromCssColorString('#ee0000'),
       // 边框颜色
       outlineColor: Cesium.Color.fromCssColorString('#fff'),
       // 边框宽度(像素)
       outlineWidth: 2,
       // 显示在距相机的距离处的属性,多少区间内是可以显示的
       distanceDisplayCondition: new Cesium.DistanceDisplayCondition(0, 1500),
       // 是否显示
       show: true
     }
   });
(二)线
viewer.entities.add({
     polyline: {
       // fromDegrees返回给定的经度和纬度值数组(以度为单位),该数组由Cartesian3位置组成。
       // Cesium.Cartesian3.fromDegreesArray([经度1, 纬度1, 经度2, 纬度2,])
       // Cesium.Cartesian3.fromDegreesArrayHeights([经度1, 纬度1, 高度1, 经度2, 纬度2, 高度2])
       positions: Cesium.Cartesian3.fromDegreesArray([
         120.9677706, 30.7985748,
         110.20, 34.55
       ]),
       // 宽度
       width: 2,
       // 线的颜色
       material: Cesium.Color.WHITE,
       // 线的顺序,仅当`clampToGround`为true并且支持地形上的折线时才有效。
       zIndex: 10,
       // 显示在距相机的距离处的属性,多少区间内是可以显示的
       distanceDisplayCondition: new Cesium.DistanceDisplayCondition(0, 1500),
       // 是否显示
       show: true
     }
   });
(三)面
viewer.entities.add({
      polygon: {
        // 获取指定属性(positions,holes(图形内需要挖空的区域))
        hierarchy: {
          positions: Cesium.Cartesian3.fromDegreesArray([
            120.9677706, 30.7985748,
            110.20, 34.55,
            120.20, 50.55
          ]),
          holes: [{
            positions: Cesium.Cartesian3.fromDegreesArray([
              119, 32,
              115, 34,
              119, 40
            ])
          }]
        },
        // 边框
        outline: true,
        // 边框颜色
        outlineColor: Cesium.Color.WHITE,
        // 边框尺寸
        outlineWidth: 2,
        // 填充的颜色,withAlpha透明度
        material: Cesium.Color.GREEN.withAlpha(0.5),
        // 是否被提供的材质填充
        fill: true,
        // 恒定高度
        height: 5000,
        // 显示在距相机的距离处的属性,多少区间内是可以显示的
        distanceDisplayCondition: new Cesium.DistanceDisplayCondition(1000, 10000000),
        // 是否显示
        show: true,
        // 顺序,仅当`clampToGround`为true并且支持地形上的折线时才有效。
        zIndex: 10
      }
    });
(四)文字
viewer.entities.add({
      position: Cesium.Cartesian3.fromDegrees(120, 30, 5),
      // 点
      point: {
        color: Cesium.Color.RED, // 点位颜色
        pixelSize: 10 // 像素点大小
      },
      // 文字
      label: {
        // 文本。支持显式换行符“ \ n”
        text: '测试名称',
        // 字体样式,以CSS语法指定字体
        font: '14pt Source Han Sans CN',
        // 字体颜色
        fillColor: Cesium.Color.BLACK,
        // 背景颜色
        backgroundColor: Cesium.Color.AQUA,
        // 是否显示背景颜色
        showBackground: true,
        // 字体边框
        outline: true,
        // 字体边框颜色
        outlineColor: Cesium.Color.WHITE,
        // 字体边框尺寸
        outlineWidth: 10,
        // 应用于图像的统一比例。比例大于会1.0放大标签,而比例小于会1.0缩小标签。
        scale: 1.0,
        // 设置样式:FILL:填写标签的文本,但不要勾勒轮廓;OUTLINE:概述标签的文本,但不要填写;FILL_AND_OUTLINE:填写并概述标签文本。
        style: Cesium.LabelStyle.FILL_AND_OUTLINE,
        // 相对于坐标的水平位置
        verticalOrigin: Cesium.VerticalOrigin.CENTER,
        // 相对于坐标的水平位置
        horizontalOrigin: Cesium.HorizontalOrigin.LEFT,
        // 该属性指定标签在屏幕空间中距此标签原点的像素偏移量
        pixelOffset: new Cesium.Cartesian2(10, 0),
        // 显示在距相机的距离处的属性,多少区间内是可以显示的
        distanceDisplayCondition: new Cesium.DistanceDisplayCondition(0, 1500),
        // 是否显示
        show: true
      }
    });
(五)广告牌(图片)
viewer.entities.add({
  position: Cesium.Cartesian3.fromDegrees(110.20, 34.55, 2.61),
  billboard: {
    // 图像地址,URI或Canvas的属性
    image: '/location.png',
    // 设置颜色和透明度
    color: Cesium.Color.WHITE.withAlpha(0.8),
    // 高度(以像素为单位)
    height: 50,
    // 宽度(以像素为单位)
    width: 50,
    // 逆时针旋转
    rotation: 20,
    // 大小是否以米为单位
    sizeInMeters: false,
    // 相对于坐标的垂直位置
    verticalOrigin: Cesium.VerticalOrigin.CENTER,
    // 相对于坐标的水平位置
    horizontalOrigin: Cesium.HorizontalOrigin.LEFT,
    // 该属性指定标签在屏幕空间中距此标签原点的像素偏移量
    pixelOffset: new Cesium.Cartesian2(10, 0),
    // 应用于图像的统一比例。比例大于会1.0放大标签,而比例小于会1.0缩小标签。
    scale: 1.0,
    // 显示在距相机的距离处的属性,多少区间内是可以显示的
    distanceDisplayCondition: new Cesium.DistanceDisplayCondition(0, 1500),
    // 是否显示
    show: true
  }
});
(六)模型
viewer.entities.add({
      // 设置方向
      orientation: orientation,
      position: Cesium.Cartesian3.fromDegrees(120, 30, 10000),
      model: {
        // 引入模型
        uri: '/SampleData/models/CesiumAir/Cesium_Air.glb',
        // 模型的近似最小像素大小,而不考虑缩放。这可以用来确保即使观看者缩小也可以看到模型。如果为0.0,则不强制使用最小大小
        minimumPixelSize: 1280,
        // 模型的颜色(与模型的渲染颜色混合的属性)
        color: Cesium.Color.WHITE.withAlpha(1),
        // 模型的最大比例大小
        maximumScale: 20000,
        // 设置模型轮廓(边框)颜色
        silhouetteColor: Cesium.Color.BLACK,
        // 设置模型轮廓(边框)大小
        silhouetteSize: 2,
        // 是否执行模型动画
        runAnimations: true,
        // 应用于图像的统一比例。比例大于会1.0放大标签,而比例小于会1.0缩小标签。
        scale: 1.0,
        // 显示在距相机的距离处的属性,多少区间内是可以显示的
        distanceDisplayCondition: new Cesium.DistanceDisplayCondition(0, 1500),
        // 是否显示
        show: true
      }
    });
如出现地形遮挡问题,可关闭cesium深度检测:viewer.scene.globe.depthTestAgainstTerrain = false;
五、添加primitive
(一)点
const pointsDataSource = viewer.scene.primitives.add(new Cesium.PointPrimitiveCollection())
// 创建点
for (const index in points) {
     pointsDataSource.add({
          pixelSize: 10,
          color: Cesium.Color.fromCssColorString('#fff'),
          position: Cesium.Cartesian3.fromDegrees(item[0], item[1], item[2]),
        });
}
// 销毁点
pointsDataSource?.removeAll();
(二)线
const newArr1 = []; let newArr2 = [];
// eslint-disable-next-line array-callback-return
points.map((item) => {
  newArr1.push(item[0]);
  newArr1.push(item[1]);
  newArr1.push(item[2]);
});
newArr2 = newArr1;
/// map原由fromDegreesArray 所需的数据属于[lon, lat, height, lon, lat, height, ...]
/// 所以需要map改造

/// 创建线
const lineDataSource = viewer.scene.primitives.add(new Cesium.PolylineCollection());
lineDataSource.add({
  width: 2,
  positions: this.Cesium.Cartesian3.fromDegreesArrayHeights(newArr2),
  material: this.Cesium.Material.fromType('Color', {
    color: this.Cesium.Color.fromCssColorString('#EADDCA'),
  }),
});

/// 销毁线
lineDataSource?.removeAll();
(三)广告牌
billboards.add({
    position: Cesium.Cartesian3.fromDegrees(item[0], item[1], item[2]),
    image: '图片地址',
    // image:pinBuilder.fromColor(Cesium.Color.fromRandom({ alpha: 1.0 }), 20).toDataURL()
    width: 18,
    height: 18,
    verticalOrigin: Cesium.VerticalOrigin.BOTTOM,
  })
加载大量贴地广告牌:BillboardCollection
const collection = new Cesium.BillboardCollection({ scene: viewer.scene })
1、heightReference属性
collection.add({
	position: position,
	image: pinBuilder.fromColor(Cesium.Color.fromRandom({ alpha: 1.0 }), 20).toDataURL(),
	verticalOrigin: Cesium.VerticalOrigin.BOTTOM,
	horizontalOrigin: Cesium.HorizontalOrigin.CENTER,
	heightReference: Cesium.HeightReference.CLAMP_TO_GROUND
})
2、sampleTerrainMostDetailed方法
// 1、生成大量随机点
const points = randomPoint(500, { bbox: [100, 25, 102, 27] })
// 2、Cartographic数组
const positions = []
for (let point of points.features) {
  const coordinates = point.geometry.coordinates
  const position = Cesium.Cartographic.fromDegrees(coordinates[0], coordinates[1])
  positions.push(position)
}
// 3、高程采样
const pinBuilder = new Cesium.PinBuilder();
const collection = new Cesium.BillboardCollection()
const terrainProvider = viewer.terrainProvider
const promise = Cesium.sampleTerrainMostDetailed(terrainProvider, positions);
Promise.resolve(promise).then(function (updatedPositions) {
  for (let position of updatedPositions) {
    collection.add({
      position: Cesium.Cartesian3.fromRadians(position.longitude, position.latitude, position.height),
      image: pinBuilder.fromColor(Cesium.Color.fromRandom({ alpha: 1.0 }), 20).toDataURL(),
      verticalOrigin: Cesium.VerticalOrigin.BOTTOM,
      horizontalOrigin: Cesium.HorizontalOrigin.CENTER,
    })
  }
  viewer.scene.primitives.add(collection)
});
(四)标注
labels.add({
  position: Cesium.Cartesian3.fromDegrees(item[0], item[1], item[2]),
  text: `文字标注`,
  font: '10px sans-serif',
});
(五)几何图形
以折线和多边形为例:
let rectangleInstanceArr = [];
    //定义折线几何
    let polyline = new Cesium.PolylineGeometry({
      positions: Cesium.Cartesian3.fromDegreesArray([
        119.7,
        30.2,
        119.8,
        30.2,
        119.85,
        30.3
      ]),
      width: 10.0,
      vertexFormat:Cesium.PolylineColorAppearance.VERTEX_FORMAT
    });
    //定义多边形几何
    // let polygon = new Cesium.PolygonGeometry({
    //   polygonHierarchy: new Cesium.PolygonHierarchy(
    //     Cesium.Cartesian3.fromDegreesArray([
    //       119.7,
    //       30.2,
    //       119.8,
    //       30.2,
    //       119.85,
    //       30.3,
    //     ])
    //   ),
    //   vertexFormat: Cesium.PerInstanceColorAppearance.VERTEX_FORMAT,
    // });
    var rectangleInstance = new Cesium.GeometryInstance({
      geometry: polyline,
      attributes: {
        color: Cesium.ColorGeometryInstanceAttribute.fromColor(
          Cesium.Color.RED
        ),
      },
    });
    rectangleInstanceArr.push(rectangleInstance);
    this.viewer.scene.primitives.add(
      new Cesium.Primitive({
        geometryInstances: rectangleInstanceArr,
        //多边形外观
        // appearance: new Cesium.PerInstanceColorAppearance({
        //   translucent: true,
        //   closed: false,
        // }),
        //折线外观
        appearance:new Cesium.PolylineColorAppearance({
            translucent:false
        }),
        asynchronous: false,
      })
    );
六、定位
(一)定位到点
1、viewer
let entity = null;
/**
 * 视图定位方法,定位到点
 * @param lon 经度
 * @param lat 纬度
 * @param alt 范围(相机距离中心点的位置为5000)
 */
function viewerFlyToLonLat(lon, lat, alt) {
	entity && viewer.entities.remove(entity);
	entity = new Cesium.Entity({
	   id: 'flyTojwd',
	   position: Cesium.Cartesian3.fromDegrees(lon, lat),
	   point: {
	       pixelSize: 10,
	       color: Cesium.Color.WHITE.withAlpha(0.9),
	       outlineColor: Cesium.Color.WHITE.withAlpha(0.9),
	       outlineWidth: 1
	   }
	});
	viewer.entities.add(entity);
	viewer.flyTo(entity, {
	   offset: {
	       heading: Cesium.Math.toRadians(0.0), //默认方向为正北,正角度为向东旋转,即水平选装,也叫偏航角
	       pitch: Cesium.Math.toRadians(-50), // 俯仰角
	       range: alt
	   }
	});
}
2、camera
/**
* 相机定位方法,定位到点
* @param lon 经度
* @param lat 纬度
* @param alt 范围(相机距离中心点的位置为5000)
*/
function cameraFlyToLonLat(lon, lat, alt) {
   viewer.camera.flyTo({
       destination: Cesium.Cartesian3.fromDegrees(lon, lat, alt),
       orientation: {
           heading: Cesium.Math.toRadians(0.0),
           pitch: Cesium.Math.toRadians(-25.0),
           roll: 0.0
       }
   });
}
(二)定位到范围
1、viewer
 /**
 * 视图定位方法,定位到范围
 * @param rect 范围数组(最西、最南、最东、最北)
 */
function viewerFlyToRange(rect) {
    if (locationRectEntity)
        viewer.entities.remove(locationRectEntity);
    	locationRectEntity = viewer.entities.add({
	        name: 'locationRectangle',
	        id: 'locationRectangle',
	        rectangle: {
	            coordinates: Cesium.Rectangle.fromDegrees(rect[0], rect[1], rect[2], rect[3]),
	            material: Cesium.Color.GREEN.withAlpha(1.0),
	            height: 10.0,
	            outline: false
	        }
	    });
	    let flyPromise = viewer.flyTo(locationRectEntity, {
	        duration: 5,
	        offset: new Cesium.HeadingPitchRange(0.0, Cesium.Math.toRadians(-20.0))
	    });
}
2、camera
/**
* 相机定位方法,定位到范围
* @param rect 范围数组(最西、最南、最东、最北)
*/
function cameraFlyToRange(rect) {
  viewer.camera.flyTo({
      destination: Cesium.Rectangle.fromDegrees(rect[0], rect[1], rect[2], rect[3]),
      duration: 5,
      orientation: {
          heading: Cesium.Math.toRadians(0.0),
          pitch: Cesium.Math.toRadians(-25.0),
          roll: 0.0
      }
  });
}
七、可视域分析
(一)ShadowMap
阴影贴图:new Cesium.ShadowMap (options)
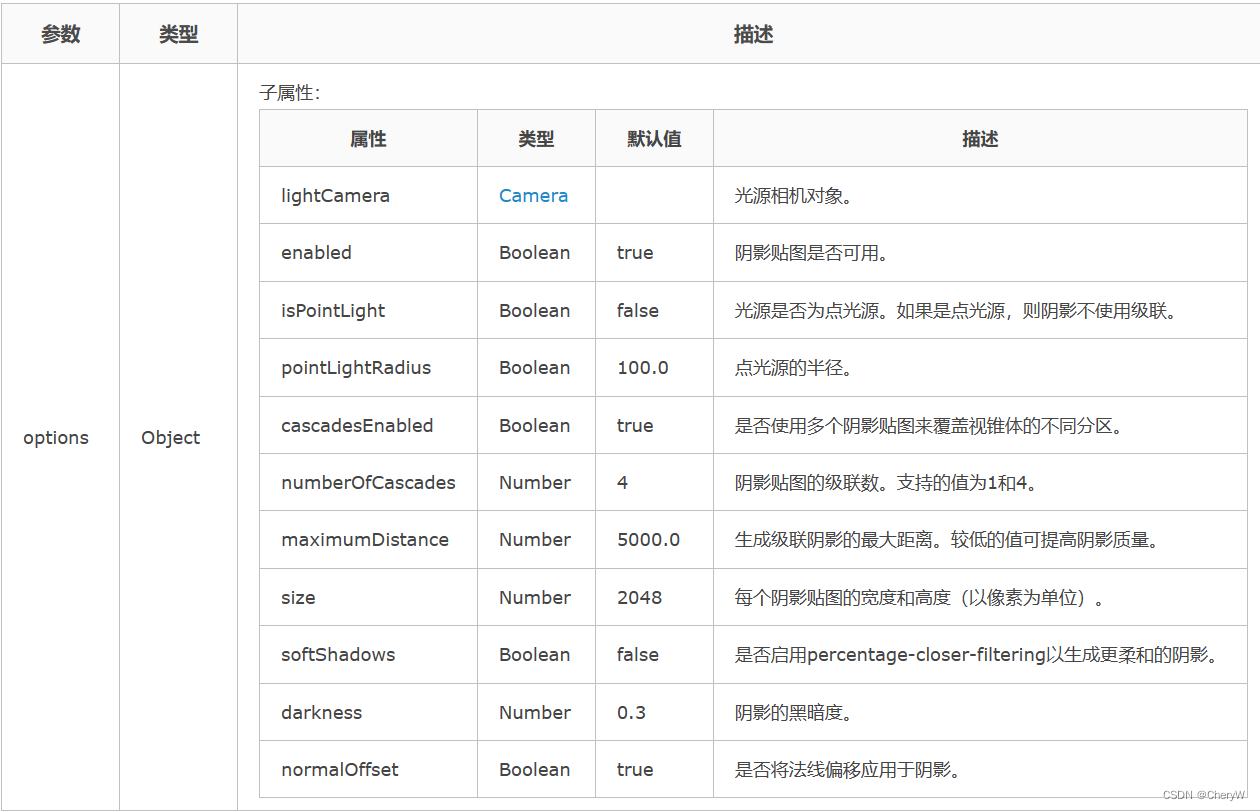
Cesium用它来实现阴影效果。
ShadowMap的一个比较明显的缺点是阴影边缘锯齿化很严重,而PCF则能有效地克服Shadow Map阴影边缘的锯齿。
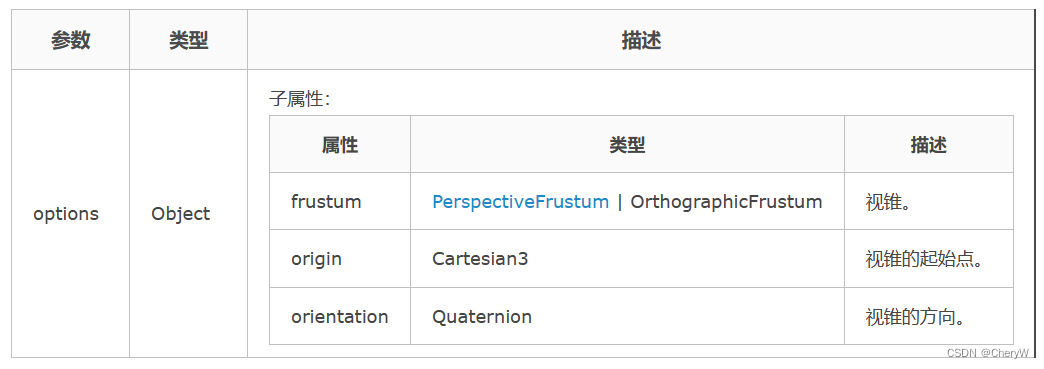
(二)Frustum
new Cesium.FrustumOutlineGeometry (options):绘制视锥的轮廓线
(三)Camera
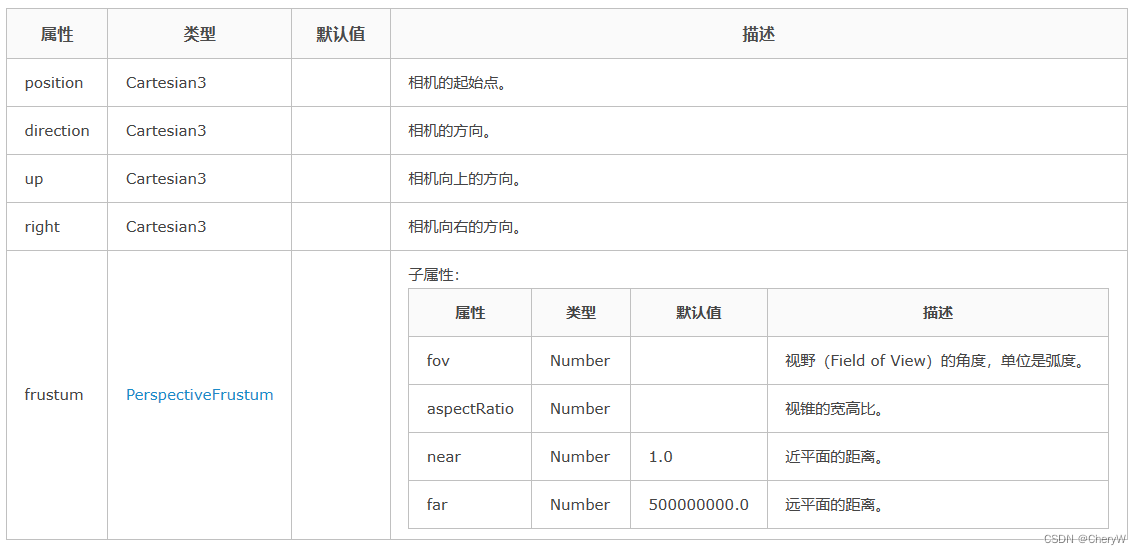
给定视锥的起点、向前的方向和向上的方向,把视锥的方向确定下来,设置了视锥的视野角度、宽高比、近平面距离和远平面距离,把视锥的形状确定下来了。
// 创建一个沿负z轴向下的,位于原点的,视野为60度的,宽高比为1:1的相机。
var camera = new Cesium.Camera(scene);
camera.position = new Cesium.Cartesian3();
camera.direction = Cesium.Cartesian3.negate(Cesium.Cartesian3.UNIT_Z, new Cesium.Cartesian3());
camera.up = Cesium.Cartesian3.clone(Cesium.Cartesian3.UNIT_Y);
camera.frustum.fov = Cesium.Math.PI_OVER_THREE;
camera.frustum.near = 1.0;
camera.frustum.far = 2.0;
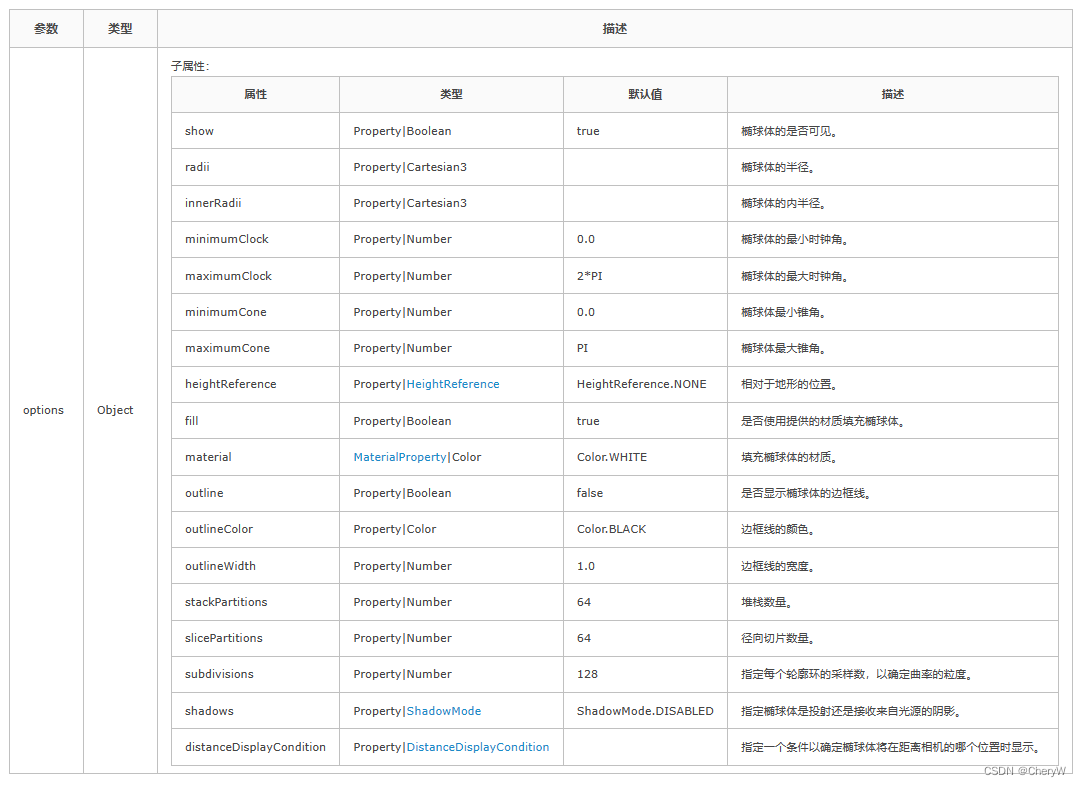
(四)视网
用EllipsoidGraphics绘制的实体对象。
(五)具体实现
// ViewShed.js

/**
 * 可视域分析。
 *
 * @author Helsing
 * @date 2020/08/28
 * @alias ViewShedStage
 * @class
 * @param {Cesium.Viewer} viewer Cesium三维视窗。
 * @param {Object} options 选项。
 * @param {Cesium.Cartesian3} options.viewPosition 观测点位置。
 * @param {Cesium.Cartesian3} options.viewPositionEnd 最远观测点位置(如果设置了观测距离,这个属性可以不设置)。
 * @param {Number} options.viewDistance 观测距离(单位`米`,默认值100)。
 * @param {Number} options.viewHeading 航向角(单位`度`,默认值0)。
 * @param {Number} options.viewPitch 俯仰角(单位`度`,默认值0)。
 * @param {Number} options.horizontalViewAngle 可视域水平夹角(单位`度`,默认值90)。
 * @param {Number} options.verticalViewAngle 可视域垂直夹角(单位`度`,默认值60)。
 * @param {Cesium.Color} options.visibleAreaColor 可视区域颜色(默认值`绿色`)。
 * @param {Cesium.Color} options.invisibleAreaColor 不可视区域颜色(默认值`红色`)。
 * @param {Boolean} options.enabled 阴影贴图是否可用。
 * @param {Boolean} options.softShadows 是否启用柔和阴影。
 * @param {Boolean} options.size 每个阴影贴图的大小。
 */
class ViewShedStage {

    constructor(viewer, options) {
        this.viewer = viewer;
        this.viewPosition = options.viewPosition;
        this.viewPositionEnd = options.viewPositionEnd;
        this.viewDistance = this.viewPositionEnd ? Cesium.Cartesian3.distance(this.viewPosition, this.viewPositionEnd) : (options.viewDistance || 100.0);
        this.viewHeading = this.viewPositionEnd ? getHeading(this.viewPosition, this.viewPositionEnd) : (options.viewHeading || 0.0);
        this.viewPitch = this.viewPositionEnd ? getPitch(this.viewPosition, this.viewPositionEnd) : (options.viewPitch || 0.0);
        this.horizontalViewAngle = options.horizontalViewAngle || 90.0;
        this.verticalViewAngle = options.verticalViewAngle || 60.0;
        this.visibleAreaColor = options.visibleAreaColor || Cesium.Color.GREEN;
        this.invisibleAreaColor = options.invisibleAreaColor || Cesium.Color.RED;
        this.enabled = (typeof options.enabled === "boolean") ? options.enabled : true;
        this.softShadows = (typeof options.softShadows === "boolean") ? options.softShadows : true;
        this.size = options.size || 2048;

        this.update();
    }

    add() {
        this.createLightCamera();
        this.createShadowMap();
        this.createPostStage();
        this.drawFrustumOutine();
        this.drawSketch();
    }

    update() {
        this.clear();
        this.add();
    }

    clear() {
        if (this.sketch) {
            this.viewer.entities.removeById(this.sketch.id);
            this.sketch = null;
        }
        if (this.frustumOutline) {
            this.frustumOutline.destroy();
            this.frustumOutline = null;
        }
        if (this.postStage) {
            this.viewer.scene.postProcessStages.remove(this.postStage);
            this.postStage = null;
        }
    }
}

export default ViewShed;
创建相机:
createLightCamera() {
    this.lightCamera = new Cesium.Camera(this.viewer.scene);
    this.lightCamera.position = this.viewPosition;
    // if (this.viewPositionEnd) {
    //     let direction = Cesium.Cartesian3.normalize(Cesium.Cartesian3.subtract(this.viewPositionEnd, this.viewPosition, new Cesium.Cartesian3()), new Cesium.Cartesian3());
    //     this.lightCamera.direction = direction; // direction是相机面向的方向
    // }
    this.lightCamera.frustum.near = this.viewDistance * 0.001;
    this.lightCamera.frustum.far = this.viewDistance;
    const hr = Cesium.Math.toRadians(this.horizontalViewAngle);
    const vr = Cesium.Math.toRadians(this.verticalViewAngle);
    const aspectRatio =
        (this.viewDistance * Math.tan(hr / 2) * 2) /
        (this.viewDistance * Math.tan(vr / 2) * 2);
    this.lightCamera.frustum.aspectRatio = aspectRatio;
    if (hr > vr) {
        this.lightCamera.frustum.fov = hr;
    } else {
        this.lightCamera.frustum.fov = vr;
    }
    this.lightCamera.setView({
        destination: this.viewPosition,
        orientation: {
            heading: Cesium.Math.toRadians(this.viewHeading || 0),
            pitch: Cesium.Math.toRadians(this.viewPitch || 0),
            roll: 0
        }
    });
}
创建阴影贴图:
createShadowMap() {
    this.shadowMap = new Cesium.ShadowMap({
        context: (this.viewer.scene).context,
        lightCamera: this.lightCamera,
        enabled: this.enabled,
        isPointLight: true,
        pointLightRadius: this.viewDistance,
        cascadesEnabled: false,
        size: this.size,
        softShadows: this.softShadows,
        normalOffset: false,
        fromLightSource: false
    });
    this.viewer.scene.shadowMap = this.shadowMap;
}
创建PostStage:
createPostStage() {
    const fs = glsl
    const postStage = new Cesium.PostProcessStage({
        fragmentShader: fs,
        uniforms: {
            shadowMap_textureCube: () => {
                this.shadowMap.update(Reflect.get(this.viewer.scene, "_frameState"));
                return Reflect.get(this.shadowMap, "_shadowMapTexture");
            },
            shadowMap_matrix: () => {
                this.shadowMap.update(Reflect.get(this.viewer.scene, "_frameState"));
                return Reflect.get(this.shadowMap, "_shadowMapMatrix");
            },
            shadowMap_lightPositionEC: () => {
                this.shadowMap.update(Reflect.get(this.viewer.scene, "_frameState"));
                return Reflect.get(this.shadowMap, "_lightPositionEC");
            },
            shadowMap_normalOffsetScaleDistanceMaxDistanceAndDarkness: () => {
                this.shadowMap.update(Reflect.get(this.viewer.scene, "_frameState"));
                const bias = this.shadowMap._pointBias;
                return Cesium.Cartesian4.fromElements(
                    bias.normalOffsetScale,
                    this.shadowMap._distance,
                    this.shadowMap.maximumDistance,
                    0.0,
                    new Cesium.Cartesian4()
                );
            },
            shadowMap_texelSizeDepthBiasAndNormalShadingSmooth: () => {
                this.shadowMap.update(Reflect.get(this.viewer.scene, "_frameState"));
                const bias = this.shadowMap._pointBias;
                const scratchTexelStepSize = new Cesium.Cartesian2();
                const texelStepSize = scratchTexelStepSize;
                texelStepSize.x = 1.0 / this.shadowMap._textureSize.x;
                texelStepSize.y = 1.0 / this.shadowMap._textureSize.y;

                return Cesium.Cartesian4.fromElements(
                    texelStepSize.x,
                    texelStepSize.y,
                    bias.depthBias,
                    bias.normalShadingSmooth,
                    new Cesium.Cartesian4()
                );
            },
            camera_projection_matrix: this.lightCamera.frustum.projectionMatrix,
            camera_view_matrix: this.lightCamera.viewMatrix,
            helsing_viewDistance: () => {
                return this.viewDistance;
            },
            helsing_visibleAreaColor: this.visibleAreaColor,
            helsing_invisibleAreaColor: this.invisibleAreaColor,
        }
    });
    this.postStage = this.viewer.scene.postProcessStages.add(postStage);
}
创建视锥线:
drawFrustumOutline() {
    const scratchRight = new Cesium.Cartesian3();
    const scratchRotation = new Cesium.Matrix3();
    const scratchOrientation = new Cesium.Quaternion();
    const position = this.lightCamera.positionWC;
    const direction = this.lightCamera.directionWC;
    const up = this.lightCamera.upWC;
    let right = this.lightCamera.rightWC;
    right = Cesium.Cartesian3.negate(right, scratchRight);
    let rotation = scratchRotation;
    Cesium.Matrix3.setColumn(rotation, 0, right, rotation);
    Cesium.Matrix3.setColumn(rotation, 1, up, rotation);
    Cesium.Matrix3.setColumn(rotation, 2, direction, rotation);
    let orientation = Cesium.Quaternion.fromRotationMatrix(rotation, scratchOrientation);

    let instance = new Cesium.GeometryInstance({
        geometry: new Cesium.FrustumOutlineGeometry({
            frustum: this.lightCamera.frustum,
            origin: this.viewPosition,
            orientation: orientation
        }),
        id: Math.random().toString(36).substr(2),
        attributes: {
            color: Cesium.ColorGeometryInstanceAttribute.fromColor(
                Cesium.Color.YELLOWGREEN//new Cesium.Color(0.0, 1.0, 0.0, 1.0)
            ),
            show: new Cesium.ShowGeometryInstanceAttribute(true)
        }
    });

    this.frustumOutline = this.viewer.scene.primitives.add(
        new Cesium.Primitive({
            geometryInstances: [instance],
            appearance: new Cesium.PerInstanceColorAppearance({
                flat: true,
                translucent: false
            })
        })
    );
}
创建视网:
drawSketch() {
    this.sketch = this.viewer.entities.add({
        name: 'sketch',
        position: this.viewPosition,
        orientation: Cesium.Transforms.headingPitchRollQuaternion(
            this.viewPosition,
            Cesium.HeadingPitchRoll.fromDegrees(this.viewHeading - this.horizontalViewAngle, this.viewPitch, 0.0)
        ),
        ellipsoid: {
            radii: new Cesium.Cartesian3(
                this.viewDistance,
                this.viewDistance,
                this.viewDistance
            ),
            // innerRadii: new Cesium.Cartesian3(2.0, 2.0, 2.0),
            minimumClock: Cesium.Math.toRadians(-this.horizontalViewAngle / 2),
            maximumClock: Cesium.Math.toRadians(this.horizontalViewAngle / 2),
            minimumCone: Cesium.Math.toRadians(this.verticalViewAngle + 7.75),
            maximumCone: Cesium.Math.toRadians(180 - this.verticalViewAngle - 7.75),
            fill: false,
            outline: true,
            subdivisions: 256,
            stackPartitions: 64,
            slicePartitions: 64,
            outlineColor: Cesium.Color.YELLOWGREEN
        }
    });
}
获取偏航角和俯仰角:
function getHeading(fromPosition, toPosition) {
    let finalPosition = new Cesium.Cartesian3();
    let matrix4 = Cesium.Transforms.eastNorthUpToFixedFrame(fromPosition);
    Cesium.Matrix4.inverse(matrix4, matrix4);
    Cesium.Matrix4.multiplyByPoint(matrix4, toPosition, finalPosition);
    Cesium.Cartesian3.normalize(finalPosition, finalPosition);
    return Cesium.Math.toDegrees(Math.atan2(finalPosition.x, finalPosition.y));
}

function getPitch(fromPosition, toPosition) {
    let finalPosition = new Cesium.Cartesian3();
    let matrix4 = Cesium.Transforms.eastNorthUpToFixedFrame(fromPosition);
    Cesium.Matrix4.inverse(matrix4, matrix4);
    Cesium.Matrix4.multiplyByPoint(matrix4, toPosition, finalPosition);
    Cesium.Cartesian3.normalize(finalPosition, finalPosition);
    return Cesium.Math.toDegrees(Math.asin(finalPosition.z));
}
自定义材质:
export default `
 #define USE_CUBE_MAP_SHADOW true
 uniform sampler2D colorTexture;
 uniform sampler2D depthTexture;
 varying vec2 v_textureCoordinates;
 uniform mat4 camera_projection_matrix;
 uniform mat4 camera_view_matrix;
 uniform samplerCube shadowMap_textureCube;
 uniform mat4 shadowMap_matrix;
 uniform vec4 shadowMap_lightPositionEC;
 uniform vec4 shadowMap_normalOffsetScaleDistanceMaxDistanceAndDarkness;
 uniform vec4 shadowMap_texelSizeDepthBiasAndNormalShadingSmooth;
 uniform float helsing_viewDistance;
 uniform vec4 helsing_visibleAreaColor;
 uniform vec4 helsing_invisibleAreaColor;

 struct zx_shadowParameters
 {
     vec3 texCoords;
     float depthBias;
     float depth;
     float nDotL;
     vec2 texelStepSize;
     float normalShadingSmooth;
     float darkness;
 };

 float czm_shadowVisibility(samplerCube shadowMap, zx_shadowParameters shadowParameters)
 {
     float depthBias = shadowParameters.depthBias;
     float depth = shadowParameters.depth;
     float nDotL = shadowParameters.nDotL;
     float normalShadingSmooth = shadowParameters.normalShadingSmooth;
     float darkness = shadowParameters.darkness;
     vec3 uvw = shadowParameters.texCoords;
     depth -= depthBias;
     float visibility = czm_shadowDepthCompare(shadowMap, uvw, depth);
     return czm_private_shadowVisibility(visibility, nDotL, normalShadingSmooth, darkness);
 }

 vec4 getPositionEC(){
     return czm_windowToEyeCoordinates(gl_FragCoord);
 }

 vec3 getNormalEC(){
     return vec3(1.);
 }

 vec4 toEye(in vec2 uv,in float depth){
     vec2 xy=vec2((uv.x*2.-1.),(uv.y*2.-1.));
     vec4 posInCamera=czm_inverseProjection*vec4(xy,depth,1.);
     posInCamera=posInCamera/posInCamera.w;
     return posInCamera;
 }

 vec3 pointProjectOnPlane(in vec3 planeNormal,in vec3 planeOrigin,in vec3 point){
     vec3 v01=point-planeOrigin;
     float d=dot(planeNormal,v01);
     return(point-planeNormal*d);
 }

 float getDepth(in vec4 depth){
     float z_window=czm_unpackDepth(depth);
     z_window=czm_reverseLogDepth(z_window);
     float n_range=czm_depthRange.near;
     float f_range=czm_depthRange.far;
     return(2.*z_window-n_range-f_range)/(f_range-n_range);
 }

 float shadow(in vec4 positionEC){
     vec3 normalEC=getNormalEC();
     zx_shadowParameters shadowParameters;
     shadowParameters.texelStepSize=shadowMap_texelSizeDepthBiasAndNormalShadingSmooth.xy;
     shadowParameters.depthBias=shadowMap_texelSizeDepthBiasAndNormalShadingSmooth.z;
     shadowParameters.normalShadingSmooth=shadowMap_texelSizeDepthBiasAndNormalShadingSmooth.w;
     shadowParameters.darkness=shadowMap_normalOffsetScaleDistanceMaxDistanceAndDarkness.w;
     vec3 directionEC=positionEC.xyz-shadowMap_lightPositionEC.xyz;
     float distance=length(directionEC);
     directionEC=normalize(directionEC);
     float radius=shadowMap_lightPositionEC.w;
     if(distance>radius)
     {
         return 2.0;
     }
     vec3 directionWC=czm_inverseViewRotation*directionEC;
     shadowParameters.depth=distance/radius-0.0003;
     shadowParameters.nDotL=clamp(dot(normalEC,-directionEC),0.,1.);
     shadowParameters.texCoords=directionWC;
     float visibility=czm_shadowVisibility(shadowMap_textureCube,shadowParameters);
     return visibility;
 }

 bool visible(in vec4 result)
 {
     result.x/=result.w;
     result.y/=result.w;
     result.z/=result.w;
     return result.x>=-1.&&result.x<=1.
     &&result.y>=-1.&&result.y<=1.
     &&result.z>=-1.&&result.z<=1.;
 }

 void main(){
     // 釉色 = 结构二维(颜色纹理, 纹理坐标)
     gl_FragColor = texture2D(colorTexture, v_textureCoordinates);
     // 深度 = 获取深度(结构二维(深度纹理, 纹理坐标))
     float depth = getDepth(texture2D(depthTexture, v_textureCoordinates));
     // 视角 = (纹理坐标, 深度)
     vec4 viewPos = toEye(v_textureCoordinates, depth);
     // 世界坐标
     vec4 wordPos = czm_inverseView * viewPos;
     // 虚拟相机中坐标
     vec4 vcPos = camera_view_matrix * wordPos;
     float near = .001 * helsing_viewDistance;
     float dis = length(vcPos.xyz);
     if(dis > near && dis < helsing_viewDistance){
         // 透视投影
         vec4 posInEye = camera_projection_matrix * vcPos;
         // 可视区颜色
         // vec4 helsing_visibleAreaColor=vec4(0.,1.,0.,.5);
         // vec4 helsing_invisibleAreaColor=vec4(1.,0.,0.,.5);
         if(visible(posInEye)){
             float vis = shadow(viewPos);
             if(vis > 0.3){
                 gl_FragColor = mix(gl_FragColor,helsing_visibleAreaColor,.5);
             } else{
                 gl_FragColor = mix(gl_FragColor,helsing_invisibleAreaColor,.5);
             }
         }
     }
 }`;
在使用的时候需开启深度检测
八、自定义弹窗
(一)思路
添加一个鼠标左键点击事件,当鼠标点击时,利用Vue.extend()动态添加一个dom元素,将DOM元素渲染到cesium容器中,并利用cesium中提供的 viewer.scene.postRender 实时更新坐标位置。
(二)实现方法
1、创建地图容器
viewer = new Cesium.Viewer('cesiumContainer',{
	// terrainProvider: Cesium.createWorldTerrain(),
	// animation: false, // 控制场景动画的播放速度控件
	// baseLayerPicker: true, // 底图切换控件
	// baselLayerPicker:false,// 将图层选择的控件关掉,才能添加其他影像数据
	// // fullscreenButton: false, // 全屏控件
	// geocoder: false, // 地理位置查询定位控件
	// homeButton: true, // 默认相机位置控件
	// timeline: false, // 时间滚动条控件
	// infoBox: false, //是否显示信息框
	// sceneModePicker: false, //是否显示3D/2D选择器
	// selectionIndicator: false, // 点击点绿色弹出 是否显示选取指示器组件
	// sceneMode: Cesium.SceneMode.SCENE3D, //设定3维地图的默认场景模式:Cesium.SceneMode.SCENE2D、Cesium.SceneMode.SCENE3D、Cesium.SceneMode.MORPHING
	// navigationHelpButton: false, // 默认的相机控制提示控件
	// scene3DOnly: true, // 每个几何实例仅以3D渲染以节省GPU内存
	// navigationInstructionsInitiallyVisible: false,
	// showRenderLoopErrors: false, //是否显示渲染错误
	// orderIndependentTranslucency:false,//设置背景透明
});
2、billboard 添加目标点位
点位的数据格式:
poin :  [{
	id:'12321321' ,
	name: "北京西路测试点",
	type: "固定枪机",
	state: "在线",
	position: {
		x: 116.4568,
		y: 39.8926
	} ,
	text:'X'
}],
将添加点的方法封装到类中:
/**
 * @param {Viewer} viewer
 *
*/
export default class DragEntity{
    constructor(val){
        this.viewer = val.viewer,
    }
    addEntity(value){
        //数据格式{id:543595234324_432423,position:[122.8,39.9],text:"L"}
        let pinBuilder = new Cesium.PinBuilder();
        let poin = this.viewer.entities.add({
            id:value.id,
            name: value.name,
            position: Cesium.Cartesian3.fromDegrees(value.position.x, value.position.y),
            billboard: {
              image: pinBuilder.fromText(value.text,Cesium.Color.ROYALBLUE, 48).toDataURL(),
              verticalOrigin: Cesium.VerticalOrigin.BOTTOM,
            },
            monitoItems:{
                    data:value
                },
        });
        return poin
    }

}
3、添加左键点击事件
leftDownAction(){
  let viewer = this.$store.state.viewer
    this.handler = new Cesium.ScreenSpaceEventHandler(viewer.scene.canvas);
    let _this = this
    let id
    _this.handler.setInputAction(function (movement) {
        let pick = viewer.scene.pick(movement.position);
        if (Cesium.defined(pick) && (pick.id.id) ) {
            // _this.leftDownFlag = true;
            id= pick.id.id;
             console.log(id)
        }

    }, Cesium.ScreenSpaceEventType.LEFT_CLICK);

},
4、弹窗
export default class Bubble {
    constructor(val){
        this.viewer = val.viewer
        this.div=document.createElement("div");
        // this.addDynamicLabel({id:1,position:val.position,title:"cl弹窗"});
    }
    addDynamicLabel(data){
        let div = this.div
        div.id = data.id;
        // div.style.display="inline"
        div.style.position = "absolute";
        div.style.width = "300px";
        div.style.height = "30px";
        let HTMLTable = `
            <div style="background:#00ffef66;height:200px;border:"1px soild #08f8a7">${data.text}
                <div style="">
            </div>
        `;
        div.innerHTML = HTMLTable;
        this.viewer.cesiumWidget.container.appendChild(div);
        let gisPosition = data.position._value
        this.viewer.scene.postRender.addEventListener(() => {
            const canvasHeight = this.viewer.scene.canvas.height;
            const windowPosition = new Cesium.Cartesian2();
            Cesium.SceneTransforms.wgs84ToWindowCoordinates(
                this.viewer.scene,
                gisPosition,
                windowPosition
            );
            div.style.bottom = canvasHeight - windowPosition.y +220 + "px";
            const elWidth = div.offsetWidth;
            div.style.left = windowPosition.x - elWidth / 2 + "px";
        }, this);
    }
    clearDiv(id){
        if(this.div){
            var parent = this.div.parentElement;
            parent.removeChild(this.div);
            // this.div.removeNode(true);
            this.viewer.scene.postRender.removeEventListener(this.addDynamicLabel,this)
        }

    }
}
修改点击事件:
import Bubble from './bubble/index.js'
leftDownAction(){
 	let viewer = this.$store.state.viewer
 	let bubble = new  Bubble({
		viewer:viewer
	})
   this.handler = new Cesium.ScreenSpaceEventHandler(viewer.scene.canvas);
   let _this = this
   let id
   _this.handler.setInputAction(function (movement) {
       let pick = viewer.scene.pick(movement.position);
       if (Cesium.defined(pick) && (pick.id.id) ) {
           // _this.leftDownFlag = true;
           id= pick.id.id;
           let entiy = this.poinEntity[id];
           bubble.addDynamicLabel(entiy);
       }else{
			bubble.clearDiv();
		}
   }, Cesium.ScreenSpaceEventType.LEFT_CLICK);
},
九、cesium 广告牌优化
entityCollection 集合加上集群聚合功能,数据量临界点在 3w~4w 左右,就会出现界面卡顿。fps 低于 20 并且波动很大,延迟保持在 100ms 左右。
当数据量大于 10w+时,基本上 fps 处于 0-5,延迟大于 200ms,加载数据时延迟直接飙升几千都可能出现,同时(entityCollection 的)数据量过大直接导致浏览器崩溃无法加载。
抛开后台接口数据传递处理的优化,只针对前端 cesium 界面的所有优化方法中,billboardCollection 广告牌集合,也适合界面显示大量的 pointPrimitiveCollection(点集合)、labelCollection(label 集合)造成的界面卡顿。
优化方法:primitiveCollection与 primitiveCluster 结合使用
在不需要聚合集群的情况下,只使用 primitiveCollection就能够完美的解决广告牌 10w+造成的界面卡顿崩溃等问题。不需要聚合功能时,就不添加 primitiveCluster 来处理优化。因为聚合会监听摄像机的改变事件时刻改变聚合数量状态,反而会出现卡顿情况。
(一)primitiveCollection
广告牌集合添加代码(如下),其他的集合如 point、label,大同小异:
const billboardCollection = viewer.scene.primitives.add(
  new Cesium.BillboardCollection()
);
billboardCollection.add({
  position: Cesium.Cartesian3.fromDegrees(114.49, 41.23, 0),
  width: 38,
  height: 38,
  image: "xxxxx"
});
此时往 billboardCollection 中添加的 billboard 就会直接呈现在界面上,能够轻松应对 10w+的数据量。对比EntityCollection的添加方式效果很明显:
// 之前的添加方式
const entityCollection = new Cesium.EntityCollection();

const billboard = new Cesium.BillboardGraphics({
  width: 38,
  height: 38,
  image: "xxxxx"
});
const entity = new Cesium.Entity({
  position: Cesium.Cartesian3.fromDegrees(114.49, 41.23, 0),
  billboard: billboard,
  s1: "xxx",
  s2: "xxx",
  s3: "xxx",
  s4: "xxx",
  s5: "xxx"
});
entityCollection.add(entity);
(二)PrimitiveCluster
primitiveCollection 的聚合功能官方并没有提供,在官方文档中只提供了 EntityCluster 方法,对 entityCollection 集合进行聚合操作。通过 EntityCluster 方法聚合时需要配合 datasource 对象使用,因为在原生的 datasource 对象自身有 clustering 属性。
由于我们直接使用的 Primitive 方式将 billboard 添加到地图中,就跳过了 datasource 的步骤。因此我们需要自己来定义一个 PrimitiveCluster 方法来创建一个 cluster 对象,针对原语集合进行聚合,结合其他博主文档提供的方法,PrimitiveCluster.js 具体实现方法总结如下:
一)往 cesium 的包文件或者依赖文件中添加 PrimitiveCluster 方法
1.添加的路径:
(1)npm 包中----- node_modules\cesium\Source\DataSources\PrimitiveCluster.js
(2)引入外部文件方式 ---- Source\DataSources\PrimitiveCluster.js
2.复制同目录下 EntityCluster.js 内容到 PrimitiveCluster.js 中
3.文件内全局修改名称,EntityCluster -> PrimitiveCluster、 entityCluster -> primitiveCluster
4.屏蔽 getScreenSpacePositions 方法中的代码块
(EntityCluster 中 item.id 指向的就是 entity 实体对象,在 primitiveCollection 中 item.id 为 undefined 会包错)
/* var canClusterLabels =
  primitiveCluster._clusterLabels && defined(item._labelCollection);
var canClusterBillboards =
  primitiveCluster._clusterBillboards && defined(item.id._billboard);
var canClusterPoints =
  primitiveCluster._clusterPoints && defined(item.id._point);
if (canClusterLabels && (canClusterPoints || canClusterBillboards)) {
  continue;
} */
第 4 步时 如果在添加广告牌时需要为广告牌添加唯一的标识 id(如下添加方式),则可以不用屏蔽源代码,添加的 id 能够规避此处报错
billboardCollection.add({
  id: "xxx",
  position: Cesium.Cartesian3.fromDegrees(114.49, 41.23, 0),
  width: 38,
  height: 38,
  image: "xxxxx"
});
5.在 PrimitiveCluster.js 的上级目录(node_modules\cesium\Source\Cesium.js)中找到入口文件 cesium.js,导入 PrimitiveCluster 方法
export { default as PrimitiveCluster } from "./DataSources/PrimitiveCluster.js";
可以直接通过 new Cesium.PrimitiveCluster()的方式来调用
二)PrimitiveCluster 方法来实现聚合
1.往 scene.primitives 中添加原语集合 primitives
2.创建一个空 billboardCollection 广告牌集合
3.通过 PrimitiveCluster 方法创建一个 cluster 实例对象 primitiveCluster
4.将 primitiveCluster 添加到集合 primitives 中
5.配置 primitiveCluster 对象的基本参数(不配置有默认参数)
6.将空 billboardCollection 广告牌集合赋予primitiveCluster._billboardCollection,手动添加聚合内容
primitiveCluster._labelCollection;
primitiveCluster._pointCollection;
7.调用_initialize 方法初始化 cluster 实例的事件监听
8.之后与 datasource 聚合方式的.then 方法一致,将 dataSource.clustering.clusterEvent.addEventListener 换成 primitiveCluster.clusterEvent.addEventListener
const primitives = viewer.scene.primitives.add(
  new Cesium.PrimitiveCollection()
);
const billboardCollection = new Cesium.BillboardCollection();

const primitiveCluster = new Cesium.PrimitiveCluster();
primitives.add(primitiveCluster);
primitiveCluster.enabled = true; //开启聚合功能
primitiveCluster.pixelRange = 15; //范围
primitiveCluster.minimumClusterSize = 2; //最小聚合数量
primitiveCluster._billboardCollection = billboardCollection;
primitiveCluster._initialize(viewer.scene);

primitiveCluster.clusterEvent.addEventListener(function(
  clusteredEntities,
  cluster
) {
  // ... 处理聚合显示广告牌代码块与dataSource处理方式一致
});
按照上面的方式完成聚合后,往 billboardCollection 集合中添加 billboard 广告牌就会在页面呈现出来并且聚合显示。但是数据量 10w+的情况下,在处理摄像机视角改变的监听事件时会出现卡顿问题。
(三)优化 PrimitiveCluster 卡顿问题
在 PrimitiveCluster.js 的_initialize 方法中,可以看到原方法使用 createDeclutterCallback 方法创建了一个回调方法,并将这个回调方法添加到了 scene.camera.changed 监听中。因此只要 scene.camera 视角改变,就会执行聚合的处理逻辑方法返回两个参数 clusteredEntities 与 cluster。
primitiveCluster.clusterEvent.addEventListener(function(
  clusteredEntities,
  cluster
) {
  // ... 处理聚合显示广告牌代码块与dataSource处理方式一致
});
只需要在_initialize 方法加一个防抖的定时器,让它事件处理频率降低就能达到优化的效果。同时暴露 delay 时间参数可以在实例化后进行配置改变
//1.PrimitiveCluster构造函数中添加_delay参数
this._delay = defaultValue(options.delay, 800)

//2.在PrimitiveCluster.prototype拦截器Object.defineProperties方法中添加_delay的访问以及设置方法
delay: {
  get: function () {
    return this._delay;
  },
  set: function (value) {
    this._delay = value;
  },
},

// 3._initialize方法改造
PrimitiveCluster.prototype._initialize = function(scene) {
  this._scene = scene;
  var cluster = createDeclutterCallback(this);
  this._cluster = cluster;
  var _t = null;
  const _self = this;
  this._removeEventListener = scene.camera.changed.addEventListener(function(amount) {
    if (_t) {
      clearTimeout(_t);
      _t = null;
    }
    _t = setTimeout(() => {
      cluster(amount);
    }, _self._delay);
  });
};
(四)功能代码记录
import * as Cesium from "cesium/Cesium";
import defaultValue from "./core/defaultValue";

/**
 * @_v 引入外部创建的Viewer实例(new Cesium.Viewer(...))
 * @myPrimitives 原语集合,可以包含页面显示的pointPrimitiveCollection、billboardCollection、labelCollection、primitiveCollection、primitiveCluster
 * @myPrimitiveCluster 自定义原语集群
 * @myBillboardCollection 广告牌集合(站点显示的内容数据)
 *
 * @desc 使用primitiveCollection原语集合与primitiveCluster原语集群,处理地图界面显示广告牌billboard数量 > 10w 级时,界面卡顿,浏览器崩溃等问题
 */
class CommomSiteTookit {
  static _v = null;
  myPrimitives = null;
  myPrimitiveCluster = null;
  myBillboardCollection = null;

  constructor() {}

  /**
   * @desc 使用commomSiteTookit实例前,必须先初始化该实例的_v对象
   */
  init(viewer) {
    this._v = viewer;
  }

  /**
   * @param [options] 具有以下属性的对象
   * @param [options.delay=800] 防抖处理定时器的time
   * @param [options.enabled=true] 是否启用集群
   * @param [options.pixelRange=15] 用于扩展屏幕空间包围框的像素范围
   * @param [options.minimumClusterSize=2] 可集群的屏幕空间对象的最小数量
   *
   * @desc 处理原语集合,并实现聚合集群功能方法
   * @return billboardCollection集合,可直接往集合里添加广告牌billboard,呈现在页面上
   */
  load(options = {}) {
    let billboardCollection = new Cesium.BillboardCollection();

    if (Cesium.defined(this.myPrimitives)) {
      this._v.scene.primitives.remove(this.myPrimitives);
    }
    this.myPrimitives = this._v.scene.primitives.add(
      new Cesium.PrimitiveCollection()
    );

    const primitiveCluster = new Cesium.PrimitiveCluster();
    this.myPrimitives.add(primitiveCluster);
    primitiveCluster.delay = defaultValue(options.delay, 800);
    primitiveCluster.enabled = defaultValue(options.enabled, true);
    primitiveCluster.pixelRange = defaultValue(options.pixelRange, 15);
    primitiveCluster.minimumClusterSize = defaultValue(
      options.minimumClusterSize,
      2
    );
    primitiveCluster._billboardCollection = billboardCollection;
    primitiveCluster._initialize(this._v.scene);

    let removeListener;
    let pinBuilder = new Cesium.PinBuilder();
    /* 定义广告牌 fromText(显示文字,颜色,大小) */
    let pin50 = pinBuilder.fromText("50+", Cesium.Color.RED, 40).toDataURL();
    let pin40 = pinBuilder.fromText("40+", Cesium.Color.ORANGE, 40).toDataURL();
    let pin30 = pinBuilder.fromText("30+", Cesium.Color.YELLOW, 40).toDataURL();
    let pin20 = pinBuilder.fromText("20+", Cesium.Color.GREEN, 40).toDataURL();
    let pin10 = pinBuilder.fromText("10+", Cesium.Color.BLUE, 40).toDataURL();
    /* 数量小于十个的聚合广告牌 */
    let singleDigitPins = new Array(8);
    for (let i = 0; i < singleDigitPins.length; ++i) {
      singleDigitPins[i] = pinBuilder
        .fromText("" + (i + 2), Cesium.Color.VIOLET, 40)
        .toDataURL();
    }

    const _ = this;
    function customStyle() {
      if (Cesium.defined(removeListener)) {
        removeListener();
        removeListener = undefined;
      } else {
        removeListener = primitiveCluster.clusterEvent.addEventListener(
          function(clusteredEntities, cluster) {
            cluster.label.show = false;
            cluster.billboard.show = true;
            cluster.billboard.id = cluster.label.id;
            cluster.billboard.verticalOrigin = Cesium.VerticalOrigin.BOTTOM;
            /* 根据站点(参数)的数量给予对应的广告牌  */
            if (clusteredEntities.length >= 50) {
              cluster.billboard.image = pin50;
            } else if (clusteredEntities.length >= 40) {
              cluster.billboard.image = pin40;
            } else if (clusteredEntities.length >= 30) {
              cluster.billboard.image = pin30;
            } else if (clusteredEntities.length >= 20) {
              cluster.billboard.image = pin20;
            } else if (clusteredEntities.length >= 10) {
              cluster.billboard.image = pin10;
            } else {
              cluster.billboard.image =
                singleDigitPins[clusteredEntities.length - 2];
            }
          }
        );
      }
      // force a re-cluster with the new styling
      let pixelRange = primitiveCluster.pixelRange;
      primitiveCluster.pixelRange = 0;
      primitiveCluster.pixelRange = pixelRange;
      _.myPrimitiveCluster = primitiveCluster;
    }
    this.myBillboardCollection = billboardCollection;
    // start with custom style
    customStyle();
    return billboardCollection;
  }

  /**
   * @params enable bool值控制开启或关闭集群
   * @desc 控制集群生效与否
   */
  enableCluster(enable) {
    if (Cesium.defined(this.myPrimitiveCluster)) {
      this.myPrimitiveCluster.enabled = enable;
    }
  }

  /**
   * @params id 站点ID
   * @return 返回可操作的广告牌[siteBillboard.image = 'xxxx']
   * @desc 根据id在集合中获取指定站点广告牌
   */
  getSiteBillboardById(id) {
    if (!Cesium.defined(this.myBillboardCollection)) return undefined;
    const _b = this.myBillboardCollection;
    const l = _b.length;
    let siteBillboard = undefined;
    for (let i = 0; i < l; i++) {
      if (id == _b.get(i).id) {
        siteBillboard = _b.get(i);
        break;
      }
    }
    return siteBillboard;
  }

  /**
   * @desc 删除所有站点广告牌
   */
  removeAll() {
    if (Cesium.defined(this.myPrimitives)) {
      this._v.scene.primitives.remove(this.myPrimitives);
    }
  }

  /**
   * @params show bool值 控制显示或隐藏
   * @desc 隐藏或显示所有站点广告牌
   */
  showStatus(show = true) {
    this.myPrimitives.show = show;
  }

  /**
   * @desc 根据id删除指定站点广告牌
   */
  remove(id) {
    const billboard = this.getSiteBillboardById(id);
    billboard && this.myBillboardCollection.remove(billboard);
  }

  /**
   * @desc 销毁(目前退出页面时直接viewer销毁)
   */
  destroy() {
    this.myPrimitives = null;
    this.myPrimitiveCluster = null;
    this.myBillboardCollection = null;
    // this._v.scene.primitives.destroy()
  }
}

export default new CommomSiteTookit();
在执行commomSiteTookit.init(viewer)后,加载数据主要的操作在 load 方法中,load 返回的 billboardCollection,可以动态的添加 billboard 数据,直接呈现在界面,代码如下:
const list = ['10w+数据']
const l = list.length
const data = commomSiteTookit.load({
  enabled: true,
  delay: 1200,
  pixelRange: 20
});
for (let i = 0; i < l; i++) {
  data.add({
    image: `xxxx`,
    scaleByDistance: new Cesium.NearFarScalar(1.5e2, 1, 1.5e7, 0.2),
    width: 38, // default: undefined
    height: 38, // default: undefined
    position: Cesium.Cartesian3.fromDegrees(
      list[i].longitude,
      list[i].latitude,
      0
    ),
    id: list[i].id + ""
  });
}
十、可视域分析
①利用高程判别:视角初始位置和视域目标点之间组成的一条直线,我们暂且称之为当前视角下的“视域线”,对该直线进行空间插值,获得直线上一系列的空间插值点。对于获取到的每个插值点P(x,y,z)通过getHeight()方法来获取当前场景下(x,y)点的地表高程h,对比z与h的高程关系。若z<h,则证明,该插值点位于地表下,可以归属于不可视域点;反之,若z>h,则归属于可视域点。这样就可以获取到视域线在当前插值精度下的可视域情况。
②pick取交:视角初始位置和视域目标点之间组成的一条射线(方向:视角位置→目标点),我们也称之为“视域线”,通过pickFromRay()方法,可以返回当前视域线与场景(地形或模型等)相交情况result。若result存在,则视角初始位置与result.position之间的区域归属于可视域范围,result.position与目标点之间的区域归属于不可视域范围;若result不存在,即无交点出现,全区域归属于可视域范围。
var createViewershed = function () {
    // 开启地形深度监测
    viewer.scene.globe.depthTestAgainstTerrain = true;

    // 设定初始视角位置点
    var viewPoint = Cesium.Cartesian3.fromDegrees(115.77774943, 40.51669238, 1000);
    var viewPointEntity = viewer.entities.add({
        position: viewPoint,
        ellipsoid: {
            radii: new Cesium.Cartesian3(5, 5, 5),
            material: Cesium.Color.YELLOW
        },
    });

    // 视角位置创建坐标轴
    var transform = Cesium.Transforms.eastNorthUpToFixedFrame(viewPoint);
    var modelMatrixPrimitive = viewer.scene.primitives.add(new Cesium.DebugModelMatrixPrimitive({
        modelMatrix: transform,
        length: 10.0
    }));

    // 世界坐标转换为投影坐标
    var webMercatorProjection = new Cesium.WebMercatorProjection(viewer.scene.globe.ellipsoid);
    var viewPointWebMercator = webMercatorProjection.project(Cesium.Cartographic.fromCartesian(viewPoint));

    // 排除碰撞监测的对象
    var objectsToExclude = [viewPointEntity, modelMatrixPrimitive];

    // 目标点集合
    var TargetPoints = [];

    // 视域点和目标点的距离
    var radius = 0;

    // 计算45°和135°之间的目标点
    for (var i = 45; i <= 135; i++) {
        var linePoints = [];//记录一条线上的所有目标点
        var pointsNum = 15;//该方向插值点数
        var lineDis = 200;//每两个插值点之间的距离m1
        for (let index = 0; index < pointsNum; index++) {
            radius = index * lineDis;
            // 度数转弧度
            var radians = Cesium.Math.toRadians(i);
            // 计算目标点
            var toPoint = new Cesium.Cartesian3(viewPointWebMercator.x + radius * Math.cos(radians), viewPointWebMercator.y + radius * Math.sin(radians), 0);
            // 投影坐标转世界坐标
            toPoint = webMercatorProjection.unproject(toPoint);
            // TargetPoints.push(Cesium.Cartographic.toCartesian(toPoint.clone()));
            var m_cartesian3 = Cesium.Cartographic.toCartesian(toPoint.clone());
            var m_ellipsoid = viewer.scene.globe.ellipsoid;
            var m_cartographic = m_ellipsoid.cartesianToCartographic(m_cartesian3);
            var m_height = viewer.scene.globe.getHeight(m_cartographic);
            var m_point = Cesium.Cartesian3.fromDegrees(m_cartographic.longitude / Math.PI * 180, m_cartographic.latitude / Math.PI * 180, m_height);
            linePoints.push({
                data: m_point,
                show: true
            });
        }
        TargetPoints.push({
            id: i,
            points: linePoints
        });
    }
    pickFromRay();

    function pickFromRay() {
        for (var i = 0; i < TargetPoints.length; i++) {
            var cur_LinePoints = TargetPoints[i].points;
            cur_LinePoints.forEach(element => {
                // 计算射线的方向,目标点left 视域点right
                var direction = Cesium.Cartesian3.normalize(Cesium.Cartesian3.subtract(element.data, viewPoint, new Cesium.Cartesian3()), new Cesium.Cartesian3());
                // 建立射线
                var ray = new Cesium.Ray(viewPoint, direction);
                // var results = viewer.scene.drillPickFromRay(ray, 10, objectsToExclude); // 计算所有的交互点,最大不超过10个
                var result = viewer.scene.pickFromRay(ray, objectsToExclude); // 计算交互点,返回第一个
                var buffer = ReturnDistance(element.data, result.position);
                // var M_color = Cesium.Color.GREEN;
                if (buffer > 10) {
                    // M_color = Cesium.Color.RED;
                    element.show = false;
                }
                //添加当前视域目标点可视化信息
                // viewer.entities.add({
                //     name: "aaaa" + i,
                //     position: element.data,
                //     ellipsoid: {
                //         radii: new Cesium.Cartesian3(30, 30, 30),
                //         material: M_color
                //     },
                // })
            });

        }
        drawViewshedLine(TargetPoints);
    }

    function drawViewshedLine(data) {
        for (let index = 0; index < data.length; index++) {
            const element = data[index].points;
            var startIndex = 0;
            for (let i = 0; i < element.length; i++) {
                var defaultColor = new Cesium.Color(0.1, 1, 0.1, 0.3);
                // console.log("第" + i + '个点的起点是:' + startIndex);
                const m_linestart = element[startIndex];
                var m_lineshow = m_linestart.show;
                const m_lineCurrent = element[i];
                const m_lineEnd = element[i + 1];
                if (m_lineEnd && m_lineCurrent.show != m_lineEnd.show) {
                    if (!m_lineshow) {
                        defaultColor = new Cesium.Color(1, 0.1, 0.1, 0.3);
                    }
                    viewer.entities.add({
                        polyline: {
                            positions: [m_linestart.data, m_lineEnd.data],
                            width: 2,
                            material: defaultColor,
                            clampToGround: true
                        }
                    });
                    startIndex = i + 1;
                }
                else if (!m_lineEnd) {
                    if (!m_lineshow) {
                        defaultColor = new Cesium.Color(1, 0.1, 0.1, 0.3);
                    }
                    viewer.entities.add({
                        polyline: {
                            positions: [m_linestart.data, m_lineCurrent.data],
                            // arcType: Cesium.ArcType.NONE,
                            width: 2,
                            material: defaultColor,
                            // depthFailMaterial: defaultColor,
                            clampToGround: true
                        }
                    });
                }

            }
        }
    }

    //空间两点距离计算函数
    function ReturnDistance(pos0, pos1) {
        var distance = 0;
        var point1cartographic = Cesium.Cartographic.fromCartesian(pos0);
        var point2cartographic = Cesium.Cartographic.fromCartesian(pos1);
        /**根据经纬度计算出距离**/
        var geodesic = new Cesium.EllipsoidGeodesic();
        geodesic.setEndPoints(point1cartographic, point2cartographic);
        var s = geodesic.surfaceDistance;
        return s.toFixed(2);
    }

    // 处理交互点
    function showIntersection(result, destPoint, viewPoint) {
        // 如果是场景模型的交互点,排除交互点是地球表面
        if (Cesium.defined(result) && Cesium.defined(result.object)) {
            drawLine(result.position, viewPoint, Cesium.Color.GREEN); // 可视区域
            drawLine(result.position, destPoint, Cesium.Color.RED); // 不可视区域
        } else {
            drawLine(viewPoint, destPoint, Cesium.Color.GREEN);
        }
    }
}


 4933
4933


 被折叠的 条评论
为什么被折叠?
被折叠的 条评论
为什么被折叠?
 到【灌水乐园】发言


