


上个月,FLUX 席卷了互联网,这并非没有原因。他们声称优于 DALLE 3、Ideogram 和 Stable Diffusion 3 等模型,而这一点已被证明是有依据的。随着越来越多的流行图像生成工具(如 Stable Diffusion Web UI Forge 和 ComyUI)开始支持这些模型,FLUX 在 Stable Diffusion 领域的扩展将会持续下去。
自 FLUX 模型发布以来,我们还看到了用户工作流程中的许多重要进展。其中最值得注意的是发布了第一个 LoRA(低秩自适应模型)和 ControlNet 模型,以改进指导。这些模型分别允许用户对文本指导和对象放置进行一定程度的控制。
在这篇文章中,我们将介绍使用 AI Toolkit 中的自定义数据训练你自己的 LoRA 的首批方法之一。Jared Burkett 提供的这个仓库,为我们带来了快速连续微调 FLUX schnell 或 dev 的最佳新方法。继续阅读,了解使用 FLUX 训练你自己的 LoRA 所需的所有步骤。
设置H100

如何在 Paperspace 控制台上创建新的机器
首先,我们使用的 H100 GPU 云服务源自 DigitalOcean 旗下的 Paperspace 平台。因为平台有 H100 单张和 H100x8 两种机型,而且提供了 Jupiter notebook和模型部署能力。该平台还提供包括 A6000、A5000、A100 等不同型号的 GPU。通过 DigitalOcean 中国区独家战略合作伙伴卓普云,可以咨询包年、包月的不同折扣。
在 DigitalOcean 的Paperspace 上可以配置单卡 GPU 或多 GPU的机器。你可以通过点击 Paperspace 控制台左上角的 Gradient/Core 按钮并切换到 Core 来启动新的 H100 或多路 A100/H100 机器。接着,点击右上角的“创建机器”按钮。
在创建新机器时,请务必选择正确的 GPU 和模板,即预装了大多数我们将使用的软件包的 ML-In-A-Box 模板。你还可以选择一台存储空间足够大的机器(大于 250 GB),以避免在训练模型后遇到潜在的内存问题。
设置完成后,启动你的机器。然后,你可以通过浏览器中的桌面流访问你的机器,或从本地机器通过 SSH 连接进入。
数据准备
现在我们已全部设置完毕,可以开始加载所有训练数据。要选择训练数据,请选择相机中独特的主题或我们可以轻松获得的图像。这可以是风格或特定类型的对象/主题/人。
例如,我们选择对本文作者的脸部进行训练。为此,我们使用高质量相机以不同角度和距离拍摄了大约 30 张自拍照。然后将这些图像裁剪成正方形,并重命名以适合命名所需的格式。然后我们使用 Florence-2 自动为每张图片添加标题,并将这些标题保存在与图像相对应的文本文件中。
数据必须以以下格式存储在自己的目录中:
---|
  Your Image Directory
   |
------- img1.png
------- img1.txt
------- img2.png
------- img2.txt
...
图片和文本文件必须遵循相同的命名约定
为了实现所有这些,我们建议调整以下代码片段以运行自动标记。在您的图像文件夹上运行以下代码片段(或 GitHub repo 中的 label.py)。
!pip install -U oyaml transformers einops albumentations python-dotenv

import requests
import torch
from PIL import Image
from transformers import AutoProcessor, AutoModelForCausalLM
import os
device = "cuda:0" if torch.cuda.is_available() else "cpu"
torch_dtype = torch.float16 if torch.cuda.is_available() else torch.float32
model_id = 'microsoft/Florence-2-large'model = AutoModelForCausalLM.from_pretrained(model_id, trust_remote_code=True, torch_dtype='auto').eval().cuda()
processor = AutoProcessor.from_pretrained(model_id, trust_remote_code=True)

prompt = "<MORE_DETAILED_CAPTION>"for i in os.listdir('<YOUR DIRECTORY NAME>'+'/'):if i.split('.')[-1]=='txt':
        continue
    image = Image.open('<YOUR DIRECTORY NAME>'+'/'+i)
    inputs = processor(text=prompt, images=image, return_tensors="pt").to(device, torch_dtype)
    generated_ids = model.generate(
      input_ids=inputs["input_ids"],
      pixel_values=inputs["pixel_values"],
      max_new_tokens=1024,
      num_beams=3,
      do_sample=False
    )
    generated_text = processor.batch_decode(generated_ids, skip_special_tokens=False)[0]
    parsed_answer = processor.post_process_generation(generated_text, task="<MORE_DETAILED_CAPTION>", image_size=(image.width, image.height))
    print(parsed_answer)with open('<YOUR DIRECTORY NAME>'+'/'+f"{i.split('.')[0]}.txt", "w") as f:
        f.write(parsed_answer["<MORE_DETAILED_CAPTION>"])
        f.close()
一旦在图像文件夹上运行完毕,带标题的文本文件将以与图像对应的名称保存。从这里开始,我们应该已经准备好开始使用 AI 工具包了!
设置训练循环
我们以 Ostris repo AI Toolkit 为基础开展这项工作,并想对他们的出色工作表示赞赏。
要开始使用 AI Toolkit,首先获取以下代码并将其粘贴到您的终端中以设置环境:
git clone https://github.com/ostris/ai-toolkit.git
cd ai-toolkit
git submodule update --init --recursive
python3 -m venv venv
source venv/bin/activate
pip3 install -r requirements.txt
pip install peft
pip3 install torch torchvision torchaudio --index-url https://download.pytorch.org/whl/cu118
这应该需要几分钟。
从这里开始,我们还有最后一步要完成。使用以下终端命令登录,向 HuggingFace Cache 添加一个只读令牌:
huggingface-cli login设置完成后,我们就可以开始训练循环了。
配置训练循环
AI Toolkit 提供了一个训练脚本 run.py,它可以处理训练 FLUX.1 模型的所有复杂问题。
可以对 schnell 或 dev 模型进行微调,但我们建议训练 dev 模型。dev 的使用许可更有限,但与 schnell 相比,它在快速理解、拼写和对象组合方面也更强大。然而,由于 schnell 经过了提炼,它的训练速度应该要快得多。
run.py 采用 yaml 配置文件来处理各种训练参数。对于此用例,我们将编辑 train_lora_flux_24gb.yaml 文件。以下是配置的示例版本:
---
job: extension
config:
  # this name will be the folder and filename name
  name: <YOUR LORA NAME>
  process:
    - type: 'sd_trainer'
      # root folder to save training sessions/samples/weights
      training_folder: "output"
      # uncomment to see performance stats in the terminal every N steps
#      performance_log_every: 1000
      device: cuda:0
      # if a trigger word is specified, it will be added to captions of training data if it does not already exist
      # alternatively, in your captions you can add [trigger] and it will be replaced with the trigger word
#      trigger_word: "p3r5on"
      network:
        type: "lora"
        linear: 16
        linear_alpha: 16
      save:
        dtype: float16 # precision to save
        save_every: 250 # save every this many steps
        max_step_saves_to_keep: 4 # how many intermittent saves to keep
      datasets:
        # datasets are a folder of images. captions need to be txt files with the same name as the image
        # for instance image2.jpg and image2.txt. Only jpg, jpeg, and png are supported currently
        # images will automatically be resized and bucketed into the resolution specified
        # on windows, escape back slashes with another backslash so
        # "C:\\path\\to\\images\\folder"
        - folder_path: <PATH TO YOUR IMAGES>
          caption_ext: "txt"
          caption_dropout_rate: 0.05  # will drop out the caption 5% of time
          shuffle_tokens: false  # shuffle caption order, split by commas
          cache_latents_to_disk: true  # leave this true unless you know what you're doing
          resolution: [1024]  # flux enjoys multiple resolutions
      train:
        batch_size: 1
        steps: 2500  # total number of steps to train 500 - 4000 is a good range
        gradient_accumulation_steps: 1
        train_unet: true
        train_text_encoder: false  # probably won't work with flux
        gradient_checkpointing: true  # need the on unless you have a ton of vram
        noise_scheduler: "flowmatch" # for training only
        optimizer: "adamw8bit"
        lr: 1e-4
        # uncomment this to skip the pre training sample
#        skip_first_sample: true
        # uncomment to completely disable sampling
#        disable_sampling: true
        # uncomment to use new vell curved weighting. Experimental but may produce better results
        linear_timesteps: true

        # ema will smooth out learning, but could slow it down. Recommended to leave on.
        ema_config:
          use_ema: true
          ema_decay: 0.99

        # will probably need this if gpu supports it for flux, other dtypes may not work correctly
        dtype: bf16
      model:
        # huggingface model name or path
        name_or_path: "black-forest-labs/FLUX.1-dev"
        is_flux: true
        quantize: true  # run 8bit mixed precision
#        low_vram: true  # uncomment this if the GPU is connected to your monitors. It will use less vram to quantize, but is slower.
      sample:
        sampler: "flowmatch" # must match train.noise_scheduler
        sample_every: 250 # sample every this many steps
        width: 1024
        height: 1024
        prompts:
          # you can add [trigger] to the prompts here and it will be replaced with the trigger word
#          - "[trigger] holding a sign that says 'I LOVE PROMPTS!'"\
          - "woman with red hair, playing chess at the park, bomb going off in the background"
          - "a woman holding a coffee cup, in a beanie, sitting at a cafe"
          - "a horse is a DJ at a night club, fish eye lens, smoke machine, lazer lights, holding a martini"
          - "a man showing off his cool new t shirt at the beach, a shark is jumping out of the water in the background"
          - "a bear building a log cabin in the snow covered mountains"
          - "woman playing the guitar, on stage, singing a song, laser lights, punk rocker"
          - "hipster man with a beard, building a chair, in a wood shop"
          - "photo of a man, white background, medium shot, modeling clothing, studio lighting, white backdrop"
          - "a man holding a sign that says, 'this is a sign'"
          - "a bulldog, in a post apocalyptic world, with a shotgun, in a leather jacket, in a desert, with a motorcycle"
        neg: ""  # not used on flux
        seed: 42
        walk_seed: true
        guidance_scale: 4
        sample_steps: 20
# you can add any additional meta info here. [name] is replaced with config name at top
meta:
  name: "[name]"
  version: '1.0'
我们要编辑的最重要的几行位于第 5 行 - 更改名称、第 30 行 - 添加图像目录的路径,以及第 69 行和第 70 行 - 我们可以编辑高度和宽度以反映我们的训练图像。编辑这些行以相应地调整训练器以在你的图像上运行。
此外,我们可能想要编辑提示。几个提示涉及动物或场景,因此如果我们试图捕捉特定的人,我们可能想要编辑这些提示以更好地通知模型。我们还可以使用第 87-88 行的指导尺度和样本步骤值进一步控制这些生成的样本。
如果我们想更快地训练 FLUX.1 模型,我们可以通过编辑第 37 行的批处理大小和第 39 行的梯度累积步骤来进一步优化模型训练。如果我们在多 GPU 或 H100 上进行训练,我们可以稍微提高这些值,但我们建议保持不变。请注意,提高它们可能会导致内存不足错误。
在第 38 行,我们可以更改训练步骤的数量。他们建议在 500 到 4000 之间,所以我们选择中间的 2500。我们用这个值得到了很好的结果。它会每 250 步检查一次,但如果需要,我们也可以在第 22 行更改这个值。
最后,我们可以将模型从 dev 更改为 schnell,方法是在第 62 行粘贴 schnell 的 HuggingFace id(“black-forest-labs/FLUX.1-schnell”)。现在一切都已设置好,我们可以运行训练了!
运行 FLUX.1 训练循环
要运行训练循环,我们现在需要做的就是使用 run.py 脚本。
python3 run.py config/examples/train_lora_flux_24gb.yaml对于我们的训练循环,我们在单个 H100 上使用 60 张图像进行 2500 步训练。整个过程大约需要 45 分钟才能运行。之后,LoRA 文件及其检查点保存在
Downloads/ai-toolkit/output/my_first_flux_lora_v1/.
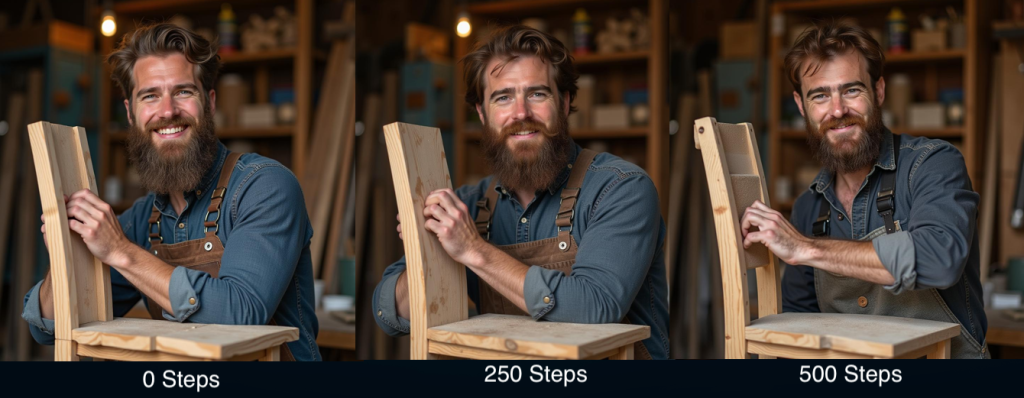
我们可以看到,面部特征慢慢发生变化,以更紧密地匹配所需对象的特征
在输出目录中,我们还可以使用前面提到的配置提示找到模型生成的样本。这些可以用来查看训练的进展情况。
使用我们新的 FLUX.1 LoRA 进行推理
现在模型已经完成训练,我们可以使用新训练的 LoRA 来调整 FLUX.1 的输出。我们提供了一个可在 Notebook 中使用的快速推理脚本。
import torch
from diffusers import DiffusionPipeline
model_id = 'black-forest-labs/FLUX.1-dev'
adapter_id = f'output/{lora_name}/{lora_name}.safetensors'
pipeline = DiffusionPipeline.from_pretrained(model_id)
pipeline.load_lora_weights(adapter_id)
prompt = "ethnographic photography of man at a picnic"
negative_prompt = "blurry, cropped, ugly"
pipeline.to('cuda' if torch.cuda.is_available() else 'mps' if torch.backends.mps.is_available() else 'cpu')
image = pipeline(
    prompt=prompt,
    num_inference_steps=50,
    generator=torch.Generator(device='cuda' if torch.cuda.is_available() else 'mps' if torch.backends.mps.is_available() else 'cpu').manual_seed(1641421826),
    width=1152,
    height=768,
).images[0]
display(image)
通过仅 500 步对本文作者的脸部进行微调,我们能够相当准确地重现他们的特征:

LoRA 训练的示例输出
此过程可应用于任何类型的对象、主题、概念或风格,以进行 LoRA 训练。我们建议尝试各种图像,尽可能多地选择捕捉主题/风格,就像稳定扩散一样。
结束语
FLUX.1 确实是向前迈出的一步,我们个人无法停止将其用于各种艺术任务。它正在迅速取代所有其他图像生成器,这是有充分理由的。
本教程展示了如何使用云端的 GPU 为 FLUX.1 微调 LoRA 模型。读者应该了解如何使用其中显示的技术训练自定义 LoRA。
目前 DigitalOcean 旗下 GPU 云服务平台 Paperspace 提供 NVIDIA H100 的实例,按秒计费,支持随时创建和取消 GPU 云实例。同时,Paperspace 还提供专用网络、云端备份,以及从模型训练到部署的一系列软件工具与服务,可大幅提升 AI 创业者们的开发与业务扩展效率。如需要详询更多产品方案细节以及目前库存情况,可联系 DigitalOcean 中国区独家战略合作伙伴卓普云。


 898
898

 被折叠的 条评论
为什么被折叠?
被折叠的 条评论
为什么被折叠?
 到【灌水乐园】发言


