


目录
序言
最近到手了一块Boring科技的STM32F411开发板,并移植了LVGL进行显示,接下来就让我们加入正题。
1.STM32CUBEX配置
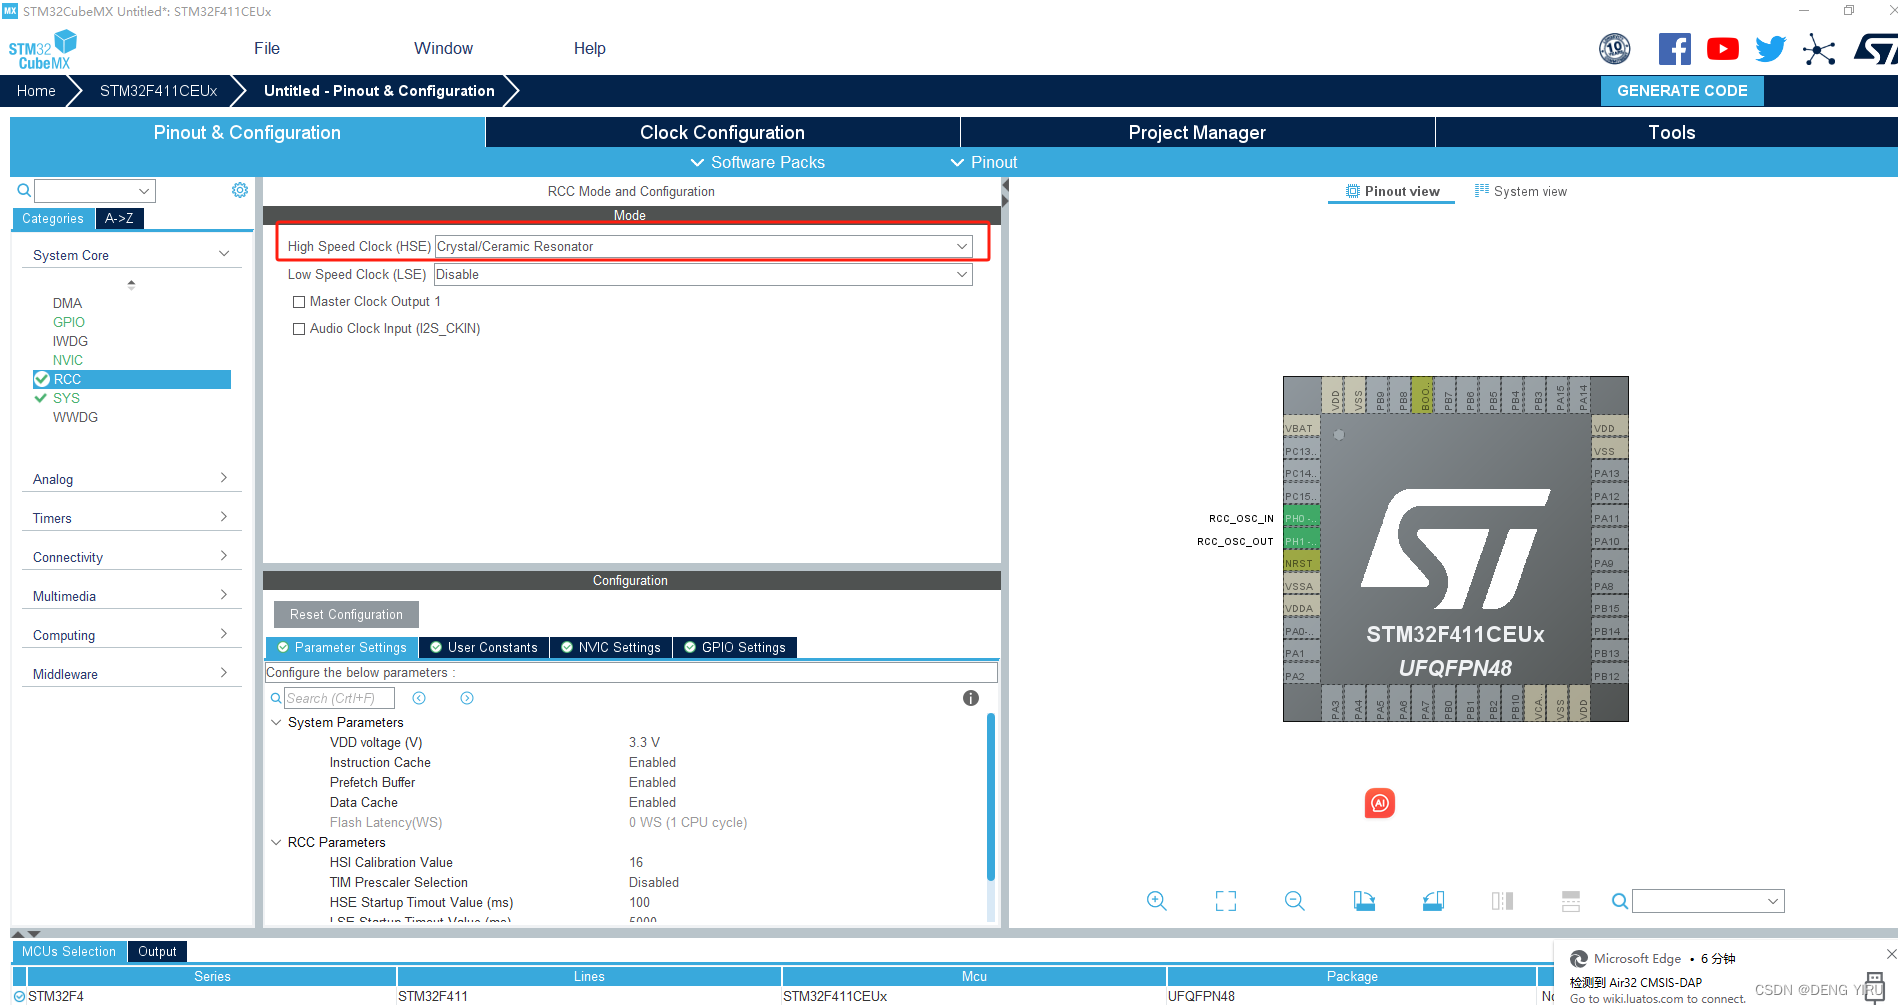
1.1RCC配置外部高速晶振(精度更高)——HSE
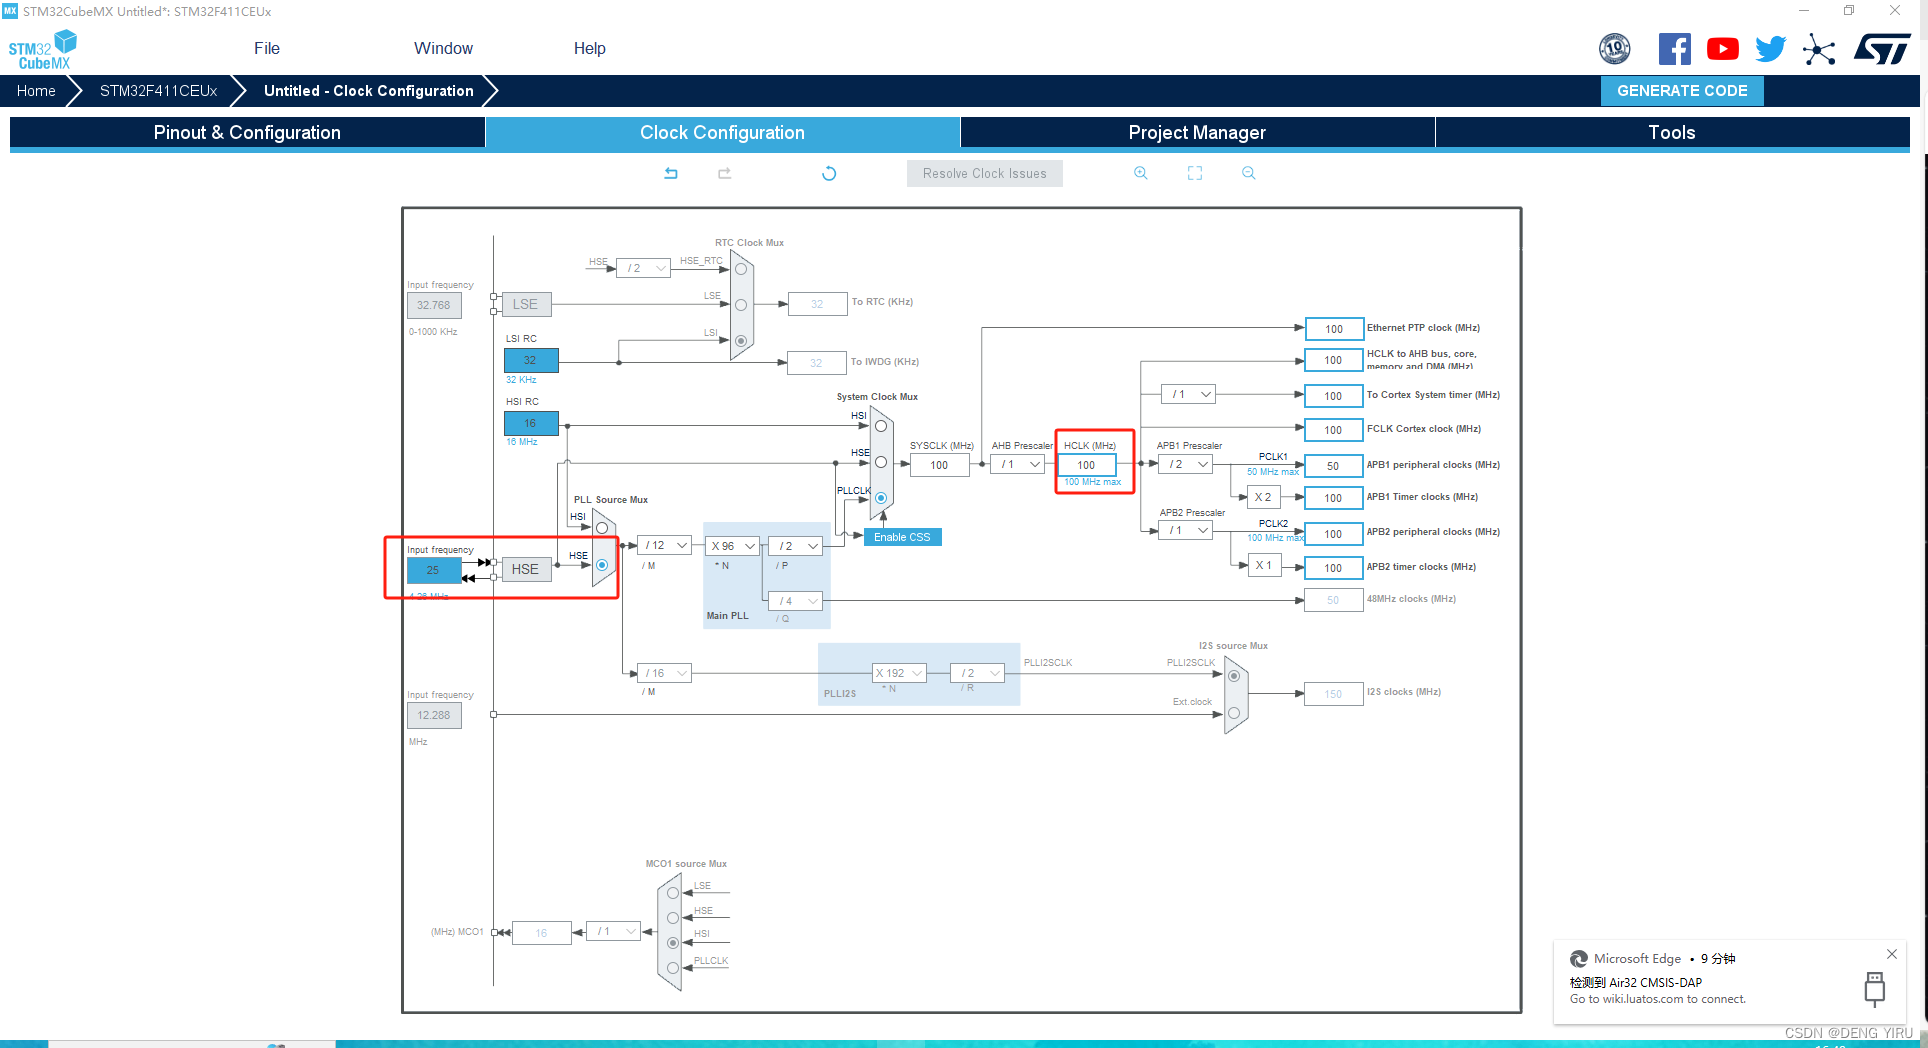
1.2设置时钟树
这里STM32F411最高频率是100MHZ,Broing家的开发板外部晶振提供的是25MHz。
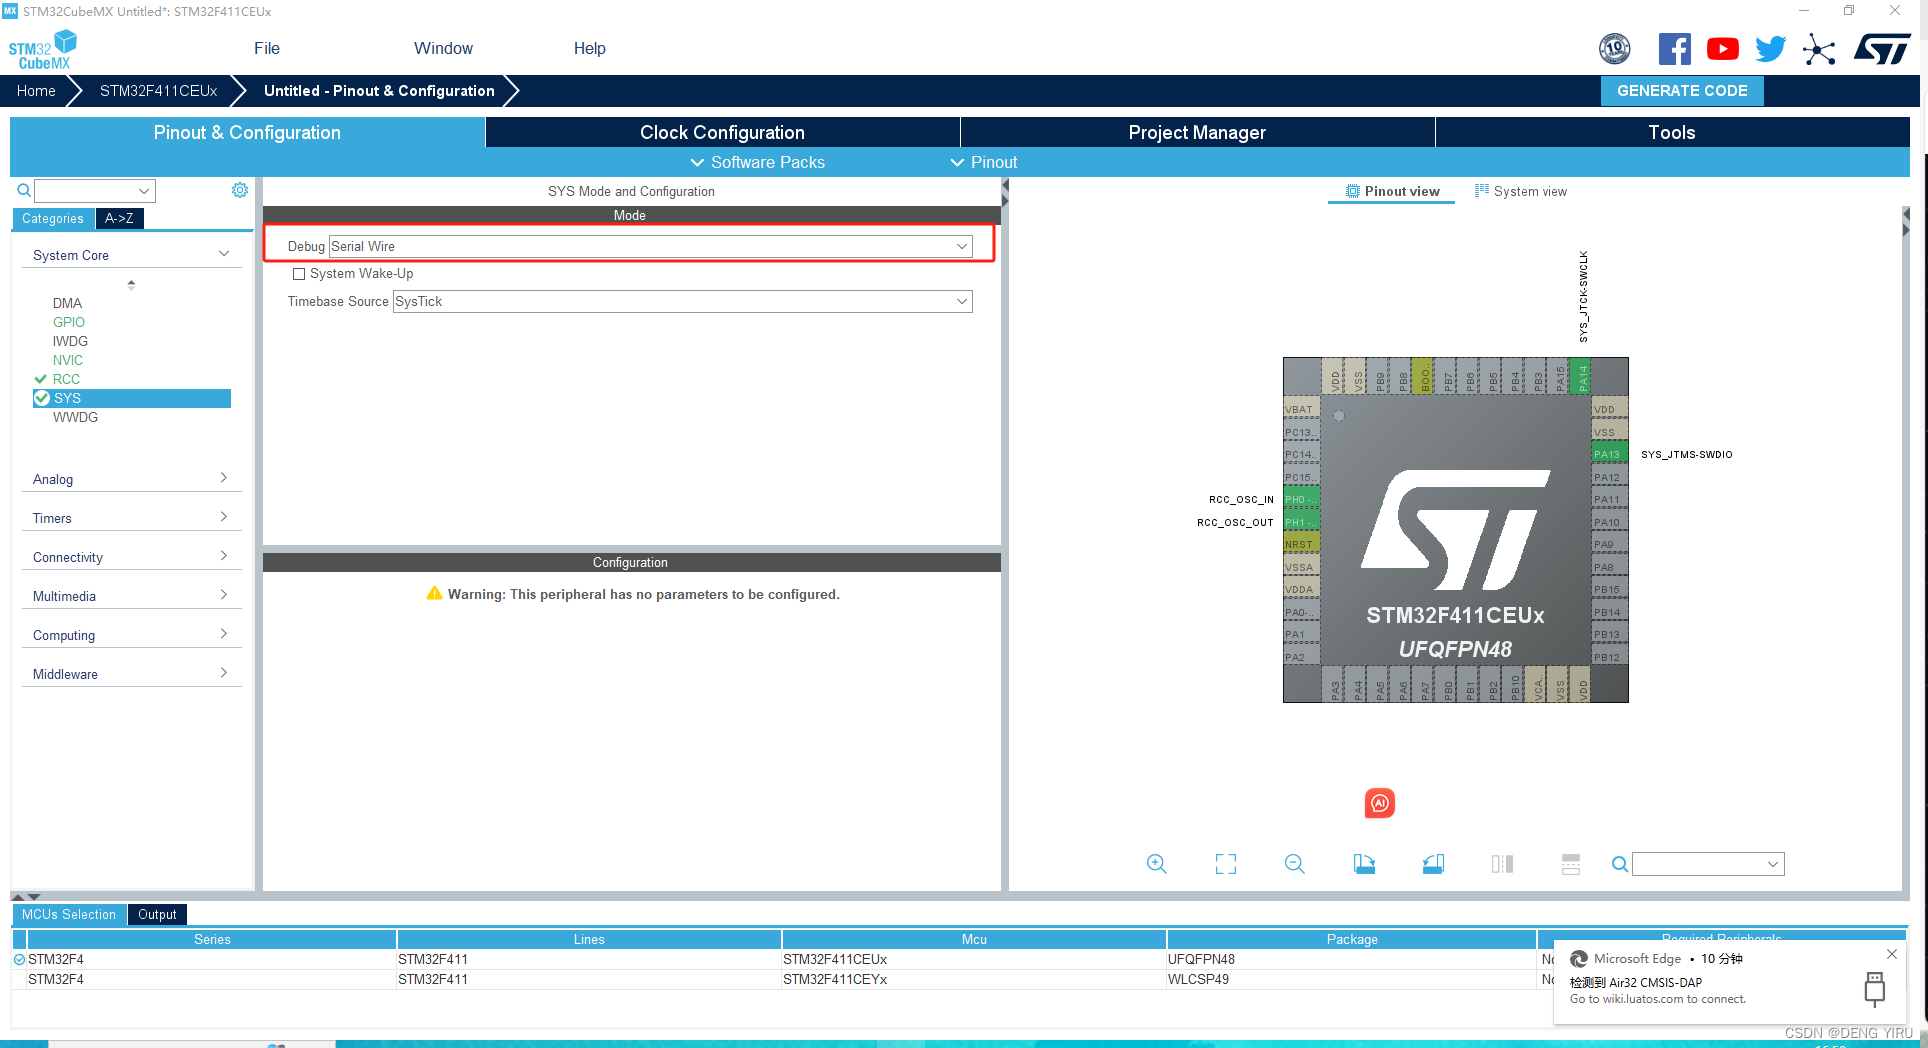
1.3SYS配置
Debug设置成Serial Wire(否则可能导致芯片自锁)
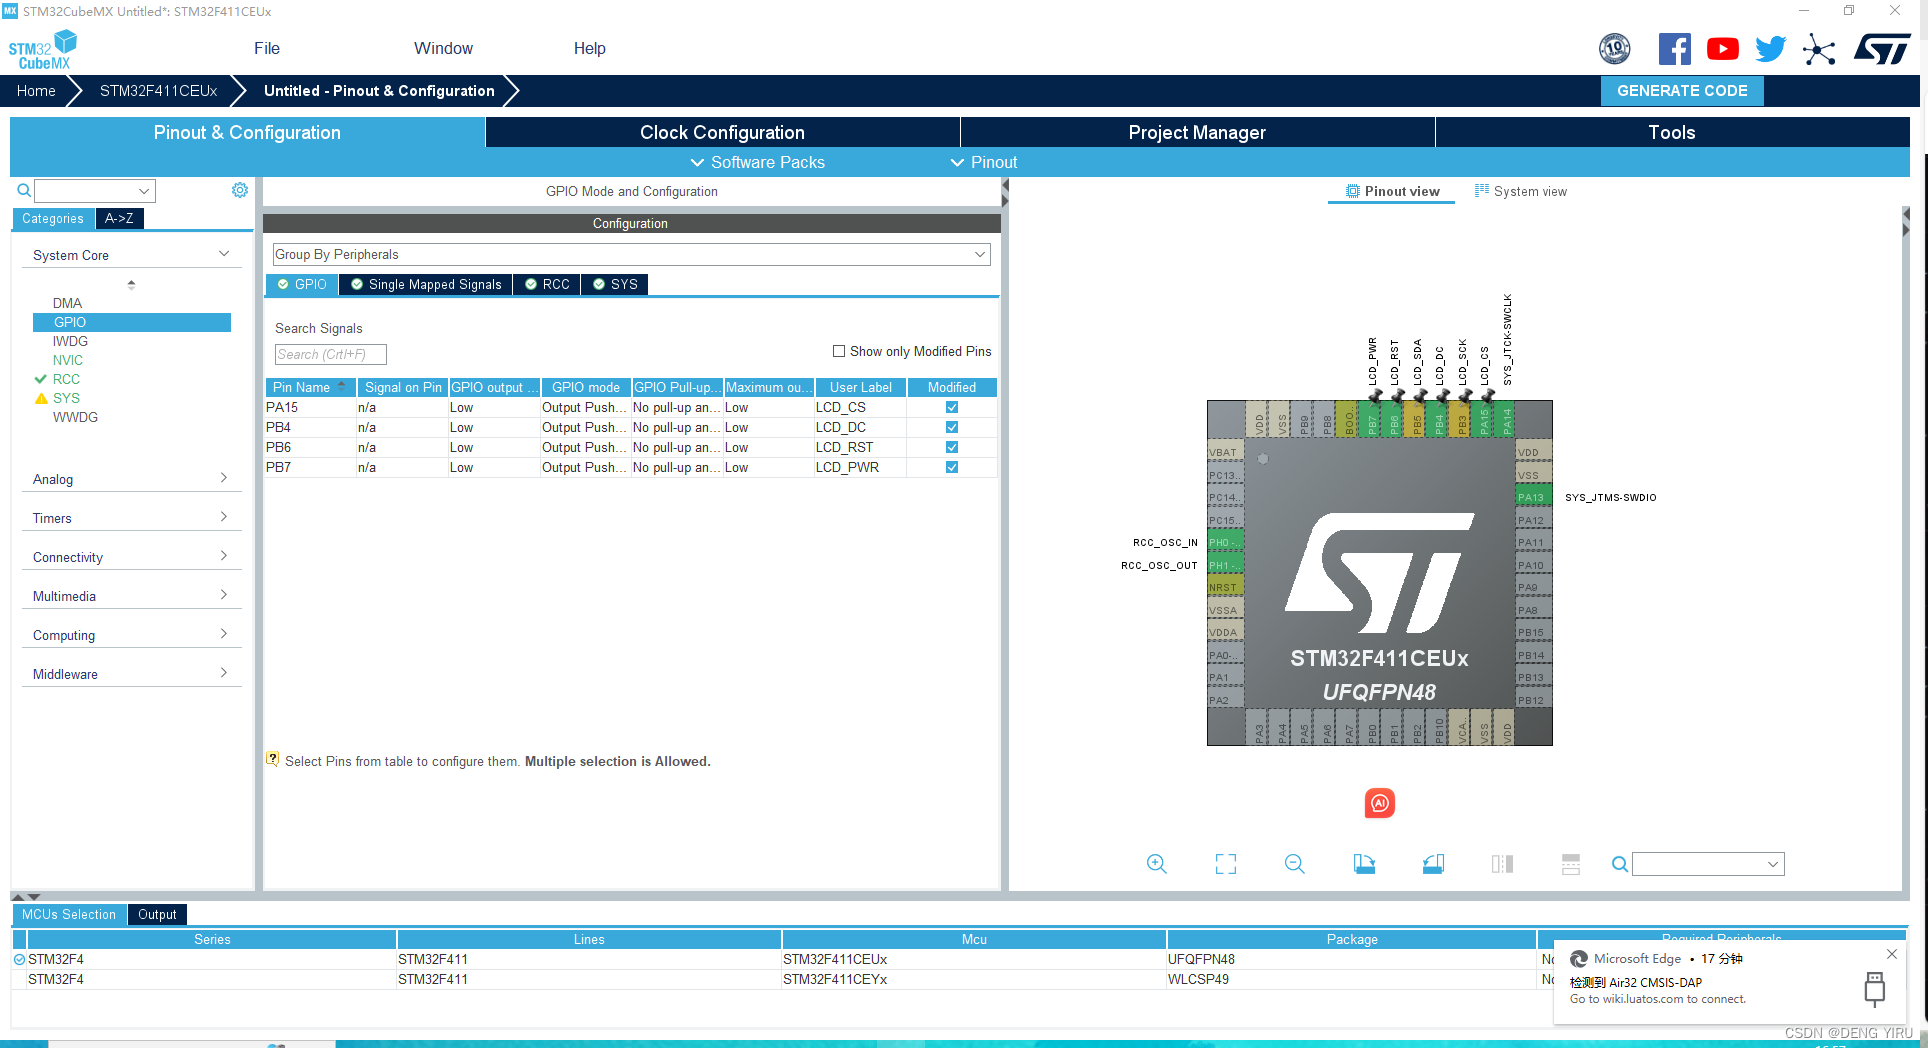
1.4 配置LCD的GPIO
这里以Boring科技给的原理图为例,将以上引脚配置,小编以SPI1为例,因为SPI1预分频之后最高频率为50MHz,用于显示LVGL比较合适。
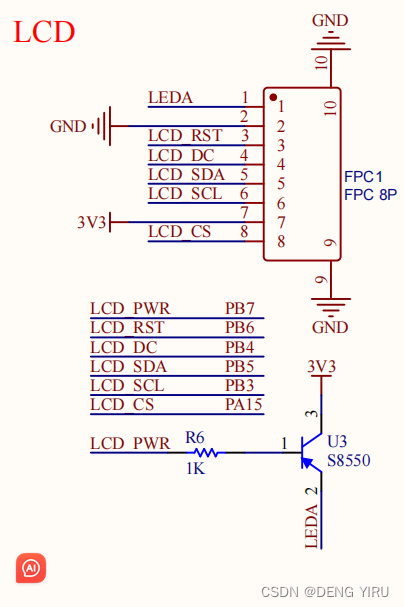
将PB7,PB6,PB4,PB3,PA15都设置为GPIO_OUTPUT,速度为:Hight;
将PB5设置为SPI1_MOSI,PB3设置为SPI1_SCK,并重命名。
根据以上操作是为了后续适配厂家给我们的LCD驱动程序。
1.5 SPI配置
配置使用SPI1作为TFT-LCD通讯方式。这里的SPI1的CPOL(极性)和CPHA(相位)是有商家提供的LCD数据手册来决定的,我使用的Broing家提供的LCD,所以选择这个。
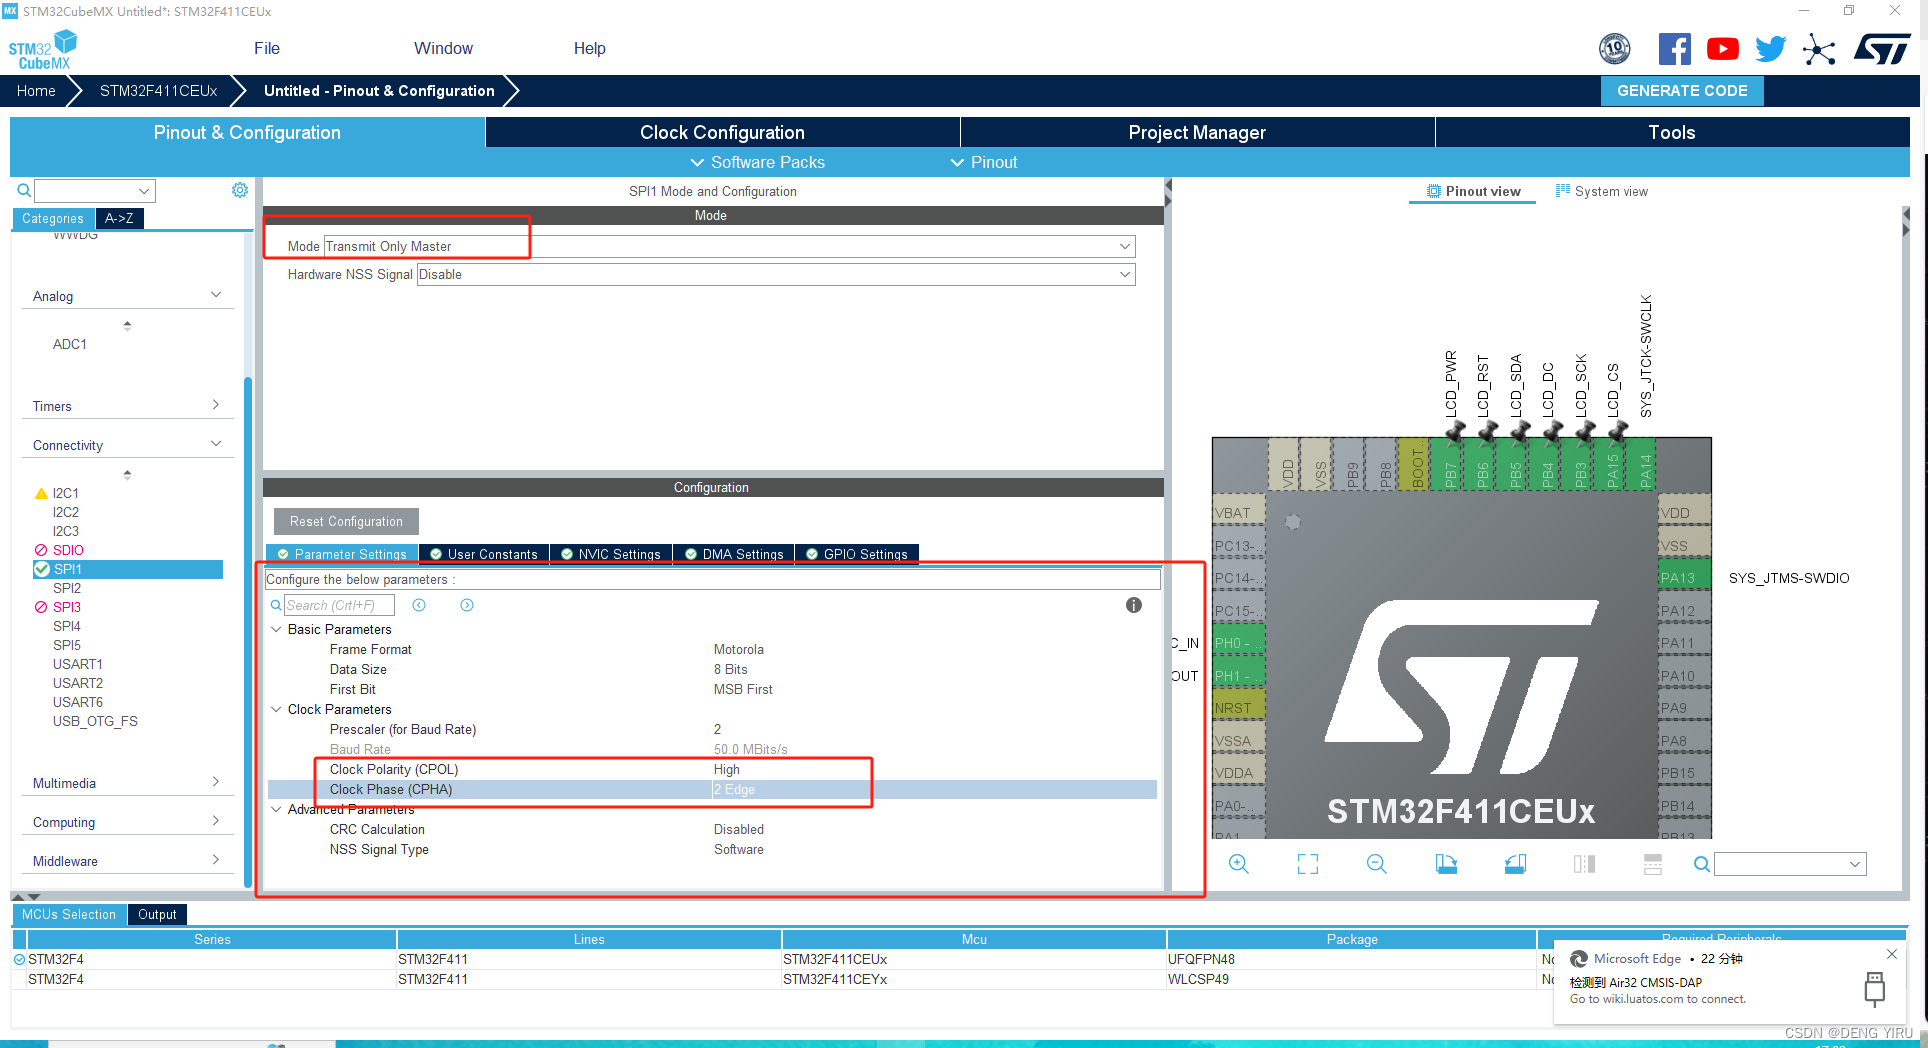
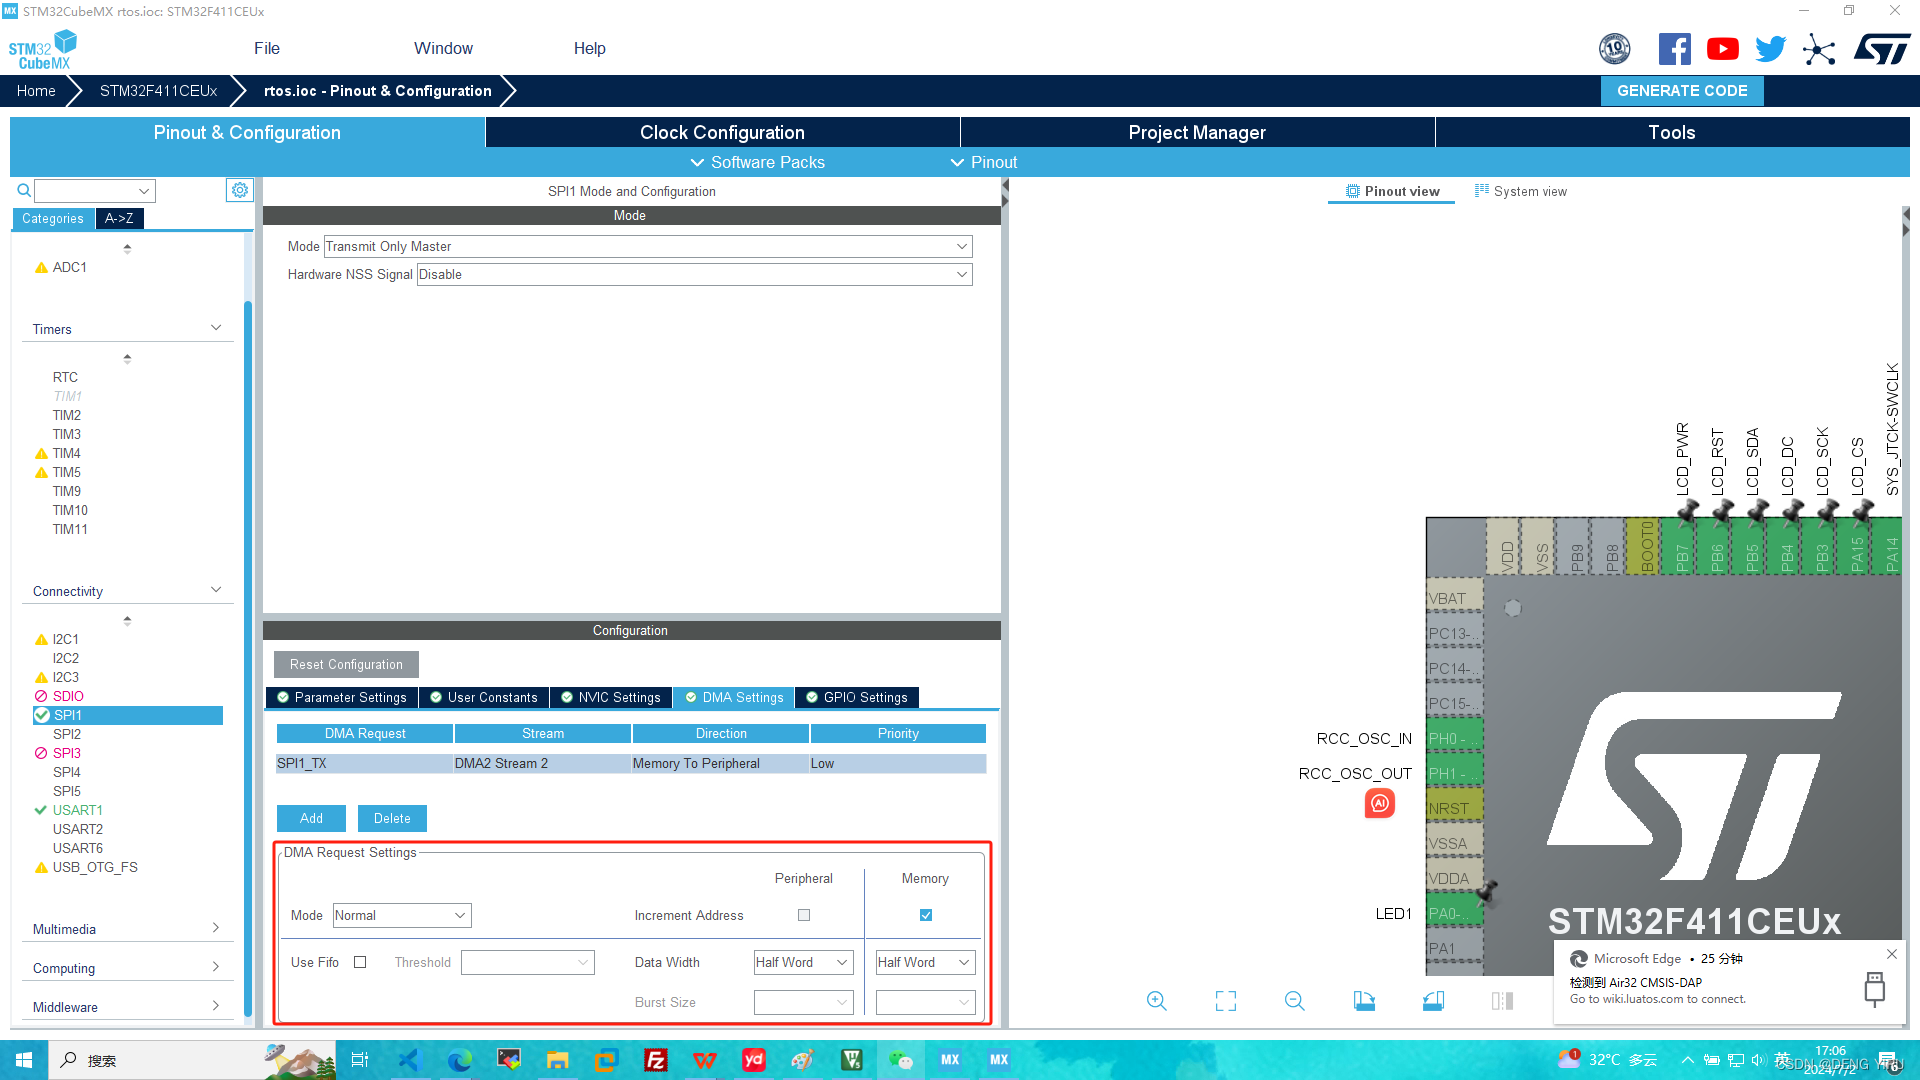
这里开启了SPI1的DMA传输,是为了LVGL传输速率更快。
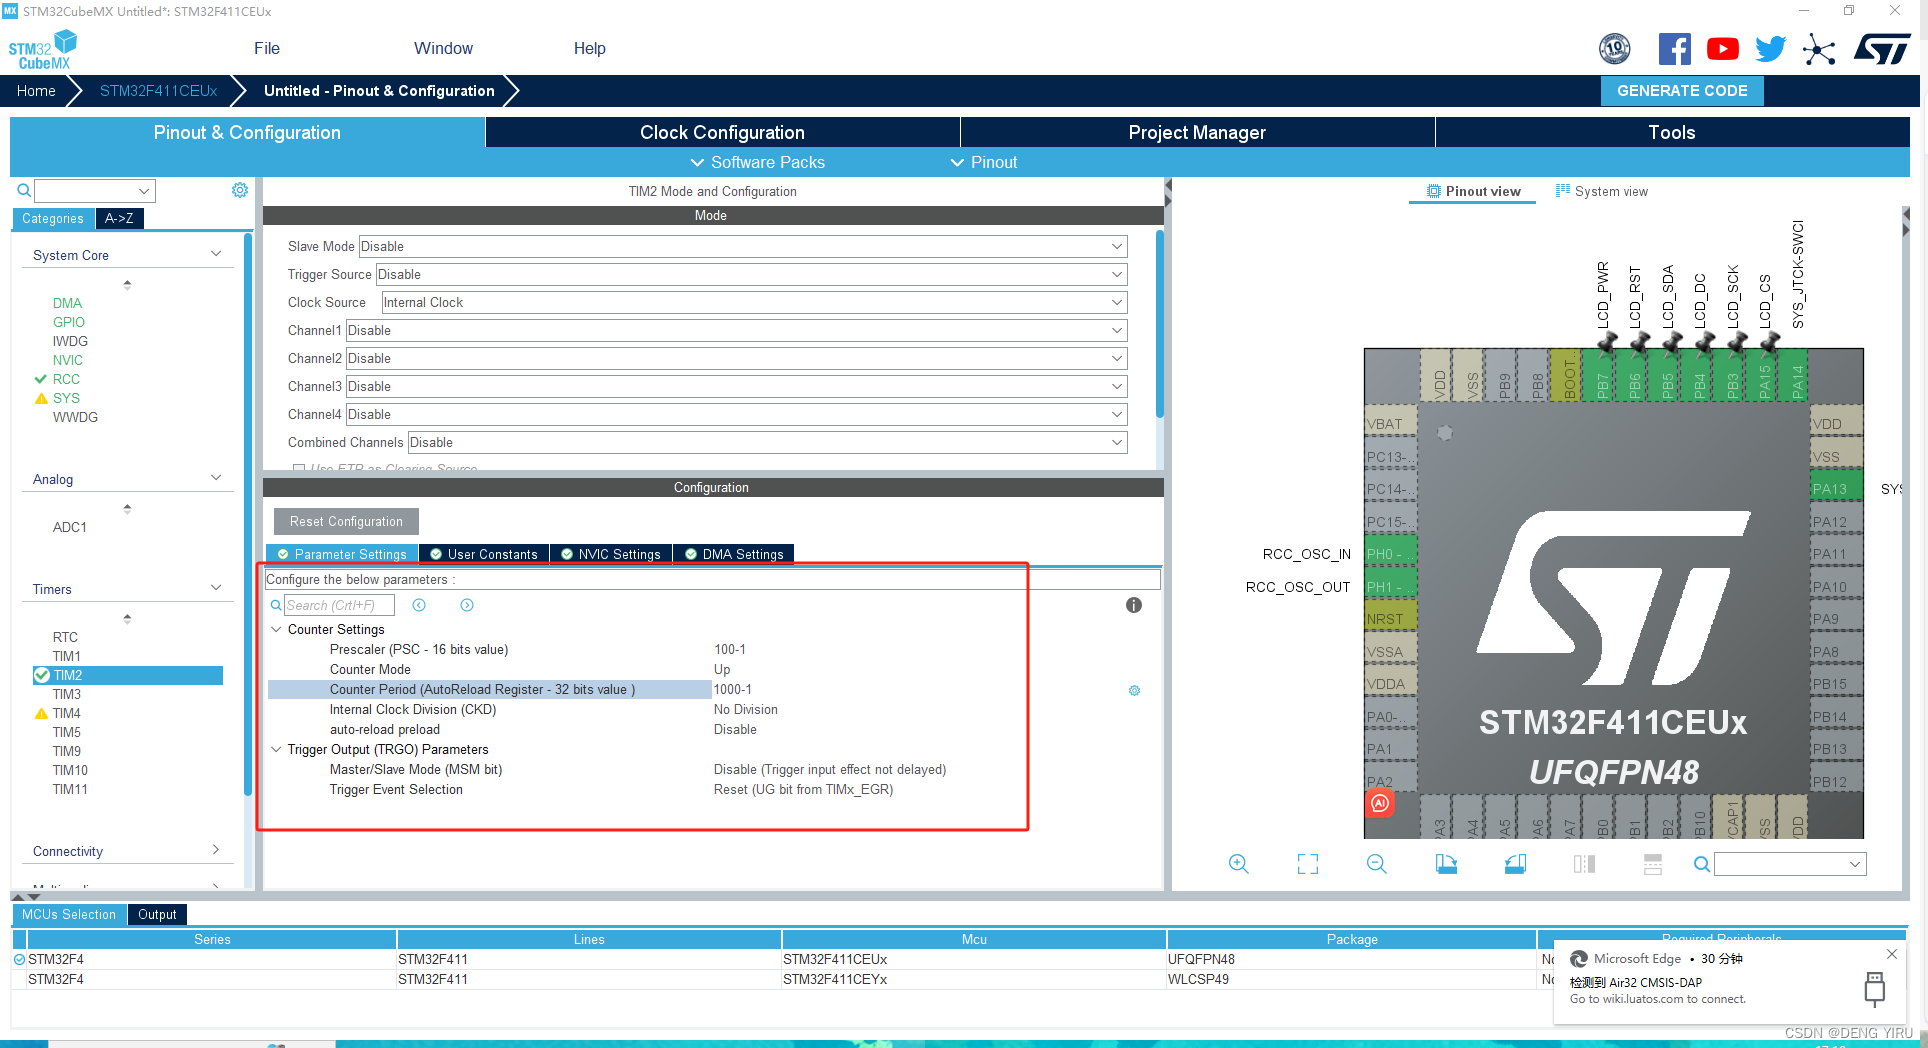
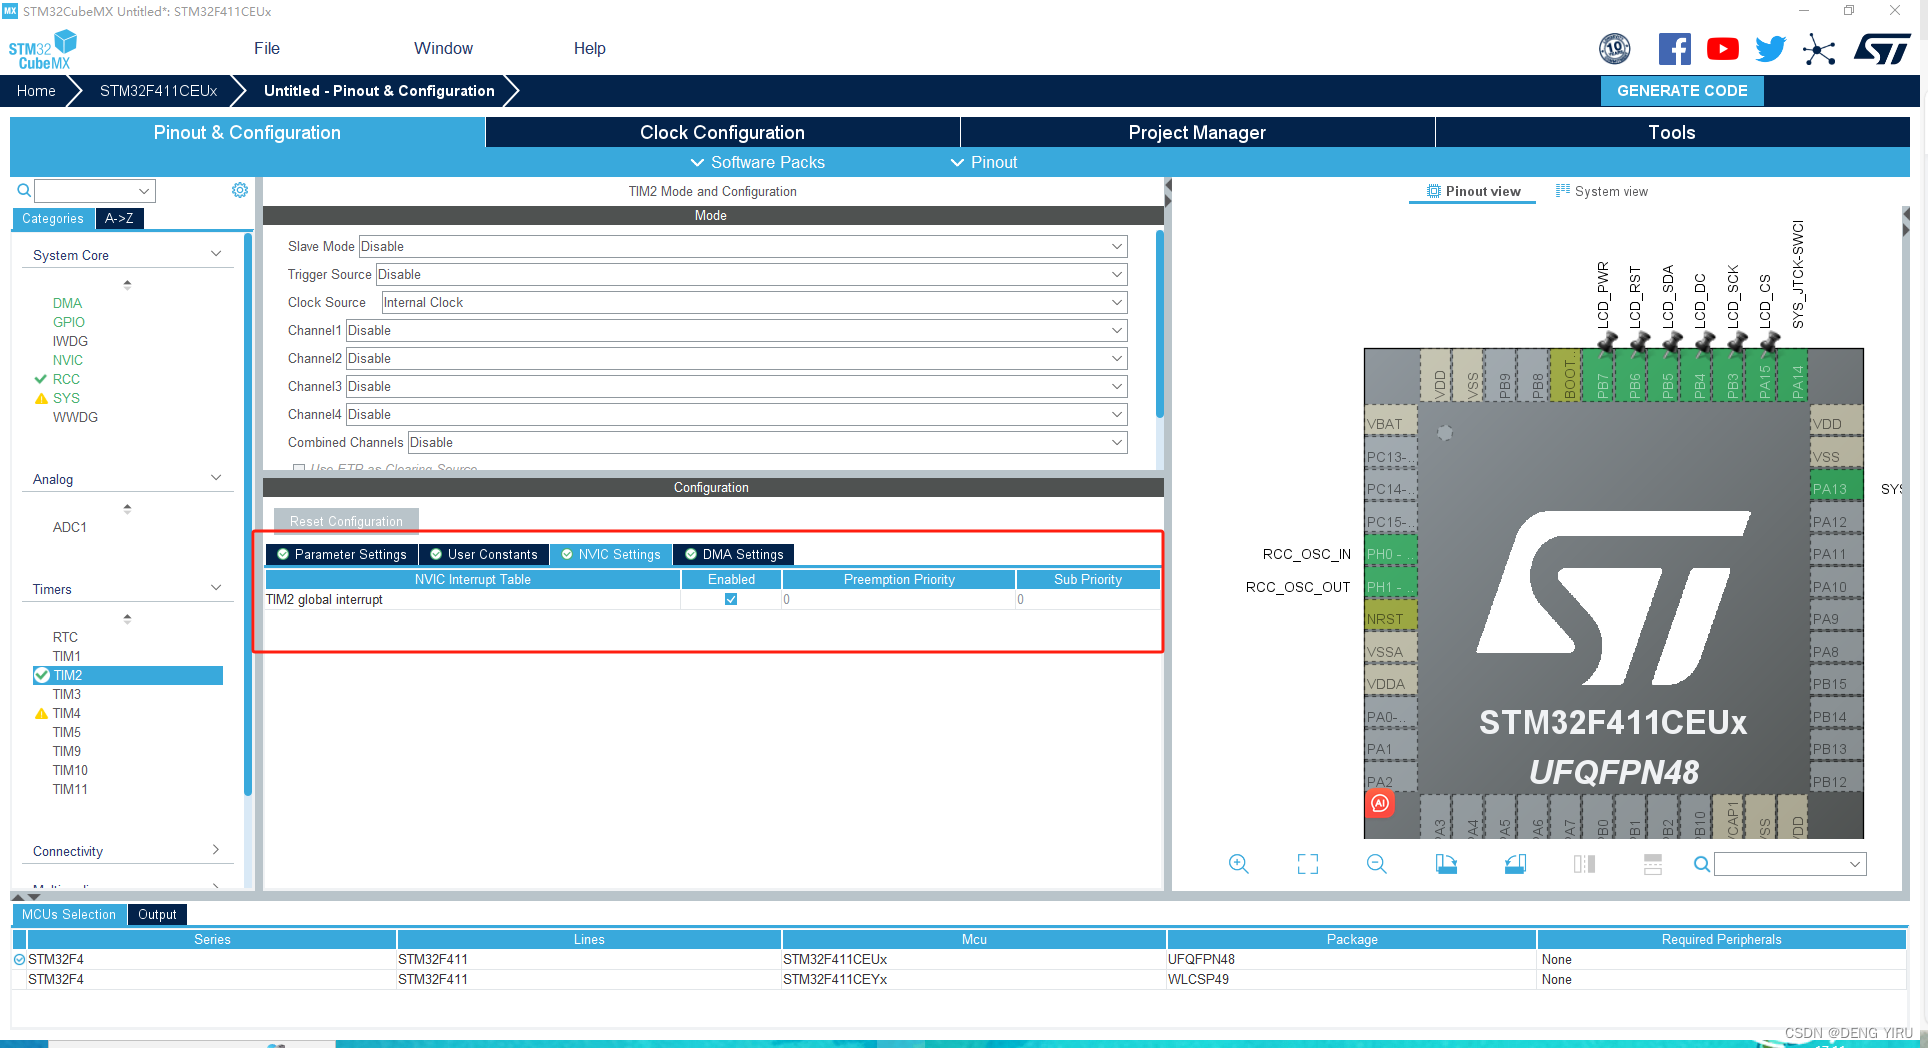
1.6 创建定时器并开启中断
这里创建了中断频率为1ms的TIM2为了后续给LVGL提供心跳使用。
1.7工程配置
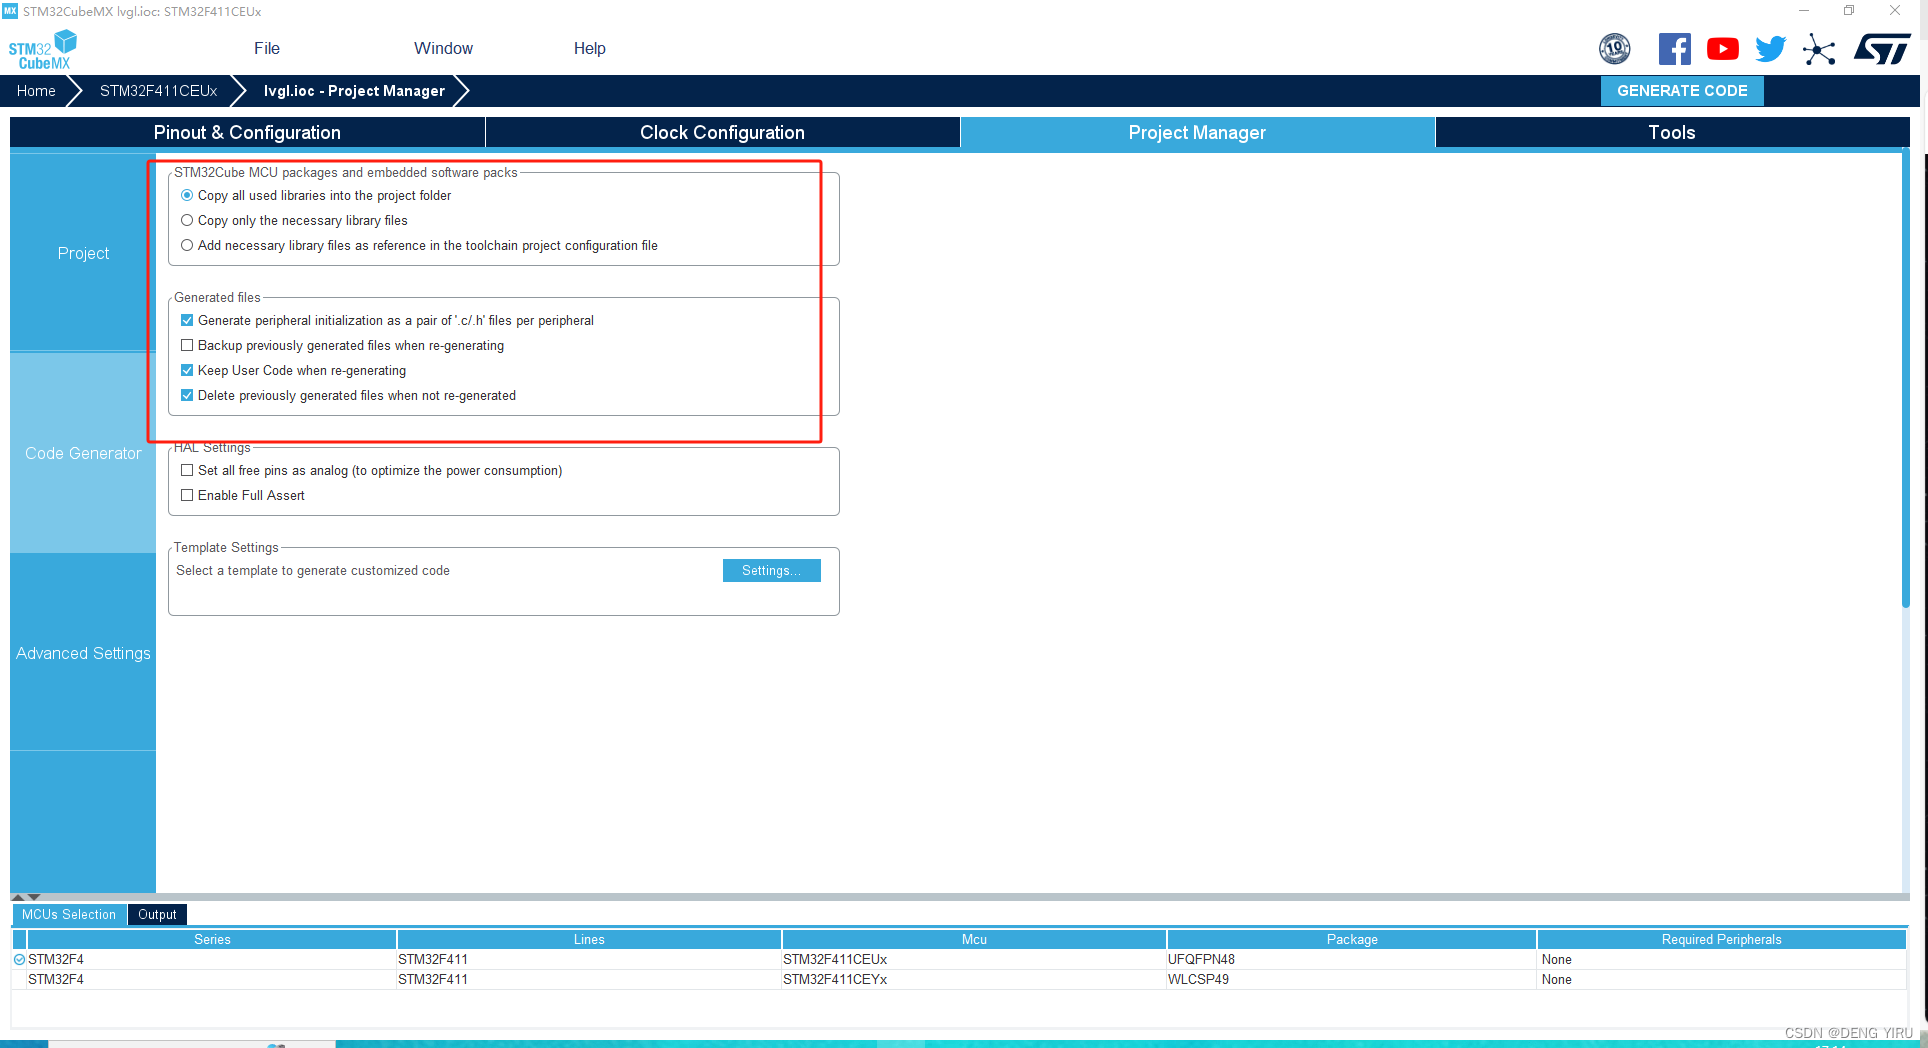
最后这里使用商家提供的LCD显示代码需要修改:
需要在SPI.C添加:
u8 SPI1_ReadWriteByte(u8 TxData)
{
    u8 Rxdata;
    HAL_SPI_TransmitReceive(&hspi1,&TxData,&Rxdata,1, 1000);

 	return Rxdata;          		    //返回收到的数据
}

u8 SPI1_WriteData(u8 *data,u16 size)
{
	return HAL_SPI_Transmit(&hspi1,data,size,1000);

}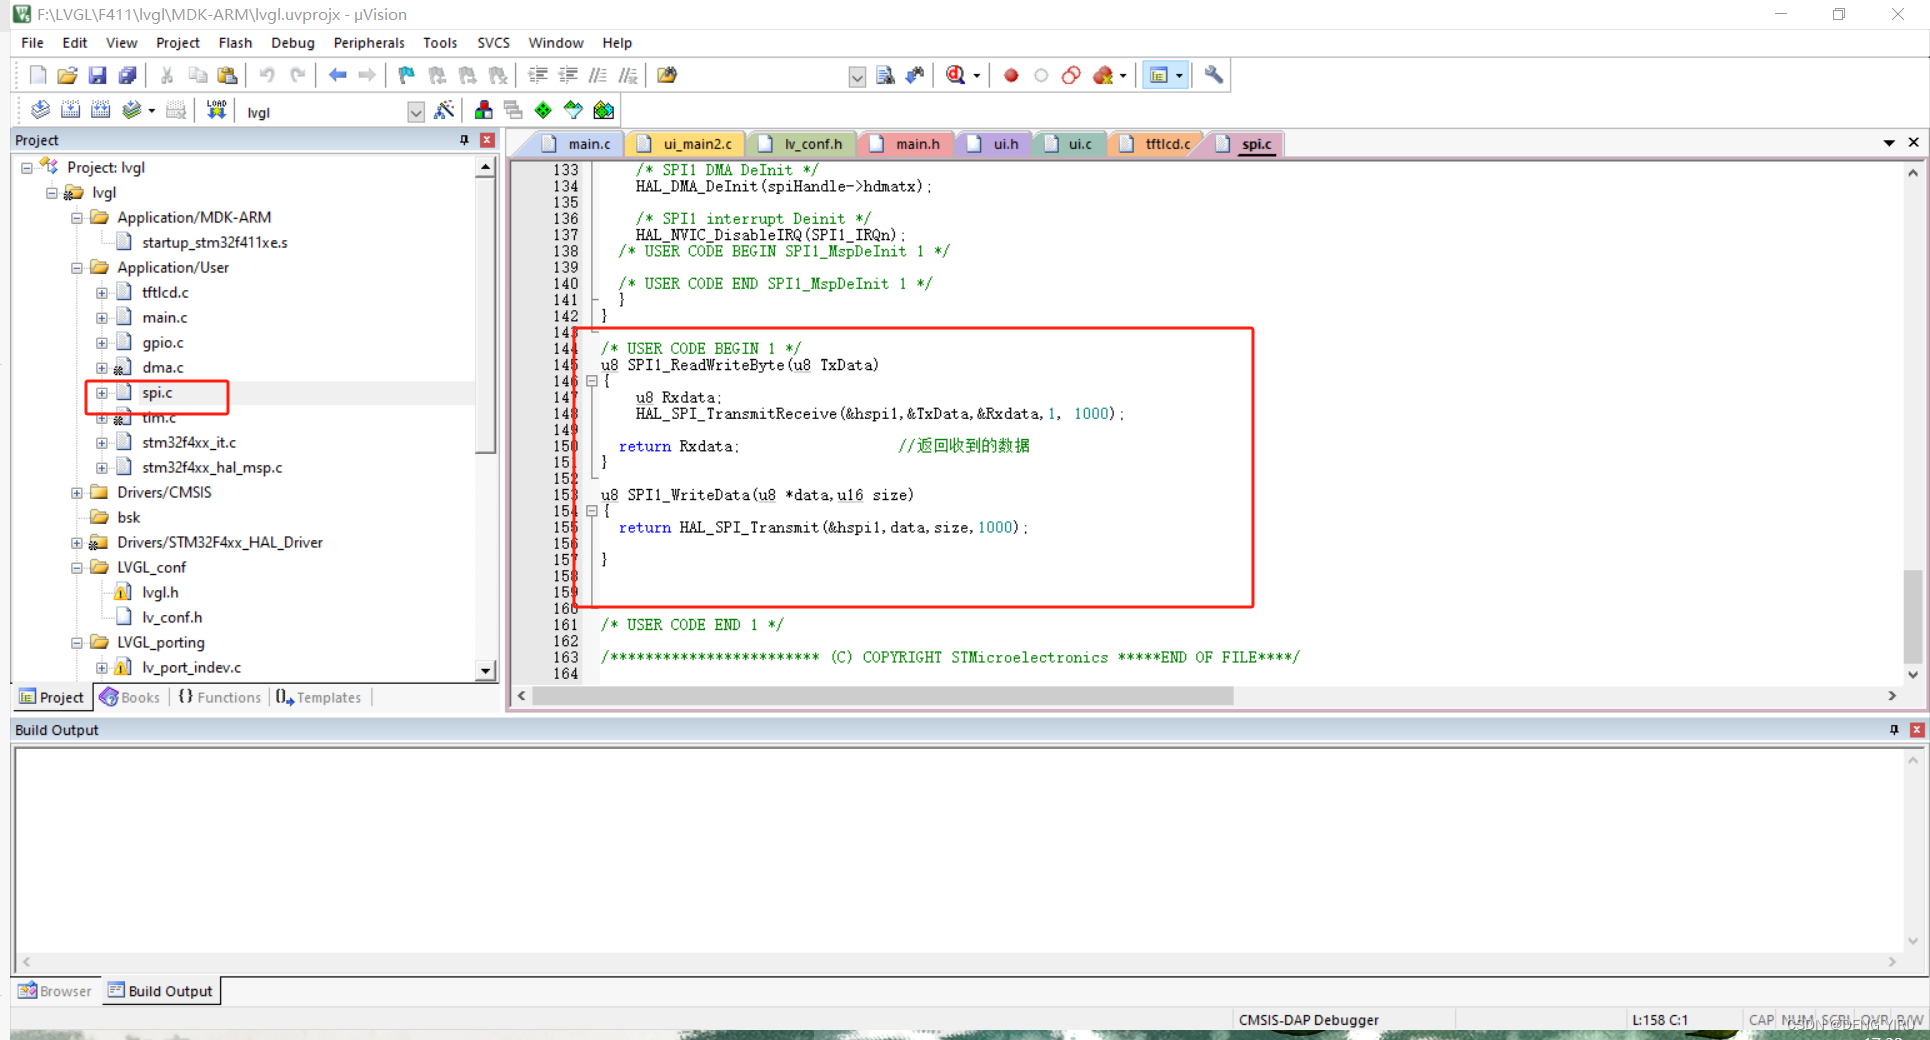
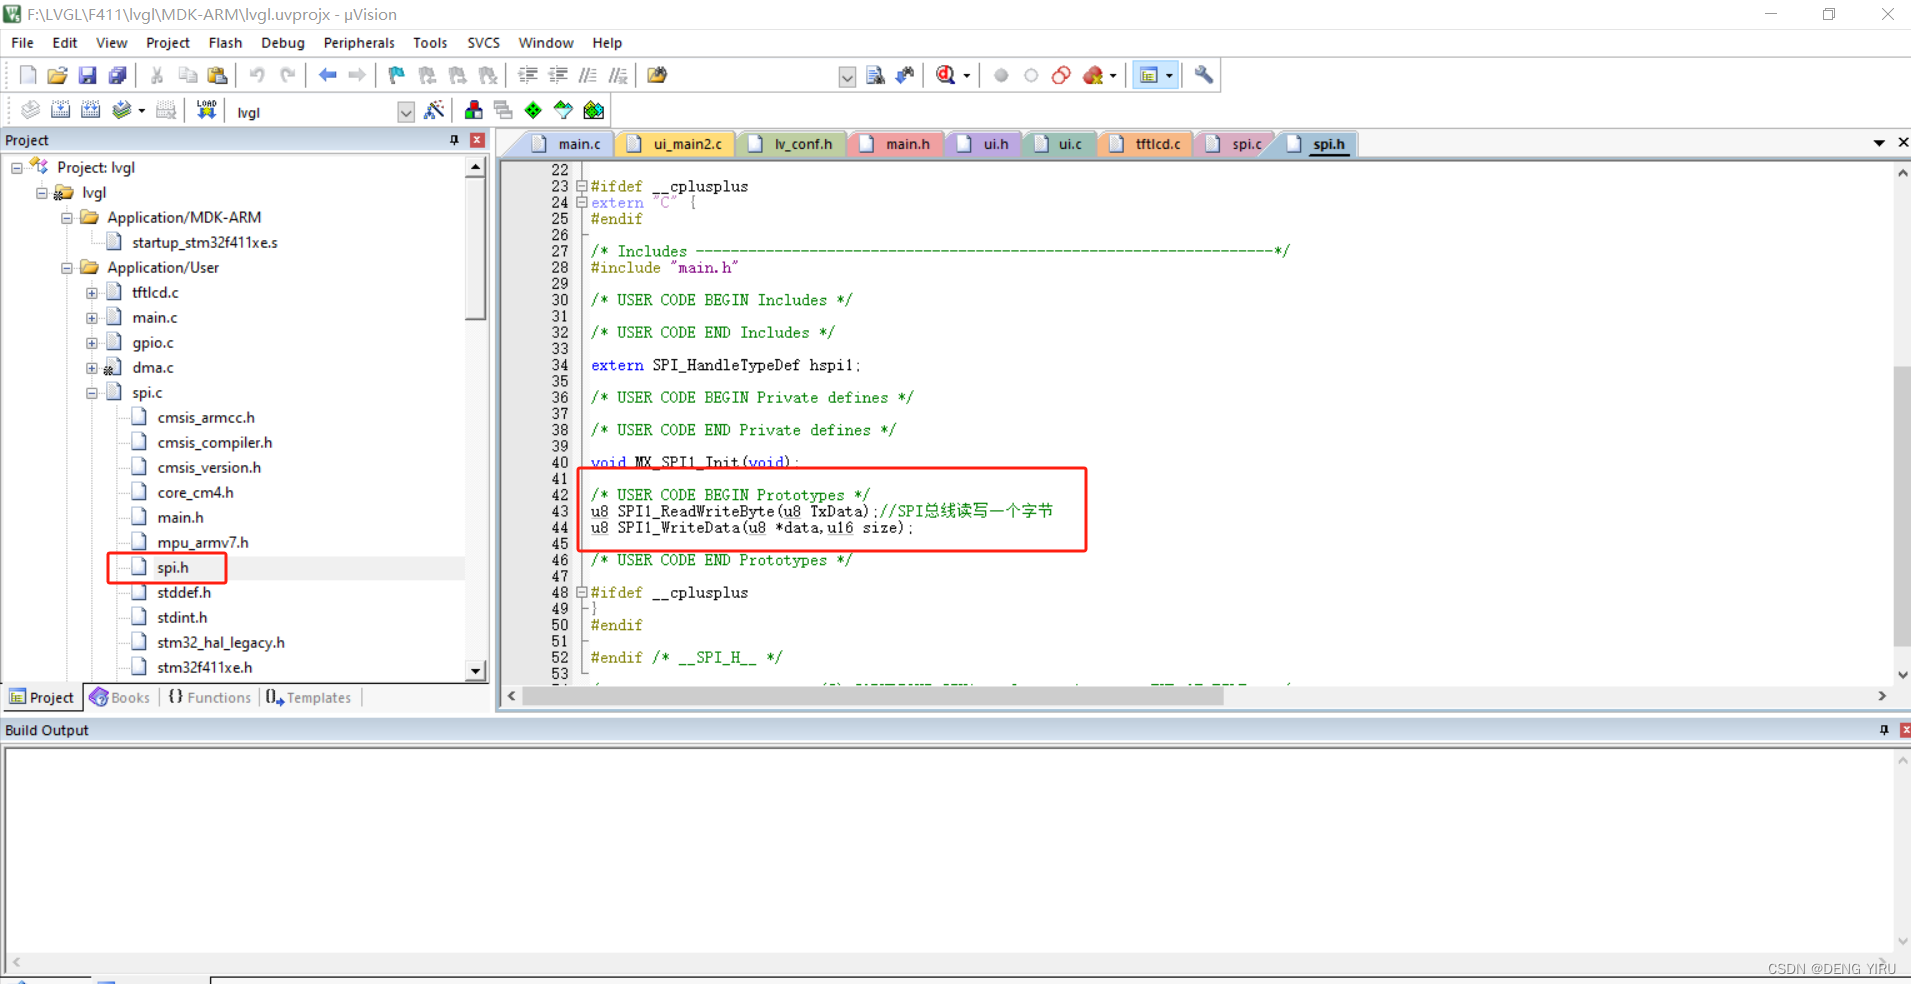
添加完成在SPI.h声明就可以了:
最后在main.c测试一下移植的LCD驱动是否成功:
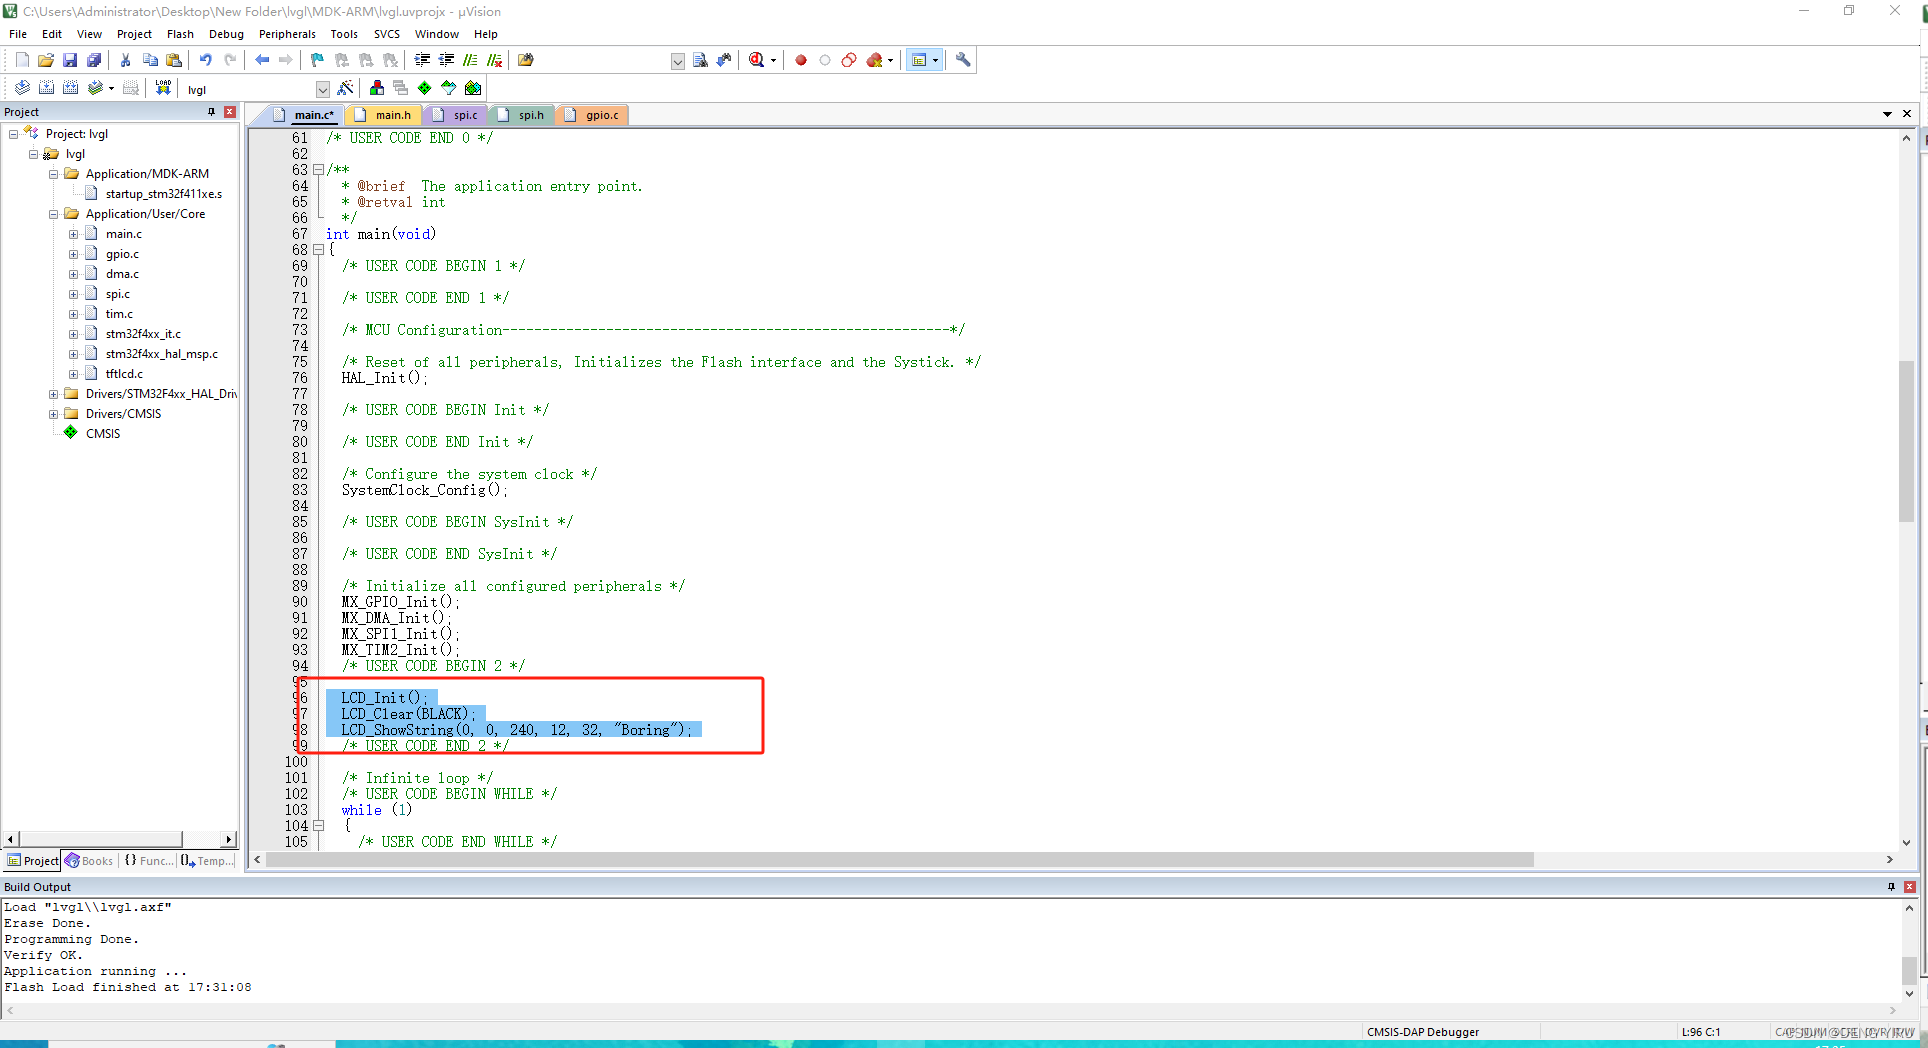
记得添加头文件和路径哦,这里小编就省去添加头文件和路径的步骤了。接下来看LCD的效果显示成功,下一步移植LVGL。

2.STM32CUBEX配置
2.1lvgl简介
lvgl是一款全部用c语言实现的ui图形库,对硬件的要求比较低,可以较为流畅的运行在单片机上。并且完全开源,对按钮,触摸,编码器旋钮等支持的非常到位。
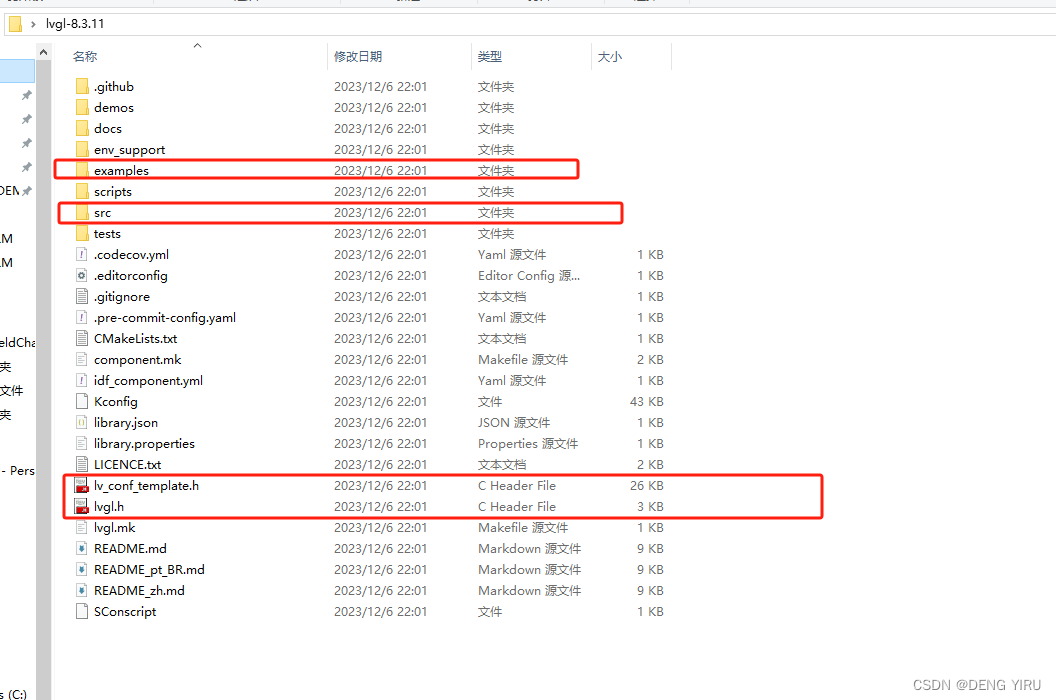
目前我用的是8.3版本可以在github中下载到:
在网盘中也可以下载到:
链接:网盘链接
提取密码:1113
2.2移植和启动LVGL思路
- 实现画点函数(绘制越快越好)
- 为Keil项目添加LVGL文件。
- 在几个port文件里对接API。(port文件就是API对接的端口文件,如lv_port_disp.c)
- 循环调用lv_tick_inc()和lv_task_handler()(我这里开了一个1ms的定时器刷新心跳)
- 调用lvgl的初始化函数(一个主初始化和三个port初始化)
2.3LVGL源码
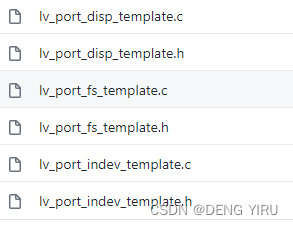
下载以后打开文件可以看见下面四个文件:
将以上文件复制到属于自己的lvgl文件夹。
Q:为什么要改文件名?
A:因为默认名有_tamplate后缀,当然不改也能用,编译器也能编,但代码是人看的,改掉比较好,把后缀_tamplate删除,文件内也要改。
默认名:
改后名:
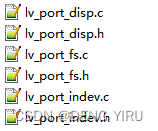
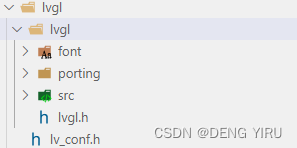
整理好后的文件结构如下:
2.4在keil添加文件
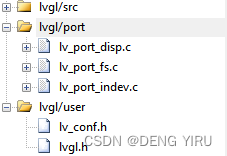
- lvgl/src :源码,所有源码都在项目根目录的src文件夹里,自行添加即可。(比较多,不列出来)
- lvgl/port :port文件,对接API的地方,在 lvgl/porting/中
- lvgl/user:用户文件,放你自己的东西,我放了lvgl头文件和配置文件,方便编辑。
使能port的使用 (重要)
Q:如何使能?
A:在port文件中把“#if 0”改为“#if 1”,c文件和h文件都有这个,其实就是预处理。
2.5显示API 对接(重要)
我们打开文件 “lv_port_disp.c”
找到这两个宏MY_DISP_HOR_RES ,MY_DISP_VER_RES,对应屏幕的长和宽。
#define MY_DISP_HOR_RES    240//这里填屏幕的长
#define MY_DISP_VER_RES    135//这里填屏幕的宽
其中的函数:lv_port_disp_init() 就是我们后面要调用的显示设备初始化函数,先记着,我们来看这个函数的内容:
————————————————
void lv_port_disp_init(void)
{
    /*-------------------------
     * Initialize your display
     * -----------------------*/
	  // 这个就是我们的显示器初始化函数应该放的地方,函数定义在下面
    disp_init();

    /*-----------------------------
     * Create a buffer for drawing
     *----------------------------*/

    /**
     * LVGL requires a buffer where it internally draws the widgets.
     * Later this buffer will passed to your display driver's `flush_cb` to copy its content to your display.
     * The buffer has to be greater than 1 display row
     *
     * There are 3 buffering configurations:
     * 1. Create ONE buffer:
     *      LVGL will draw the display's content here and writes it to your display
     *
     * 2. Create TWO buffer:
     *      LVGL will draw the display's content to a buffer and writes it your display.
     *      You should use DMA to write the buffer's content to the display.
     *      It will enable LVGL to draw the next part of the screen to the other buffer while
     *      the data is being sent form the first buffer. It makes rendering and flushing parallel.
     *
     * 3. Double buffering
     *      Set 2 screens sized buffers and set disp_drv.full_refresh = 1.
     *      This way LVGL will always provide the whole rendered screen in `flush_cb`
     *      and you only need to change the frame buffer's address.
     */

    /* Example for 1) */
//    static lv_disp_draw_buf_t draw_buf_dsc_1;
//    static lv_color_t buf_1[MY_DISP_HOR_RES * 10];                          /*A buffer for 10 rows*/
//    lv_disp_draw_buf_init(&draw_buf_dsc_1, buf_1, NULL, MY_DISP_HOR_RES * 10);   /*Initialize the display buffer*/

    /* Example for 2) */
    static lv_disp_draw_buf_t draw_buf_dsc_2;
    static lv_color_t buf_2_1[MY_DISP_HOR_RES * 10];                        /*A buffer for 10 rows*/
    static lv_color_t buf_2_2[MY_DISP_HOR_RES * 10];                        /*An other buffer for 10 rows*/
    lv_disp_draw_buf_init(&draw_buf_dsc_2, buf_2_1, buf_2_2, MY_DISP_HOR_RES * 10);   /*Initialize the display buffer*/

    /* Example for 3) also set disp_drv.full_refresh = 1 below*/
//    static lv_disp_draw_buf_t draw_buf_dsc_3;
//    static lv_color_t buf_3_1[MY_DISP_HOR_RES * MY_DISP_VER_RES];            /*A screen sized buffer*/
//    static lv_color_t buf_3_2[MY_DISP_HOR_RES * MY_DISP_VER_RES];            /*Another screen sized buffer*/
//    lv_disp_draw_buf_init(&draw_buf_dsc_3, buf_3_1, buf_3_2,
//                          MY_DISP_VER_RES * LV_VER_RES_MAX);   /*Initialize the display buffer*/

    /*-----------------------------------
     * Register the display in LVGL
     *----------------------------------*/

    static lv_disp_drv_t disp_drv;                         /*Descriptor of a display driver*/
    lv_disp_drv_init(&disp_drv);                    /*Basic initialization*/

    /*Set up the functions to access to your display*/

    /*Set the resolution of the display*/
    disp_drv.hor_res = MY_DISP_HOR_RES;
    disp_drv.ver_res = MY_DISP_VER_RES;

    /*Used to copy the buffer's content to the display*/
    disp_drv.flush_cb = disp_flush;

    /*Set a display buffer*/
    disp_drv.draw_buf = &draw_buf_dsc_2;

    /*Required for Example 3)*/
    //disp_drv.full_refresh = 1;

    /* Fill a memory array with a color if you have GPU.
     * Note that, in lv_conf.h you can enable GPUs that has built-in support in LVGL.
     * But if you have a different GPU you can use with this callback.*/
    //disp_drv.gpu_fill_cb = gpu_fill;

    /*Finally register the driver*/
    lv_disp_drv_register(&disp_drv);
}
我使用的是双缓冲区的模块,这样配合DMA刷新会快很多。
我这里采用的是DMA刷新的方式显示,具体代码如下:
/******************************************************************************
      函数说明:在指定区域填充颜色
      入口数据:xsta,ysta   起始坐标
                xend,yend   终止坐标
								color       要填充的颜色
      返回值:  无
******************************************************************************/
void LCD_Color_Fill_DMA(uint16_t xsta, uint16_t ysta, uint16_t xend, uint16_t yend, uint16_t *color_p)
{
	u16 width,height;
	width = xend-xsta+1;
	height = yend-ysta+1;
	uint32_t size = width * height;

	LCD_Address_Set(xsta,ysta,xend,yend);
	LCD_DC(1);
	hspi1.Init.DataSize = SPI_DATASIZE_16BIT;
hspi1.Instance->CR1|=SPI_CR1_DFF;


	HAL_SPI_Transmit_DMA(&hspi1,(uint8_t*)color_p,size);
	while(__HAL_DMA_GET_COUNTER(&hdma_spi1_tx)!=0);

	hspi1.Init.DataSize = SPI_DATASIZE_8BIT;
	hspi1.Instance->CR1&=~SPI_CR1_DFF;
}
我们继续往下看,找到disp_flush函数的定义,参考我下面的改法:
/*Flush the content of the internal buffer the specific area on the display
 *You can use DMA or any hardware acceleration to do this operation in the background but
 *'lv_disp_flush_ready()' has to be called when finished.*/
static void disp_flush(lv_disp_drv_t * disp_drv, const lv_area_t * area, lv_color_t * color_p)
{

	LCD_Color_Fill_DMA(area->x1,area->y1,area->x2,area->y2,(uint16_t*)color_p);
    lv_disp_flush_ready(disp_drv);
}
具体的lv_port_disp.c如下:
/**
 * @file lv_port_disp_templ.c
 *
 */

/*Copy this file as "lv_port_disp.c" and set this value to "1" to enable content*/
#if 1

/*********************
 *      INCLUDES
 *********************/
#include "lv_port_disp.h"
#include <stdbool.h>
#include "tftlcd.h"
/*********************
 *      DEFINES
 *********************/
#define MY_DISP_HOR_RES    240//这里填屏幕的长
#define MY_DISP_VER_RES    135//这里填屏幕的宽


/**********************
 *      TYPEDEFS
 **********************/

/**********************
 *  STATIC PROTOTYPES
 **********************/
static void disp_init(void);

static void disp_flush(lv_disp_drv_t * disp_drv, const lv_area_t * area, lv_color_t * color_p);
//static void gpu_fill(lv_disp_drv_t * disp_drv, lv_color_t * dest_buf, lv_coord_t dest_width,
//        const lv_area_t * fill_area, lv_color_t color);

/**********************
 *  STATIC VARIABLES
 **********************/

/**********************
 *      MACROS
 **********************/

/**********************
 *   GLOBAL FUNCTIONS
 **********************/

void lv_port_disp_init(void)
{
    /*-------------------------
     * Initialize your display
     * -----------------------*/
	  // 这个就是我们的显示器初始化函数应该放的地方,函数定义在下面
    disp_init();

    /*-----------------------------
     * Create a buffer for drawing
     *----------------------------*/

    /**
     * LVGL requires a buffer where it internally draws the widgets.
     * Later this buffer will passed to your display driver's `flush_cb` to copy its content to your display.
     * The buffer has to be greater than 1 display row
     *
     * There are 3 buffering configurations:
     * 1. Create ONE buffer:
     *      LVGL will draw the display's content here and writes it to your display
     *
     * 2. Create TWO buffer:
     *      LVGL will draw the display's content to a buffer and writes it your display.
     *      You should use DMA to write the buffer's content to the display.
     *      It will enable LVGL to draw the next part of the screen to the other buffer while
     *      the data is being sent form the first buffer. It makes rendering and flushing parallel.
     *
     * 3. Double buffering
     *      Set 2 screens sized buffers and set disp_drv.full_refresh = 1.
     *      This way LVGL will always provide the whole rendered screen in `flush_cb`
     *      and you only need to change the frame buffer's address.
     */

    /* Example for 1) */
//    static lv_disp_draw_buf_t draw_buf_dsc_1;
//    static lv_color_t buf_1[MY_DISP_HOR_RES * 10];                          /*A buffer for 10 rows*/
//    lv_disp_draw_buf_init(&draw_buf_dsc_1, buf_1, NULL, MY_DISP_HOR_RES * 10);   /*Initialize the display buffer*/

    /* Example for 2) */
    static lv_disp_draw_buf_t draw_buf_dsc_2;
    static lv_color_t buf_2_1[MY_DISP_HOR_RES * 10];                        /*A buffer for 10 rows*/
    static lv_color_t buf_2_2[MY_DISP_HOR_RES * 10];                        /*An other buffer for 10 rows*/
    lv_disp_draw_buf_init(&draw_buf_dsc_2, buf_2_1, buf_2_2, MY_DISP_HOR_RES * 10);   /*Initialize the display buffer*/

    /* Example for 3) also set disp_drv.full_refresh = 1 below*/
//    static lv_disp_draw_buf_t draw_buf_dsc_3;
//    static lv_color_t buf_3_1[MY_DISP_HOR_RES * MY_DISP_VER_RES];            /*A screen sized buffer*/
//    static lv_color_t buf_3_2[MY_DISP_HOR_RES * MY_DISP_VER_RES];            /*Another screen sized buffer*/
//    lv_disp_draw_buf_init(&draw_buf_dsc_3, buf_3_1, buf_3_2,
//                          MY_DISP_VER_RES * LV_VER_RES_MAX);   /*Initialize the display buffer*/

    /*-----------------------------------
     * Register the display in LVGL
     *----------------------------------*/

    static lv_disp_drv_t disp_drv;                         /*Descriptor of a display driver*/
    lv_disp_drv_init(&disp_drv);                    /*Basic initialization*/

    /*Set up the functions to access to your display*/

    /*Set the resolution of the display*/
    disp_drv.hor_res = MY_DISP_HOR_RES;
    disp_drv.ver_res = MY_DISP_VER_RES;

    /*Used to copy the buffer's content to the display*/
    disp_drv.flush_cb = disp_flush;

    /*Set a display buffer*/
    disp_drv.draw_buf = &draw_buf_dsc_2;

    /*Required for Example 3)*/
    //disp_drv.full_refresh = 1;

    /* Fill a memory array with a color if you have GPU.
     * Note that, in lv_conf.h you can enable GPUs that has built-in support in LVGL.
     * But if you have a different GPU you can use with this callback.*/
    //disp_drv.gpu_fill_cb = gpu_fill;

    /*Finally register the driver*/
    lv_disp_drv_register(&disp_drv);
}

/**********************
 *   STATIC FUNCTIONS
 **********************/

/*Initialize your display and the required peripherals.*/
static void disp_init(void)
{
    /*You code here*/
	  LCD_Init();
}

volatile bool disp_flush_enabled = true;

/* Enable updating the screen (the flushing process) when disp_flush() is called by LVGL
 */
void disp_enable_update(void)
{
    disp_flush_enabled = true;
}

/* Disable updating the screen (the flushing process) when disp_flush() is called by LVGL
 */
void disp_disable_update(void)
{
    disp_flush_enabled = false;
}

/*Flush the content of the internal buffer the specific area on the display
 *You can use DMA or any hardware acceleration to do this operation in the background but
 *'lv_disp_flush_ready()' has to be called when finished.*/
static void disp_flush(lv_disp_drv_t * disp_drv, const lv_area_t * area, lv_color_t * color_p)
{

		LCD_Color_Fill_DMA(area->x1,area->y1,area->x2,area->y2,(uint16_t*)color_p);

    lv_disp_flush_ready(disp_drv);
}

/*OPTIONAL: GPU INTERFACE*/

/*If your MCU has hardware accelerator (GPU) then you can use it to fill a memory with a color*/
//static void gpu_fill(lv_disp_drv_t * disp_drv, lv_color_t * dest_buf, lv_coord_t dest_width,
//                    const lv_area_t * fill_area, lv_color_t color)
//{
//    /*It's an example code which should be done by your GPU*/
//    int32_t x, y;
//    dest_buf += dest_width * fill_area->y1; /*Go to the first line*/
//
//    for(y = fill_area->y1; y <= fill_area->y2; y++) {
//        for(x = fill_area->x1; x <= fill_area->x2; x++) {
//            dest_buf[x] = color;
//        }
//        dest_buf+=dest_width;    /*Go to the next line*/
//    }
//}


#else /*Enable this file at the top*/

/*This dummy typedef exists purely to silence -Wpedantic.*/
typedef int keep_pedantic_happy;
#endif
lv_conf.h 中把“#if 0”改为“#if 1”
那么做到这里,你已经完成了显示API的对接了,接下来可以启动LVGL了。
2.5 启动LVGL
到了这步就很简单了,按照下面顺序在main函数中调用几个初始化函数即可。但是光这样还不能使用LVGL,因为他没有“心跳”。
	lv_init();			  // lvgl系统初始化
	lv_port_disp_init();  // lvgl显示接口初始化,放在lv_init()的后面
我这里使用了一个1ms的定时器中断提供心跳:
void HAL_TIM_PeriodElapsedCallback(TIM_HandleTypeDef *htim)
{
if(htim->Instance == TIM2)
{
lv_tick_inc(1); // tick单位是ms,设置为1ms即可,一般只要有值就行
}
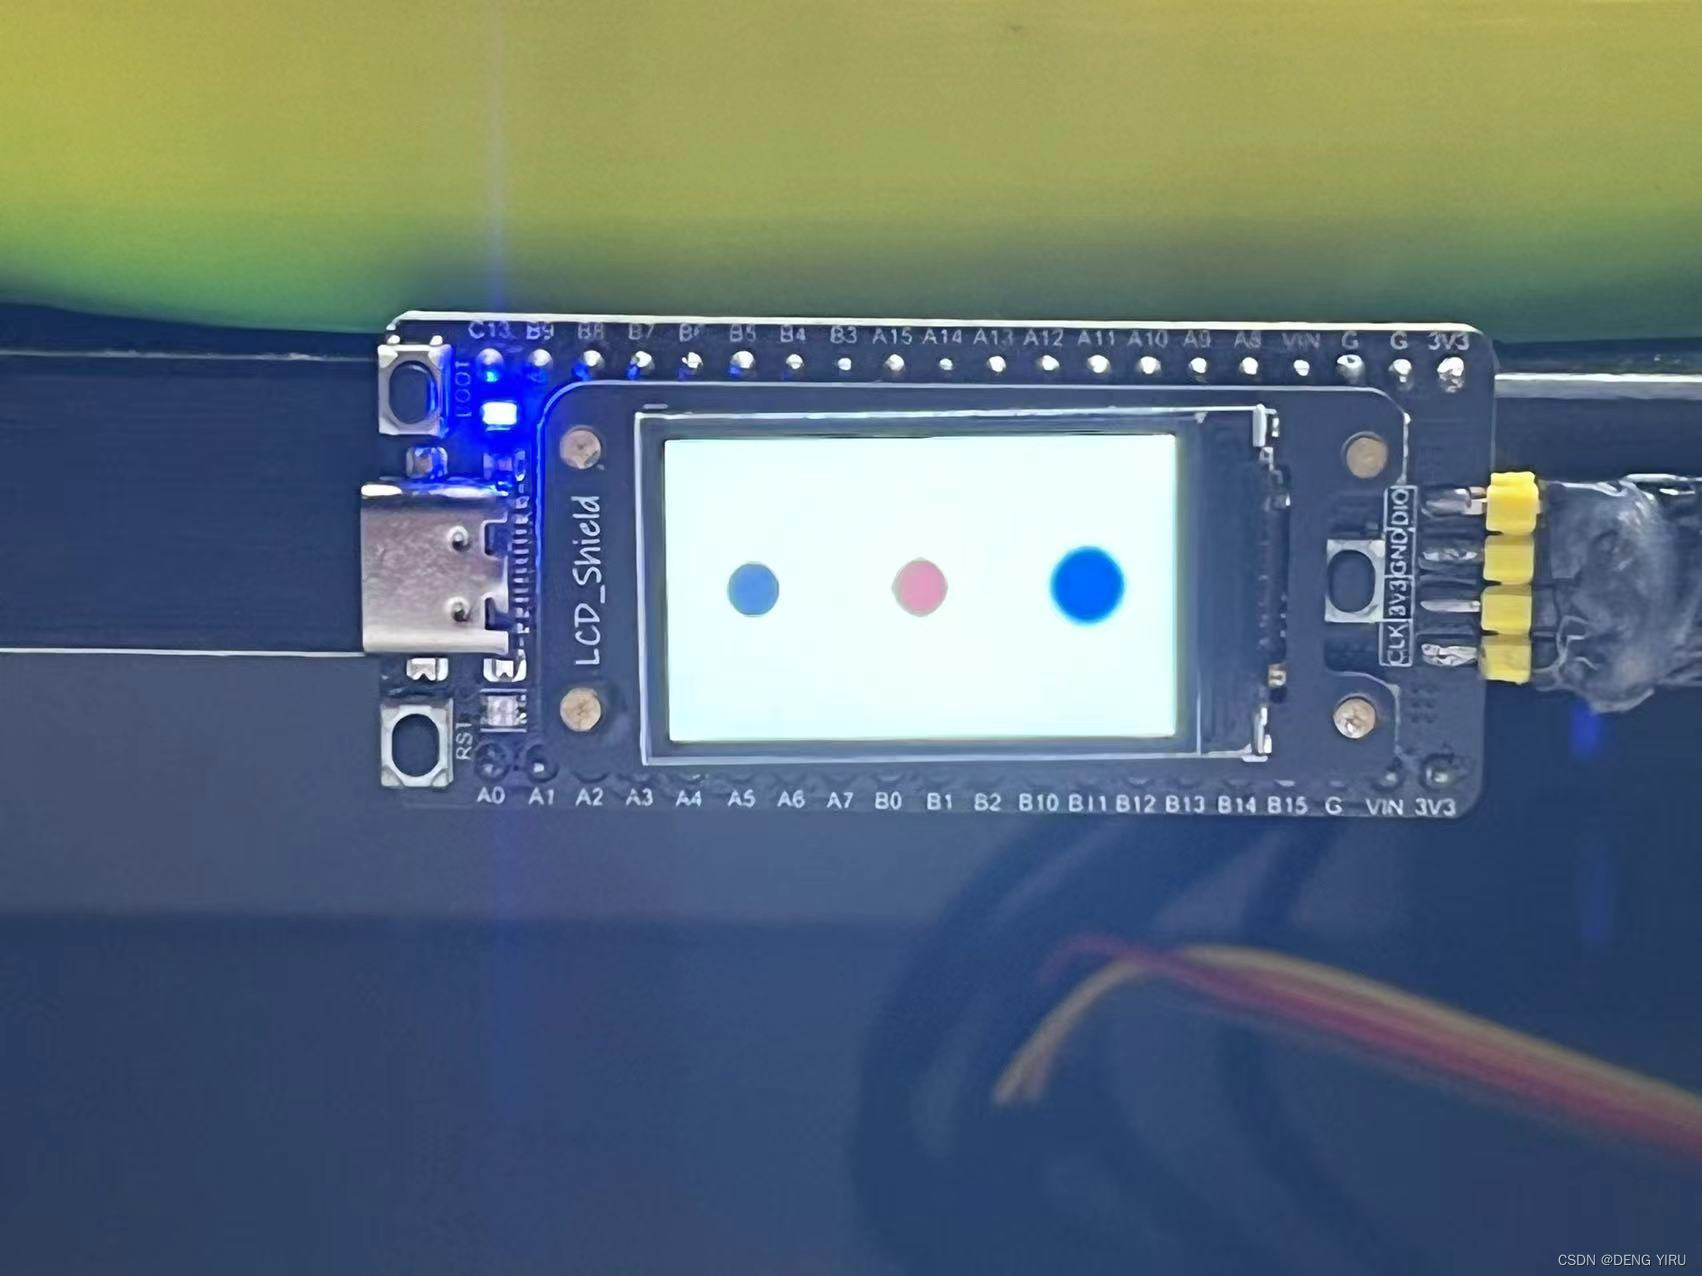
}这里写了一个测试DEMO去显示:
void demo1(void)
{
	   lv_obj_t * led1  = lv_led_create(lv_scr_act());
    lv_obj_align(led1, LV_ALIGN_CENTER, -80, 0);
    lv_led_off(led1);

    /*Copy the previous LED and set a brightness*/
    lv_obj_t * led2  = lv_led_create(lv_scr_act());
    lv_obj_align(led2, LV_ALIGN_CENTER, 0, 0);
    lv_led_set_brightness(led2, 150);
    lv_led_set_color(led2, lv_palette_main(LV_PALETTE_RED));

    /*Copy the previous LED and switch it ON*/
    lv_obj_t * led3  = lv_led_create(lv_scr_act());
    lv_obj_align(led3, LV_ALIGN_CENTER, 80, 0);
    lv_led_on(led3);
}
运行结果如下:
具体的main.c代码如下:
/* USER CODE BEGIN Header */
/**
******************************************************************************
* @file : main.c
* @brief : Main program body
******************************************************************************
* @attention
*
* <h2><center>© Copyright (c) 2024 STMicroelectronics.
* All rights reserved.</center></h2>
*
* This software component is licensed by ST under BSD 3-Clause license,
* the "License"; You may not use this file except in compliance with the
* License. You may obtain a copy of the License at:
* opensource.org/licenses/BSD-3-Clause
*
******************************************************************************
*/
/* USER CODE END Header */
/* Includes ------------------------------------------------------------------*/
#include "main.h"
#include "dma.h"
#include "spi.h"
#include "tim.h"
#include "gpio.h"
/* Private includes ----------------------------------------------------------*/
/* USER CODE BEGIN Includes */
#include "lvgl.h"
#include "lv_port_disp.h"
/* USER CODE END Includes */
/* Private typedef -----------------------------------------------------------*/
/* USER CODE BEGIN PTD */
/* USER CODE END PTD */
/* Private define ------------------------------------------------------------*/
/* USER CODE BEGIN PD */
/* USER CODE END PD */
/* Private macro -------------------------------------------------------------*/
/* USER CODE BEGIN PM */
/* USER CODE END PM */
/* Private variables ---------------------------------------------------------*/
/* USER CODE BEGIN PV */
void demo1(void)
{
lv_obj_t * led1 = lv_led_create(lv_scr_act());
lv_obj_align(led1, LV_ALIGN_CENTER, -80, 0);
lv_led_off(led1);
/*Copy the previous LED and set a brightness*/
lv_obj_t * led2 = lv_led_create(lv_scr_act());
lv_obj_align(led2, LV_ALIGN_CENTER, 0, 0);
lv_led_set_brightness(led2, 150);
lv_led_set_color(led2, lv_palette_main(LV_PALETTE_RED));
/*Copy the previous LED and switch it ON*/
lv_obj_t * led3 = lv_led_create(lv_scr_act());
lv_obj_align(led3, LV_ALIGN_CENTER, 80, 0);
lv_led_on(led3);
}
/* USER CODE END PV */
/* Private function prototypes -----------------------------------------------*/
void SystemClock_Config(void);
/* USER CODE BEGIN PFP */
/* USER CODE END PFP */
/* Private user code ---------------------------------------------------------*/
/* USER CODE BEGIN 0 */
/* USER CODE END 0 */
/**
* @brief The application entry point.
* @retval int
*/
int main(void)
{
/* USER CODE BEGIN 1 */
/* USER CODE END 1 */
/* MCU Configuration--------------------------------------------------------*/
/* Reset of all peripherals, Initializes the Flash interface and the Systick. */
HAL_Init();
/* USER CODE BEGIN Init */
/* USER CODE END Init */
/* Configure the system clock */
SystemClock_Config();
/* USER CODE BEGIN SysInit */
/* USER CODE END SysInit */
/* Initialize all configured peripherals */
MX_GPIO_Init();
MX_DMA_Init();
MX_SPI1_Init();
MX_TIM2_Init();
/* USER CODE BEGIN 2 */
lv_init(); // lvgl系统初始化
lv_port_disp_init(); // lvgl显示接口初始化,放在lv_init()的后面
HAL_TIM_Base_Start_IT(&htim2);
demo1();
/* USER CODE END 2 */
/* Infinite loop */
/* USER CODE BEGIN WHILE */
while (1)
{
/* USER CODE END WHILE */
/* USER CODE BEGIN 3 */
lv_task_handler();//这个比较重要,从名字就能知道他是用来运行lvgl的task的
}
/* USER CODE END 3 */
}
/**
* @brief System Clock Configuration
* @retval None
*/
void SystemClock_Config(void)
{
RCC_OscInitTypeDef RCC_OscInitStruct = {0};
RCC_ClkInitTypeDef RCC_ClkInitStruct = {0};
/** Configure the main internal regulator output voltage
*/
__HAL_RCC_PWR_CLK_ENABLE();
__HAL_PWR_VOLTAGESCALING_CONFIG(PWR_REGULATOR_VOLTAGE_SCALE1);
/** Initializes the RCC Oscillators according to the specified parameters
* in the RCC_OscInitTypeDef structure.
*/
RCC_OscInitStruct.OscillatorType = RCC_OSCILLATORTYPE_HSE;
RCC_OscInitStruct.HSEState = RCC_HSE_ON;
RCC_OscInitStruct.PLL.PLLState = RCC_PLL_ON;
RCC_OscInitStruct.PLL.PLLSource = RCC_PLLSOURCE_HSE;
RCC_OscInitStruct.PLL.PLLM = 12;
RCC_OscInitStruct.PLL.PLLN = 96;
RCC_OscInitStruct.PLL.PLLP = RCC_PLLP_DIV2;
RCC_OscInitStruct.PLL.PLLQ = 4;
if (HAL_RCC_OscConfig(&RCC_OscInitStruct) != HAL_OK)
{
Error_Handler();
}
/** Initializes the CPU, AHB and APB buses clocks
*/
RCC_ClkInitStruct.ClockType = RCC_CLOCKTYPE_HCLK|RCC_CLOCKTYPE_SYSCLK
|RCC_CLOCKTYPE_PCLK1|RCC_CLOCKTYPE_PCLK2;
RCC_ClkInitStruct.SYSCLKSource = RCC_SYSCLKSOURCE_PLLCLK;
RCC_ClkInitStruct.AHBCLKDivider = RCC_SYSCLK_DIV1;
RCC_ClkInitStruct.APB1CLKDivider = RCC_HCLK_DIV2;
RCC_ClkInitStruct.APB2CLKDivider = RCC_HCLK_DIV1;
if (HAL_RCC_ClockConfig(&RCC_ClkInitStruct, FLASH_LATENCY_3) != HAL_OK)
{
Error_Handler();
}
}
/* USER CODE BEGIN 4 */
void HAL_TIM_PeriodElapsedCallback(TIM_HandleTypeDef *htim)
{
if(htim->Instance == TIM2)
{
lv_tick_inc(1); // tick单位是ms,设置为1ms即可,一般只要有值就行
}
}
/* USER CODE END 4 */
/**
* @brief This function is executed in case of error occurrence.
* @retval None
*/
void Error_Handler(void)
{
/* USER CODE BEGIN Error_Handler_Debug */
/* User can add his own implementation to report the HAL error return state */
__disable_irq();
while (1)
{
}
/* USER CODE END Error_Handler_Debug */
}
#ifdef USE_FULL_ASSERT
/**
* @brief Reports the name of the source file and the source line number
* where the assert_param error has occurred.
* @param file: pointer to the source file name
* @param line: assert_param error line source number
* @retval None
*/
void assert_failed(uint8_t *file, uint32_t line)
{
/* USER CODE BEGIN 6 */
/* User can add his own implementation to report the file name and line number,
ex: printf("Wrong parameters value: file %s on line %d\r\n", file, line) */
/* USER CODE END 6 */
}
#endif /* USE_FULL_ASSERT */
/************************ (C) COPYRIGHT STMicroelectronics *****END OF FILE****/
最后,感谢Boring科技提供的开发板这款开发板适合新手学习LVGL,这是我移植好的源码,提取密码1113.


 2387
2387


 被折叠的 条评论
为什么被折叠?
被折叠的 条评论
为什么被折叠?
 到【灌水乐园】发言


