


1.什么是串口通讯?
- 基本概念:
- 串口通信是指通过串行接口(Serial Interface)在两个设备之间发送和接收数据的过程。
- 串行接口可以将来自CPU的并行数据字符转换为连续的串行数据流发送出去,同时可将接收的串行数据流转换为并行的数据字符供给CPU。
- 串口通信按位(bit)发送和接收字节,这种方式虽然比按字节(byte)的并行通信慢,但能实现远距离通信,且使用简单。
- 数据格式:
- 串口通信的数据传输通常以字符为单位,每个字符一位一位地传输。
- 每个字符的传输以一个“起始位”开始,接着是7位或8位的数据位(取决于通信协议),然后是可选的奇偶校验位(用于检错),最后以一位或更多位的“停止位”结束。
- 停止位后面是不定长的空闲位,都规定为高电平。
- 通讯方式:
- 单工模式(Simplex Communication):数据传输是单向的,一方固定为发送端,另一方固定为接收端。
- 半双工模式(Half Duplex):使用同一根传输线,既可以发送数据又可以接收数据,但不能同时进行。
- 全双工模式(Full Duplex):通信允许数据同时在两个方向上传输,每一端都有发送器和接收器,信息传输效率高。
- 重要参数:
- 波特率(Baud Rate):衡量符号传输速率的参数,单位时间内信号变化的次数。
- 数据位(Data Bits):衡量通信中实际数据位的参数,通常为6、7或8位。
- 停止位(Stop Bits):表示单个包的最后一位,通常为1、1.5或2位。
- 奇偶校验位(Parity Bit):一种简单的检错方式,可以是偶校验、奇校验或无校验。
- 应用领域:
- 串口通信在工业自动化、消费电子产品、计算机网络、科研设备、汽车电子等领域都有广泛应用。
- 优缺点:
- 优点:普及率高、成本低、使用简单。
- 缺点:组网能力差、通信速度相对较慢、适合低速率和小数据量的通信。
3.串口通讯前的代码演示
3.1 串口通讯前的准备工作
3.1.1 下载虚拟串口软件
因为笔者只有一台笔记本电脑,为了实现串口通讯,我们必须使用虚拟串口软件。
Virtual Serial Port Driver Installation (virtual-serial-port.org) 虚拟串口下载软件
3.1.2 使用虚拟串口软件创建虚拟串口
为了进一步的进行串口通讯实现,这里使用软件创建两个虚拟串口1(COM1)和虚拟串口2(COM2)
3.2 用C#制作串口通讯程序
3.2.1 搭配环境
(1)windows 10
(2)winform模块
(3).netfarmwork 4.6
3.2.2 创建串口通讯类
创建串口通讯类CserialPortParm.cs文件代码如下
using System;
using System.Collections.Generic;
using System.Linq;
using System.Text;
using System.IO.Ports;   //串口通讯

namespace CSharp串口通讯
{

    static class CSerialPortParm
   {

        //  1.串口通讯的波特率
        public static   string[] StrBaudRate=new string[]{"110","300","600","1200","2400","4800","7200","9600","14400","19200","28800","38400","56000","115200"};

        //  2.串口通讯的串口号
        public static string[] StrCOM = new string[] {  };

        // 3.串口通讯的数据位
        public static string[] StrDatabits = new string[] { "5", "6", "7", "8" };

        // 4.串口通讯的校验位
        public static string[] StrParity = new string[] { "None", "Odd", "Even", "Mark", "Space" };

        // 5.串口通讯的停止位
        public static string[] StrStopBit = new string[] { "1", "1.5", "2" };


        // 1.设置波特率
        public static int SetBaudRate(String StrBaudRate)
        {
            return Convert.ToInt32(StrBaudRate);
        }


        // 2.串口号
        public static String SetCOM(String StrCOM)
        {
            return StrCOM;
        }


        // 3.数据位
        public static int SetDatabits(String StrDatabits)
        {
            return Convert.ToInt32(StrDatabits);
        }


        // 4.校验位
        public static Parity SetParity(String StrParity)
        {

            Parity ParityBit = Parity.None;
            switch (StrParity)
            {
                case "None":
                    ParityBit = Parity.None;
                break;

                case "Odd":
                    ParityBit= Parity.Odd;
                break;

                case "Even":
                    ParityBit= Parity.Even;
                break;

                case "Mark":
                     ParityBit = Parity.Mark;
                break;

                case "Space":
                    ParityBit= Parity.Space;
                break;
            }
            return ParityBit;
        }


        // 5.设置停止位
        public static StopBits SetStopBit(String StrStopBit)
        {

            StopBits StopBit = StopBit = StopBits.None;
            switch (StrStopBit)
            {
                case "无":
                    StopBit = StopBits.None;
                break;

                case "1":
                    StopBit= StopBits.One;
                break;

                case "1.5":
                   StopBit= StopBits.OnePointFive;
                break;

                case "2":
                    StopBit= StopBits.Two;
                break;
            }
            return StopBit;
        }

        public static string[] FindCom()
        {
            return SerialPort.GetPortNames();
        }
    }
}
3.2.2 主程序界面和代码
串口通讯界面设计,如图所示
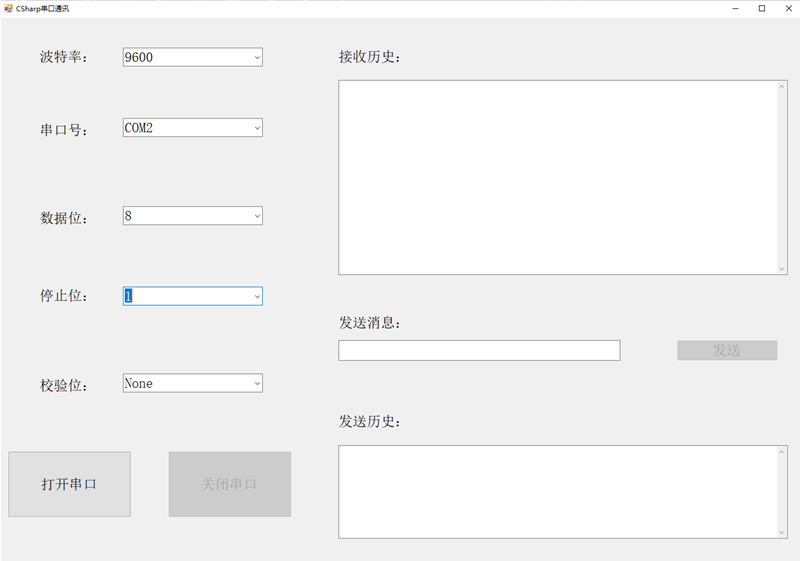
主程序代码如下
using System;
using System.Collections.Generic;
using System.ComponentModel;
using System.Data;
using System.Drawing;
using System.Linq;
using System.Text;
using System.Windows.Forms;
using System.IO.Ports;
using System.Threading;

namespace CSharp串口通讯
{
    public partial class CSharrp串口通信 : Form
    {
        public CSharrp串口通信()
        {
            InitializeComponent();


        }


        #region  打开串口
        private void LinkComBtn_Click(object sender, EventArgs e)
        {


            // 1.设置串口名称
            SerialPortCom.PortName=ComboBoxCOM.Text.Trim();

            // 2.设置串口波特率
            SerialPortCom.BaudRate = CSerialPortParm.SetBaudRate(ComboBoxBaudRate.Text);

            // 3.设置串口的数据位
            SerialPortCom.DataBits = CSerialPortParm.SetDatabits(ComboBoxDataBit.Text);

            // 4.设置校验位
            SerialPortCom.Parity=CSerialPortParm.SetParity(ComboBoxParity.Text);

            // 5.设置停止位
            SerialPortCom.StopBits = CSerialPortParm.SetStopBit(ComboBoxStopBit.Text);

            // 6.打开串口
            try
            {
                SerialPortCom.Open();
                OpenComBtn.Enabled = false;
                CloseComBtn.Enabled = true;
                SendOderBtn.Enabled = true;
                ComboBoxCOM.Enabled = false;
                ComboBoxBaudRate.Enabled = false;
                ComboBoxDataBit.Enabled = false;
                ComboBoxParity.Enabled = false;
                ComboBoxStopBit.Enabled = false;
                TimerFindCOM.Enabled = false;
                TimerRev.Enabled = true;
            }
            catch
            {
                MessageBox.Show("串口打开失败", "警告");
                OpenComBtn.Enabled = true;
                CloseComBtn.Enabled = false;
                SendOderBtn.Enabled = false;

                ComboBoxCOM.Enabled = true;
                ComboBoxBaudRate.Enabled = true;
                ComboBoxDataBit.Enabled = true;
                ComboBoxParity.Enabled = true;
                ComboBoxStopBit.Enabled = true;
            }


        }


        #endregion


        #region 初始化函数
        private void CSharrp串口通信_Load(object sender, EventArgs e)
        {
            //1.初始化波特率

            ComboBoxBaudRate.DataSource = CSerialPortParm.StrBaudRate;


            // 寻找串口
            CSerialPortParm.StrCOM = CSerialPortParm.FindCom();

            // 添加串口文本
            ComboBoxCOM.DataSource = CSerialPortParm.StrCOM;


            //3.初始化数据位

            ComboBoxDataBit.DataSource = CSerialPortParm.StrDatabits;

            // 4.初始化校验位

            ComboBoxParity.DataSource = CSerialPortParm.StrParity;

            // 5.初始化停止位
            ComboBoxStopBit.DataSource = CSerialPortParm.StrStopBit;

            OpenComBtn.Enabled = true;
            CloseComBtn.Enabled = false;
            SendOderBtn.Enabled = false;

        }
        #endregion


        #region 发送指令
        private void button1_Click(object sender, EventArgs e)
        {

            if(TextBoxOrder.Text=="")
            {
                return;
            }

            SerialPortCom.Write(TextBoxOrder.Text);
            TextBoxSend.Text = TextBoxSend.Text + "发送指令:" + "\r\n" + TextBoxOrder.Text + "\r\n" +"发送指令时间:"+ System.DateTime.Now.ToString("F") + "\r\n" + "\r\n";
            TextBoxSend.SelectionStart = TextBoxSend.Text.Length;
            TextBoxSend.ScrollToCaret();
        }
        #endregion


        #region 关闭串口
        private void CloseComBtn_Click(object sender, EventArgs e)
        {
            try
            {
                SerialPortCom.Close();

                OpenComBtn.Enabled = true;
                CloseComBtn.Enabled = false;
                SendOderBtn.Enabled = false;
                ComboBoxCOM.Enabled = true;
                ComboBoxBaudRate.Enabled = true;
                ComboBoxDataBit.Enabled = true;
                ComboBoxParity.Enabled = true;
                ComboBoxStopBit.Enabled = true;
                TimerFindCOM.Enabled = true;
                TimerRev.Enabled = false;

            }
            catch
            {
                MessageBox.Show("警告", "串口打开失败");
                OpenComBtn.Enabled = false;
                CloseComBtn.Enabled = true;
                SendOderBtn.Enabled = true;
                ComboBoxCOM.Enabled = false;
                ComboBoxBaudRate.Enabled = false;
                ComboBoxDataBit.Enabled = false;
                ComboBoxParity.Enabled = false;
                ComboBoxStopBit.Enabled = false;
            }


        }
        #endregion


        #region 设置接受信息定时器

        private void TimerRev_Tick(object sender, EventArgs e)
        {

            string str = SerialPortCom.ReadExisting();

            if(str.Length!= 0)
            {
                TextBoxRev.Text = TextBoxRev.Text + "接收指令:" + "\r\n" + str + "\r\n" + "接受指令时间:" + System.DateTime.Now.ToString("F") + "\r\n" + "\r\n";
                TextBoxRev.SelectionStart = TextBoxRev.Text.Length;
                TextBoxRev.ScrollToCaret();
            }

        }

        #endregion


    }
}
代码演示效果,左边是串口通讯助手,右边是自己编写的C#串口程序

能完美的接受和发送数据,实验成功


 1202
1202

 被折叠的 条评论
为什么被折叠?
被折叠的 条评论
为什么被折叠?
 到【灌水乐园】发言


