


文章目录
26. 双线性插值(Bilinear Interpolation)
使用双线性插值将图像放大1.5倍吧!
双线性插值考察4邻域的像素点,并根据距离设置权值.虽然计算量增大使得处理时间变长,但是可以有效抑制画质劣化.
放大图像的坐标(x',y')除以放大率a,得到对应原图像的坐标 floor(x'/a,y'/a). '求原图像的坐标(x'/a,y'/a)周围4邻域的坐标 I(x,y), I(x+1,y), I(x,y+1),I(x+1,y+1)
I(x,y) 		I(x+1,y)
	(x'/a,y'/a)
I(x,y+1) 	I(x+1,y+1)
-
分别求这个四个点与(x’/a,y’/a)的距离,根据距离设置权重: w = d / sum d
-
根据下式求得放大后图像(x’,y’)处的像素值:
dx = x'/a - x
dy = y'/y - y
I'(x',y') = (1-dx)(1-dy)I(x,y) + dx(1-dy)I(x+1,y) + (1-dx)dyI(x,y+1) + dxdyI(x+1,y+1)
代码实现:
# @Time   : 2022/6/11 16:59
# @Author : Fioman
# @Phone  : 13149920693
# @Tips   : Talk is Cheap,Show me the code! ^_^^_^
from settings import *


def linear_interpolate(image, ax=1.1, ay=1.):
    H, W = image.shape[:2]
    aH = int(ay * H)
    aW = int(ax * H)

    # get position of original position
    y = np.arange(aH).repeat(aW).reshape(aH, -1)
    x = np.tile(np.arange(aW), (aH, 1))

    # get position of original position
    y = (y / ay)
    x = (x / ax)

    ix = np.floor(x).astype(np.int0)
    iy = np.floor(y).astype(np.int0)

    ix = np.minimum(ix, W - 2)
    iy = np.minimum(iy, H - 2)

    # get distance
    dx = x - ix
    dy = y - iy

    dx = np.repeat(np.expand_dims(dx, axis=-1), 3, axis=-1)
    dy = np.repeat(np.expand_dims(dy, axis=-1), 3, axis=-1)

    # interpolation
    out = (1 - dx) * (1 - dy) * image[iy, ix] + dx * (1 - dy) * image[iy, ix + 1] + \
          (1 - dx) * dy * image[iy + 1, ix] + dx * dy * image[iy + 1, ix + 1]
    out = np.clip(out, 0, 255)
    out = out.astype(np.uint8)

    return out


if __name__ == '__main__':
    imagePath = os.path.join(OPENCV_100_Q_PATH,"color_02.bmp")
    imageOriginal = cv.imread(imagePath,cv.IMREAD_COLOR)
    out = linear_interpolate(imageOriginal,ax=1.5,ay=1.5)
    cv.imshow("Original",imageOriginal)
    cv.imshow("Out",out)
    cv.waitKey(0)
27. 双三次插值 (Bicubic Interpolation)
双三次插值是双线性插值的扩展,它使用的是邻域的16个像素进行插值.
I(x-1,y-1)  I(x,y-1)  I(x+1,y-1)  I(x+2,y-1)
I(x-1,y)    I(x,y)    I(x+1,y)    I(x+2,y)
I(x-1,y+1)  I(x,y+1)  I(x+1,y+1)  I(x+2,y+1)
I(x-1,y+2)  I(x,y+2)  I(x+1,y+2)  I(x+2,y+2)
各像素间的距离由下式决定:
dx1 = x'/a - (x-1) , dx2 = x'/a - x , dx3 = (x+1) - x'/a , dx4 = (x+2) - x'/a
dy1 = y'/a - (y-1) , dy2 = y'/a - y , dy3 = (y+1) - y'/a , dy4 = (y+2) - y'/a
由于距离的权重函数由以下函数取得,a在大部分时候取-1:
h(t) = { (a+2)|t|^3 - (a+3)|t|^2 + 1    (when |t|<=1)
         a|t|^3 - 5a|t|^2 + 8a|t| - 4a  (when 1<|t|<=2)
         0                              (when 2<|t|)
利用上面得到的权重,通过下面的式子扩大图像.将每个像素和权重的乘积之和除以权重的和.
I'(x', y') = (Sum{i=-1:2}{j=-1:2} I(x+i,y+j) * wxi * wyj) / Sum{i=-1:2}{j=-1:2} wxi * wyj
实现代码如下:
# @Time   : 2022/6/13 10:48
# @Author : Fioman
# @Phone  : 13149920693
# @Tips   : Talk is Cheap,Show me the code! ^_^^_^
from settings import *

# Bicubic Interpolation (双三次插值算法)
def bicubic_interpolation(image,ax=1.,ay=1.):
    H,W,C = image.shape

    aH = int(ay * H)
    aW = int(ax * W)

    # get positions of resized image
    y = np.arange(aH).repeat(aW).reshape(aH,-1)
    x = np.tile(np.arange(aW),(aH,1))
    y = (y / ay)
    x = (x / ax)

    # get positions of original image
    ix = np.floor(x).astype(np.int0)
    iy = np.floor(y).astype(np.int0)

    ix = np.minimum(ix,W-1)
    iy = np.minimum(iy,H-1)

    # get distance of each postion of original image
    dx2 = x- ix
    dy2 = y - iy
    dx1 = dx2 + 1
    dy1 = dy2    +1
    dx3 = 1 - dx2
    dy3 = 1 - dy2
    dx4 = 1 +dx3
    dy4 = 1 + dy3

    dxs = [dx1,dx2,dx3,dx4]
    dys = [dy1,dy2,dy3,dy4]

    # bi-cubic weight
    def weight(t):
        a = -1
        at = np.abs(t)
        w = np.zeros_like(t)
        ind = np.where(at <= 1)
        w[ind] = ((a+2) * np.power(at,3) - (a +3) * np.power(at,2) + 1)[ind]
        ind = np.where((at > 1) & (at <= 2))
        w[ind] = (a * np.power(at,3) - 5 * a * np.power(at,2) +8*a*at - 4 * a)[ind]
        return w

    wSum = np.zeros((aH,aW,C),dtype=np.float32)
    out = np.zeros((aH,aW,C),dtype=np.float32)

    # interpolation
    for j in range(-1,3):
        for i in range(-1,3):
            indX = np.minimum(np.maximum(ix + i,0),W-1)
            indY = np.minimum(np.maximum(iy+j,0),H-1)

            wx = weight(dxs[i+1])
            wy = weight(dys[j+1])
            wx = np.repeat(np.expand_dims(wx,axis=-1),3,axis=-1)
            wy = np.repeat(np.expand_dims(wy,axis=-1),3,axis=-1)

            wSum += wx * wy
            out += wx*wy*image[indY,indX]

    out /= wSum
    out = np.clip(out,0,255)
    out = out.astype(np.uint8)
    return out

if __name__ == '__main__':
    imagePath = os.path.join(OPENCV_100_Q_PATH,"color_02.bmp")
    imageOriginal = cv.imread(imagePath,cv.IMREAD_COLOR)
    out = bicubic_interpolation(imageOriginal,1.5,1.5)
    cv.imshow("Original",imageOriginal)
    cv.imshow("BicubicRes",out)
    cv.waitKey(0)
28. 仿射变换(Afine Transformations) - 平移移动
平移操作可以这么去看待:

然后写成矩阵的方式:
原图记为(x,y),变换后的图像记为(x’,y’).图像放大缩小的矩阵为下式:

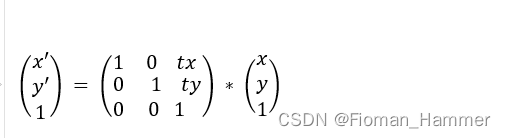
另一方面,平行移动按照下面的式子去计算:

上面的两个式子合成一个:

但是在实际的操作的过程中,如果一个一个地去计算原图像的像素的话,处理后的像素可能没有在原图像中有对应的坐标.
因此,我们有必要对处理后的图像中各个像素进行仿射变换逆变换,取得变换后图像中的像素在原图像中的坐标.仿射变换的逆变换如下:

实现代码:
# @Time   : 2022/6/13 13:55
# @Author : Fioman
# @Phone  : 13149920693
# @Tips   : Talk is Cheap,Show me the code! ^_^^_^
from settings import *


def affine(image, a, b, c, d, tx, ty):
    H, W, C = image.shape

    # temporary image,这个临时图像的宽和高都加了两个像素,然后中间赋值为原图像.
    imageTemp = np.zeros((H + 2, W + 2, C), dtype=np.float32)
    imageTemp[1:H + 1, 1:W + 1] = image

    # get new image shape,这里也有缩放的那个意思,不只是平移.
    newH = np.round(H * d).astype(np.int0)
    newW = np.round(W * a).astype(np.int0)

    out = np.zeros((newH + 1, newW + 1, C), dtype=np.float32)

    # get position of new image
    newX = np.tile(np.arange(newW), (newH, 1))
    newY = np.arange(newH).repeat(newW).reshape(newH, -1)

    # get position of original image by affine
    adbc = a * d - b * c
    x = np.round((d * newX - b * newY) / adbc).astype(np.int0) - tx + 1
    y = np.round((-c * newX + a * newY) / adbc).astype(np.int0) - ty + 1

    x = np.minimum(np.maximum(x, 0), W + 1).astype(np.int0)
    y = np.minimum(np.maximum(y, 0), H + 1).astype(np.int0)

    # assgin pixcel to new image
    out[newY, newX] = image[y, x]

    out = out[:newH, :newW]
    out = out.astype(np.uint8)

    return out


if __name__ == '__main__':
    imagePath = os.path.join(OPENCV_100_Q_PATH, "color_02.bmp")
    imageOriginal = cv.imread(imagePath, cv.IMREAD_COLOR)
    out = affine(imageOriginal, a=1, b=0, c=0, d=1, tx=30, ty=30)
    cv.imshow("Original", imageOriginal)
    cv.imshow("MoveAffine", out)
    cv.waitKey(0)
29. 仿射变换(Affine Transformations) - 放大缩小
- 使用仿射变换,将图片在x方向上放大1.3倍,在y方向上缩小至原来的0.8.
- 在上面的条件下,同时在x方向上向右平移30(+30),在y方向上向上平移30(-30).
代码实现:
from settings import *


def affine(image, a, b, c, d, tx, ty):
    H, W, C = image.shape

    # temporary image
    newImage = np.zeros((H + 2, W + 2, C), dtype=np.float32)
    newImage[1:H + 1, 1:W + 1] = image

    # get new image shape
    newH = np.round(H * d).astype(np.int0)
    newW = np.round(W * a).astype(np.int0)
    out = np.zeros((newH + 1, newW + 1, C), dtype=np.float32)

    # get position of new image
    newX = np.tile(np.arange(newW), (newH, 1))
    newY = np.arange(newH).repeat(newW).reshape(newH, -1)

    # get position of original image by affine
    adbc = a * d - b * c
    x = np.round((d * newX - b * newY) / adbc).astype(np.int0) - tx + 1
    y = np.round((-c * newX + a * newY) / adbc).astype(np.int0) - ty + 1

    x = np.minimum(np.maximum(x, 0), W + 1).astype(np.int0)
    y = np.minimum(np.maximum(y, 0), H + 1).astype(np.int0)

    out[newY, newX] = image[y, x]

    out = out[:newH, :newW]
    out = out.astype(np.uint8)
    return out


if __name__ == '__main__':
    imagePath = os.path.join(OPENCV_100_Q_PATH,"color_02.bmp")
    imageOriginal = cv.imread(imagePath,cv.IMREAD_COLOR)
    out = affine(imageOriginal,a = 1.3,b = 0,c = 0, d = 0.8,tx=30,ty = 30)

    cv.imshow("Original",imageOriginal)
    cv.imshow("NewImage",out)
    cv.waitKey(0)
30. 仿射变换(Affine Transformations - 旋转)
- 使用仿射变换,逆时针旋转30度.
- 使用仿射变换,逆时针旋转30度并且能够让全部的图像显现(也就是说,单纯地做仿射变换会让图片边缘丢失,这一步中要让图像的边缘不丢失,需要耗费一些功夫!)
- 使用下面的式子进行逆时针方向旋转A度的仿射变换:

代码实现:
# @Time   : 2022/6/13 15:55
# @Author : Fioman
# @Phone  : 13149920693
# @Tips   : Talk is Cheap,Show me the code! ^_^^_^
from settings import *


def affine(image, a, b, c, d, tx, ty):
    H, W, C = image.shape

    # temporary image
    imageNew = np.zeros((H + 2, W + 2, C), dtype=np.float32)
    imageNew[1:H + 1, 1:W + 1] = image

    # get shape of new image
    newH = np.round(H).astype(np.int0)
    newW = np.round(W).astype(np.int0)
    out = np.zeros((newH, newW, C), dtype=np.float32)

    # get position of new image
    newX = np.tile(np.arange(newW), (newH, 1))
    newY = np.arange(newH).repeat(newW).reshape(newH, -1)

    # get position of original image by affine
    adbc = a * d - b * c
    x = np.round((d * newX - b * newY) / adbc).astype(np.int0) - tx + 1
    y = np.round((-c * newX + a * newY) / adbc).astype(np.int0) - ty + 1

    # adjust center by affine
    dcX = (x.max() + x.min()) // 2 - W // 2
    dcY = (y.max() + y.min()) // 2 - H // 2

    x -= dcX
    y -= dcY

    x = np.clip(x, 0, W + 1)
    y = np.clip(y, 0, H + 1)

    # assign pixcel
    out[newY, newX] = imageNew[y, x]
    out = out.astype(np.uint8)

    return out


if __name__ == '__main__':
    imagePath = os.path.join(OPENCV_100_Q_PATH, "color_02.bmp")
    imageOriginal = cv.imread(imagePath, cv.IMREAD_COLOR)
    A = 30.
    theta = -np.pi * A / 180
    out = affine(imageOriginal, a=np.cos(theta), b=-np.sin(theta), c=np.sin(theta), d=np.cos(theta), tx=0, ty=0)
    cv.imshow("Original", imageOriginal)
    cv.imshow("NewImage", out)
    cv.waitKey(0)


 3990
3990


 被折叠的 条评论
为什么被折叠?
被折叠的 条评论
为什么被折叠?
 到【灌水乐园】发言


