


文章目录
opencv函数cv2.warpAffine 和 cv2.warpPerspective 的理解和复现
1. warpAffine 函数处理仿射变换
仿射矩阵是2 * 3的矩阵。
首先进行坐标转换,然后应用插值
具体代码如下, 与opencv一致:
def warp_affine_forward(image, rot_mat, dst_h, dst_w):
    M = rot_mat.reshape([2, 3])
    hs, ws, cs = image.shape
    hh, ww = np.arange(hs), np.arange(ws)
    xx, yy = np.meshgrid(ww, hh)

    sx, sy = xx, yy # 不缩放图像
    tx, ty = M[0, 0] * sx + M[0, 1] * sy + M[0, 2], M[1, 0] * sx + M[1, 1] * sy + M[1, 2]
    # tx = np.sum(M[0, :].reshape([1, 1, 3]) * np.dstack((sx, sy, np.ones_like(sx))), axis=-1)
    # ty = np.sum(M[1, :].reshape([1, 1, 3]) * np.dstack((sx, sy, np.ones_like(sx))), axis=-1)

    dhh, dww = np.arange(dst_h), np.arange(dst_w)
    dxx, dyy = np.meshgrid(dww, dhh)
    grid_x, grid_y = dxx, dyy
    points = np.dstack((tx, ty))
    # print(points.shape, image.shape, grid_x.shape)
    out = griddata(points.reshape(-1, 2), image.reshape(-1, 3), (grid_x, grid_y), method='linear')
    out[np.isnan(out)] = 0

    return out
逆变换代码:
def warp_affine(image, rot_mat, dst_h, dst_w):
    M = rot_mat.reshape([2, 3])
    hs, ws, cs = image.shape
    hh, ww = np.arange(dst_h), np.arange(dst_w)
    xx, yy = np.meshgrid(ww, hh)

    sx, sy = (xx + 0.5) * (ws / ws) - 0.5, (yy + 0.5) * (hs / hs) - 0.5 # 不缩放图像。
    # sx, sy = (xx + 0.5) * (ws / dst_w) - 0.5, (yy + 0.5) * (hs / dst_h) - 0.5 # 缩放图像
    tx, ty = M[0, 0] * sx + M[0, 1] * sy + M[0, 2], M[1, 0] * sx + M[1, 1] * sy + M[1, 2]
    # tx = np.sum(M[0, :].reshape([1, 1, 3]) * np.dstack((sx, sy, np.ones_like(sx))), axis=-1)
    # ty = np.sum(M[1, :].reshape([1, 1, 3]) * np.dstack((sx, sy, np.ones_like(sx))), axis=-1)

    mask = ((tx < 0) + (ty < 0) + (tx > ws - 1) + (ty > hs - 1)) > 0
    # print(mask.shape, mask.dtype, np.sum(mask))
    out = interp_linear(image, tx, ty)
    out[mask] = 0
    return out
也可以求解转换矩阵的逆后,再正变换,结果相同。
其中用到重查找函数:根据tx,ty坐标位置,获取值
和cv2.remap函数相同。
def interp_linear(image, tx, ty):
    '''
    类似 cv2.remap 函数
    :param image: h,w,c image  np.float
    :param tx:  dst_h * dst_w, float , 目标位置x方向
    :param ty:  dst_h * dst_w, float , 目标位置y方向
    :return:
    '''
    h, w, c = image.shape
    hv, wv = ty, tx
    hh = np.floor(hv).astype(np.int32)
    ww = np.floor(wv).astype(np.int32)
    u = hv - hh
    v = wv - ww

    # special case
    u[hh < 0] = 0
    hh[hh < 0] = 0
    u[hh >= h - 1] = 1.0
    hh[hh >= h - 1] = h - 2

    v[ww < 0] = 0
    ww[ww < 0] = 0
    v[ww >= w - 1] = 1.0
    ww[ww >= w - 1] = w - 2
    # v = v.reshape(-1)

    w00 = (1-u)*(1-v)
    w01 = u * (1-v)
    w10 = (1-u) * v
    w11 = u*v
    out = w00[..., None] * image[hh, ww] + w10[..., None]  * image[hh, ww + 1] + w01[..., None]  * image[(hh + 1), ww] + w11[..., None]  * image[hh + 1, ww + 1]
    return out
2. warp_perspective
warpPerspective 和 warpAffine 是类似的。
但是warpPerspective的转换矩阵是3*3的透视变换矩阵,经过变换后平行线可能不在平行
一个逆变换 和 两个正变换的代码如下:
# 逆变换函数
def warp_perspective(image, pers_mat, dst_h, dst_w):
    M = pers_mat.reshape([3, 3])
    hs, ws, cs = image.shape
    hh, ww = np.arange(dst_h), np.arange(dst_w)
    xx, yy = np.meshgrid(ww, hh)
    sx, sy = (xx + 0.5) * (ws / ws) - 0.5, (yy + 0.5)* (hs / hs) - 0.5
    # sx, sy = (xx + 0.5) * (ws / dst_w) - 0.5, (yy + 0.5) * (hs / dst_h) - 0.5  # 缩放图像

    t = M[2, 0] * sx + M[2, 1] * sy + M[2, 2]
    tx, ty = M[0, 0] * sx + M[0, 1] * sy + M[0, 2] , M[1, 0] * sx + M[1, 1] * sy + M[1, 2]
    tx, ty = tx / t, ty / t
    # out = np.zeros_like(image)
    mask = ((tx < 0 ) + (ty < 0) + (tx > ws - 1) + (ty > hs - 1)) > 0
    print(mask.shape, mask.dtype, np.sum(mask))
    # out = interp_linear(image, tx, ty)
    out = cv2.remap(image, tx.astype(np.float32), ty.astype(np.float32), interpolation=cv2.INTER_LINEAR)
    out[mask] = 0
    return out
# 正变化函数
def warp_perspective_forward(image, pers_mat, dst_h, dst_w):
    M = pers_mat.reshape([3, 3])
    hs, ws, cs = image.shape
    hh, ww = np.arange(hs), np.arange(ws)
    xx, yy = np.meshgrid(ww, hh)

    sx, sy = xx, yy  # 不缩放图像

    t = M[2, 0] * sx + M[2, 1] * sy + M[2, 2]
    tx, ty = M[0, 0] * sx + M[0, 1] * sy + M[0, 2] , M[1, 0] * sx + M[1, 1] * sy + M[1, 2]
    tx, ty = tx / t, ty / t

    # interp
    dhh, dww = np.arange(dst_h), np.arange(dst_w)
    dxx, dyy = np.meshgrid(dww, dhh)
    grid_x, grid_y = dxx, dyy
    points = np.dstack((tx, ty))
    # print(points.shape, image.shape, grid_x.shape)
    out = griddata(points.reshape(-1, 2), image.reshape(-1, 3), (grid_x, grid_y), method='linear')
    out[np.isnan(out)] = 0
    return out

# 正变换函数:这里利用np.linalg.inv 求逆矩阵,然后按照warp_perspective的方式进行
def warp_perspective_forward2(image, pers_mat, dst_h, dst_w):
    M = pers_mat.reshape([3, 3])
    M_inv = np.linalg.inv(M)
    M = M_inv
    hs, ws, cs = image.shape
    hh, ww = np.arange(dst_h), np.arange(dst_w)
    xx, yy = np.meshgrid(ww, hh)
    sx, sy = (xx + 0.5) * (ws / ws) - 0.5, (yy + 0.5) * (hs / hs) - 0.5
    # sx, sy = (xx + 0.5) * (ws / dst_w) - 0.5, (yy + 0.5) * (hs / dst_h) - 0.5  # 缩放图像

    t = M[2, 0] * sx + M[2, 1] * sy + M[2, 2]
    tx, ty = M[0, 0] * sx + M[0, 1] * sy + M[0, 2], M[1, 0] * sx + M[1, 1] * sy + M[1, 2]
    tx, ty = tx / t, ty / t
    # out = np.zeros_like(image)
    mask = ((tx < 0) + (ty < 0) + (tx > ws - 1) + (ty > hs - 1)) > 0
    print(mask.shape, mask.dtype, np.sum(mask))
    # out = interp_linear(image, tx, ty)
    out = cv2.remap(image, tx.astype(np.float32), ty.astype(np.float32), interpolation=cv2.INTER_LINEAR)
    out[mask] = 0
    return out
3, 实验
验证以上代码和opencv中的一致性
import cv2
import numpy as np
from matplotlib import pyplot as plt
from scipy.interpolate import griddata
def cal_sobel(img):
    #分别求X,Y方向的梯度
    grad_X=cv2.Sobel(img,-1,1,0)
    grad_Y=cv2.Sobel(img,-1,0,1)
    #求梯度图像
    grad=cv2.addWeighted(grad_X,0.5,grad_Y,0.5,0)
    return grad
if __name__ == "__main__":
    file1 = r'test.jpg'
    image1 = cv2.imread(file1) / 255
    image1 = cv2.resize(image1, (0, 0), fx=0.5, fy=0.5)
    h, w, c = image1.shape
    print(h, w, c)

    center = (w // 2, h // 2)
    angle = -50
    scale = 0.6

    rot_mat = cv2.getRotationMatrix2D(center, angle, scale)
    print(rot_mat)

    dst_h, dst_w = int(image1.shape[0] * 0.7), int(image1.shape[1]* 0.7)
    image2 = cv2.warpAffine(image1, rot_mat, (dst_w, dst_h))

    center = (w // 2, h // 2)
    angle = 50
    scale = 1 / 0.6
    rot_mat2 = cv2.getRotationMatrix2D(center, angle, scale)
    print(rot_mat2)
    image3 = warp_affine(image1, rot_mat2, dst_h, dst_w)
    image4 = warp_affine_forward(image1, rot_mat, dst_h, dst_w)
    plt.figure()
    plt.subplot(221)
    plt.imshow(image1)
    plt.subplot(222)
    plt.imshow(image2)
    plt.subplot(223)
    plt.imshow(image3)
    plt.subplot(224)
    plt.imshow(image4)
    plt.show()

    # 根据4个点求透视转换
    pts1 = np.float32([[56, 65], [368, 52], [28, 387], [389, 390]])
    pts2 = np.float32([[0, 0], [300, 0], [0, 300], [300, 300]])
    M = cv2.getPerspectiveTransform(pts1, pts2)

    image2 = cv2.warpPerspective(image1, M, (dst_w, dst_h), flags=cv2.INTER_LINEAR + cv2.WARP_INVERSE_MAP)
    image3 = warp_perspective(image1, M, dst_h, dst_w)

    image4 = cv2.warpPerspective(image1, M, (dst_w, dst_h), flags=cv2.INTER_LINEAR)
    image5 = warp_perspective_forward(image1, M, dst_h, dst_w)
    image6 = warp_perspective_forward2(image1, M, dst_h, dst_w)

    plt.figure()
    plt.subplot(231)
    plt.imshow(image1)
    plt.subplot(232)
    plt.imshow(image2)
    plt.subplot(233)
    plt.imshow(image3)
    plt.subplot(234)
    plt.imshow(image4)
    plt.subplot(235)
    plt.imshow(image5)
    plt.subplot(236)
    plt.imshow(image6)
    plt.show()
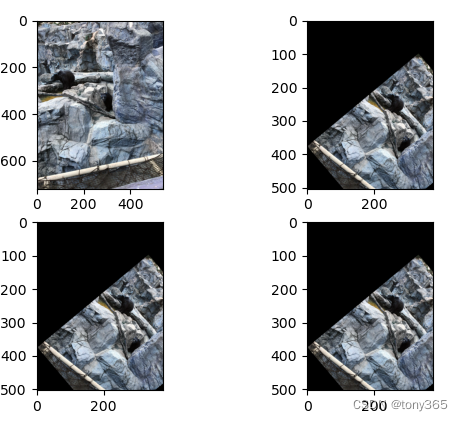
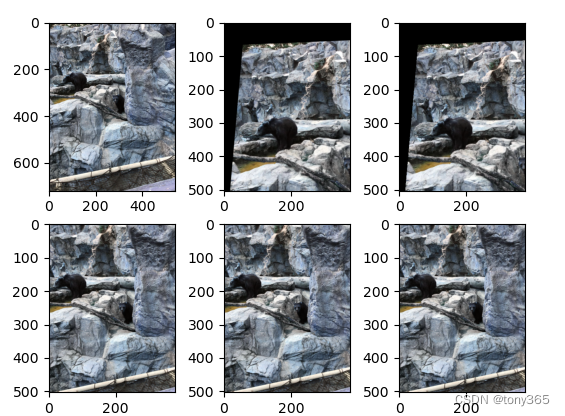
运行上面的代码,实验结果如下:
warp affine实验结果:
warp perspective 实验结果


 1万+
1万+

 被折叠的 条评论
为什么被折叠?
被折叠的 条评论
为什么被折叠?
 到【灌水乐园】发言


