


前言
类激活图CAM(class activation mapping)用于可视化深度学习模型的感兴趣区域,增加了神经网络的可解释性。现在常用Grad-CAM可视化,Grad-CAM基于梯度计算激活图,对比传统的CAM更加灵活,且不需要修改模型结构。
虽然计算grad-cam并不复杂,但是本着能导包就导包的原则,想着去用现成的库。
pip install grad-cam
简单试用
- 加载模型和预训练权重
这里使用PyTorch官方提供的在ImageNet上预训练的Resnet50。注意:这里使用现成的模型参数,也需要用它们提供的图片预处理方式
from torchvision.models import resnet50, ResNet50_Weights

# 加载ResNet模型和预训练权重
weights = ResNet50_Weights.DEFAULT
model = resnet50(weights=weights)
model.eval()

preprocess = weights.transforms() # 图片预处理方法
- 简单读入一张图片
from PIL import Image

src = 'bird.jpg'
img = Image.open(src)
print(f'The Image size:{img.size}')
img_tensor = preprocess(img)
print(f'The shape of image preprocessed: {img_tensor.shape}')
Output
The Image size:(474, 315)
The shape of image preprocessed: torch.Size([3, 224, 224])
- 计算Grad-CAM
rom pytorch_grad_cam import GradCAM

grad_cam = GradCAM(model=model, target_layers=[model.layer4[-1]])
cam = grad_cam(input_tensor=img_tensor.unsqueeze(0)) # 输入的Shape: B x C x H x W

print(f'Cam.shape: {cam.shape}')
print(f'Cam.max: {cam.max()}, Cam.min: {cam.min()}')
Output
Cam.shape: (1, 224, 224)
Cam.max: 0.9999998807907104, Cam.min: 0.0
这里可以看到计算的CAM值的区间是[0, 1],一些处理长尾数据的图像增强的方法,通过CAM的值与原图像相乘,得到图像的主体或背景(上下文)。
- 可视化
from pytorch_grad_cam.utils.image import show_cam_on_image
import uuid
import numpy as np
import torch
def vis_cam(cam: np.ndarray, input_tensor: torch.Tensor):
def normalization(x: np.ndarray, scale=1): # 归一化
x_min = np.min(x)
x_max = np.max(x)
return (x - x_min) / (x_max - x_min) * scale
# 底层是cv2实现的所以要求图像形状为 H x W x C
input_tensor= input_tensor.permute(1, 2, 0).numpy()
norm_img = normalization(input_tensor)
# 可视化不支持batch,所以要取cam第一个
vis = show_cam_on_image(norm_img, cam[0], use_rgb=True)
vis_img = Image.fromarray(vis)
vis_img.save(f'cam_{uuid.uuid1()}.jpg')
return vis
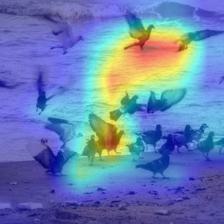
vis1 = vis_cam(cam, img_tensor)
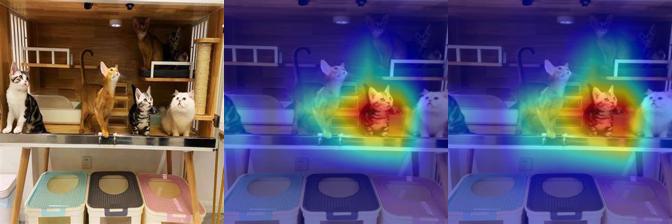
结果如下,由于图像经过了预处理,size=224x224,所以CAM的大小也是这个尺寸。
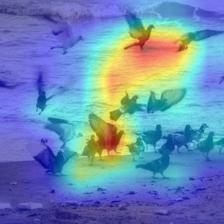
另外,这个库也提供了其他CAM方法,如GradCAMElementWise,与Grad-CAM相似,将激活值与梯度逐元素相乘,然后在求和之前应用 ReLU 运算。但是简单使用后,肉眼没有察觉差异:
from pytorch_grad_cam import GradCAMElementWise
grad_cam = GradCAMElementWise(model=model, target_layers=[model.layer4[-1]])
cam = grad_cam(input_tensor=img_tensor.unsqueeze(0)) # 输入的Shape: B x C x H x W
vis2 = vis_cam(cam, img_tensor)
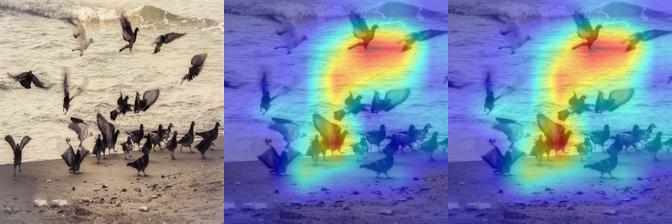
将它们做一个横向对比,从左至右分别是原图、GradCAM,GradCAMElementWise
img_hstack = np.hstack([img.resize(size=(224, 224)), vis1, vis2])
Image.fromarray((img_hstack).astype(np.uint8)).save('cam_compare.jpg')

其他
有一点很重要,但是文中并没有使用,关于ClassifierOutputTarget的使用,文档中它的一种用法:
cam = GradCAM(model=model, target_layers=target_layers, use_cuda=args.use_cuda)

targets = [ClassifierOutputTarget(281)]

grayscale_cam = cam(input_tensor=input_tensor, targets=targets)
输入的参数是图片对应的target,也就是one-hot标签里面的1的下标,但由于使用的是预训练模型,所以不知道具体的标签。而当cam这里的targets=None时,会自动选择得分最高的类。
关于grad-cam还有许多功能,这里仅仅介绍了计算cam和可视化的部分。
运行环境
grad-cam                  1.5.0                    pypi_0    pypi
pytorch                   2.2.2           py3.12_cuda12.1_cudnn8_0    pytorch
最后
感谢你们的阅读和喜欢,我收藏了很多技术干货,可以共享给喜欢我文章的朋友们,如果你肯花时间沉下心去学习,它们一定能帮到你。
因为这个行业不同于其他行业,知识体系实在是过于庞大,知识更新也非常快。作为一个普通人,无法全部学完,所以我们在提升技术的时候,首先需要明确一个目标,然后制定好完整的计划,同时找到好的学习方法,这样才能更快的提升自己。
这份完整版的大模型 AI 学习资料已经上传CSDN,朋友们如果需要可以微信扫描下方CSDN官方认证二维码免费领取【保证100%免费】

一、全套AGI大模型学习路线
AI大模型时代的学习之旅:从基础到前沿,掌握人工智能的核心技能!
二、640套AI大模型报告合集
这套包含640份报告的合集,涵盖了AI大模型的理论研究、技术实现、行业应用等多个方面。无论您是科研人员、工程师,还是对AI大模型感兴趣的爱好者,这套报告合集都将为您提供宝贵的信息和启示。
三、AI大模型经典PDF籍
随着人工智能技术的飞速发展,AI大模型已经成为了当今科技领域的一大热点。这些大型预训练模型,如GPT-3、BERT、XLNet等,以其强大的语言理解和生成能力,正在改变我们对人工智能的认识。 那以下这些PDF籍就是非常不错的学习资源。
四、AI大模型商业化落地方案

五、面试资料
我们学习AI大模型必然是想找到高薪的工作,下面这些面试题都是总结当前最新、最热、最高频的面试题,并且每道题都有详细的答案,面试前刷完这套面试题资料,小小offer,不在话下。

这份完整版的大模型 AI 学习资料已经上传CSDN,朋友们如果需要可以微信扫描下方CSDN官方认证二维码免费领取【保证100%免费】


 2806
2806

 被折叠的 条评论
为什么被折叠?
被折叠的 条评论
为什么被折叠?
 到【灌水乐园】发言


