


代码地址:https://gitcode.com/jacobgil/pytorch-grad-cam
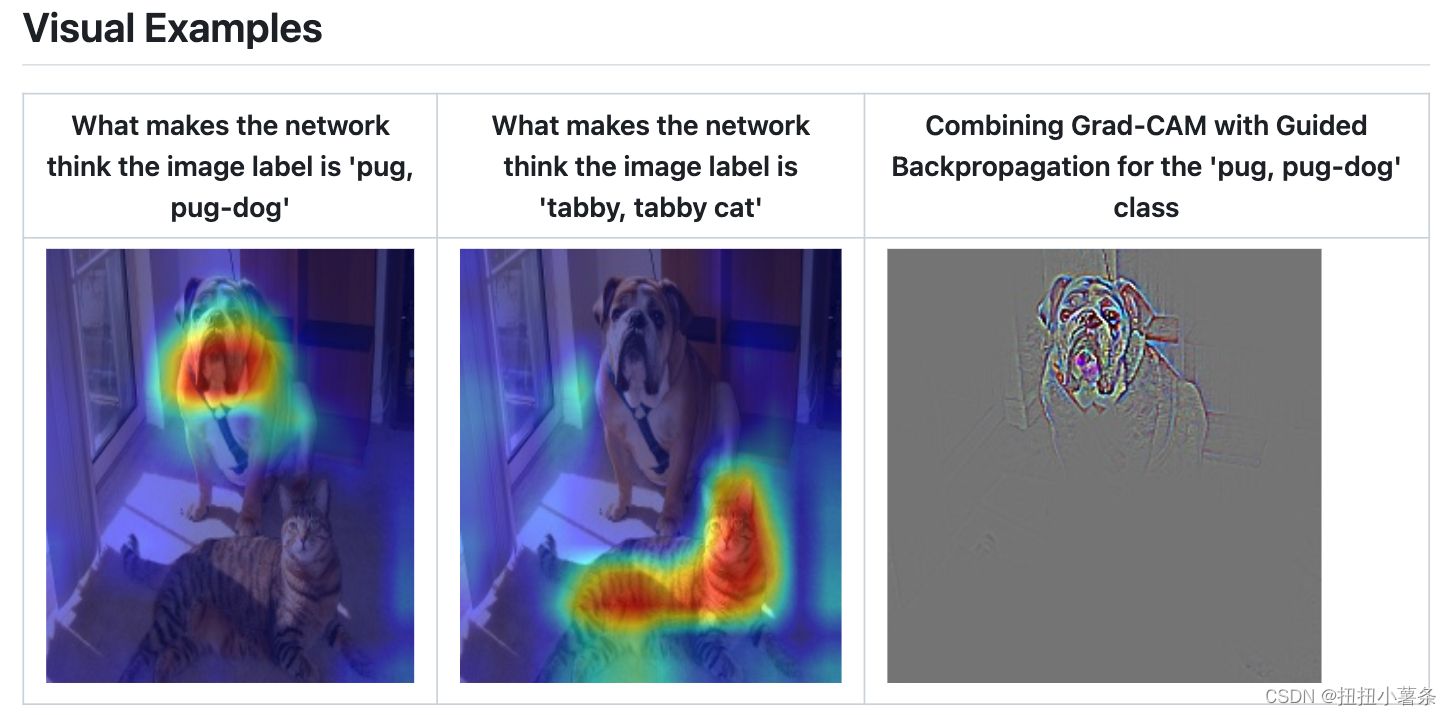
Grad-CAM是一个库,可以可视化感受野,可以可视化的展示对最终结果产生影响的区域。可以用于模型预测结果的分析。
案例:
需要选择用于计算CAM的目标层。一些常见的选择包括:
FasterRCNN: model.backbone
Resnet18和Resnet50: model.layer4[-1]
VGG和Densenet161: model.features[-1]
Mnasnet1_0: model.layers[-1]
ViT: model.blocks[-1].norm1
SwinT: model.layers[-1].blocks[-1].norm1
如果传递一个包含多个层的列表,CAM将在它们之间进行平均。这在你不确定哪个层会表现最佳时非常有用。
图像分类代码:
'''
1)导入相关的包并加载模型
'''

from pytorch_grad_cam import GradCAM, ScoreCAM, GradCAMPlusPlus, AblationCAM, XGradCAM, EigenCAM
from pytorch_grad_cam.utils.image import show_cam_on_image, \
                                         deprocess_image, \
                                         preprocess_image
from torchvision.models import resnet50
import cv2
import numpy as np
import os

os.environ["KMP_DUPLICATE_LIB_OK"]="TRUE"

# 1.加载模型
model = resnet50(pretrained=True) #预先训练
# 2.选择目标层
# target_layer = model.layer4[-1]
target_layer = [model.layer4]
'''
Resnet18 and 50: model.layer4[-1]
VGG and densenet161: model.features[-1]
mnasnet1_0: model.layers[-1]
ViT: model.blocks[-1].norm1
'''
#------------------------------
'''
2)构建输入图像的Tensor形式,使其能传送到model里面去计算
'''


image_path = '../../examples/both.png'
rgb_img = cv2.imread(image_path, 1)[:, :, ::-1]   # 1是读取rgb
                                                 #imread返回从指定路径加载的图像
rgb_img = cv2.imread(image_path, 1) #imread()读取的是BGR格式
rgb_img = np.float32(rgb_img) / 255


# preprocess_image作用:归一化图像,并转成tensor
input_tensor = preprocess_image(rgb_img, mean=[0.485, 0.456, 0.406],
                                             std=[0.229, 0.224, 0.225])   # torch.Size([1, 3, 224, 224])
# Create an input tensor image for your model..
# Note: input_tensor can be a batch tensor with several images!


#----------------------------------------
'''
3)初始化CAM对象,包括模型,目标层以及是否使用cuda等
'''
# Construct the CAM object once, and then re-use it on many images:
cam = GradCAM(model=model, target_layers=target_layer, use_cuda=False)
'''
4)选定目标类别,如果不设置,则默认为分数最高的那一类
'''
# If target_category is None, the highest scoring category
# will be used for every image in the batch.
# target_category can also be an integer, or a list of different integers
# for every image in the batch.
target_category = None
#指定类:target_category = 281

'''
5)计算cam
'''
# You can also pass aug_smooth=True and eigen_smooth=True, to apply smoothing.
grayscale_cam = cam(input_tensor=input_tensor, target_category=target_category)  # [batch, 224,224]

#----------------------------------
'''
6)展示热力图并保存
'''
# In this example grayscale_cam has only one image in the batch:
# 7.展示热力图并保存, grayscale_cam是一个batch的结果,只能选择一张进行展示
grayscale_cam = grayscale_cam[0]
visualization = show_cam_on_image(rgb_img, grayscale_cam)  # (224, 224, 3)
cv2.imwrite(f'first_try.jpg', visualization)
思路是梯度作为每个channel每个位置的权重,和特征图进行相乘。
手写Grad-CAM:
# 获取热力图
def get_heatmap(model, img):
    model.eval()
    img_pre = model(img)
    # 获取预测最高的类别
    pre_class = torch.argmax(img_pre, dim=-1).item()
    # 获取相对于模型参数的输出梯度
    img_pre[:, pre_class].backward()
    # 获取模型的梯度
    gradients = model.get_activations_gradient()
    # 计算梯度相应通道的均值
    mean_gradients = torch.mean(gradients, dim=[0, 2, 3])
    # 获取图像在相应卷积层输出的卷积特征
    activations = model.get_activations(input_im).detach()
    # 每个通道乘以相应的梯度均值
    for i in range(len(mean_gradients)):
        activations[:, i, :, :] *= mean_gradients[i]
    # 计算所有通道的均值输出得到热力图
    heatmap = torch.mean(activations, dim=1).squeeze()
    # 使用Relu函数作用于热力图
    heatmap = F.relu(heatmap)
    # 对热力图进行标准化
    heatmap /= torch.max(heatmap)
    heatmap = heatmap.numpy()

    return heatmap
cam = GradCAM()
# 获取热力图
heatmap = get_heatmap(cam, input_im)
# 可视化热力图
plt.matshow(heatmap)
plt.show()
先对channel求平均,每个channel的平均梯度。
用对channel的平均梯度对特征图进行乘法操作。
对所有通道进行均值得到最终的热力图。
参考:李卓璐的博客


 3559
3559


 被折叠的 条评论
为什么被折叠?
被折叠的 条评论
为什么被折叠?
 到【灌水乐园】发言


