


EdgeConnect:使用对抗边缘学习进行生成图像修复
源码一:https://github.com/knazeri/edge-connect#testing
介绍
我们开发了一种新的图像修复方法,可以更好地再现填充区域,这些区域展示了受我们对艺术家工作方式的理解启发而产生的细节:首先是线条,然后是颜色。我们为此提出了一个二阶对抗模型EdgeConnect,它包括边缘生成器,然后紧接着是图像补全网络。边缘生成器可以使得图像的缺失区域(包括规则和不规则)的边缘产生幻觉,接下来图像补全网络会利用这个幻觉边缘作为先验补全缺失的区域。有关本系统的详细说明,可以参阅我们的论文。

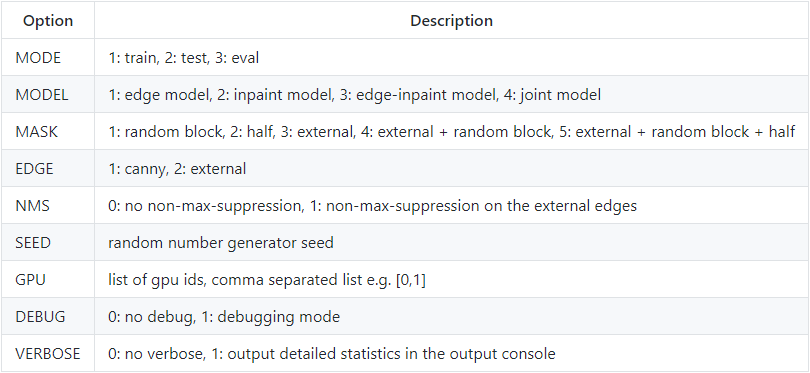
(a)输入缺失区域的图像,并用白色填充缺失的区域。
(b)计算边缘掩码。 使用Canny边缘检测器计算以黑色绘制的边缘(对于可用区域); 而蓝色显示的边缘被边缘发生器网络幻觉化。
(c)图像修复拟议方法的结果。
准备工具
-
Python 3
-
PyTorch 1.0
-
NVIDIA GPU + CUDA cuDNN
安装
-
克隆本项目仓库:
git clone https://github.com/knazeri/edge-connect.git
cd edge-connect
-
从PyTorch网站(http://pytorch.org)安装PyTorch及其依赖项
-
安装Python需求文档:
pip install -r requirements.txt
数据集
我们使用了 Places2, CelebA 和 Paris Street-View 这三个数据集,要想在完整的数据集上训练模型,请到其官网下载数据集(链接在左边)。我们的模型是根据 Liu et al. 提供的不规则掩模数据集进行训练的,你可以从他们的网站下载已公开的可用训练/测试掩模数据集。
下载数据集以后,运行 scripts/flist.py 以生成训练、测试和验证集的文件列表。举个例子,如果要在Places2数据集上生成训练集文件列表的话,需要执行以下命令:
mkdir datasets
python ./scripts/flist.py --path path_to_places2_train_set --output
./datasets/places_train.flist
eg:
python3 ./scripts/flist.py --path /home/gavin/Dataset/celeba --output ./datasets/celeba_train.flist入门
使用以下链接去下载预先训练的模型,并将它们复制到 ./checkpoints 目录下。
Places2 | CelebA | Paris-StreetView
或者,您可以运行以下脚本来自动下载预先训练的模型:
bash ./scripts/download_model.sh
1)训练
要训练模型,请创建类似于示例配置文件的 config.yaml 文件,并将其复制到检查点目录(./checkpoints )下。 有关模型配置的更多信息,请阅读配置指南。
EdgeConnect分三个阶段进行训练:1.训练边缘模型,2.训练inpaint模型,3.训练关节模型。
训练模型,请运行:
python train.py --model [stage] --checkpoints [path to checkpoints]
例如,在 ./checkpoints/places2 目录下的Places2数据集上训练边缘模型,要运行:
python train.py --model 1 --checkpoints ./checkpoints/places2模型的收敛性因数据集而异。 例如,Places2数据集收敛于1/2个时期,而像CelebA这样的较小数据集需要近40个时期才能收敛。 你可以通过更改配置文件中的 MAX_ITERS 值来设置训练迭代次数。
2)测试
要测试模型,需要创建一个类似于示例配置文件的 config.yaml 文件,并将其复制到检查点目录( ./checkpoints )下。 有关模型配置的更多信息,请阅读配置指南。
你可以在这所有的三个阶段去测试模型:1)边缘模型,2)inpaint模型,3)关节模型。 在每种情况下,你都需要提供输入图像(带掩码的图像)和灰度掩码文件。 请确保掩码文件覆盖输入图像中的整个遮罩区域。 要测试模型,请运行:
python test.py \
  --model [stage] \
  --checkpoints [path to checkpoints] \
  --input [path to input directory or file] \
  --mask [path to masks directory or mask file] \
  --output [path to the output directory]
我们在 ./examples 目录下提供了一些测试样例。 请下载预训练模型并运行以下命令:
python test.py \
  --checkpoints ./checkpoints/places2
  --input ./examples/places2/images
  --mask ./examples/places2/mask
  --output ./checkpoints/results
该脚本将使用 ./examples/places2/mask 目录中的相应掩码来修复 ./examples/places2/images 中的所有图像,并将结果保存在 ./checkpoints/results 目录中。 默认情况下,test.py 脚本在第3阶段运行(--model=3)。
3)评估
要评估模型,首先需要在测试模式下针对 validartion集运行这个模型,然后将结果保存到磁盘里。我们提供了一个实用工具 ./scripts/metrics.py ,用PSNR,SSIM和平均绝对误差来评估模型:
python ./scripts/metrics.py --data-path [path to validation set] --output-path [path to model output]
要测量Fréchet的初始距离(FID得分),请运行 ./scripts/fid_score.py 。 我们从这里利用了FID的PyTorch实现,它使用了PyTorch的Inception模型中的预训练权重。
python ./scripts/fid_score.py --path [path to validation, path to model output] --gpu [GPU id to use]
模型配置
模型配置存储在checkpoints目录下的 config.yaml 文件中。 下表提供了配置文件中所有可用选项的文档:
一般模型配置
加载训练,测试和验证设置的配置
训练模式的配置
源码二:https://github.com/youyuge34/Anime-InPainting
An application tool of edge-connect, which can do anime inpainting and drawing.
动漫人物图片自动修复,去马赛克,填补,去瑕疵
demo运行
- 下训练好的模型文件 --> Google Drive | Baidu
- 解压
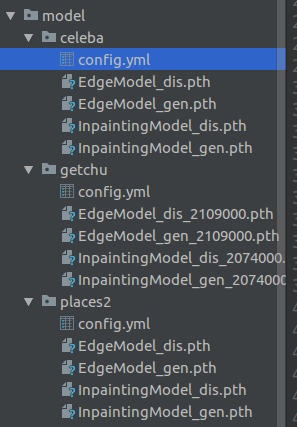
.7z放到你的根目录下. 确保你的目录现在是这样:./model/getchu/<xxxxx.pth> - 完成上面的基础环境和第三方库安装步骤
- (可选) 检查并编辑
./model/getchu/config.yml配置文件 - 使用以下命令运行:
默认Tool:
python tool_patch.py --path model/getchu/带Edge编辑窗口的Tool:
python tool_patch.py --edge --path model/getchu/命令行参数帮助
python tool_patch.py -hPS. 你也能用tool跑别的任何模型,在这里下载原作更多模型Edge-Connect. 文件组织方式参考上面,其余运行命令都一样。唯一注意的是这个项目的
config.yml比原作的多了几个选项,报错了的话注意修改。
config.yml参考
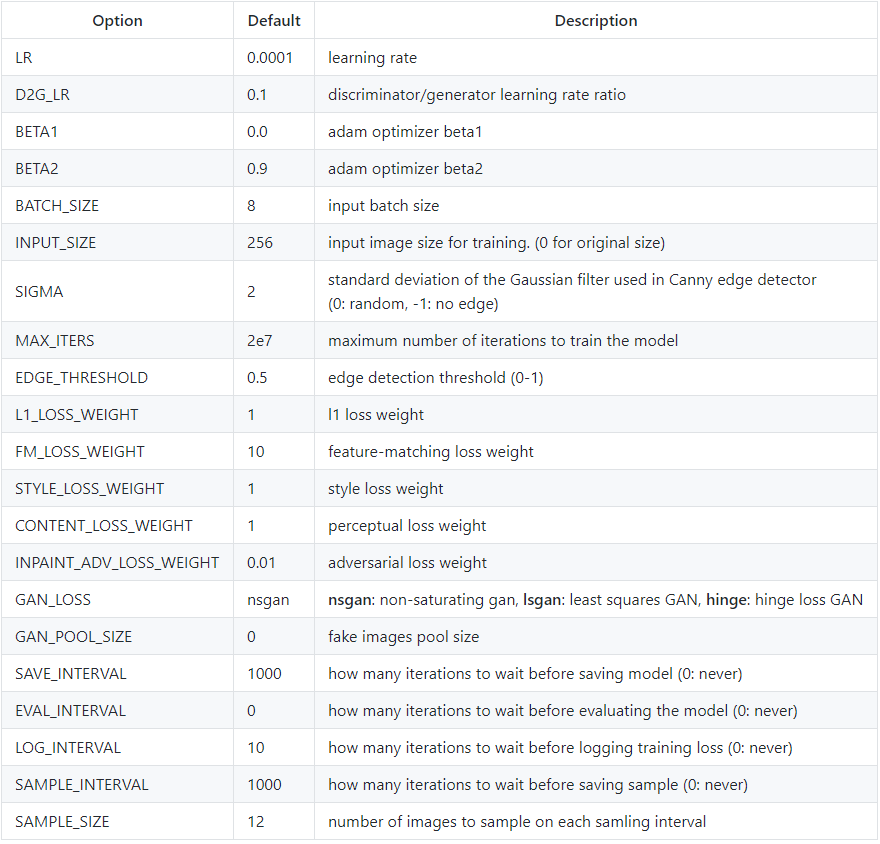
MODE: 1             # 1: train, 2: test, 3: eval
MODEL: 1            # 1: edge model, 2: inpaint model, 3: edge-inpaint model, 4: joint model
MASK: 4             # 1: random block, 2: half, 3: external, 4: (external, random block), 5: (external, random block, half)
EDGE: 1             # 1: canny, 2: external
NMS: 1              # 0: no non-max-suppression, 1: applies non-max-suppression on the external edges by multiplying by Canny
SEED: 10            # random seed
DEVICE: 1           # 0: CPU, 1: GPU
GPU: [0,1,2]            # list of gpu ids
DEBUG: 1            # turns on debugging mode
VERBOSE: 0          # turns on verbose mode in the output console
SKIP_PHASE2: 1      # When training Inpaint model, 2nd and 3rd phases (model 2--->model 3 ) by order are needed. But we can merge 2nd phase into the 3rd one to speed up (however, lower performance).

TRAIN_FLIST: ./datasets/celeba/train.flist
VAL_FLIST: ./datasets/celeba/val.flist
TEST_FLIST: ./datasets/celeba/test.flist

TRAIN_EDGE_FLIST: ./datasets/places2_edges_train.flist
VAL_EDGE_FLIST: ./datasets/places2_edges_val.flist
TEST_EDGE_FLIST: ./datasets/places2_edges_test.flist

TRAIN_MASK_FLIST: ./datasets/mask_dataset/train.flist
VAL_MASK_FLIST: ./datasets/mask_dataset/val.flist
TEST_MASK_FLIST: ./datasets/mask_dataset/test.flist

LR: 0.0001                    # learning rate
D2G_LR: 0.1                   # discriminator/generator learning rate ratio
BETA1: 0.0                    # adam optimizer beta1
BETA2: 0.9                    # adam optimizer beta2
BATCH_SIZE: 8                 # input batch size for training
INPUT_SIZE: 128               # input image size for training 0 for original size
SIGMA: 1.5                      # standard deviation of the Gaussian filter used in Canny edge detector (0: random, -1: no edge)
MAX_ITERS: 2e7                # maximum number of iterations to train the model

EDGE_THRESHOLD: 0.5           # edge detection threshold
L1_LOSS_WEIGHT: 1             # l1 loss weight
FM_LOSS_WEIGHT: 10            # feature-matching loss weight
STYLE_LOSS_WEIGHT: 1          # style loss weight
CONTENT_LOSS_WEIGHT: 1        # perceptual loss weight
INPAINT_ADV_LOSS_WEIGHT: 0.01 # adversarial loss weight

GAN_LOSS: nsgan               # nsgan | lsgan | hinge
GAN_POOL_SIZE: 0              # fake images pool size

SAVE_INTERVAL: 1000           # how many iterations to wait before saving model (0: never)
SAMPLE_INTERVAL: 200         # how many iterations to wait before sampling (0: never)
SAMPLE_SIZE: 12               # number of images to sample
EVAL_INTERVAL: 0              # how many iterations to wait before model evaluation (0: never)
LOG_INTERVAL: 1000              # how many iterations to wait before logging training status (0: never)
PRINT_INTERVAL: 20            # how many iterations to wait before terminal prints training status (0: never)
训练
简介(必看)
整个训练过程并不是端到端(end-to-end)的,根据论文为了得到最佳效果训练被分为了几个阶段。 有点复杂,所以理解论文并查看代码框架可以让你更好理解。
论文中说整个训练阶段有两个小模型:EdgeModel 和 InpaintingModel. 但是根据代码为了得到最佳效果,实际上整个训练分为训练俩小模型和三个训练阶段,训练完还要test和eval, 所以一切变得都令人困惑。不用担心,这个手册写的可清晰了~
重点:这里被我成为阶段phase,在原作代码中被成为model,因为会和EdgeModel 和 InpaintingModel混淆,所以我叫做阶段。
e.g. 训练命令行中的
--model参数指定的就是我所说的阶段
| 阶段 | 对应命令行 | 训练的小模型 | 输入 | 输出 | 说明 |
|---|---|---|---|---|---|
| 1st | --model 1 | EdgeModel | Masked Greyscale Image + Masked Edge + Mask | Full Edge | 单独训练 EdgeModel |
| 2nd | --model 2 | InpaintingModel | Masked Image + Full canny Edge from Original full Image+ Mask | Full Image | 单独预训练 InpaintingModel,为了让它学到Edge的重要性 |
| 3rd | --model 3 | InpaintingModel | Masked Image + Full Edge from 1st phase output + Mask | Full Image | 真正的训练 InpaintingModel,使用来自阶段1的输出Edge |
数据集准备
- 我们需要同时准备图片和mask数据集:
- Mask dataset:
- 不规则 Mask Dataset (download link) 来自 Liu et al. ,推荐使用这个来对付不规则的图片缺陷。
- 规则的方块mask不需要数据集,可使用代码生成
- Image dataset:
- 接下来我们要把图片数据分成train/validation/test三个部分(Mask数据集不用).
python scripts/flist_train_split.py --path <your dataset directory> --output <output path> --train 28 --val 1 --test 1这个脚本会默认将30张图片分为28张训练,1张验证,1张测试。注意,分的时候没有shuffle打乱,是根据文件名排序 一轮一轮均匀分的,因为动漫头像数据集是按年代排序的,我们想让数据集分布均匀。请修改脚本以适配你自己的数据集。 现在,在<output path>目录下应该有三个.filst文件了,它们包含了图片的绝对路径。
- 复制根目录下的
config.yml.example到你的模型文件夹下. 重命名为config.yml并编辑它. 下面是几个和数据集有关的配置需要修改:
- 修改
MASK: 3(同样推荐使用4). - 修改
TRAIN_FLIST,VAL_FLIST和TEST_FLIST变成你的.flist路径。 - 修改
TRAIN_MASK_FLIST,VAL_MASK_FLIST和TEST_MASK_FLIST变成你的mask数据集路径(三个相同).
# 把图片数据分成train/validation/test三个部分
python3 scripts/flist_train_split.py --path /home/gavin/Dataset/celeba --output ./datasets/celeba

python3 scripts/flist_train_split.py --path /home/gavin/Dataset/mask/testing_mask_dataset --output ./datasets/mask_dataset

# 训练阶段1,对应模型 EdgeModel.
python3 train.py --model 1 --path ./model/celeba/

# 训练阶段3,对应 InpaintingModel ,需要用到上一步中训练好的EdgeModel的.pth
# 我们跳过了训练阶段2(实际上是融合了),在 config.yml中SKIP_PHASE2 必须配置为 1 !

python3 train.py --model 3 --path ./model/celeba/
模型分享:百度网盘,密码:


 5万+
5万+

 被折叠的 条评论
为什么被折叠?
被折叠的 条评论
为什么被折叠?
 到【灌水乐园】发言


