


MNN的文档有中文
https://www.yuque.com/mnn/cn/about
除了部分细节, 按照文档基本没啥问题,本文部分内容基本也是拆解文档
目前windows支持的Python版本:3.5、3.6、3.7,用的时候再去这里确认下吧
https://www.yuque.com/mnn/cn/usage_in_python
1. Python 直接安装
安装很简单,直接pip就好
pip install -U pip -i https://mirror.baidu.com/pypi/simple
pip install -U MNN -i https://mirror.baidu.com/pypi/simple
安装完毕之后,在命令行输入
> mnn
mnn toolsets has following command line tools
    $mnn
        list out mnn commands
    $mnnconvert
        convert other model to mnn model
    $mnnquant
        quantize  mnn model
这就安装成功了
mnnconvert 是用来做模型转化,
mnnquant 量化工具
按理说,安装完毕之后,命令行会有:
> mnnconvert

Usage:
  MNNConvert [OPTION...]

  -h, --help                    Convert Other Model Format To MNN Model

  -v, --version                 show current version
  -f, --framework arg           model type, ex: [TF,CAFFE,ONNX,TFLITE,MNN]
      --modelFile arg           tensorflow Pb or caffeModel, ex:
                                *.pb,*caffemodel
      --batch arg               if model input's batch is not set, set as the
                                batch size you set
      --keepInputFormat         keep input dimension format or not, default:
                                false
      --optimizeLevel arg       graph optimize option, 0: don't run
                                optimize(only support for MNN source), 1: use graph
                                optimize only for every input case is right, 2:
                                normally right but some case may be wrong,
                                default 1
      --optimizePrefer arg      graph optimize option, 0 for normal, 1 for
                                smalleset, 2 for fastest
      --prototxt arg            only used for caffe, ex: *.prototxt
      --MNNModel arg            MNN model, ex: *.mnn
      --fp16                    save Conv's weight/bias in half_float data
                                type
      --benchmarkModel          Do NOT save big size data, such as Conv's
                                weight,BN's gamma,beta,mean and variance etc.
                                Only used to test the cost of the model
      --bizCode arg             MNN Model Flag, ex: MNN
      --debug                   Enable debugging mode.
      --forTraining             whether or not to save training ops BN and
                                Dropout, default: false
      --weightQuantBits arg     save conv/matmul/LSTM float weights to int8
                                type, only optimize for model size, 2-8 bits,
                                default: 0, which means no weight quant
      --weightQuantAsymmetric   the default weight-quant uses SYMMETRIC quant
                                method, which is compatible with old MNN
                                versions. you can try set --weightQuantAsymmetric
                                to use asymmetric quant method to improve
                                accuracy of the weight-quant model in some cases,
                                but asymmetric quant model cannot run on old
                                MNN versions. You will need to upgrade MNN to
                                new version to solve this problem. default:
                                false
      --compressionParamsFile arg
                                The path of the compression parameters that
                                stores activation, weight scales and zero
                                points for quantization or information for
                                sparsity.
      --OP                      print framework supported op
      --saveStaticModel         save static model with fix shape, default:
                                false
      --targetVersion arg       compability for old mnn engine, default: 1.2f
      --customOpLibs arg        custom op libs ex: libmy_add.so;libmy_sub.so
      --authCode arg            code for model authentication.
      --inputConfigFile arg     set input config file for static model, ex:
                                ~/config.txt
      --alignDenormalizedValue arg
                                if 1, converter would align denormalized
                                float(|x| < 1.18e-38) as zero, because of in
                                ubuntu/protobuf or android/flatbuf, system
                                behaviors are different. default: 1, range: {0, 1}

[10:15:46] @ 192: framework Invalid, use -f CAFFE/MNN/ONNX/TFLITE/TORCH !
如果命令行不能用,可以参考这个:
https://www.yuque.com/mnn/cn/usage_in_python
python(3) -m MNN.tools.mnn
python(3) -m MNN.tools.mnnconvert
python(3) -m MNN.tools.mnnquant
2. 转化
这里转化一下,将onnx转换为mnn模型
MNNConvert -f ONNX --modelFile output.onnx --MNNModel output.mnn --bizCode biz
加上 --fp 可以转换为半精度的模型,模型的大小比例近乎缩小一半:

MNNConvert -f ONNX --modelFile output.onnx --MNNModel output16.mnn --bizCode biz --fp16
半精度转换文档在这里:
https://www.yuque.com/mnn/cn/qxtz32
3. MNN 权值量化
这个之前没怎么用过,直接copy一下官方文档:
将模型中卷积的float权值量化为int8存储,推理时反量化还原为float权值进行计算。因此,其推理速度和float模型一致,但是模型大小可以减小到原来的1/4,可以通过模型转换工具一键完成,比较方便。推荐float模型性能够用,仅需要减少模型大小的场景使用。
使用MNNConvert.exe(c++)或者mnnconvert(python包中自带)进行转换,转换命令行中加上下述选项即可:
--weightQuantBits 8 [--weightQuantAsymmetric](可选)
--weightQuantAsymmetric 选项是指使用非对称量化方法,精度要比默认的对称量化精度好一些。
以上是直接用Python 命令行工具转换的,接下来是,编译转换工具的过程:
注意:实验证明,Python命令行工具mnnconvert 与 编译的转换工具MNNConvert.exe 效果相同,当然,可能在后续大版本有些不同
4. 编译 MNNConvert.exe
编译前需要 ninja, cmake 和 VS2017/2019
cmake安装:
https://blog.csdn.net/HaoZiHuang/article/details/126015717
ninja 安装:
https://blog.csdn.net/HaoZiHuang/article/details/126083356
(ninja 是构建工具,比nmake更快)
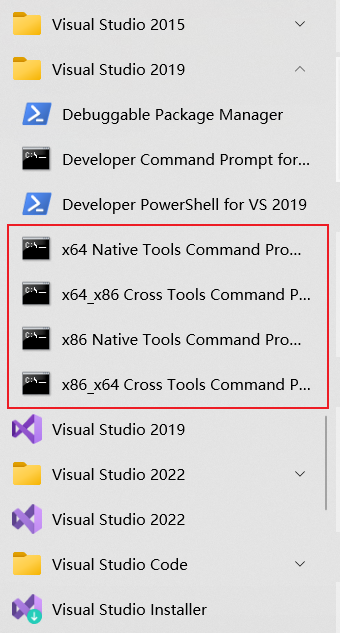
安装VS之后,在编译过程中,命令行用x64 Native Tools Command Prompt 就好
编译具体过程参考文档:
https://www.yuque.com/mnn/cn/cvrt_windows
把 MNN git 下来,然后
cd MNN
mkdir build
cd build
cmake -G "Ninja" -DMNN_BUILD_SHARED_LIBS=OFF -DMNN_BUILD_CONVERTER=ON -DCMAKE_BUILD_TYPE=Release -DMNN_WIN_RUNTIME_MT=ON ..
ninja
之后会在目录下生成:MNNConvert.exe 该工具就是转换工具
5. 编译推理引擎
官方文档在:
https://www.yuque.com/mnn/cn/build_windows
由于编译后的引擎在当前版本无法被Python调用,所以如果不用C++,该部分直接跳过不用看
下载GPU Caps Viewer,你可以通过这个工具来查看本机设备的详细信息(opencl、opengl、vulkan等)
在Github上有个issue:
编译的引擎如何用Python API调用:https://github.com/alibaba/MNN/issues/2010
官方回复是需要编译 pymnn, 目前文档还没出来,等官方更新吧
同时编译的时候需要 powershell
同时依旧需要VS的命令行x64 Native Tools Command Prompt
cd /path/to/MNN
powershell     # 运行该命令从 cmd 环境进入 powershell 环境,后者功能更强大

./schema/generate.ps1
如果出现:
PS xxxxxxxxxxxxxxxxxxxxxxxx> ./xx/xx.ps1
./xx/xx.ps1 : 无法加载文件
X:\XXXXXX\xxxxx.ps1,因为在此系统上禁止运行脚本。
有关详细信息,请参阅 https:/go.microsoft.com/fwlink/?LinkID=135170
中的 about_Execution_Policies。
所在位置 行:1 字符: 1
+ ./xx/xx.ps1
+ ~~~~~~~~~~~~~~~~~~~~~
    + CategoryInfo          : SecurityError: (:) [],PSSecurityException
    + FullyQualifiedErrorId : UnauthorizedAccess
可以参考这篇:
https://blog.csdn.net/HaoZiHuang/article/details/126088344
如果只需要 CPU 后端
# CPU, 64位编译
.\package_scripts\win\build_lib.ps1 -path MNN-CPU/lib/x64
# CPU, 32位编译
.\package_scripts\win\build_lib.ps1 -path MNN-CPU/lib/x86
如果需要 opencl 和 vulkan 后端
# CPU+OpenCL+Vulkan, 64位编译
.\package_scripts\win\build_lib.ps1 -path MNN-CPU-OPENCL/lib/x64 -backends "opencl,vulkan"
# CPU+OpenCL+Vulkan, 32位编译
.\package_scripts\win\build_lib.ps1 -path MNN-CPU-OPENCL/lib/x86 -backends "opencl,vulkan"
如果仅需要 opencl 后端
# CPU+OpenCL, 64位编译
.\package_scripts\win\build_lib.ps1 -path MNN-CPU-OPENCL/lib/x64 -backends opencl
# CPU+OpenCL, 32位编译
.\package_scripts\win\build_lib.ps1 -path MNN-CPU-OPENCL/lib/x86 -backends opencl
如果仅需要 vulkan 后端
# CPU+Vulkan, 64位编译
.\package_scripts\win\build_lib.ps1 -path MNN-CPU-OPENCL/lib/x64 -backends vulkan
# CPU+Vulkan, 32位编译
.\package_scripts\win\build_lib.ps1 -path MNN-CPU-OPENCL/lib/x86 -backends vulkan
具体都可以参考这些:
https://www.yuque.com/mnn/cn/build_windows
6. 验证安装是否成功
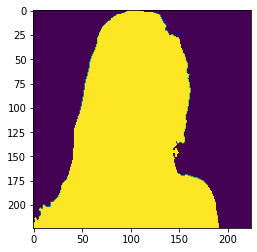
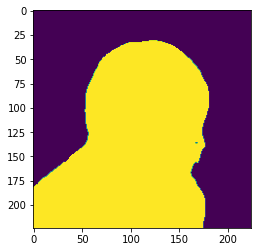
测试图片shiyuan.jpg:

结果图片:
测试的mnn模型在这里下载:
https://download.csdn.net/download/HaoZiHuang/86337543
import numpy as np
import MNN
import cv2
import matplotlib.pyplot as plt


def normalize(im,
                mean=(0.5, 0.5, 0.5),
                std=(0.5, 0.5, 0.5)):
    im = im.astype(np.float32, copy=False) / 255.0
    im -= mean
    im /= std
    return im


if __name__ == "__main__":
    """ inference PPliteSeg using a specific picture """

    img = "shiyuan.jpg"
    interpreter = MNN.Interpreter("originalpool/output.mnn") # custompool originalpool
    session = interpreter.createSession()
    input_tensor = interpreter.getSessionInput(session)

    image = cv2.imread(img)
    image = cv2.resize(image, (224, 224))
    image = normalize(image)
    image = image.transpose((2, 0, 1))
    image = image.astype(np.float32)


    tmp_input = MNN.Tensor((1, 3, 224, 224),
                            MNN.Halide_Type_Float,
                            image,
                            MNN.Tensor_DimensionType_Caffe)
    input_tensor.copyFrom(tmp_input)
    interpreter.runSession(session)
    output_tensor = interpreter.getSessionOutput(session)
    tmp_output = MNN.Tensor((1, 2, 224, 224),
                            MNN.Halide_Type_Float,
                            np.ones([1, 2, 224, 224]).astype(np.float32),
                            MNN.Tensor_DimensionType_Caffe)
    output_tensor.copyToHostTensor(tmp_output)

    res = tmp_output.getNumpyData()[0]
    res = res.argmax(axis=0)

    plt.imshow(res)
    plt.show()
7.1 代码出现的问题
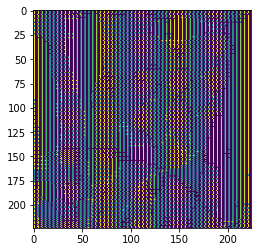
如果你自己的结果出现全1或者结果不对,可能就是我遇到的问题:
我的mnn模型是onnx模型导出来的,之前出现全1的结果,多次尝试发现,我的onnx模型输入是动态的,不是静态,所以出现这个问题
如果也是这个 onnx -> mnn 的情况,用下边儿这个脚本看看,是否是动态输入:
https://blog.csdn.net/HaoZiHuang/article/details/126168132
如果是动态输入,尝试将onnx模型修改为静态输入试试,如果四 Paddle模型转onnx模型,在Paddle2onnx工具后加添加 --input_shape_dict "{'x':[1,3,224,224]}"
Paddle2onnx工具命令使用指南在这里:
https://github.com/PaddlePaddle/Paddle2ONNX#命令行转换
7.2 结果图片杂乱无章
本来的结果图:
结果是酱紫:
可以参考该文章:
https://blog.csdn.net/HaoZiHuang/article/details/126136436


 4144
4144

 被折叠的 条评论
为什么被折叠?
被折叠的 条评论
为什么被折叠?
 到【灌水乐园】发言


