


商城项目第一篇
项目搭建
后端接口:ShowDoc
{
  "pages": [
    "pages/index/index",
    "pages/category/category",
    "pages/goods_list/goods_list",
    "pages/goods_detail/goods_detail",
    "pages/cart/cart",
    "pages/collect/collect",
    "pages/order/order",
    "pages/search/search",
    "pages/user/user",
    "pages/feedback/feedback",
    "pages/login/login",
    "pages/auth/auth",
    "pages/pay/pay",
    "pages/logs/logs"
  ],
  "window": {
    "backgroundTextStyle": "light",
    "navigationBarBackgroundColor": "#eb4450",
    "navigationBarTitleText": "碰磕Shop",
    "navigationBarTextStyle": "white"
  },
  "tabBar": {
    "list": [
      {
      "pagePath": "pages/index/index",
      "text": "首页",
      "iconPath": "icons/home.png",
      "selectedIconPath": "icons/home-o.png"
      },
      {
        "pagePath": "pages/category/category",
        "text": "分类",
        "iconPath": "icons/category.png",
        "selectedIconPath": "icons/category-o.png"
      },
      {
        "pagePath": "pages/cart/cart",
        "text": "购物车",
        "iconPath": "icons/cart.png",
        "selectedIconPath": "icons/cart-o.png"
      },
      {
        "pagePath": "pages/user/user",
        "text": "我的",
        "iconPath": "icons/my.png",
        "selectedIconPath": "icons/my-o.png"
      }
  ]
  },
  "style": "v2",
  "sitemapLocation": "sitemap.json"
}
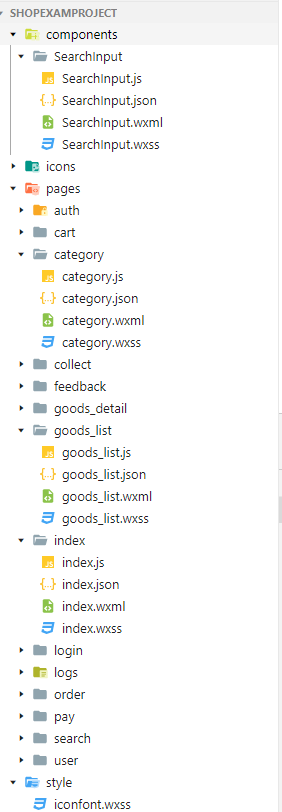
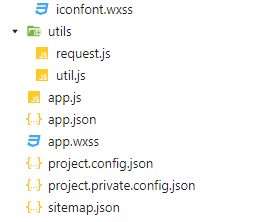
项目结构
编写整个项目中需要用到的功能
request.js
用于ajax请求接口,封装成方法…
//promise 发送ajax
export const request=(path,data)=>{
    return new Promise((resolve,reject)=>{
        wx.request({
          url: "https://api-hmugo-web.itheima.net/api/public/v1/"+path,
          data:data,
          success:ret=>{
            resolve(ret);
          },
          //失败
          fail:err=>{
            reject(err);
          }
        })
    })
};
全局样式
此处icon用了阿里巴巴的矢量库,可自行选择性下载
@import './style/iconfont.wxss';

page,view,text,swiper,swiper-item,image,navigator{
    padding:0;
    margin:0;
    box-sizing: border-box;
}

image{
    width: 100%;
}
组件(搜索框)
SearchInput
界面xml
<!--components/SearchInput/SearchInput.wxml-->
<view class=".search_input">
    <navigator url="/pages/search/search" open-type="navigate">搜索</navigator>
</view>
样式wxss
.search_input{
    height: 90rpx;
    padding: 10rpx;
    background-color: var(--themeColor);
    color: #666666;
}
.search_input navigator{
    height: 100%;
    display: flex;
    justify-content: center;
    align-items: center;
    background-color: #fff;
    border-radius: 10rpx;
}
这样别的页面就可以使用该组件了,不过使用前记得要配置组件…
首页
index
代码编写
使用searchinput搜索框组件时需要配置…
json
{
  "usingComponents": {
    "search-input":"../../components/SearchInput/SearchInput"
  }
}
界面
<view>
<!-- 首页搜索框 -->
  <search-input></search-input>
  <!-- 轮播图
        默认:320*240  原图 750*340
        图片 宽 100% 高 自适应
   -->
  <view class="index_swiper">
    <swiper indicator-dots autoplay circular>
      <swiper-item wx:for="{{swiperList}}" wx:key="goods_id">
      <navigator>
        <image src="{{item.image_src}}" mode="widthFix" />
      </navigator>
      </swiper-item>
    </swiper>
  </view>

  <!-- 导航条 -->
  <view class="index_cate">
    <navigator wx:for="{{catesList}}" wx-key="name">
      <image src="{{item.image_src}}" mode="widthFix" />
    </navigator>
  </view>
  <!-- 楼层信息 -->
  <view class="index_floor">
  <view class="floor_group" wx:for="{{FloorList}}" wx:for-item="f"
  wx:for-index="i" wx-key="f.floor_title.name">
    <!-- 标题 -->
    <view class="floor_title">
      <image src="{{f.floor_title.image_src}}" mode="widthFix" />
    </view>
    <!-- 图片 -->
    <view class="floor_list">
      <navigator wx:for="{{f.product_list}}" wx-key="item.name">
        <image src="{{item.image_src}}" mode="widthFix"></image>
      </navigator>
    </view>
  </view>
  </view>
</view>
样式wxss
.index_swiper swiper{
  width: 750rpx;
  height: 340rpx;
}
.index_swiper swiper image{
  width: 100%;
}
/* 导航条 */
.index_cate{
  display: flex;
}
.index_cate navigator{
  flex: 1;
  padding: 25rpx;
}
.index_cate navigator image{
  width:100%;
}
/* 楼层 */
.index_floor .floor_group .floor_title {
  padding: 10rpx 0;
}
.index_floor .floor_group .floor_title image {
  width: 100%;
}
.index_floor .floor_group .floor_list {
  overflow: hidden;
}
.index_floor .floor_group .floor_list navigator {
  float: left;
  width: 33.33%;
  /* 后四个超链接 */
  /* 2 3 两个超链接 */
}
.index_floor .floor_group .floor_list navigator:nth-last-child(-n+4) {
  /* 原图的宽高 232 *386 */
  height: 27.7vw;
  border-left: 10rpx solid #fff;
}
.index_floor .floor_group .floor_list navigator image {
  width: 100%;
  height: 100%;
}
js
- 第一步:引入request(用于获取接口数据)
- 第二步:创建三个数组用于存放对应的数据
- 第三步:编写三个方法得到数据,并且赋值给数组,页面加载时调用…
//index.js
import {request} from '../../utils/request.js'
Page({
  data:{
    //轮播图数据
    swiperList:[],
    //导航信息
    catesList:[],
    //楼层信息
    FloorList:[]
  },
  onLoad(){
    this.getSwiperList();
    this.getCatesList();
    this.getFloorList();
  },
  //获取轮播图
  async getSwiperList(){
    //发送请求
    let ret= await request("home/swiperdata",null);
    // console.log(ret);
    this.setData({
      swiperList:ret.data.message
    })
  },
  //获取导航信息
  async getCatesList(){
    //发送请求
    let ret= await request("home/catitems",null);
    this.setData({
      catesList:ret.data.message
    })
  },
  //获取楼层信息
  async getFloorList(){
    //发送请求
    let ret= await request("home/floordata",null);
    this.setData({
      FloorList:ret.data.message
    })
  }
})
效果图


 2120
2120


 被折叠的 条评论
为什么被折叠?
被折叠的 条评论
为什么被折叠?
 到【灌水乐园】发言


