


【参考:【循环神经网络】5分钟搞懂RNN,3D动画深入浅出_哔哩哔哩_bilibili】
【参考:RNN的Excel实现_哔哩哔哩_bilibili】
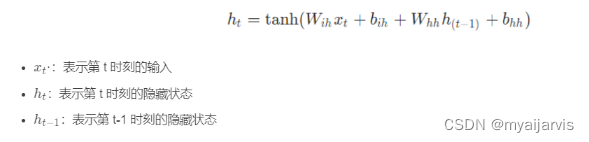
参数理解

上面这张图最能表明RNN的运行原理
【参考:pytorch中RNN参数的详细解释_lwgkzl的博客-CSDN博客】
自己的笔记 【参考:【PyTorch深度学习实践 | 刘二大人】B站视频教程笔记_myaijarvis的博客-CSDN博客】
【参考:Pytorch实现RNN,LSTM和GRU超详细代码参数解析_adczsw的博客-CSDN博客】
多层、双向RNN


手动实现
【参考:Pytorch中RNN入门思想及实现_瞳瞳瞳呀的博客-CSDN博客】
【参考:【Pytorch官方教程】从零开始自己搭建RNN1 - 字母级RNN的分类任务_iteapoy的博客-CSDN博客】
官方文档:https://pytorch.org/docs/stable/generated/torch.nn.RNN.html#torch.nn.RNN
RNN源码:https://pytorch.org/docs/stable/_modules/torch/nn/modules/rnn.html#RNN
【参考:RNN原理及逐行实现_哔哩哔哩_bilibili】
【参考:29 - RNN的原理、API讲解及其逐行代码实现_取个名字真难呐的博客-CSDN博客】
【参考:深度学习/RNN手动实现 · myaijarvis/AI - 码云 - 开源中国】
单向单层
# 单向单层custom_rnn_function
def custom_rnn_function(input, h_prev, w_ih, w_hh, b_ih, b_hh):  #  h_prev就是h_t-1
    """

    h_t = tanh(w_{ih}*x_t+b_{ih}+w_{hh}*h_{t-1}+b_{hh})
    x_t is the input at time t

    :param input: input(batch_size,seq_len,input_size)
    :param h_prev: previous hidden h_prev (batch_size,hidden_size)
    # 本来应该是(1,batch_size,hidden_size) 这里为了简便传递参数和下面的计算 因为很多时候传递的参数都是二维

    :param w_ih: weight w_ih (hidden_size,input_size)
    :param w_hh: weight w_hh (hidden_size,hidden_size)
    :param b_ih: bias b_ih (hidden_size)
    :param b_hh: bias b_hh (hidden_size)
    :return: output ,h_n

    """
    # print("input:",input)
    # print("w_ih:",w_ih)
    # print("w_hh:",w_hh)
    # print("b_ih:",b_ih)
    # print("b_hh:",b_hh)
    # print("h_prev:",h_prev)

    batch_size, seq_len, input_size = input.shape

    hidden_size, input_size = w_ih.shape

    output = torch.zeros(batch_size, seq_len, hidden_size)  # 初始化一个输出矩阵output 看官方参数来定义

    for t in range(seq_len):  # t就相当于每个时刻
        # input[:,t,:].shape = [batch_size,input_size] -> (batch_size,input_size,1)
        x_t = input[:, t, :].unsqueeze(2)

        # w_ih_batch.shape = [hidden_size,input_size] -> (batch_size,hidden_size,input_size)
        #  unsqueeze(0) -> (1,hidden_size,input_size)
        #  tile(batch_size, 1, 1): 第0维变成原来的batch_size倍(默认行复制)其他两维为1保持不动-> (batch_size,hidden_size,input_size)
        w_ih_batch = w_ih.unsqueeze(0).tile(batch_size, 1, 1)

        # w_hh_batch = [hidden_size,hidden_size] -> (batch_size,hidden_size,hidden_size)
        w_hh_batch = w_hh.unsqueeze(0).tile(batch_size, 1, 1)

        # bmm() 含有批次大小的矩阵相乘 mm 矩阵相乘 具体看官方函数

        # w_ih_times_x.shape=(batch_size,hidden_size,1) -> (batch_size,hidden_size)
        w_ih_times_x = torch.bmm(w_ih_batch, x_t).squeeze(-1)  # W_ih * x_t

        # h_prev.unsqueeze(2) : (batch_size,hidden_size,1)
        # w_hh_times_h.shape =(batch_size,hidden_size,1)->(batch_size,hidden_size)
        w_hh_times_h = torch.bmm(w_hh_batch, h_prev.unsqueeze(2)).squeeze(-1)

        # h_prev = (1,batch_size,hidden_size)->(batch_size, hidden_size)
        h_prev = torch.tanh(w_ih_times_x + b_ih + w_hh_times_h + b_hh)

        output[:, t, :] = h_prev  # 将t-1时刻的输出放入输出矩阵中

    # 按官方api格式返回
    # h_prev.unsqueeze(0) : (1,batch_size,hidden_size) 因为官方参数为(D∗num_layers,bs,hidden_size)
    return output, h_prev.unsqueeze(0)
双向单层
# 双向单层custom_rnn_function
def bi_custom_rnn_function(input,  # 前向的数据
                           h_prev,  #
                           w_ih, w_hh, b_ih, b_hh,  # 前向的模型参数
                           w_ih_reverse, w_hh_reverse, b_ih_reverse, b_hh_reverse):  # 反向的模型参数 需要使用反向的数据

    # h_prev (2*1,batch_size, hidden_size)
    # h_prev[0,:,:]是前向的模型参数 h_prev[1,:,:]是后向的模型参数 默认都是全0

    batch_size, seq_len, input_size = input.shape
    hidden_size, input_size = w_ih.shape

    output = torch.zeros(batch_size, seq_len, hidden_size * 2)  # *2 前向+反向

    forward_output = custom_rnn_function(input,
                                         h_prev[0, :, :],
                                         w_ih, w_hh, b_ih, b_hh)[0]  # [0] 获取output
    # 为啥这里不返回h_prev呢?因为h_prev可以从output中得到,output的最后一个时刻的数据就是h_prev

    # flip 翻转  torch.flip(input, [1]) 将输入数据的seq顺序变成反向
    backward_output = custom_rnn_function(torch.flip(input, [1]),
                                          h_prev[1, :, :],
                                          w_ih_reverse, w_hh_reverse, b_ih_reverse, b_hh_reverse)[0]

    output[:, :, :hidden_size] = forward_output  # 最后一维前hidden_size个

    output[:, :, hidden_size:] = torch.flip(backward_output, [1])  # 最后一维最后hidden_size个

    # output[:, -1, :] output最后一个时刻的数据 -> (batch_size,hidden_size * 2)
    # reshape -> (batch_size, 2, hidden_size)
    # transpose(0, 1) 交换维度  -> (2, batch_size,  hidden_size)
    # return output, output[:, -1, :].reshape((batch_size, 2, hidden_size)).transpose(0, 1)

    # forward_output:(batch_size, seq_len, hidden_size)
    # [:, -1, :] -> (batch_size,hidden_size)
    # unsqueeze(0) -> (1,batch_size, hidden_size)
    # cat(,dim=0) -> (2,batch_size, hidden_size*2)
    return output, torch.cat([forward_output[:, -1, :].unsqueeze(0), backward_output[:, -1, :].unsqueeze(0)], dim=0)
单向多层
# 单向多层custom_numlayers_rnn_function
def custom_numlayers_rnn_function(input,h_prev,num_layers,
                                  w_ih_0, w_hh_0,  # 第一层的权重
                                  w_ih_i, w_hh_i,  # 第二层及以上的的权重
                                  b_ih, b_hh):  # 所有层的偏置
    # h_prev: (1*num_layers,batch_size,hidden_size)

    # batch_size, seq_len, input_size = input.shape
    # hidden_size, input_size = w_ih_0.shape
    # output = torch.zeros(batch_size, seq_len, hidden_size)  # 初始化一个输出矩阵output 看官方参数来定义

    # 第一层的输出为output ,然后作为第二层的输入数据
    # input (bs,seq_len,input_size)
    # output (bs,seq_len,1*hidden_size)
    # print(f'********************{0}*************************')
    h_prev_temp = torch.tensor(h_prev)  # 这里新建一个变量存放结果 不要直接在原变量上修改 容易出问题、还会污染原变量
    output, h_prev_temp[0, :, :] = custom_rnn_function(input,
                                                       h_prev[0, :, :], # 使用自己初始化的h_prev
                                                       w_ih_0, w_hh_0,
                                                       b_ih[0, :], b_hh[0, :])

    # 官网:从第二层开始 weight_ih_l[k] shape is (hidden_size, 1 * hidden_size) 其它权重参数的shape未变化
    # 所以 输入维度也变为 (bs,seq_len,1*hidden_size) 也就是说 从第二层开始input_size=hidden_size
    for i in range(1, num_layers):
        # print(f'********************{i}*************************')
        # output 维度不变
        output, h_prev_temp[i, :, :] = custom_rnn_function(output,
                                                           h_prev[i, :, :], # 使用自己初始化的h_prev
                                                           w_ih_i[i - 1, :, :], w_hh_i[i - 1, :, :],  # 第i层的权重参数 注意下标
                                                           b_ih[i, :], b_hh[i, :],)
        # print(output)
        # print(h_prev[i, :, :])

    # (D∗num_layers,bs,hidden_size)
    return output, h_prev_temp
    # return output, h_prev
    # output (N,L,D∗H_out) when batch_first=True containing the output features (h_t) from the last layer of the RNN,
    # output 只包含最后一层的
    # h_n (D∗num_layers,N,H_out) containing the final hidden state for each element in the batch
    # h_n 包含每一层的最后的输出h_t,就是把每一层的最后的输出h_t按第一维度拼接起来
双向多层
# 双向多层
def bi_custom_numlayers_rnn_function(input,  # 前向的数据
                                     h_prev,
                                     num_layers,
                                     w_ih_0, w_hh_0,  # 第一层的权重
                                     w_ih_i, w_hh_i,  # 第二层及以上的的权重
                                     b_ih, b_hh,  # 所有层的偏置
                                     w_ih_0_reverse, w_hh_0_reverse,  # 第一层的权重
                                     w_ih_i_reverse, w_hh_i_reverse,  # 第二层及以上的的权重
                                     b_ih_reverse, b_hh_reverse):  # 所有层的偏置

    # batch_size, seq_len, input_size = input.shape
    # hidden_size, input_size = w_ih_0.shape
    # output = torch.zeros(batch_size, seq_len, hidden_size)  # 初始化一个输出矩阵output 看官方参数来定义

    # 第一层的输出为output ,然后作为第二层的输入数据
    # input (bs,seq_len,input_size)
    # output (bs,seq_len,1*hidden_size)
    # print(f'********************{0}*************************')
    h_prev_temp = torch.tensor(h_prev)  # 这里新建一个变量存放结果 不要直接在原变量上修改 容易出问题、还会污染原变量
    output, h_prev_temp[0:2, :, :] = bi_custom_rnn_function(input,
                                                            h_prev[0:2, :, :],  # (2,bs,hidden_size)
                                                            w_ih_0, w_hh_0, b_ih[0, :], b_hh[0, :],
                                                            w_ih_0_reverse, w_hh_0_reverse, b_ih_reverse[0, :],
                                                            b_hh_reverse[0, :])  # 使用自己初始化的h_prev
    # output, h_prev[0, :, :] = [], []
    # 官网:从第二层开始 weight_ih_l[k] shape is (hidden_size, 1 * hidden_size) 其它权重参数的shape未变化
    # 所以 输入维度也变为 (bs,seq_len,1*hidden_size) 也就是说 从第二层开始input_size=hidden_size
    for i in range(1, num_layers):
        # print(f'********************{i}*************************')
        # output 维度不变
        output, h_prev_temp[i*2:i*2+2, :, :] = bi_custom_rnn_function(output,
                                                                    h_prev[i:i + 2, :, :],  # (2,bs,hidden_size) 保持三维
                                                                    w_ih_i[i - 1, :, :], w_hh_i[i - 1, :, :],# 第i层的权重参数 注意下标

                                                                    b_ih[i, :], b_hh[i, :],
                                                                    w_ih_i_reverse[i - 1, :, :],
                                                                    w_hh_i_reverse[i - 1, :, :],  # 第i层的权重参数 注意下标
                                                                    b_ih_reverse[i, :],
                                                                    b_hh_reverse[i, :])
        # print(output)
        # print(h_prev[i, :, :])

    # (D∗num_layers,bs,hidden_size)
    return output, h_prev_temp
    # return output, h_prev
    # output (N,L,D∗H_out) when batch_first=True containing the output features (h_t) from the last layer of the RNN,
    # output 只包含最后一层的
    # h_n (D∗num_layers,N,H_out) containing the final hidden state for each element in the batch
    # h_n 包含每一层的最后的输出h_t,就是把每一层的最后的输出h_t按第一维度拼接起来
自定义模型权重参数
上面使用的都是RNN API模型的权重参数,我想自己初始化,看看怎样能达到和Pytorch一样的结果
更新待定


 986
986


 被折叠的 条评论
为什么被折叠?
被折叠的 条评论
为什么被折叠?
 到【灌水乐园】发言


