


1. 原理
RNN


放大节点

LSTM 工作原理
参考文档:Understanding LSTM Networks http://colah.github.io/posts/2015-08-Understanding-LSTMs/

LSTM 有通过精心设计的称作为“门”的结构来去除或者增加信息到细胞状态的能力。门是一种让信息选择式通过的方法。他们包含一个 sigmoid 神经网络层和一个 pointwise 乘法操作。
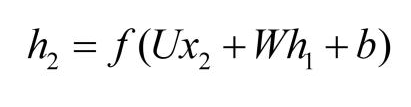
几个重要的公式:


解决的问题:The Problem of Long-Term Dependencies
Step-by-Step LSTM Walk Through
- first step:decide what information we’re going to throw away
- next step:decide what new information we’re going to store in the cell state
-
- part1 : a sigmoid layer called the “input gate layer”:decides which values we’ll update
-
- part2 : a tanh layer creates a vector of new candidate values, C~t, that could be added to the state
- next step : combine these two (sigmoid,tanh)to create an update to the state.
- Finally : decide what we’re going to output. This output will be based on our cell state, but will be a filtered version.(only output the parts we decided to)
-
- First : run a sigmoid layer which decides what parts of the cell state we’re going to output
-
- Then : put the cell state through tanh (to push the values to be between −1 and 1) and multiply it by the output of the sigmoid gate
2. 编程案例
参考教程 https://www.datatechnotes.com/2019/06/text-classification-example-with-keras.html
embedding_dim=50
model=Sequential()
model.add(layers.Embedding(input_dim=vocab_size, # important
      output_dim=embedding_dim,
      input_length=maxlen))
model.add(layers.LSTM(units=50,return_sequences=True))  # important
model.add(layers.LSTM(units=10)) # important
model.add(layers.Dropout(0.5))
model.add(layers.Dense(8))
model.add(layers.Dense(1, activation="sigmoid"))
model.compile(optimizer="adam", loss="binary_crossentropy",
     metrics=['accuracy'])
model.summary()
3. 重要函数说明
3.1 Embedding 功能和参数说明
参考文档:https://keras-cn.readthedocs.io/en/latest/layers/embedding_layer/
嵌入层将正整数(下标)转换为具有固定大小的向量,如[[4],[20]]->[[0.25,0.1],[0.6,-0.2]]
Embedding层只能作为模型的第一层
参数
input_dim:大或等于0的整数,字典长度,即输入数据最大下标+1
output_dim:大于0的整数,代表全连接嵌入的维度
embeddings_initializer: 嵌入矩阵的初始化方法,为预定义初始化方法名的字符串,或用于初始化权重的初始化器。参考initializers
embeddings_regularizer: 嵌入矩阵的正则项,为Regularizer对象
embeddings_constraint: 嵌入矩阵的约束项,为Constraints对象
mask_zero:布尔值,确定是否将输入中的‘0’看作是应该被忽略的‘填充’(padding)值,该参数在使用递归层处理变长输入时有用。设置为True的话,模型中后续的层必须都支持masking,否则会抛出异常。如果该值为True,则下标0在字典中不可用,input_dim应设置为|vocabulary| + 1。
input_length:当输入序列的长度固定时,该值为其长度。如果要在该层后接Flatten层,然后接Dense层,则必须指定该参数,否则Dense层的输出维度无法自动推断。
输入shape
形如(samples,sequence_length)的2D张量
输出shape
形如(samples, sequence_length, output_dim)的3D张量
3.2 LSTM 功能和参数说明
LSTM层
keras.layers.recurrent.LSTM(units, activation=‘tanh’, recurrent_activation=‘hard_sigmoid’, use_bias=True, kernel_initializer=‘glorot_uniform’, recurrent_initializer=‘orthogonal’, bias_initializer=‘zeros’, unit_forget_bias=True, kernel_regularizer=None, recurrent_regularizer=None, bias_regularizer=None, activity_regularizer=None, kernel_constraint=None, recurrent_constraint=None, bias_constraint=None, dropout=0.0, recurrent_dropout=0.0)
Keras长短期记忆模型,关于此算法的详情,请参考本教程
参数
units:输出维度
activation:激活函数,为预定义的激活函数名(参考激活函数)
recurrent_activation: 为循环步施加的激活函数(参考激活函数)
use_bias: 布尔值,是否使用偏置项
kernel_initializer:权值初始化方法,为预定义初始化方法名的字符串,或用于初始化权重的初始化器。参考initializers
recurrent_initializer:循环核的初始化方法,为预定义初始化方法名的字符串,或用于初始化权重的初始化器。参考initializers
bias_initializer:权值初始化方法,为预定义初始化方法名的字符串,或用于初始化权重的初始化器。参考initializers
kernel_regularizer:施加在权重上的正则项,为Regularizer对象
bias_regularizer:施加在偏置向量上的正则项,为Regularizer对象
recurrent_regularizer:施加在循环核上的正则项,为Regularizer对象
activity_regularizer:施加在输出上的正则项,为Regularizer对象
kernel_constraints:施加在权重上的约束项,为Constraints对象
recurrent_constraints:施加在循环核上的约束项,为Constraints对象
bias_constraints:施加在偏置上的约束项,为Constraints对象
dropout:0~1之间的浮点数,控制输入线性变换的神经元断开比例
recurrent_dropout:0~1之间的浮点数,控制循环状态的线性变换的神经元断开比例
其他参数参考Recurrent的说明
Recurrent层
参数
weights:numpy array的list,用以初始化权重。该list形如[(input_dim, output_dim),(output_dim, output_dim),(output_dim,)]
return_sequences:布尔值,默认False,控制返回类型。若为True则返回整个序列,否则仅返回输出序列的最后一个输出
go_backwards:布尔值,默认为False,若为True,则逆向处理输入序列并返回逆序后的序列
stateful:布尔值,默认为False,若为True,则一个batch中下标为i的样本的最终状态将会用作下一个batch同样下标的样本的初始状态。
unroll:布尔值,默认为False,若为True,则循环层将被展开,否则就使用符号化的循环。当使用TensorFlow为后端时,循环网络本来就是展开的,因此该层不做任何事情。层展开会占用更多的内存,但会加速RNN的运算。层展开只适用于短序列。
implementation:0,1或2, 若为0,则RNN将以更少但是更大的矩阵乘法实现,因此在CPU上运行更快,但消耗更多的内存。如果设为1,则RNN将以更多但更小的矩阵乘法实现,因此在CPU上运行更慢,在GPU上运行更快,并且消耗更少的内存。如果设为2(仅LSTM和GRU可以设为2),则RNN将把输入门、遗忘门和输出门合并为单个矩阵,以获得更加在GPU上更加高效的实现。注意,RNN dropout必须在所有门上共享,并导致正则效果性能微弱降低。
input_dim:输入维度,当使用该层为模型首层时,应指定该值(或等价的指定input_shape)
input_length:当输入序列的长度固定时,该参数为输入序列的长度。当需要在该层后连接Flatten层,然后又要连接Dense层时,需要指定该参数,否则全连接的输出无法计算出来。注意,如果循环层不是网络的第一层,你需要在网络的第一层中指定序列的长度(通过input_shape指定)。
输入shape
形如(samples,timesteps,input_dim)的3D张量
输出shape
如果return_sequences=True:返回形如(samples,timesteps,output_dim)的3D张量
否则,返回形如(samples,output_dim)的2D张量
默认值
				activation='tanh',
                 recurrent_activation='sigmoid',
                 use_bias=True,
                 kernel_initializer='glorot_uniform',
                 recurrent_initializer='orthogonal',
                 bias_initializer='zeros',
                 unit_forget_bias=True,
                 kernel_regularizer=None,
                 recurrent_regularizer=None,
                 bias_regularizer=None,
                 activity_regularizer=None,
                 kernel_constraint=None,
                 recurrent_constraint=None,
                 bias_constraint=None,
                 dropout=0.,
                 recurrent_dropout=0.,
                 implementation=2,
                 return_sequences=False,
                 return_state=False,
                 go_backwards=False,
                 stateful=False,
                 unroll=False,
                 **kwargs):
4. 完整实现代码
from keras.preprocessing.text import Tokenizer
from keras.preprocessing.sequence import pad_sequences
from keras.models import Sequential
from keras import layers
from sklearn.model_selection import train_test_split
from sklearn.metrics import confusion_matrix
import pandas as pd

df = pd.read_csv('datasets/sentiments.csv')
df.columns = ["label","text"]
x = df['text'].values
y = df['label'].values

x_train, x_test, y_train, y_test = \
 train_test_split(x, y, test_size=0.1, random_state=123)

tokenizer = Tokenizer(num_words=100)
tokenizer.fit_on_texts(x)
xtrain= tokenizer.texts_to_sequences(x_train)
xtest= tokenizer.texts_to_sequences(x_test)

vocab_size=len(tokenizer.word_index)+1

maxlen=10
xtrain=pad_sequences(xtrain,padding='post', maxlen=maxlen)
xtest=pad_sequences(xtest,padding='post', maxlen=maxlen)

print(x_train[3])
print(xtrain[3])

embedding_dim=50
model=Sequential()
model.add(layers.Embedding(input_dim=vocab_size,
         output_dim=embedding_dim,
         input_length=maxlen))
model.add(layers.LSTM(units=50,return_sequences=True))
model.add(layers.LSTM(units=10))
model.add(layers.Dropout(0.5))
model.add(layers.Dense(8))
model.add(layers.Dense(1, activation="sigmoid"))
model.compile(optimizer="adam", loss="binary_crossentropy",
     metrics=['accuracy'])
model.summary()
model.fit(xtrain,y_train, epochs=20, batch_size=16, verbose=False)

loss, acc = model.evaluate(xtrain, y_train, verbose=False)
print("Training Accuracy: ", acc.round(2))
loss, acc = model.evaluate(xtest, y_test, verbose=False)
print("Test Accuracy: ", acc.round(2))

ypred=model.predict(xtest)

ypred[ypred>0.5]=1
ypred[ypred<=0.5]=0
cm = confusion_matrix(y_test, ypred)
print(cm)

result=zip(x_test, y_test, ypred)
for i in result:
  print(i)
5. 仿写,可成功运行,精确度偏低
# encoding: utf-8
"""
@author: julse@qq.com
@time: 2019/10/25 20:21
@desc:
"""
# second neural network with keras tutorial
import numpy as np
from keras.models import Sequential
from keras.layers import Dense,Dropout,LSTM,Embedding
from sklearn.model_selection import train_test_split
import tensorflow as tf
import os
if __name__ == '__main__':
"""
测试tensorflow
"""
# hello = tf.constant('hello tensorflow')
# sess = tf.Session()
# print(sess.run(hello))
"""
测试keras
"""
# load the dataset
# dataset = loadtxt('file/resource/pima-indians-diabetes.csv', delimiter=',')
# split into input (X) and output (y) variables
# X = dataset[:, 0:8]
# y = dataset[:, 8]
# load the dataset
print('load the dataset')
dataset = np.load('file/resource/trainPair_label5000.npy')
row, col = dataset.shape
np.random.shuffle(dataset)
# split into input (X) and output (y) variables
X = dataset[:, 0:col-1]
y = dataset[:, col-1]
print(y)
x_train, x_test, y_train, y_test = \
train_test_split(X, y, test_size=0.1, random_state=123)
# # define the keras model
print('define the keras model')
model = Sequential()
# model.add(Dense(12, input_dim=col-1, activation='relu')) # The first hidden layer has 12 nodes
# model.add(Dense(8, activation='relu')) # the second hidden layer has 8 nodes
# model.add(Dense(1, activation='sigmoid')) # The output layer has one node
embedding_dim = 64
# model.add(Embedding(
# input_dim=x_train.shape[1],
# input_shape=(1,x_train.shape[1]),
# output_dim=embedding_dim,
# # input_length=x_train.shape[0]
# )
# )
model.add(LSTM(units=50,input_dim=col-1,return_sequences=True))
model.add(LSTM(units=10))
model.add(Dropout(0.5))
model.add(Dense(8))
model.add(Dense(1, activation="sigmoid"))
print('compile the keras model')
# # compile the keras model
model.compile(loss='binary_crossentropy', optimizer='adam', metrics=['accuracy'])
print('fit the keras model on the dataset')
# fit the keras model on the dataset
# model.fit(X, y, epochs=200, batch_size=20)
x_train3D = np.reshape(x_train,(x_train.shape[0],1,x_train.shape[1]))
model.fit(x_train3D, y_train, epochs=200, batch_size=20)
print('evaluate the keras model')
# evaluate the keras model
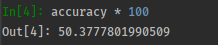
_, accuracy = model.evaluate(x_train3D, y_train)
print('Accuracy: %.2f' % (accuracy * 100))
print('_: %.2f' % (_ * 100))
# # make class predictions with the model
# predictions = model.predict_classes(X)
# # summarize the first 5 cases
# for i in range(5):
# print('%s => %d (expected %d)' % (X[i].tolist(), predictions[i], y[i]))
output
模型的summary如下:

精度


 1万+
1万+


 被折叠的 条评论
为什么被折叠?
被折叠的 条评论
为什么被折叠?
 到【灌水乐园】发言


