


本博文采用Xilinx HLS 2014.4工具,实现一个肤色检测的模块。其中,本文重点是构建HLS图像处理函数。新建HLS工程的步骤,本博文不再详述。
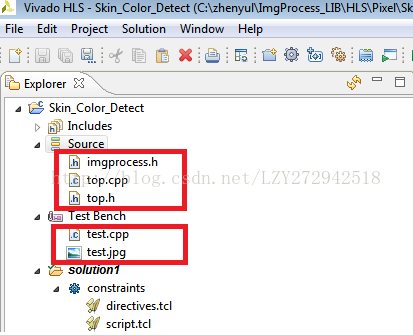
本工程新建之后,只添加了五个文件,如下图所示。其中,top.cpp中的主函数最终会综合生成HLS硬件图像处理模块。test.cpp是测试文件,调用测试图片,测试top.cpp的图像处理函数功能。
top.cpp的源码如下:
#include "top.h"
#include "imgprocess.h"
#include <string.h>

void ImgProcess_Top(AXI_STREAM& input, AXI_STREAM& output,int rows, int cols,
		int y_lower,int y_upper,int cb_lower,int cb_upper,int cr_lower,int cr_upper)
{
	#pragma HLS RESOURCE variable=input core=AXIS metadata="-bus_bundle INPUT_STREAM"
	#pragma HLS RESOURCE variable=output core=AXIS metadata="-bus_bundle OUTPUT_STREAM"
	#pragma HLS RESOURCE core=AXI_SLAVE variable=rows metadata="-bus_bundle CONTROL_BUS"
	#pragma HLS RESOURCE core=AXI_SLAVE variable=cols metadata="-bus_bundle CONTROL_BUS"
	#pragma HLS RESOURCE core=AXI_SLAVE variable=y_lower metadata="-bus_bundle CONTROL_BUS"
	#pragma HLS RESOURCE core=AXI_SLAVE variable=y_upper metadata="-bus_bundle CONTROL_BUS"
	#pragma HLS RESOURCE core=AXI_SLAVE variable=cb_lower metadata="-bus_bundle CONTROL_BUS"
	#pragma HLS RESOURCE core=AXI_SLAVE variable=cb_upper metadata="-bus_bundle CONTROL_BUS"
	#pragma HLS RESOURCE core=AXI_SLAVE variable=cr_lower metadata="-bus_bundle CONTROL_BUS"
	#pragma HLS RESOURCE core=AXI_SLAVE variable=cr_upper metadata="-bus_bundle CONTROL_BUS"
	#pragma HLS RESOURCE core=AXI_SLAVE variable=return metadata="-bus_bundle CONTROL_BUS"

	#pragma HLS INTERFACE ap_stable port=rows
	#pragma HLS INTERFACE ap_stable port=cols
	#pragma HLS INTERFACE ap_stable port=y_lower
	#pragma HLS INTERFACE ap_stable port=y_upper
	#pragma HLS INTERFACE ap_stable port=cb_lower
	#pragma HLS INTERFACE ap_stable port=cb_upper
	#pragma HLS INTERFACE ap_stable port=cr_lower
	#pragma HLS INTERFACE ap_stable port=cr_upper
	RGB_IMAGE  src_mat(rows,cols);
	RGB_IMAGE  dst_mat(rows,cols);
	#pragma HLS dataflow
	hls::AXIvideo2Mat(input, src_mat);
	SkinColorDetect(src_mat,dst_mat, y_lower, y_upper, cb_lower, cb_upper, cr_lower, cr_upper);
	hls::Mat2AXIvideo(dst_mat, output);
}
input:视频流输入,axi-stream接口;
output:视频流输出,axi-stream接口;
rows,cols:可配置参数,图像的行数、列数。通过AXI-Lite接口,由PS配置。
y_lower,y_upper,cb_lower,cb_upper,cr_lower,cr_upper:可配置参数,肤色检测的一些阈值。通过AXI-Lite接口,由PS配置。
上述代码中,比较重要的一条优化指令为:#pragma HLS dataflow。它使得任务之间为流水线方式,也就是hls::AXIvideo2Mat(input, src_mat);SkinColorDetect(src_mat,dst_mat, y_lower, y_upper, cb_lower, cb_upper, cr_lower, cr_upper);hls::Mat2AXIvideo(dst_mat, output);这三个函数之间为流水线方式执行。
肤色检测的核心函数为SkinColorDetect(src_mat,dst_mat, y_lower, y_upper, cb_lower, cb_upper, cr_lower, cr_upper);它包含在imgprocess.h源码如下:
#ifndef ___IMAGEPROCESS__
#define ___IMAGEPROCESS__
#include "top.h"

u1 rgb2ycbcr(u8 B, u8 G, u8 R, int y_lower, int y_upper, int cb_lower, int cb_upper, int cr_lower, int cr_upper)
{
#pragma HLS PIPELINE
	u8 y, cr, cb;
	y = (76 * R.to_int() + 150 * G.to_int() + 29 * B.to_int()) >> 8;
	cb = 128 + ((128*B.to_int() -43*R.to_int() - 85*G.to_int())>>8);
	cr = 128 + ((128*R.to_int() -107*G.to_int() - 21 * B.to_int())>>8);

	if (y > y_lower && y < y_upper && cb > cb_lower && cb < cb_upper
			&& cr > cr_lower && cr < cr_upper)
		 return 1;
	else
		 return 0;
}

namespace hls {
template<int SRC_T, int DST_T,int ROW, int COL>
void ImgProcess(Mat<ROW, COL, SRC_T> &_src, Mat<ROW, COL, DST_T>	&_dst,
		int y_lower,int y_upper,int cb_lower,int cb_upper,int cr_lower,int cr_upper)
{
	loop_height: for(HLS_SIZE_T i= 0;i< ROW;i++)
	{
	#pragma HLS LOOP_TRIPCOUNT max=ROW
		loop_width: for (HLS_SIZE_T j= 0;j< COL;j++)
		{
		#pragma HLS LOOP_FLATTEN OFF
		#pragma HLS LOOP_TRIPCOUNT max=COL
		#pragma HLS DEPENDENCE array inter false
		#pragma HLS PIPELINE
			u8 r, g, b;
			u1 skin_region;

			HLS_TNAME(SRC_T) temp0=0;
			HLS_TNAME(SRC_T) temp1=0;
			HLS_TNAME(SRC_T) temp2=0;
			/***********stream input *********/
			_src.data_stream[0]>>temp0;
			_src.data_stream[1]>>temp1;
			_src.data_stream[2]>>temp2;

			b = temp0;
			g = temp1;
			r = temp2;
			/********detect skin region*******/
			skin_region = rgb2ycbcr(b, g, r,y_lower,y_upper,cb_lower,cb_upper,cr_lower,cr_upper);
			HLS_TNAME(DST_T) temp_dst0=0;
			HLS_TNAME(DST_T) temp_dst1=0;
			HLS_TNAME(DST_T) temp_dst2=0;

			temp_dst0= (skin_region == 1)? b : (u8)0;
			temp_dst1= (skin_region == 1)? g : (u8)0;
			temp_dst2= (skin_region == 1)? r : (u8)0;

			/***********stream output ********/
			_dst.data_stream[0]<<temp_dst0;
			_dst.data_stream[1]<<temp_dst1;
			_dst.data_stream[2]<<temp_dst2;

		}
	}
}


template<int SRC_T, int DST_T,int ROW, int COL>
void SkinColorDetect(Mat<ROW, COL, SRC_T> &_src,Mat<ROW, COL, DST_T> &_dst,
		int y_lower,int y_upper,int cb_lower,int cb_upper,int cr_lower,int cr_upper)
{
#pragma HLS INLINE
	ImgProcess(_src, _dst, y_lower, y_upper, cb_lower, cb_upper, cr_lower, cr_upper);
}

}


#endif
核心函数是rgb2ycbcr这个函数。关于肤色检测有多种方式,本文的肤色检测方法是将rgb转换为ycbcr,然后设置阈值。
保存后,综合。综合完毕,打开分析工具:
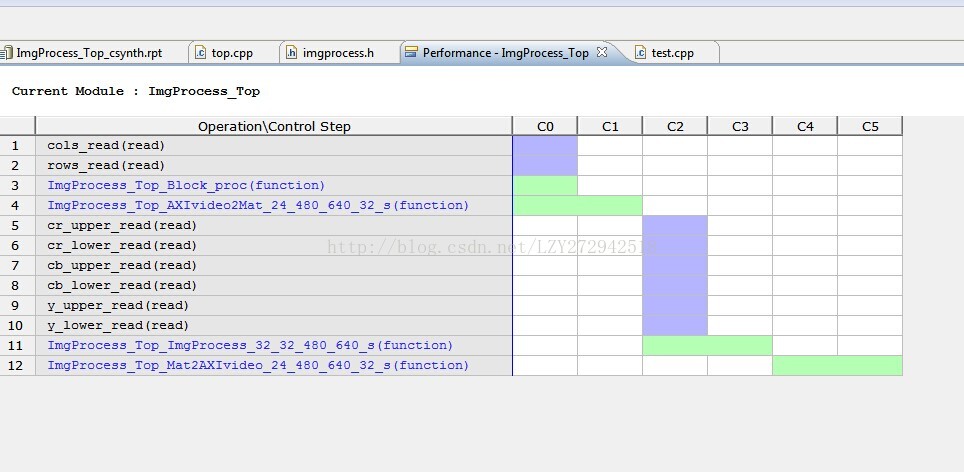
点击红框里的内容:
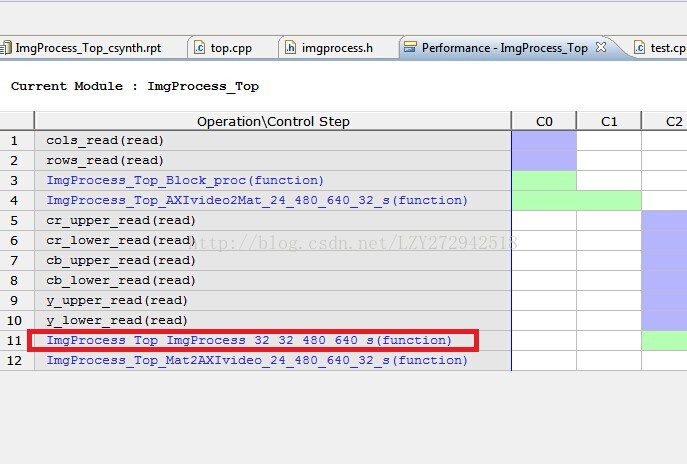
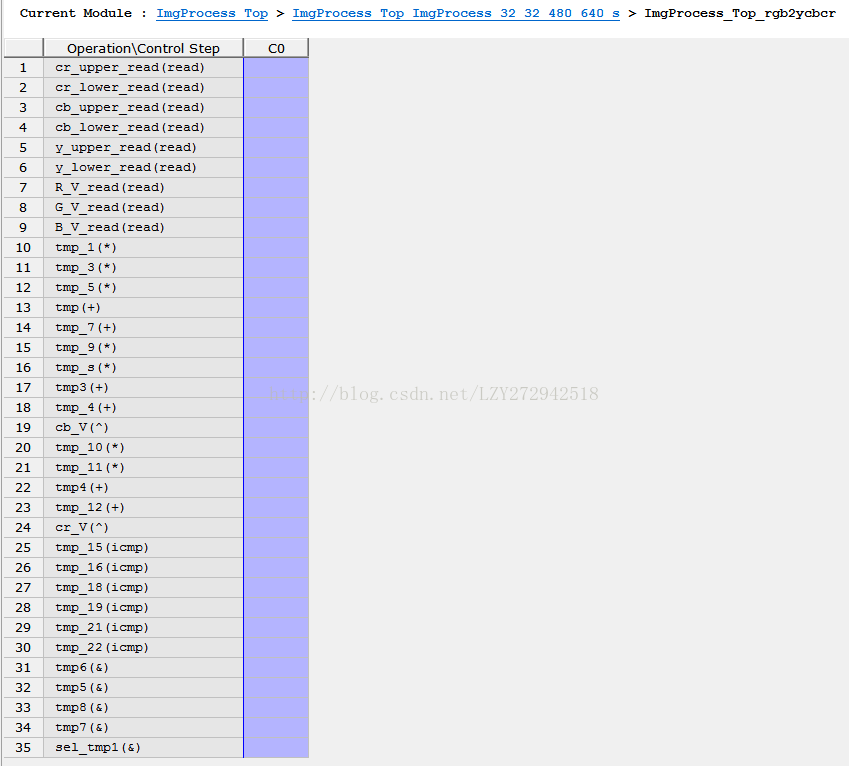
可以看到imgprocess.h中,ImgProcess这个函数的执行状态:
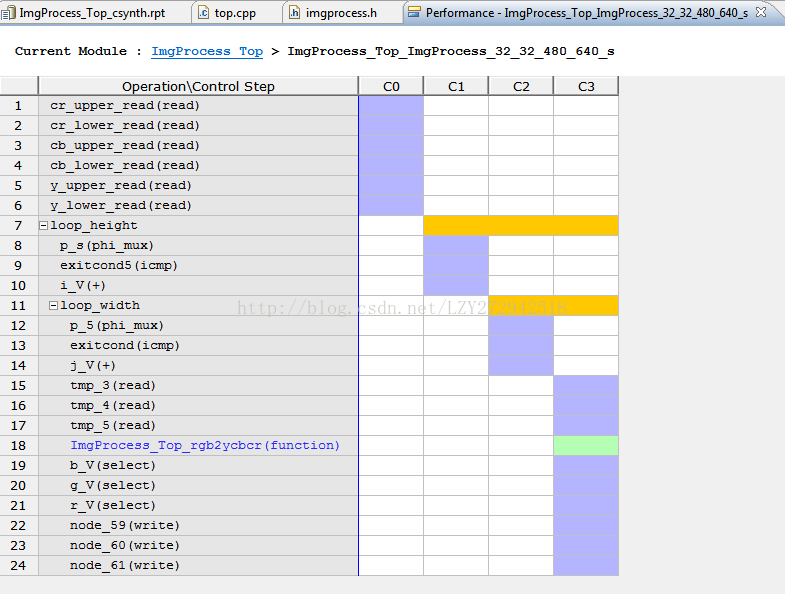
然后点击ImgProcess_Top_rgb2ycbcr,可以看到如下图:
综合之后,就可以测试了。test.cpp内容如下:
#include "top.h"
#include "hls_opencv.h"
#include"iostream"
#include<time.h>
using namespace std;
using namespace cv;


int main (int argc, char** argv) {


    Mat src = imread("test.jpg");
	AXI_STREAM  src_axi, dst_axi;
	Mat dst(Size(640,480),CV_8UC3);

	resize(src,src,Size(640,480));
	//mat to axi video
	cvMat2AXIvideo(src, src_axi);
	//test function
	ImgProcess_Top(src_axi, dst_axi, 480, 640,0,255,80,135,131,185);
	//axi video to mat
	AXIvideo2cvMat(dst_axi, dst);

	imshow("src",src);
	imshow("dst_hls",dst);

	waitKey(0);

	return 0;
}
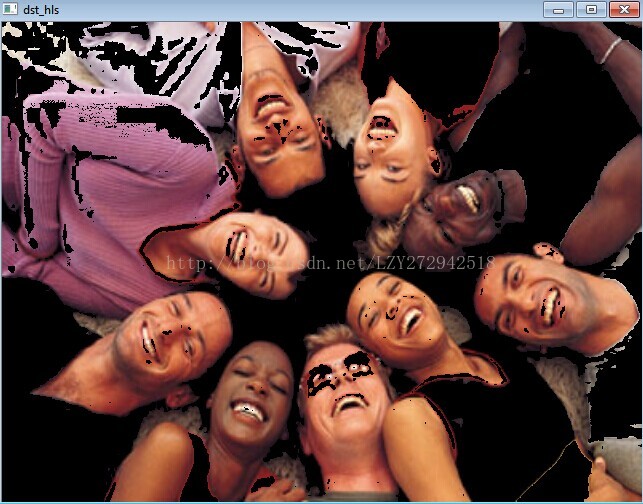
运行测试程序后,输出图像如下:
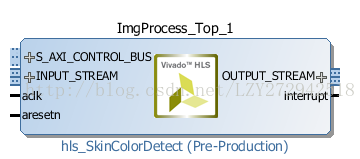
通过测试后,点击hls界面工具栏的export RTL按钮,打包生成ip。最后的IP如下所示:


 1053
1053

 被折叠的 条评论
为什么被折叠?
被折叠的 条评论
为什么被折叠?
 到【灌水乐园】发言


