


Chapter 3: Helper Classes
Overview
In the Helper namespace I usually put a lot of helpful little tools and classes, which become quite useful over time. For a single project it might not be the most important or valuable code, but because it is used again and again, no matter whether other parts of the engine change, helper classes will be the most consistent part of your engines and projects. Most of the helper classes don’t have much to do with game programming, and they are useful in other projects or even in websites.
在Helper命名空间里,我总是会放入很多有用的小工具或类,慢慢的,这会变得非常有用。在一个小的项目里,它可能不是最重要的代码,但是因为它可以一次又一次的使用,无论是在游戏引擎的什么地方,辅助类都是引擎和项目中最一致的部分。大多数辅助类做的不多,但可能会在别的项目中被用到,甚至是在网站里。
You just saw in the previous chapter that you can write a whole game without any helper classes and without even using any extra files or classes at all. But as the projects become bigger and bigger you will see that there are a lot of repeating patterns and similar problems occur, which were already solved in the past. Usually most of the reused functionality in XNA is graphic components. In the next chapter and especially in the second part of this book you learn more about game components and the graphic engine. For now this chapter keeps the focus on the very basic functionality to log messages, access the game content, do unit testing effectively, how to generate random numbers, and many other smaller issues.
在前面章节中并没有使用任何额外的文件或者辅助类来编写游戏。但是随着项目变得越来越大,你将会看到许多重复的模式和发生相似的问题,这些都是在以前的项目中遇到过的。XNA中最常重用的功能是图形组件。本章将关注最基本的功能,像记录日志、连接游戏素材,有效的进行单元测试,如何生成随机数还有很多类似的问题。
To make this chapter a little bit more exciting, you also create another little game just for the fun of it. Not all of the helper classes will be used, but building a game engine is not an easy task. For that reason, this and the next chapter start with the helper classes and the game components to make developing your graphic engine in Part II of this book a little easier. Please note that I did not write the helper classes in the way they are presented in this chapter; they evolved over the course of the past couple of years. Just add functionally or your own helper classes whenever you need them. If you solve a problem once and think it might not be useful again, just leave it where it is. But if you find yourself copying that solution over to a new project or maybe just to another class several times, you should seriously consider extracting the logic and putting it into a special class.
为了让这一章更令人激动,我们来创建一个小游戏玩玩。并不是所有的辅助类都会被用到,但是建立一个游戏引擎不是件容易的事儿。因为这个原因,这一章和下一章都由辅助类和游戏组件开始来开发本书第二部分的图形引擎的早期部分。请注意,我并没有专门为这一章写辅助类,它们是几年前就已经存在的。只有当你需要用到新功能或自己的辅助类的时候才去添加它们。如果你解决了一个问题,觉得以后不会再用到,就不用理它了。但是如果你发现如果你曾经几次把一些功能代码复制到新的项目或另外的类里面,你就应该考虑将其中逻辑分离出来将其放到一个特殊的类里。
Additionally, you learn a little bit more about the content pipeline you already used in the previous chapters to support the Xbox 360. It is possible to directly load textures or shaders without using the content pipeline, but all these methods work only on the Windows platform. If you want to create a cross-platform game you should make sure everything compiles and works on both the Windows and the Xbox 360 platforms. You will continue to do that throughout this book.
还有,你还要学更多关于素材管线的只是来支持Xbox360.直接加载纹理和着色器而不使用素材管线是可以的,但是这只适用于Windows平台。如果你想创建一个跨平台的游戏,你应该保证每一样东西都被正常编译,并能在Windows和Xbox360平台上正常运作。你将通过本书继续学习这些。
At the end of this chapter you will quickly develop a fun Breakout clone game. It will be a lot easier than in the previous chapter because you will write all the helper classes first. For example, sprite rendering is very easy with the help of the SpriteHelper class. You can find more helper classes and game components to improve both the Pong and Breakout games in the next chapter.
本章的最后你将快速开发一个Breakout的克隆版游戏。则会比前面章节的开发来得容易,因为你要首先写好辅助类。例如,使用SpriteHelper类,精灵的渲染就会变得很容易。在下一章里你可以找到更多辅助类和游戏组件来改进Pong和Breakout。
Managing the Content Pipeline管理素材管线
As you learned in Chapter 1, the content pipeline is used to import game assets like textures, models, shaders, and sound files. Instead of just adding them to your project like any other unsupported files for Visual Studio (or XNA Studio), the content files get processed and then are compiled into binary content files, which can be loaded from your game (see Figure 3-1).
就像在第一章学到的,素材管线用来导入像纹理、模型、着色器还有声音文件。素材文件经过处理然后被编译成可以在游戏中加载的二进制文件,而不能往项目中添加其它不支持的文件。

Figure 3-1
In the past a game programmer had to write his own importer to load game content data or use one of the available formats like the .x file format in DirectX for model files. But often the available formats are insufficient, too slow, or just too inflexible when trying to add new features to a game. This is the reason why almost every commercial game has its own file formats and custom logic programmed behind it. This has the advantage that only the developers of a game know the layout of their internal format and they can extend it or change it as often as they want. However, it is usually a lot of work to get 3D content in your game this way. Loading textures is usually not that complicated because many libraries exist and even when writing your own file format, it basically just contains pixels, which are stored as 24- or 32-bit color values. It can become a little bit more difficult if you try using compression or if you want to use hardware-compressed textures like with the DXT format, but DirectX has a great repertoire of helpful methods to assist you with that.
过去程序员需要自己编写导入器来加载游戏素材或者使用像DX的.x这样的模型文件格式。但通常可利用的格式是不足的,太慢了或者在你想要为游戏加入新特性是很难改变。这就是为什么几乎所有的商业游戏都有自己的文件格式和背后的自定义逻辑代码。这样做有一个好处就是只有游戏的开发者知道他们内部格式的布局并可以根据需要来修改或扩展。然而这样来在游戏中获取3D素材通常需要做很多工作。加载纹理通常不编译,因为有很多库,而且当你想写你自己的文件格式时,这一基本是只包含用24或32位色储存的像素。如果你想使用压缩或想使用像DXT这样的硬件压缩纹理这会变得有些困难,但是DX有一套很好的指令系统来帮助你实现。
On the other hand, loading 3D model data is a lot more complicated, especially in XNA, where you have to have not only the geometry data, but also shaders to render a 3D object and then, of course, material data to tell the shaders which colors, textures, and parameters to use. In DirectX most tutorials and samples just use the .x file format, but the .x file format might not be sufficient for many projects. Especially if you use normal napping and require the geometry data to contain tangents, the .x file format will not be very helpful. You would have to generate tangents in your application and work around problems this might introduce. For example, one of my older games, Rocket Commander, had this exact problem and it required a complex model loading process and tangent regeneration process.
另一方面,加载3D模型有点复杂,特别是在XNA里,你不仅需要集合几何数据,还要着色器来渲染一个3D对象,然后把材质的颜色、纹理还有参数传给着色器。在DX中,大多数的tutorial和例子只使用.x文件格式,但是.x文件格式对于你的项目来说可能并不足够。特别是如果你使用【normal napping】并需要包含切线的几何数据,.x文件就不是非常有用。你可能需要在你的程序中生成切线,【接着会介绍相关的问题】。例如,我的一个老游戏——火箭指挥官——就有这样的问题,它需要一个复杂的模型加载和切线生成过程。
Other game data like loading sound files (.wav), shaders (.fx), or custom (for example, .xml) data might be straightforward because your game or the framework you are using provides enough helpful classes to load everything quickly, but then you might run into problems running your game with the same content on another platform. You can, for example, use ACPCM sound files on the Windows platform and use compiled Pixel Shader 1.1 files or just load a couple of .jpg files as textures, but there is no ACPCM support on the Xbox 360; sound is either PCM or in the custom XMA format for the Xbox. Shader code has to be in the format the Xbox 360 accepts, and loading textures might work differently too. This problem would even get more complicated if more platforms are supported in the future.
其他游戏数据例如加载声音文件(.wav)、着色器(.fx)或自定义(如.xml)数据是可以直接被使用的,因为你的游戏或你使用的框架提供了足够有用的类来快速加载这些文件,但是你可能会在别的平台上运行的时候遇到困难。例如,你可以在Windows上使用ACPCM声音文件、编译过的Pixel Shader 1.1文件或加载几个jpg文件作为纹理,但是ACPCM不被Xbox360支持,声音在Xbox上是PCM或XMA格式。着色代码要使用Xbox360接受的格式,还有加载文理也可能会以不同的方式进行。如果未来支持更多平台,问题也会变得更复杂。
To simplify loading the game content, XNA allows you now to just drop the raw content files into your XNA Studio project and they will be processed and compiled to the correct output format for the currently selected platform. For example, your sound files can be processed and based on your XACT project settings - you will have different output formats and compressions, but all the raw sound files in the wave bank are the same and only have to be updated in one place. This idea is great, but it would require that any raw content file format is supported, which is not practical because there are so many file formats available and you don’t know which ones are going to be used. For example, one of your graphic artists might use Photoshop and store .psd files, and other teams might use Gimp or Paint-Shop or just the Paint program of Windows. And there are thousands of other graphic tools and programs around. Additionally, you don’t really know which data to extract; many formats can have multiple layers and maybe the artist wants to have each layer available or just have everything merged down.
为了化简素材的加载,XNA现在允许你将未处理过的素材文件拖入到XNA Studio项目中,然后将正确处理并编译成为当前所选平台的输出格式。例如,你的声音文件可以被处理并基于XACT项目设置——你将会得到不同的输出格式和压缩,但是所有wave bank中的的未经处理的声音文件都是一样的,在同一个地方更新。这个方法是好的,但是这要求任何一个没被处理的素材文件格式是被支持的,但这是不实际的,因为有如此多的格式可以利用,而你却不知道哪一个将会被用到。例如,你的一个美工可能要用Photoshop并存成.psd文件,而另一个团队可能使用Gimp或Paint-Shop或者仅仅是Windows的画图工具。除此之外还有上千种图像工具和程序。你不能真正知道哪一个数据要被分离,许多格式都可以是多层的,可能美工想利用每一个层或溶合到一起。
Supported File Formats支持的文件格式
Instead of just dropping anything, use one of the available processors and supported formats or try to write your own content processors (see Chapter 7) if you think you will need it:
你可以使用使用一个可用的处理器和支持的格式或者试着编写自己的素材处理器(第七章):
§ Texture formats: .dds, .png, .jpg, .bmp, .tga - Basically everything you can load with the .NET Framework or DirectX. The input format should usually be uncompressed for the best quality. Highly compressed .jpg files are bad, especially if you compress them again with DXT for your game. Alternatively, you can use the correct output compression in your input files (dds files with DXT compression) and set the same settings for the content properties again to leave them that way (which is the way I process most of the content in all my projects).
§ Sound and Music formats: .xap (XACT Audio Project) - In XACT you can only import .wav files, but you can set a lot of effects, set parameters, and choose ACPCM compression on the Windows platform or XMA on the Xbox 360 platform. Read more about this in Chapter 9.
§ 3D Model formats: .fbx and .x model files - .x files are known from the DirectX SDK and many samples and tutorials. DirectX provides classes to easily load .x files. Most .x files should work fine with XNA too; the main difference is that DirectX usually doesn’t use shaders for .x files and XNA always uses shaders. To export models from 3D Studio Max, use the Panda DirectX Exporter. You can find the Panda Exporter plugin at http://www.andytather.co.uk/Panda/directxmax.aspx.
.fbx files are a little bit newer and were originally developed by Alias, the makers of Maya, also a 3D modeling tool. Alias was acquired by Autodesk, the makers of 3D Studio Max and many CAT programs. .fbx stands for “Universal 3D Asset Exchange” and is Autodesk’s free format for cross-platform content interchanging. In the new version of 3D Studio Max 9 it is included by default and Maya supports it too. There are also many other 3D content creation programs that support importing and exporting the .fbx format. In XNA it is especially useful for animated models, bones, and skinning. It supports more options for that, but it is especially bad for shaders, because no material or any shader settings can be exported.
Another problem with the .fbx format is the missing format specification, and to access the SDK you have to join the Autodesk Developer Network for an annual membership fee, which really sucks. If you take a look at other interchange formats like Collada, you can see that they are much more open and extensible, and because they are not just developed by one company many new additions and features are added constantly. In the past Collada did not support shader settings, but the current versions are very good for 3D data; you can export tangents, shader settings, and everything else you need for a game. Sadly, Collada is not supported by XNA and I was not able to convince Microsoft to include it. XNARacer initially used Collada files for all models, track, and landscape data, but this was changed later to support the content pipeline.
§ Other formats - You can import custom file formats, for example xml files, binary files, or even write your own custom processor. This can be useful if you have a bigger project and it is worth the effort or you need a special model format and it is not supported yet by XNA. For example, Quake3/Doom3 uses md3/md5 files and if you just used to import some models for testing and playing around, an md5 importer would be nice.
§ 声音和音乐格式:.xap(XACT音频项目)——在XACT中你只可以导入.wav文件,但是你可以设置多种效果、参数还可以选择在Windows上使用ACPCM压缩或在Xbox360上使用XMA。详情请参见第九章。
§ 3D模型格式:.fbx和.x模型文件——.x是DX SDK中的例子和教程使用的格式。DX提供了可以方便加载.x文件的类。多数.x文件同样可以在XNA上很好工作。主要区别是DX的.x文件经常不使用着色器,而XNA确总是使用着色器。要将3DS MAX的模型导出成.x文件需要使用Panda DirectX Exporter.你可以从http://www.andytather.co.uk/Panda/directxmax.aspx中找到这个插件。
.fbx文件是一个稍微新的格式,首先由Maya的制作者Alias开发。Alias受聘于Autodesk公司,Autodesk开发3DS Max和很多CAT程序。.fbx代表“Universal 3D Asset Exchange”的意思,是Autodesk公司的一个免费的跨平台的转换格式。在新版本的3DS max 9和Maya都支持这个格式。其它很多3D素材制作软件也同样支持.fbx文件格式的导入和导出。在XNA中这个格式非常适用于动画模型、骨骼还有皮肤。它支持更多的选项,但是对着色器特别不好,因为不能导出材质或着色器设置。
.fbx格式的另一个问题就是丢失了文件规范,要得到SDK你就不得不付Autodesk Developer Network的年费。如果你看看其他的转换格式像Collada,你会发现这更开放和可扩展,而且因为它们不是由一个公司开发的,所以很多新的特性被加了进去。在过去的Collada不支持着色器设置,但是现在的版本非常利于3D数据;你可以导出切线、着色器设置还有你游戏中所需要的东西。可惜的是,XNA不支持Collada,而我也没能说服MS包含它。XNARacer起初是使用Collada文件来做模型、赛道还有景色数据的,但是后来为了支持素材管线而改变了。
In case you have more content files or some custom data for your game you can either decide to write a custom processor and then use the imported and compiled data in your project or just do it the old way by loading the content files yourself. For example, the racer game you will write in the last chapters of this book uses a landscape with landscape height values imported from a bitmap file. Processing the bitmap file and outputting the landscape height data for the game would be possible, but it is too much work - just loading the height data is much simpler and only required once.
想在游戏中使用更多的素材文件或自定义数据,你可以选择编写自定义处理器然后在你的项目中导入和编译,或者使用老方法来自己加载素材文件。例如,在本书最后几章里你要写的一个赛车游戏的场景高度值就是从一个bmp文件导入的。为游戏处理bmp文件和输出高度数据是可行的,但是这需要太多的工作,而加载高度数据更简单,而且只用一次。
Advantages and Disadvantages优势与不足
Another disadvantage of the content pipeline is the fact that your compiled content cannot be changed anymore. Once you start your game or have your game deployed on client computers or the Xbox 360, all the content files have only the compiled data in them. Say you have just written a particle editor with shader support for all particles. If you want to change the textures, shaders, and other particle settings dynamically while the editor is running, you would have to reload the textures, shaders, and so on. But because you need to have the content compiled first inside of XNA Studio you have to stop your application, add all the files to your XNA Studio project, recompile and wait until all the content is rebuilt, and then start again. Especially in the case of just testing and tweaking effects or particles, this can be very annoying and slows down your work process a lot. It would be more useful to just load textures, shaders, and your particle settings dynamically and not use the content pipeline for programs like that.
素材管线的另一个缺点就是你编译的素材不能修改。一旦你在电脑上或Xbox360上运行游戏,所有的素材就只是经过编译的数据。比方说你用支持所有粒子的一个着色器写了一个粒子编辑器。如果你想在编辑器运行期间动态的改变纹理、着色器和其它粒子设置,你就需要重新加载那些东西。但是因为你需要在XNA中先编译你的素材,你就必须停止程序,将所有需要的文件添加到XNA项目中,重新编译直到所有素材重新生成,然后才能重新开始。特别在你测试和tweaking【?】特效或粒子的时候,这是很烦人的,并且会拖慢你的工作。在程序中动态加载纹理、着色器和粒子设置会更有用。
Last but not least, here is a trick I use in most projects with many content files: compile them all and make sure you don’t change them very often (only every couple of days). Now you can use a dummy project to compile all your game content and copy over all compiled content files to your real project. Especially when using unit testing and the Agile Methodology talked about in the last chapter, you will start the application several hundred times a day and each run should be as fast as possible.
这里有一个我在大多数项目中处理素材使用的技巧:编译并确保你不会很频繁的更改它们(仅仅几天做一次)。你可以使用一个假的项目来编译你所有的游戏素材,然后将它们复制并覆盖你真正项目中的素材文件。特别在最后一章使用单元测试和敏捷方法的时候,你将每天要运行几百次的程序,每一次运行应该尽可能的快。
The good thing about the content pipeline is that the compiled data (.xnb files) cannot be read by any programs except from an XNA engine and the loading process is usually also a lot faster because all the data is already in the exact format you need for your game. For example, textures are always stored as DXT files and use mip-maps if you specified that in the content properties. This way the game just has to load the texture data in one quick call and then send it to the graphic card for rendering, again a very fast process. This is even more important for 3D model data. If you take a look at Rocket Commander and profile it a little bit, you can see that loading the 3D models and generating all the extra data and tangents takes most of the initialization time (over 90%), whereas XNA games with 10 times as many models load a lot faster. Loading all data as quickly as possible is also a good thing for the Xbox 360 console; console games usually have a short loading time.
素材管线的优点是编译过的数据(.fbx文件)只能被XNA读取而不能被其它程序读取,加载过程也是较快的因为所有的数据都已经是游戏需要的正确格式了。例如,纹理通常是存为DXT文件并且如果你在素材中指定了属性,他将使用多重纹理映射。用这种方法游戏只需要调用一个方法就可以快速加载纹理,然后传送到图形卡来渲染,又是一个非常快的过程。这个对3D模型数据来说非常重要。如果你看Rocket Commander的源码你会发现加载3D模型和生成所有额外数据和切线花费了大多数的初始化时间(超过90%),而XNA游戏用十次来加载纹理,速度很快。尽可能快的加载所有数据对于Xbox360是个优点;控制台游戏通常需要很短的加载时间。
Handling Content Directories操作素材目录
Okay, you learned a lot about the advantages and disadvantages of using the content pipeline; here you focus on the game programming a little bit more and the everyday problems. If you take a look at the content directories for the Rocket Commander game and Racing game (see Figure 3-2) you can see that Rocket Commander has a lot of directories, whereas just two simple directories are used in XNARacer.
OK,你已经了解到了许多关于素材管线的优缺点;现在要更多的关注游戏编程和日常的问题。如果你观察一下Rocket Commander和Racing的素材目录你会发现Rocket Commander有很多目录,反过来XNARacer只有两个简单的目录。
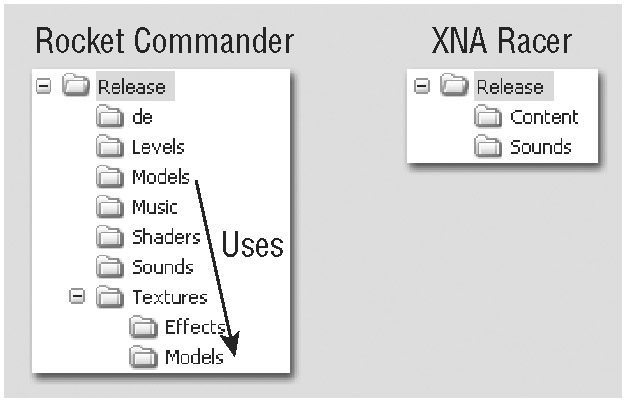
Figure 3-2
From the looks of it you would expect that Rocket Commander has a lot more content, but in reality XNARacer uses almost 10 times as many 3D model files and also has a lot more textures, music, and sound files.
看到这个你会认为Rocket Commander有更多的素材,但实际上XNARacer包含了10倍多的3D模型文件,还有更多的纹理、音乐和声音文件。
You might ask why Rocket Commander uses so many directories. There is no content pipeline in the game, and to keep everything organized and easy to find directories are used for each part of the game. For example, the Textures folder holds all the 2D textures for the menu and game interface, the Models sub-directory holds the textures for the 3D models, the Effects sub-directory contains the effect textures, and so on.
你可能要问为什么Rocket Commander用了这么多的目录。因为没有素材管线,游戏保持了原始文件,你可以很方便地找到游戏每一部分用的是哪个目录。例如Textures文件夹存放的是用于菜单和游戏界面的2D纹理,Models子目录存放3D模型纹理,Effects子目录包含效果纹理,等等。
In XNA you cannot use this kind of directory structure because most content files, especially the 3D models, can require a lot of other content files to be loaded recursively (see Figure 3-3).
在XNA中不能使用这种目录结构,因为大多数素材文件特别是3D模型需要很多其他递归加载的素材文件。
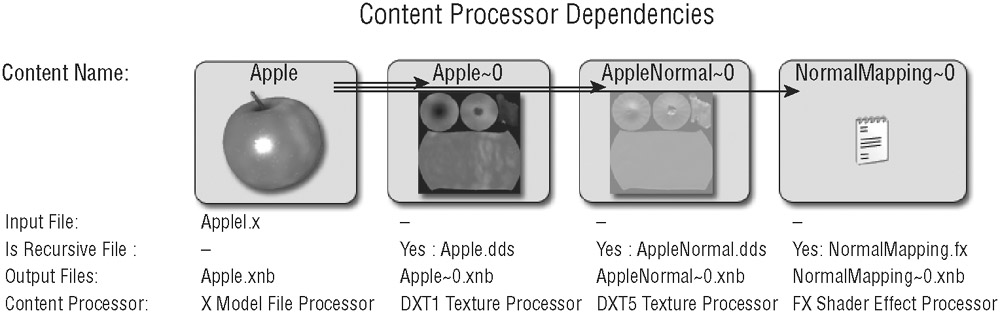
Figure 3-3
As you can see, the Apple model is loaded from the Apple.x file, which recursively loads Apple.dds, AppleNormal.dds, and NormalMapping.fx. The content processor expects all these files in the same directory, which forces you to use one directory for all the 3D models and the textures and shaders you use for them. Additionally, most shaders are used for other 3D data as well and it would be very confusing duplicating the shaders and having them in another directory too. You also sometimes load the textures for custom 3D data too (for example, the guard rail holder model uses the same texture as the generated guard rail object in XNARacer).
如你所见,Apple模型从Apple.x文件中加载,而Apple.x又要加载Apple.dds、AppleNormal.dds和NormalMapping.fx文件。素材处理器需要这些文件在同一个目录下,这就要求你使用一个目录来存放3D模型和纹理还有着色器。还有,大多数着色器也需要用到其它3D数据,并且【重复着色器和让他们在另外一个目录会非常混乱】。你有时还要为自定义3D数据加载纹理(例如,在XNARacer中,【guard rail holder模型要用到一样的纹理来作为生成的guard rail对象】)。
Anyway, it is important to remember that each piece of content must have a unique name. You can’t have an Apple model and an Apple texture. As you can see in the Input File line of Figure 3-3 you only add the Apple.x file; all the other files are added automatically through the model processor. Additionally XNA is clever enough to rename all the recursive files because they often use textures with the same names as the model files. Recursive files will end with ~0. You also can’t set the content properties of these recursive files because you don’t add them into your project. For that reason make sure the input files already use the correct format (DXT1 and DXT5 in the preceding example).
总之,记住每一个素材需要一个唯一的名字这一点很重要。你不能使用Apple同时作为模型和纹理的命名。像你在图3-3的输入文件线看到的,你只添加了Apple.x文件,所有其他的文件都被模型处理器自动添加了。XNA有一套聪明的机制来重命名递归文件,因为它们有时使用相同的名字来作为纹理和模型命名。递归文件会以~0结尾。你也不能设置这些递归文件的素材属性,因为你没有添加他们到你的项目中。因为这个原因,确保输入文件使用了正确的格式(像之前的DXT1和DXT5)。
Importing and Accessing Content导入和连接素材
You now know enough to import some content and access it from your game. In the previous chapters you already accessed some content files and took a quick look at the content pipeline. Now you will take a closer look at the actual process and how to use content files. In Chapter 7 you learn how to write your own content processors by extending the X Model File Processor with some useful features for your graphics engine.
现在你已经知道了如何从游戏导入和访问素材。在前面的章节里,你已经访问了一些素材文件,并且了解了一些关于素材管线。现在你要来了解真实的过程还有如何使用素材文件。在第七章中,你要学习如何编写自己的素材处理器来为你的游戏引擎扩展一些X模型文件处理器的有用特征。
Back in Chapter 1 you learned how to add textures; just take a texture file (.dds, .jpg, .bmp, or .png) and drop it onto your XNA Studio project. Now you can click the texture and configure the Texture Content Processor settings (see Figure 3-4).
回到第一章,你学到了如何添加纹理,只是把一个纹理文件(.dds, .jpg, .bmp, or .png)拖入到XNA项目中。现在你可以点击纹理文件然后设置纹理素材处理器选项了。
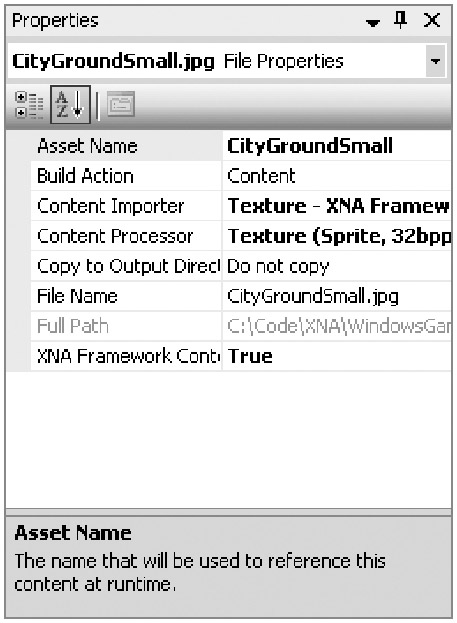
Figure 3-4
For textures it is important to set the correct Content Processor mode. For 2D data like sprites, text, and all user interface (UI) graphics you have in your game it is usually best to use the 32bpp Sprite format (uncompressed, which means it takes 4 MB for a 1024x1024 texture with 32bbp).
设置正确的素材处理器模式对纹理很重要。对于像精灵、文字还有所有UI图像等2D数据来说,最好使用32bpp的精灵格式(未压缩的,意味着1024x1024的32bpp纹理要用4M的磁盘空间)。
3D texture data will be used a lot more in a 3D game than 2D UI textures, and textures and levels are getting bigger with every game. For this reason it is very important to keep the texture sizes small. Instead of just reducing the resolution for your textures and making your games look very bad, use hardware texture compression instead. You can simply select DXT1 for a 1:6 compression ratio for color textures and DXT5 for a 1:4 compression ratio for textures with alpha information (or compressed normal maps). This means with DXT1 textures you can have six times as many textures in your game consuming the same amount of video memory as uncompressed textures without losing much of its quality. Another trick is to combine or even generate textures inside your shaders; for example, detail textures can improve landscape details for almost no extra video memory cost.
在3D游戏里3D纹理比2D的UI纹理使用更广泛,纹理和级别会变得更大。出于这个原因,保持纹理的小尺寸非常重要。如果只是为纹理减小分辨率,这会使你的游戏非常难看,而合理的方法是采用硬件压缩。你可以为彩色的纹理选择使用DXT1格式来获得1:6的压缩率,或者为带有alpha信息(或者压缩法线映射)的纹理使用1:4压缩率的DXT5格式。使用DXT1意味着你可以用原来未经压缩素材占用的显存空间来存储6倍的DXT1纹理文件而不失原来的质量。另一个技巧是在你的着色器里合并或生成纹理。例如,细节纹理可以改善地形的细节而不用占用额外的显存。
For models you can currently only select the X Model Importer or the FBX Model Importer (see Figure 3-5). Maybe more formats will be available in the future. If you write custom model processors like you will do in Chapter 7, you can select them the same way you select texture processors. For normal mapping you want to select your custom XNARacer Tangent Model Processor from Chapter 7. For the next few chapters just leave the default value.
对于模型文件,一般可以选择X模型导入器或FBX模型导入器。在将来可能支持更多的格式。如果你像第七章那样编写自己的自定义的模型处理器,你可以用同样的方法来选择纹理处理器。对于法线贴图/映射,你可以选则第七章的自定义的XNARacer 切线模型处理器。在下面的几章里我们使用默认的处理器。
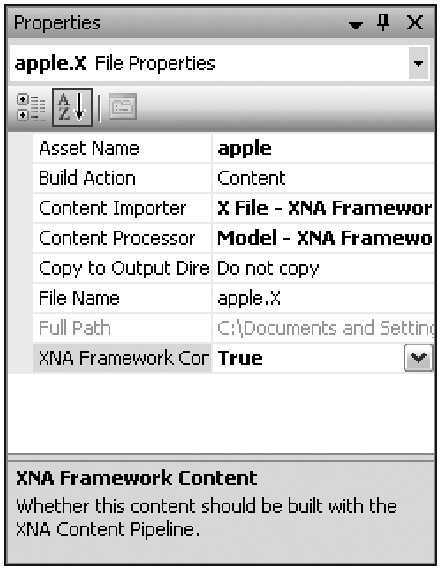
Figure 3-5
If you followed the way you loaded textures in the last two chapters you will probably already know how to load content in XNA. Textures are loaded with:
如果你按照下面上两章的加载纹理的方法,你可能已经学会了如何在XNA里加载纹理了。
backgroundTexture = content.Load<Texture2D>("CityGroundSmall");
And 3D models can be loaded the same way - just change the generic type of the Load method:
加载3D纹理的方法也差不多,只需要改变Load方法的图形类型:
appleModel = content.Load<Model>("apple");
Displaying a model is a little bit more complicated; there is no simple draw method, you have to go through all model meshes and update all shader effects, and then you can render each part. For more details see Chapters 5 and 6. Later in this book in Chapter 7 you will see a new class just for loading and rendering models, which makes it even easier to just show the 3D model in our 3D world with just one single line of code:
显示模型会有点复杂,由于没有简单的绘制方法,你不得不检查所有的网格和更新所有的着色器效果,然后就刻意渲染每一个部分了。更多内容详见第五、第六章。在稍后的第七章里你会看到用于加载和渲染模型的新类,只用一行代码就能很容易的在3D世界里显示3D模型。
appleModel.Render(Vector3.Zero);
You now know all the basics about the content pipeline. You learn more about the content pipeline in the upcoming chapters when adding 3D models with your custom tangent model processor in your graphics engine, and in Chapter 9 when you learn in detail about XACT.
你现在已经知道了关于素材管线的基本知识了。你会在接下来的的章节里学到更多来在你自己的图像引擎中使用自定义切线模型处理器添加3D模型,第九章中还有关于XACT的更详细内容。


 731
731

 被折叠的 条评论
为什么被折叠?
被折叠的 条评论
为什么被折叠?
 到【灌水乐园】发言


