


环境准备篇
-
安装hiddenlayer(用来生成什么网络拓扑图?管他呢,装吧) pip install --upgrade git+https://github.com/nanohanno/hiddenlayer.git@bugfix/get_trace_graph#egg=hiddenlayer
-
安装环境,由于服务器已经装好pytorch哈哈,现在在setup.py里面,把pytorch删掉!其他按照指令: pip install -i https://pypi.tuna.tsinghua.edu.cn/simple -e . (清华源快点哦
dataset_conversion篇
-
修改python Task216_Amos2022_task1.py,需要修改一下amos_base的路径,注意,这里是数据集的初始路径
-
其次,需要在root路径下面vim .bashrc并输入以下内容:
export nnUNet_raw_data_base="/root/autodl-tmp/amos22_raw"
export nnUNet_preprocessed="/root/autodl-tmp/amos22_pre"
export RESULTS_FOLDER="/root/autodl-tmp/nnUNet_trained_models"
注意看!第一行是格式化命名后的数据集,第二行是预处理后的数据集,第三行是训练的模型,这里都放在数据盘!
然后 source .bashrc
-
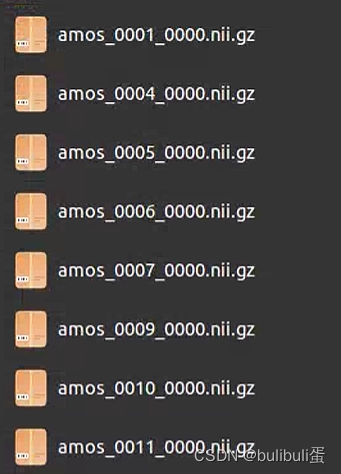
运行python Task216_Amos2022_task1.py,
目的:重新格式化文件名,全都化成这样的形式:
nnUNet_plan_and_preprocess篇
运行指令:
nnUNet_plan_and_preprocess -t 216 -pl3d ExperimentPlanner3D_residual_v21_bfnnUNet_31 -pl2d None
输入指令后,参数将传给 nnUNet_plan_and_preprocess.py 文件,然后会调用到三个函数:
crop(task_name, False, tf) #用于crop出有器官的地方,去除边界部分

exp_planner.plan_experiment() #应该是用于调用模型

exp_planner.run_preprocessing(threads) #用于进行预处理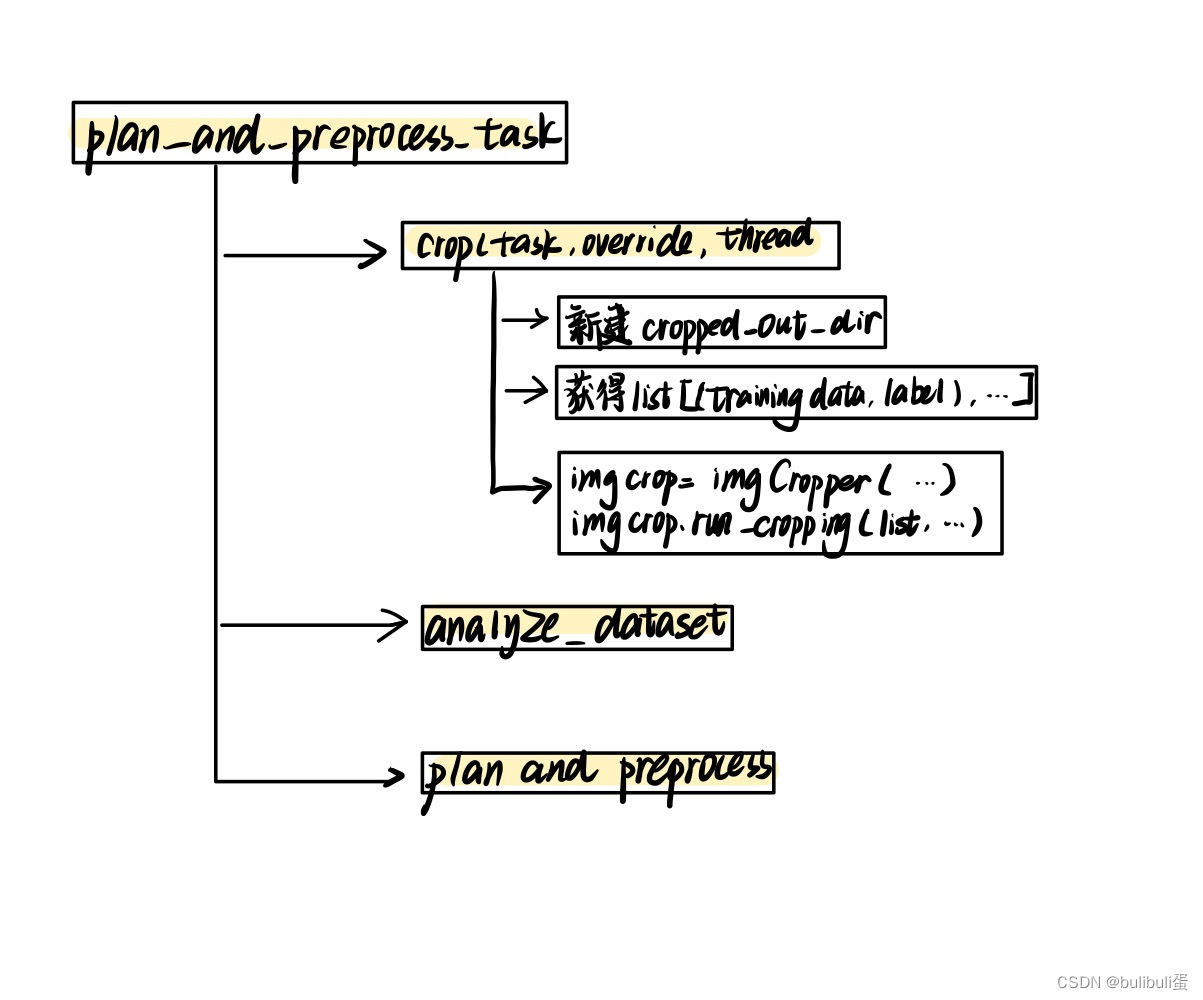
我们输入的指令是:nnUNet_plan_and_preprocess -t 216 -pl3d ExperimentPlanner3D_residual_v21_bfnnUNet_31 -pl2d None
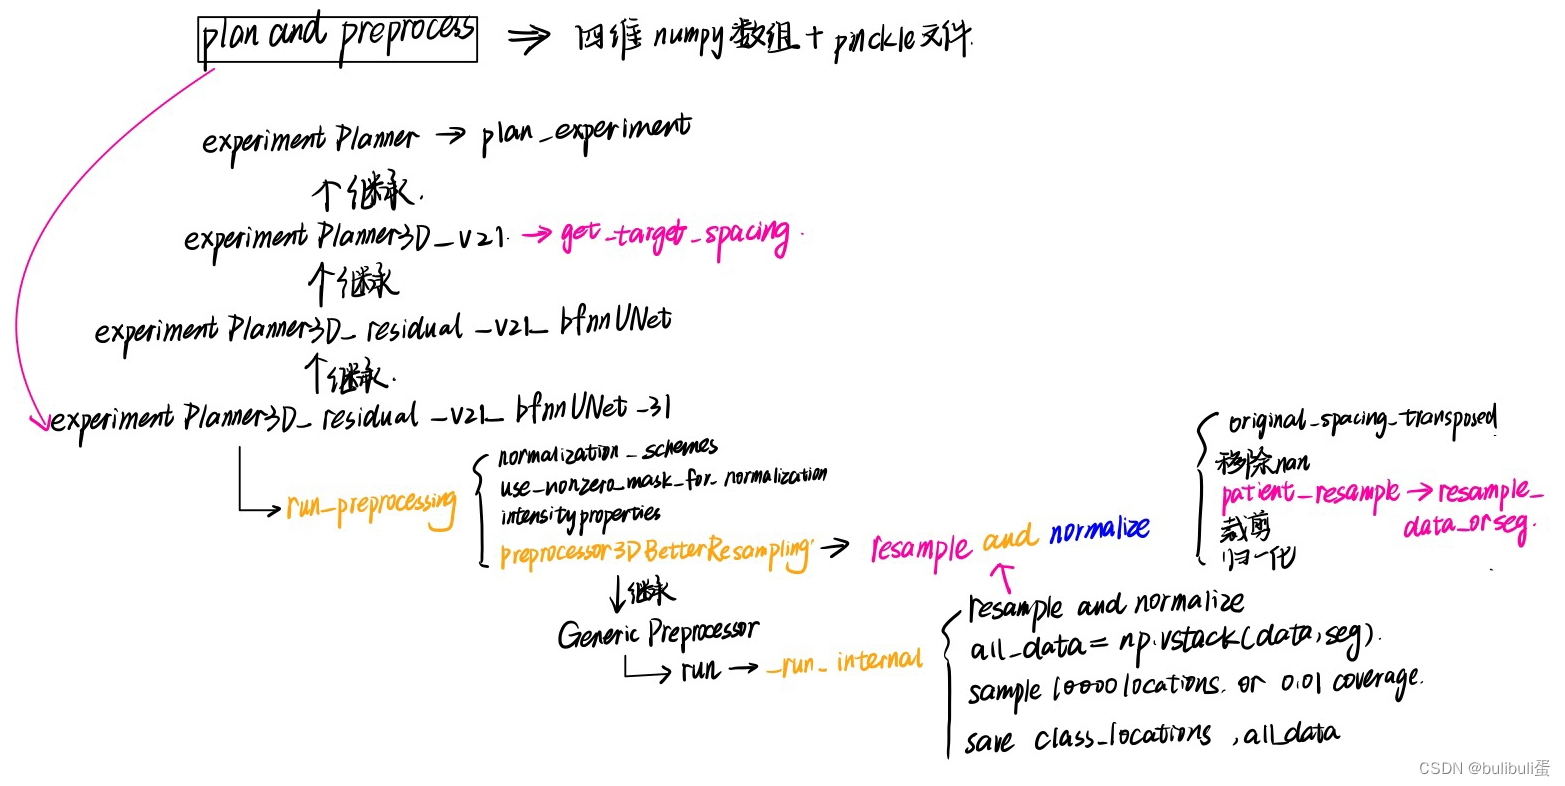
说明我们采用的planner是ExperimentPlanner3D_residual_v21_bfnnUNet_31
继承关系是ExperimentPlanner->ExperimentPlanner3D_v21->ExperimentPlanner3D_residual_v21_bfnnUNet->ExperimentPlanner3D_residual_v21_bfnnUNet_31,
这个预处理看起来很复杂,不要慌,我们一个一个往前看:
ExperimentPlanner3D_residual_v21_bfnnUNet_31
初始化:鉴别器,预处理器:Preprocessor3DBetterResampling
def __init__(self, folder_with_cropped_data, preprocessed_output_folder):
        super().__init__(folder_with_cropped_data, preprocessed_output_folder)
        self.data_identifier = "nnUNetData_bfnnUNet_31"
        self.plans_fname = join(self.preprocessed_output_folder,
                                "nnUNetPlans_bfnnUNet_fabresnet_31_plans_3D.pkl")
        self.preprocessor_name = 'Preprocessor3DBetterResampling'
plan_experiments:继承了父类
run_preprocessing:
def run_preprocessing(self, num_threads):
        if os.path.isdir(join(self.preprocessed_output_folder, "gt_segmentations")):
            shutil.rmtree(join(self.preprocessed_output_folder, "gt_segmentations"))
        shutil.copytree(join(self.folder_with_cropped_data, "gt_segmentations"), join(self.preprocessed_output_folder,
                                                                                      "gt_segmentations"))

        normalization_schemes = self.plans['normalization_schemes'] #设置模态,单/多模态
        use_nonzero_mask_for_normalization = self.plans['use_mask_for_norm'] #是否采取掩膜,是没必要的,因为task216 全是CT
        intensityproperties = self.plans['dataset_properties']['intensityproperties']
        preprocessor_class = recursive_find_python_class([join(nnunet.__path__[0], "preprocessing")],
                                                         self.preprocessor_name, current_module="nnunet.preprocessing")
        assert preprocessor_class is not None
        preprocessor = preprocessor_class(normalization_schemes, use_nonzero_mask_for_normalization,
                                          self.transpose_forward,
                                          intensityproperties) #创建预处理器
        target_spacings = [i["current_spacing"] for i in self.plans_per_stage.values()] #获取每阶段的spacing,stage0大概是[2,1.3,1.3],stage1大概是[1.5,1,1]
        if self.plans['num_stages'] > 1 and not isinstance(num_threads, (list, tuple)):
            num_threads = (default_num_threads, num_threads)
        elif self.plans['num_stages'] == 1 and isinstance(num_threads, (list, tuple)):
            num_threads = num_threads[-1]
        preprocessor.run(target_spacings, self.folder_with_cropped_data, self.preprocessed_output_folder,
                         self.plans['data_identifier'], num_threads, force_separate_z=False)# 进行预处理
数据格式转换

每一个病人的数据都会被转换成一个四维numpy数组和一个pickle文件。
四维数组array(CXYZ)中,第一个维度的最后array[-1..]存储的是分割标注结果。而第一个维度的前面存储不同模态的数据,如果仅单模态,则四维数组第一维度长度仅为2,分别表示影像数据以及标注数据。四维数组array的后三个维度代表x,;.z三个坐标表示的三维数据,对于原始影像数据,值大小代表强度,而对于标注结果,后三个维度的三维数据值分别为0,1,…..表示不同的标注类别。
Preprocessor3DBetterResampling
该类继承GenericPreprocessor,所以直接看他的run函数:
可以看到首先初始化了input和output的路径,然后加载了一些config文件,调用了p.starmap(self._run_internal, all_args) ,这个_run_internal才是预处理的关键。
- 先对data和金标准进行transpose
- 根据target_spacing重采样和归一化
- 将data,seg组成all_data
- 期望每个类sample 10000 locations或样本数的0.01
- 保存class_locations
- 保存all_data
def _run_internal(self, target_spacing, case_identifier, output_folder_stage, cropped_output_dir, force_separate_z,
all_classes):
data, seg, properties = self.load_cropped(cropped_output_dir, case_identifier)
data = data.transpose((0, *[i + 1 for i in self.transpose_forward]))
seg = seg.transpose((0, *[i + 1 for i in self.transpose_forward]))
# 首先进行transpose
# 然后根据target_spacing进行重采样和归一化
data, seg, properties = self.resample_and_normalize(data, target_spacing,
properties, seg, force_separate_z)
all_data = np.vstack((data, seg)).astype(np.float32)
# we need to find out where the classes are and sample some random locations
# let's do 10.000 samples per class
# seed this for reproducibility!
num_samples = 10000
min_percent_coverage = 0.01 # at least 1% of the class voxels need to be selected, otherwise it may be too sparse
rndst = np.random.RandomState(1234)
class_locs = {}
for c in all_classes:
all_locs = np.argwhere(all_data[-1] == c)
if len(all_locs) == 0:
class_locs[c] = []
continue
target_num_samples = min(num_samples, len(all_locs))
target_num_samples = max(target_num_samples, int(np.ceil(len(all_locs) * min_percent_coverage)))
selected = all_locs[rndst.choice(len(all_locs), target_num_samples, replace=False)]
class_locs[c] = selected
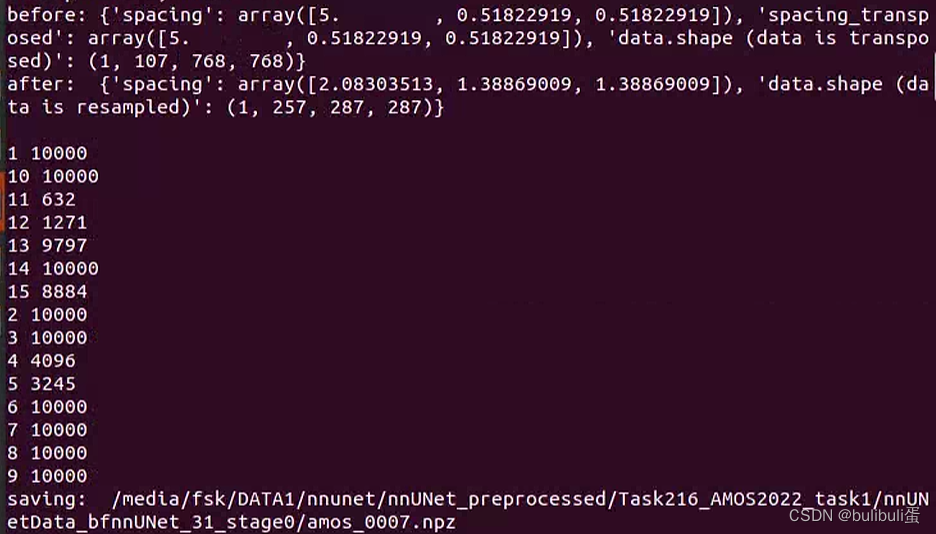
print(c, target_num_samples)
properties['class_locations'] = class_locs
print("saving: ", os.path.join(output_folder_stage, "%s.npz" % case_identifier))
np.savez_compressed(os.path.join(output_folder_stage, "%s.npz" % case_identifier),
data=all_data.astype(np.float32))
with open(os.path.join(output_folder_stage, "%s.pkl" % case_identifier), 'wb') as f:
pickle.dump(properties, f)归一化部分详解:resample and nomalized
回到Preprocessor3DBetterResampling,对于CT而言:调用numpy中的函数统计整个训练集的均值,标准差,0.5%分位HU值,99.5%分位HU值,并利用这些统计信息对每张图像进行clip以及z-scoring。代码中用use_nonzero_mask表示是否只在nonzero区域进行normalization.
  if scheme == "CT":
       # clip to lb and ub from train data foreground and use foreground mn and sd from training data
       assert self.intensityproperties is not None, "ERROR: if there is a CT then we need intensity properties"
       mean_intensity = self.intensityproperties[c]['mean']
       std_intensity = self.intensityproperties[c]['sd']
       lower_bound = self.intensityproperties[c]['percentile_00_5']
       upper_bound = self.intensityproperties[c]['percentile_99_5']
       data[c] = np.clip(data[c], lower_bound, upper_bound)
       data[c] = (data[c] - mean_intensity) / std_intensity
       if use_nonzero_mask[c]:
             data[c][seg[-1] < 0] = 0
重采样部分详解:get_target_spacing+resample_patient+resample_data_or_seg
第一步是确定重采样的目标空间大小。在之前数据格式转换的时候,每个数据的spacing信息存储在对应的pickle文件中,需要依次进行读取,然后一起存放在一个列表spacings当中。之后调用numpy中函数统计每个维度spacing的中值即可。
接下来根据中值spacing进行判断,数据集是否存在各向异性的问题。nnUNet设定的判断标准是,中值spacing中三个维度,是否有一个维度spacing大于另一个维度spacing的3倍,并且,该维度的中值size小于另一个维度中值size的1/3。如果存在各向异性,对spacing特别大的维度,取数据集中该维度spacing值的10%分位点作为该维度的目标空间大小。
get_target_spacing中:
anisotropy_threshold = 3

worst_spacing_axis = np.argmax(target)
other_axes = [i for i in range(len(target)) if i != worst_spacing_axis]
other_spacings = [target[i] for i in other_axes]

has_aniso_spacing = target[worst_spacing_axis] > (anisotropy_threshold * min(other_spacings))
has_aniso_voxels = target_size[worst_spacing_axis] * self.anisotropy_threshold < min(other_sizes)
if has_aniso_spacing and has_aniso_voxels:
    spacings_of_that_axis = np.vstack(spacings)[:, worst_spacing_axis]
    target_spacing_of_that_axis = np.percentile(spacings_of_that_axis, 10)
    # don't let the spacing of that axis get higher than the other axes
    if target_spacing_of_that_axis < min(other_spacings):
        target_spacing_of_that_axis = max(min(other_spacings), target_spacing_of_that_axis) + 1e-5
    target[worst_spacing_axis] = target_spacing_of_that_axis
第二步:resample_patient中,根据target_spacing重新确定目标尺寸。
new_shape = np.round(((np.array(original_spacing) / np.array(target_spacing)).astype(float) * shape)).astype(int)
第三步:调用resample_data_or_seg,skimage库中的reisze函数对每张图像进行resize即可,但在nnUNet中会根据图像是否存在各向异性进行不同的resize策略。如果不存在各向异性,对整个三维图像进行3阶spline插值即可。如果图像存在各向异性,设spacing大的维度为z轴,则仅在图像的xy平面进行3阶spline插值,而在z轴采用最近邻插值。而对于分割的标注图像,无论各向异性与否,在三个维度上都采用最近邻插值。下面代码中,用do_seperate_z表示是否存在各向异性,用axis表示各向异性图像中spacing最大的轴。
resample_data_or_seg中:
from skimage.transform import resize
if do_separate_z:
    if axis == 0:
        new_shape_2d = new_shape[1:]
    elif axis == 1:
        new_shape_2d = new_shape[[0, 2]]
    else:
        new_shape_2d = new_shape[:-1]
    reshaped_final_data = []
    for c in range(data.shape[0]):
        reshaped_data = []
        for slice_id in range(shape[axis]):
            if axis == 0:
                reshaped_data.append(resize(data[c, slice_id], new_shape_2d, order=3))
            elif axis == 1:
                reshaped_data.append(resize(data[c, :, slice_id], new_shape_2d, order=3))
            else:
                reshaped_data.append(resize(data[c, :, :, slice_id], new_shape_2d, order=3))

    if shape[axis] != new_shape[axis]:
        # The following few lines are blatantly copied and modified from sklearn's resize()
        rows, cols, dim = new_shape[0], new_shape[1], new_shape[2]
        orig_rows, orig_cols, orig_dim = reshaped_data.shape

        row_scale = float(orig_rows) / rows
        col_scale = float(orig_cols) / cols
        dim_scale = float(orig_dim) / dim

        map_rows, map_cols, map_dims = np.mgrid[:rows, :cols, :dim]
        map_rows = row_scale * (map_rows + 0.5) - 0.5
        map_cols = col_scale * (map_cols + 0.5) - 0.5
        map_dims = dim_scale * (map_dims + 0.5) - 0.5

        coord_map = np.array([map_rows, map_cols, map_dims])
        reshaped_final_data.append(map_coordinates(reshaped_data, coord_map, order=0, cval=cval,
                                                                   mode='nearest')[None])
else:
    reshaped = []
    for c in range(data.shape[0]):
        reshaped.append(resize(data[c], new_shape, order=3)[None])
    reshaped_final_data = np.vstack(reshaped)

reshaped_seg = resize(seg, new_shape, order=0)
实验结果:


 898
898

 被折叠的 条评论
为什么被折叠?
被折叠的 条评论
为什么被折叠?
 到【灌水乐园】发言


