


drawerlayout是一个viewgroup,里面放入2个直接子控件,第一个用来显示界面,第二个是可以从界面边界划入画出的布局文件,即通常所说的侧滑菜单
使用步骤:
1.导入v4.jar包
2.xml文件引用android.support.v4.widget.DrawerLayout
<LinearLayout xmlns:android="http://schemas.android.com/apk/res/android"
    xmlns:tools="http://schemas.android.com/tools"
    android:layout_width="match_parent"
    android:layout_height="match_parent"
    android:orientation="vertical"
    tools:context="com.min.mydrawer.MainActivity" >

    <android.support.v4.widget.DrawerLayout
        android:id="@+id/drawerlayout"
        android:layout_width="match_parent"
        android:layout_height="match_parent" >

        <TextView
            android:layout_width="match_parent"
            android:layout_height="match_parent"
            android:background="#bebebe"
            android:gravity="center"
            android:text="content"
            android:textColor="#fff"
            android:textSize="30sp" />

        <TextView
            android:layout_width="match_parent"
            android:layout_height="match_parent"
            android:layout_gravity="start"
            android:background="#00bfbf"
            android:gravity="center"
            android:text="drawer"
            android:textColor="#fff"
            android:textSize="30sp" />
    </android.support.v4.widget.DrawerLayout>

</LinearLayout>
值得注意的是,drawerlayout应该指定宽高为match_parent,而第二个子控件,必须有android:gravity这一个属性,values为left或者start则表示从左侧划入划出,,values为right或者end则表示从右侧划入划出;
toolbar的使用:
1.引入android-support-v7-appcompat
有可能在引入之后,这个文件报错,一般都是这个文件以低版本编译造成的,例如以4.4w版本,只需要重新编译一下即可;eclipse下
File/propertites/Android: project build Target选择
高于5.0以上版本编译,然后clean一下项目即可
2.把android-support-v7-appcompat下引入到自己项目中File/propertites/Android右下方添加即可,clean一下
包即可
3.使用toolbar,先把原本的actionbar干掉;最直接方法修改主题为NoActionBar,在values文件下styles.xml,继承theme.AppCompat.Light.NoActionBar,像这样
<resources>
<!-- Base application theme. -->
<style name="AppTheme" parent="AppBaseTheme"></style>
<style name="AppBaseTheme" parent="Theme.AppCompat.Light.NoActionBar">
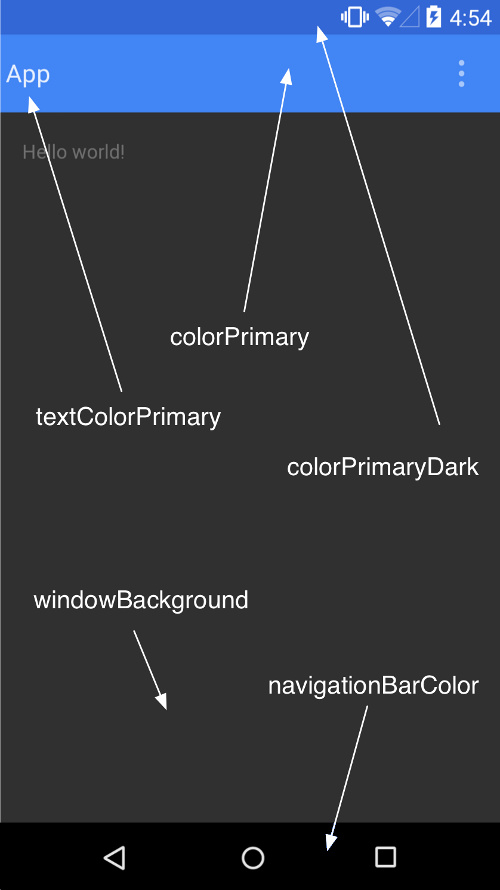
<!-- customize the color palette -->
<item name="colorPrimary">#009688</item>
<item name="colorPrimaryDark">#00796B</item>
<item name="colorAccent">#FD87A9</item>
</style>
</resources>
继承AppBaseTheme,可以修改各种属性;在values-v11,values-v14的styles.xml都改为:
<resources>

   <style name="AppTheme" parent="AppBaseTheme"></style>

</resources>
若需要修改navigationBarColor,需要在values21/styles.xml中定义:
<resources xmlns:android="http://schemas.android.com/apk/res/android">

    <style name="AppTheme" parent="@style/AppBaseTheme">

        <!-- 底部导航栏颜色 -->
        <item name="android:navigationBarColor">#4876FF</item>
    </style>

</resources>
4.添加toolbar布局文件
<LinearLayout xmlns:android="http://schemas.android.com/apk/res/android"
    xmlns:tools="http://schemas.android.com/tools"
    android:layout_width="match_parent"
    android:layout_height="match_parent"
    android:orientation="vertical"
    tools:context="com.min.mydrawer.MainActivity" >

    <android.support.v7.widget.Toolbar
        xmlns:android="http://schemas.android.com/apk/res/android"
        xmlns:app="http://schemas.android.com/apk/res/com.min.mydrawer"
        android:id="@+id/toolbar"
        android:layout_width="match_parent"
        android:layout_height="wrap_content"
        android:background="?attr/colorPrimary"
        android:minHeight="?attr/actionBarSize"
        app:logo="@drawable/kebon_icon"
        app:popupTheme="@style/ThemeOverlay.AppCompat.Light"
        app:theme="@style/ThemeOverlay.AppCompat.ActionBar"
        app:title="Kebon" >
    </android.support.v7.widget.Toolbar>


    <android.support.v4.widget.DrawerLayout
        android:id="@+id/drawerlayout"
        android:layout_width="match_parent"
        android:layout_height="match_parent" >

        <TextView
            android:layout_width="match_parent"
            android:layout_height="match_parent"
            android:background="#bebebe"
            android:gravity="center"
            android:text="content"
            android:textColor="#fff"
            android:textSize="30sp" />

        <TextView
            android:layout_width="match_parent"
            android:layout_height="match_parent"
            android:layout_gravity="start"
            android:background="#00bfbf"
            android:gravity="center"
            android:text="drawer"
            android:textColor="#fff"
            android:textSize="30sp" />
    </android.support.v4.widget.DrawerLayout>

</LinearLayout>
5.toolbar当成acitonbar使用
Activity继承自AppCompatActivity
package com.min.mydrawer;


import android.os.Bundle;
import android.support.v4.widget.DrawerLayout;
import android.support.v7.app.ActionBarDrawerToggle;
import android.support.v7.app.AppCompatActivity;
import android.support.v7.widget.Toolbar;

public class MainActivity extends AppCompatActivity{
    private DrawerLayout mdrawerLayout;
    private Toolbar toolbar;
    private ActionBarDrawerToggle mActionBarDrawerToggle;

    @Override
    protected void onCreate(Bundle savedInstanceState) {
        super.onCreate(savedInstanceState);
        setContentView(R.layout.activity_main);
        mdrawerLayout = (DrawerLayout) findViewById(R.id.drawerlayout);
        toolbar = (Toolbar) findViewById(R.id.toolbar);

        setSupportActionBar(toolbar);
        // 设置drawer

        mActionBarDrawerToggle = new ActionBarDrawerToggle(this, mdrawerLayout,
                toolbar, R.string.open, R.string.close);
        mActionBarDrawerToggle.syncState();
        mdrawerLayout.addDrawerListener(mActionBarDrawerToggle);

    }

}
效果图:


 82
82


 被折叠的 条评论
为什么被折叠?
被折叠的 条评论
为什么被折叠?
 到【灌水乐园】发言


