


效果预览


综合准确率在90%以上。
环境和数据准备
我们先保存几个教务处的验证码,通过观察这些验证码,我们发现了以下特点:
- 背景有一些彩色的椒盐噪声(可用滤波或点降噪去除)
- 验证码主体只有一种颜色 RGB:(0,0,153)(无法通过颜色的区别来分割字符)
- 进行了随机角度的旋转(可以想到切割后进行倾斜度矫正)
- 字符之间存在粘连,不易切割(主要是w、m等)
因此很容易可以想到以下两种识别方式:
- 对验证码切割后使用SoftMax回归训练识别。(因为验证码存在粘连,准确率可能不是太高)
- 直接对整张图片使用CNN(卷积神经网络)识别。(因为有4位字符,可能需要大量带标记样本才能达到不错的效果)
在本文中我们采用第二种方式,在不进行字符切割的情况下直接对验证码进行端到端的识别。
带标记数据获取
数据预处理
格式转换
直接获取到的验证码是gif编码的,由于cv2不能处理gif,附一个转换成png格式的小脚本(当然也可以选择用其他的图形库替代cv2)。
import os
import Image

samples = os.listdir('train')
for i in range(0, len(samples)):
    path = os.path.join('train', samples[i])
    savepath = path[:-3] + 'png'

    im = Image.open(path)
    def iter_frames(im):
        try:
            i = 0
            while 1:
                im.seek(i)
                imframe = im.copy()
                if i == 0:
                    palette = imframe.getpalette()
                else:
                    imframe.putpalette(palette)
                yield imframe
                i += 1
        except EOFError:
            pass
    for i, frame in enumerate(iter_frames(im)):
        frame.save(savepath, **frame.info)
去除边框、降噪、二值化
其实对于CNN这种级别的武器来说,不经过降噪直接识别也有不错的准确率,但是为了排除验证码带来的干扰,仍然进行降噪处理。
在输入的图像中虽然有较多的噪声点,但是经观察发现,验证码主体转成灰度图后只有3个灰度(17、62和68),因此在灰度图上先去除除了这三个灰度的所有点,再进行滤波。
读取灰度图


只保留3个灰度(代码)
# 去掉边框后为 70*25
crop = img[1:26, 1:71]
for h in range(25):
    for w in range(70):
        if crop[h,w]!=17 and crop[h,w]!=62 and crop[h,w]!=68:
            crop[h, w] =255
只保留3个灰度(效果)


去除噪点(代码)
# 去除噪点
for h in range(1, 25 - 1):
    for w in range(1, 70 - 1):
        count = 0
        if crop[h, w - 1] > 245:
            count = count + 1
        if crop[h, w + 1] > 245:
            count = count + 1
        if crop[h - 1, w] > 245:
            count = count + 1
        if crop[h + 1, w] > 245:
            count = count + 1
        if count > 2:
            crop[h, w] = 255
去除噪点(效果)


输入和输出转化
由于在TensorFlow中,只支持向量的输入输出。所以我们将输入转成70*25维的向量,每个值代表一个像素(仅取0和1)。将输出转成36*4维的向量。其中4个字符,每个字符取值为数字0-9或小写字母a-z,分别对应0-35。例如:‘123p’对应的向量为:
[0. 1. 0. 0. 0. 0. 0. 0. 0. 0. 0. 0. 0. 0. 0. 0. 0. 0. 0. 0. 0. 0. 0. 0. 0. 0. 0. 0. 0. 0. 0. 0. 0. 0. 0. 0.

0. 0. 1. 0. 0. 0. 0. 0. 0. 0. 0. 0. 0. 0. 0. 0. 0. 0. 0. 0. 0. 0. 0. 0. 0. 0. 0. 0. 0. 0. 0. 0. 0. 0. 0. 0.

0. 0. 0. 1. 0. 0. 0. 0. 0. 0. 0. 0. 0. 0. 0. 0. 0. 0. 0. 0. 0. 0. 0. 0. 0. 0. 0. 0. 0. 0. 0. 0. 0. 0. 0. 0.

0. 0. 0. 0. 0. 0. 0. 0. 0. 0. 0. 0. 0. 0. 0. 0. 0. 0. 0. 0. 0. 0. 0. 0. 0. 1. 0. 0. 0. 0. 0. 0. 0. 0. 0. 0.]
训练
由于我们只有3000个样本,但是对于卷积神经网络来说,至少2-3k次的训练才开始有效果。我们取64个样本为一个batch,样本量远远满足不了训练的需求。因此我们采用滑动窗口的方式,第1次训练样本1-64,第2次训练样本2-65。。以此类推,当所有的样本都被训练完后,再回到第一个样本开始重复训练。
# 定义CNN
def crack_captcha_cnn(w_alpha=0.01, b_alpha=0.1):
    x_image = tf.reshape(x, shape=[-1, IMAGE_HEIGHT, IMAGE_WIDTH, 1])

    # 3 个卷积层
    w_c1 = tf.Variable(w_alpha * tf.random_normal([3, 3, 1, 32]))
    b_c1 = tf.Variable(b_alpha * tf.random_normal([32]))
    conv1 = tf.nn.relu(tf.nn.bias_add(tf.nn.conv2d(x_image, w_c1, strides=[1, 1, 1, 1], padding='SAME'), b_c1))
    conv1 = tf.nn.max_pool(conv1, ksize=[1, 2, 2, 1], strides=[1, 2, 2, 1], padding='SAME')
    conv1 = tf.nn.dropout(conv1, keep_prob)

    w_c2 = tf.Variable(w_alpha * tf.random_normal([3, 3, 32, 64]))
    b_c2 = tf.Variable(b_alpha * tf.random_normal([64]))
    conv2 = tf.nn.relu(tf.nn.bias_add(tf.nn.conv2d(conv1, w_c2, strides=[1, 1, 1, 1], padding='SAME'), b_c2))
    conv2 = tf.nn.max_pool(conv2, ksize=[1, 2, 2, 1], strides=[1, 2, 2, 1], padding='SAME')
    conv2 = tf.nn.dropout(conv2, keep_prob)

    w_c3 = tf.Variable(w_alpha * tf.random_normal([3, 3, 64, 64]))
    b_c3 = tf.Variable(b_alpha * tf.random_normal([64]))
    conv3 = tf.nn.relu(tf.nn.bias_add(tf.nn.conv2d(conv2, w_c3, strides=[1, 1, 1, 1], padding='SAME'), b_c3))
    conv3 = tf.nn.max_pool(conv3, ksize=[1, 2, 2, 1], strides=[1, 2, 2, 1], padding='SAME')
    conv3 = tf.nn.dropout(conv3, keep_prob)

    # 全连接层
    #w_d = tf.Variable(w_alpha * tf.random_normal([8 * 20 * 64, 1024]))
    w_d = tf.Variable(w_alpha * tf.random_normal([6 * 4 * 64, 1024]))

    b_d = tf.Variable(b_alpha * tf.random_normal([1024]))
    dense = tf.reshape(conv3, [-1, w_d.get_shape().as_list()[0]])
    dense = tf.nn.relu(tf.add(tf.matmul(dense, w_d), b_d))
    dense = tf.nn.dropout(dense, keep_prob)

    w_out = tf.Variable(w_alpha * tf.random_normal([1024, 4 * 36]))
    b_out = tf.Variable(b_alpha * tf.random_normal([4 * 36]))
    out = tf.add(tf.matmul(dense, w_out), b_out)
    # out = tf.nn.softmax(out)
    return out

def train():
    output = crack_captcha_cnn()
    # loss
    # loss = tf.reduce_mean(tf.nn.softmax_cross_entropy_with_logits(output, Y))
    loss = tf.reduce_mean(tf.nn.sigmoid_cross_entropy_with_logits(logits=output, labels=y_))
    # 最后一层用来分类的softmax和sigmoid有什么不同?
    # optimizer 为了加快训练 learning_rate应该开始大,然后慢慢衰
    optimizer = tf.train.AdamOptimizer(learning_rate=0.001).minimize(loss)

    predict = tf.reshape(output, [-1, 4, 36])
    max_idx_p = tf.argmax(predict, 2)
    max_idx_l = tf.argmax(tf.reshape(y_, [-1, 4, 36]), 2)
    correct_pred = tf.equal(max_idx_p, max_idx_l)
    accuracy = tf.reduce_mean(tf.cast(correct_pred, tf.float32))

    saver = tf.train.Saver()
    with tf.Session() as sess:
        sess.run(tf.global_variables_initializer())

        step = 0
        while True:
            batch_x, batch_y = get_next_batch(step,64)
            _, loss_ = sess.run([optimizer, loss], feed_dict={x: batch_x, y_: batch_y, keep_prob: 0.75})
            print(step, loss_)

            # 每100 step计算一次准确率
            if step % 100 == 0:
                batch_x_test, batch_y_test = get_next_batch(step,100)
                acc = sess.run(accuracy, feed_dict={x: batch_x_test, y_: batch_y_test, keep_prob: 1.})
                print(step, acc)
                # 训练次数大于多少时保存并退出
                if step > 20000:
                    saver.save(sess, "checkpoint/test")
                    break

            step += 1


train()
可视化模型图
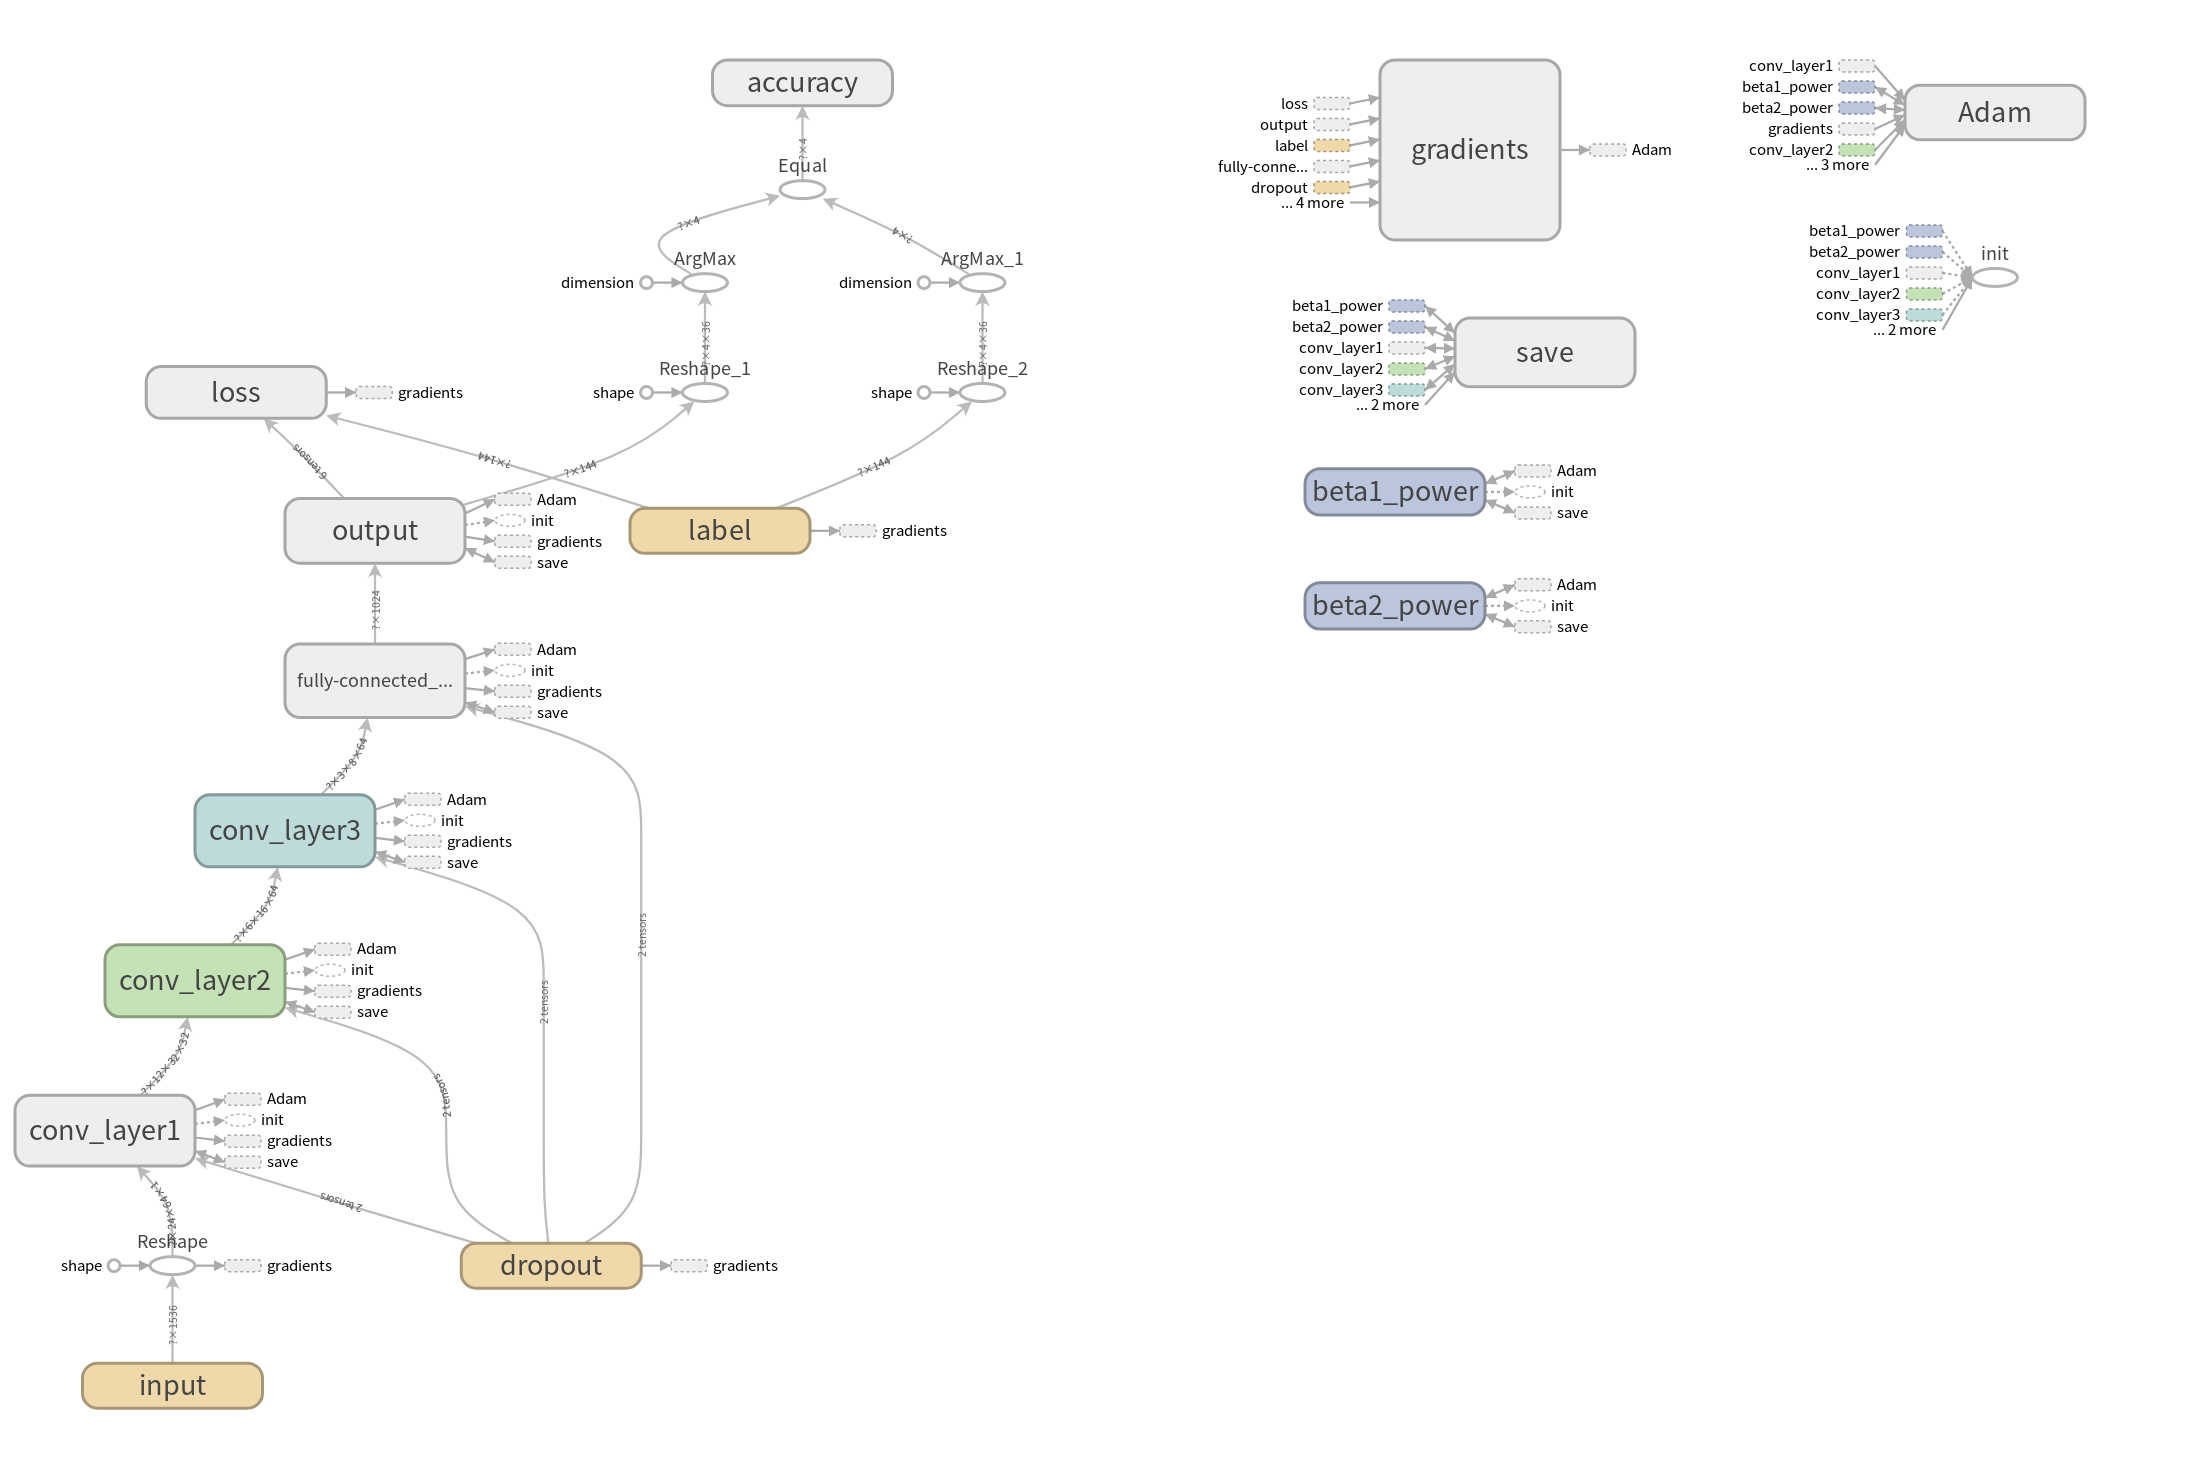
(Powered by Tensorboard)
测试
训练完成后,使用保存的模型(迭代20000次)对100个测试集样本进行测试,正确率为93%,即在100个验证码的400个字符中,有7个字符识别错误。
def ints2tag(ints):
    re = ''
    for i in ints:
        if i<10:
            re=re+str(i)
        else:
            re=re+chr(i-10+97)

    return re

def crack_captcha(captcha_image):
    from train import crack_captcha_cnn
    output = crack_captcha_cnn()

    saver = tf.train.Saver()
    with tf.Session() as sess:
        # 加载保存的模型
        saver.restore(sess, tf.train.latest_checkpoint('checkpoint'))
        predict = tf.argmax(tf.reshape(output, [-1, 4, 36]), 2)
        from train import keep_prob
        from train import x
        text_list = sess.run(predict, feed_dict={x: captcha_image, keep_prob: 1})

        for i in range(0,99):
            text = text_list[i].tolist()
            print ints2tag(text)

def recog():
    X2=[]
    Y2=[]
    samples = os.listdir('test')
    samples.sort()
    for i in range(1, 100):  # len(samples)
        if i % 10 == 0:
            print i
        path = os.path.join('test', '%d.png' %i)

        img = cv2.imread(path, 0)
        # 预处理
        mask = pre_handle(img)

        X2.append(image2vector(mask))

    crack_captcha(X2)

recog()
训练效果分析
识别错误的验证码


原因分析
字符重合度较大时,难以识别出重合的两个字符。另一方面,由于训练样本较少,某些字符旋转到特定的角度时可能没有被训练到(如:向右倾斜的6)
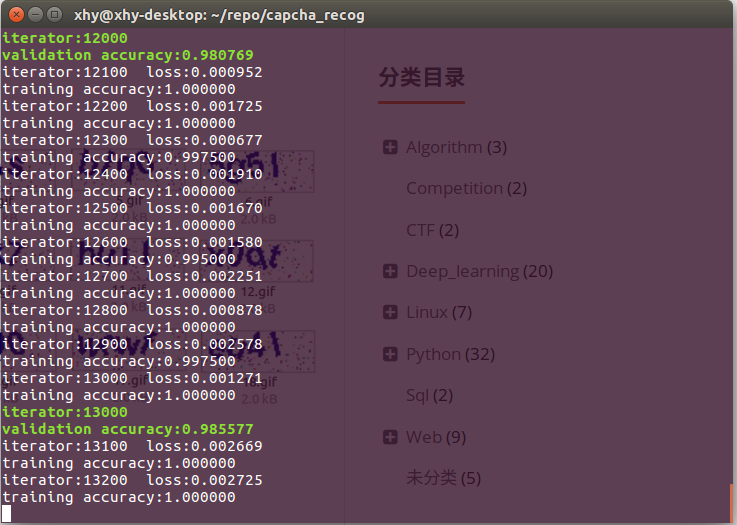
loss和准确率曲线


loss和准确率曲线在3000,6000,9000处存在跳变,这是因为总共3000个训练样本,训练完一遍重新从头开始训练的缘故(改进训练样本的获取方式可以让曲线更平滑)。
可以看出,CNN在训练次数很小(小于2000)时几乎起不到任何作用,训练数到达某处时(2000)突然就开始有了突飞猛进的进步(量变引起质变?),最后逐渐趋向于稳定。当然这个loss开始下降的阈值并不是固定的,它取决于学习任务的难度、每次feed的样本量、学习率等多方面因素。
项目代码
https://github.com/misads/capcha_recog
我的博客
如果这些内容对你有所帮助,可以关注我的个人博客哦~
http://www.xyu.ink/blog


 641
641


 被折叠的 条评论
为什么被折叠?
被折叠的 条评论
为什么被折叠?
 到【灌水乐园】发言


