


一、UITableView概述
表现为Plain和Grouped两种风格,分别如下图所示:
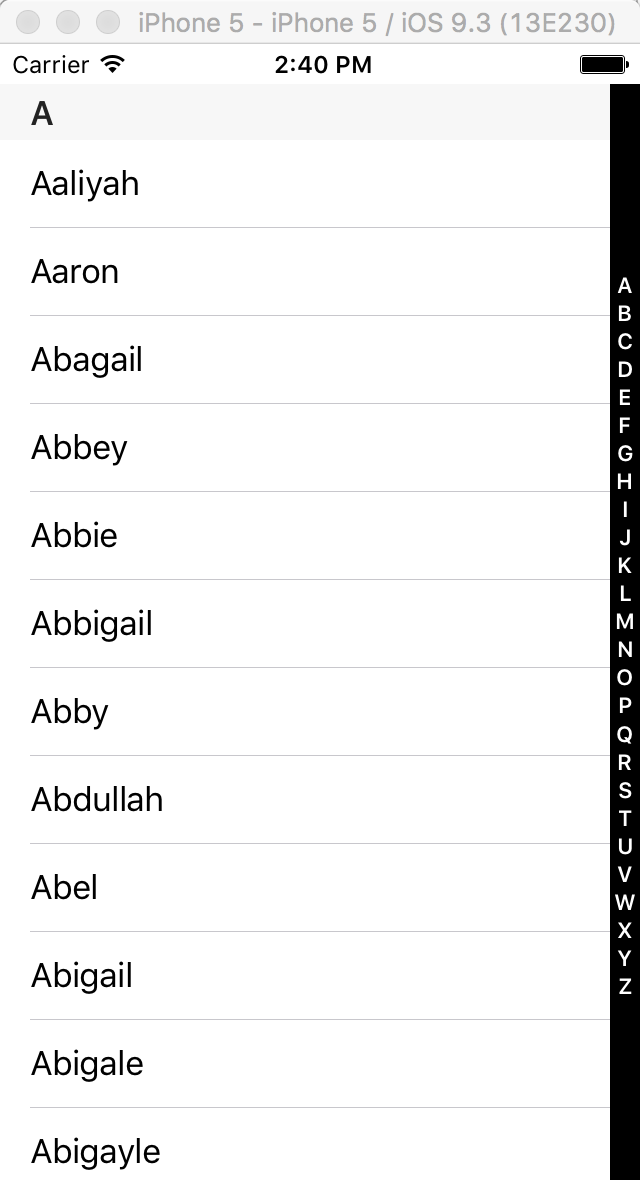
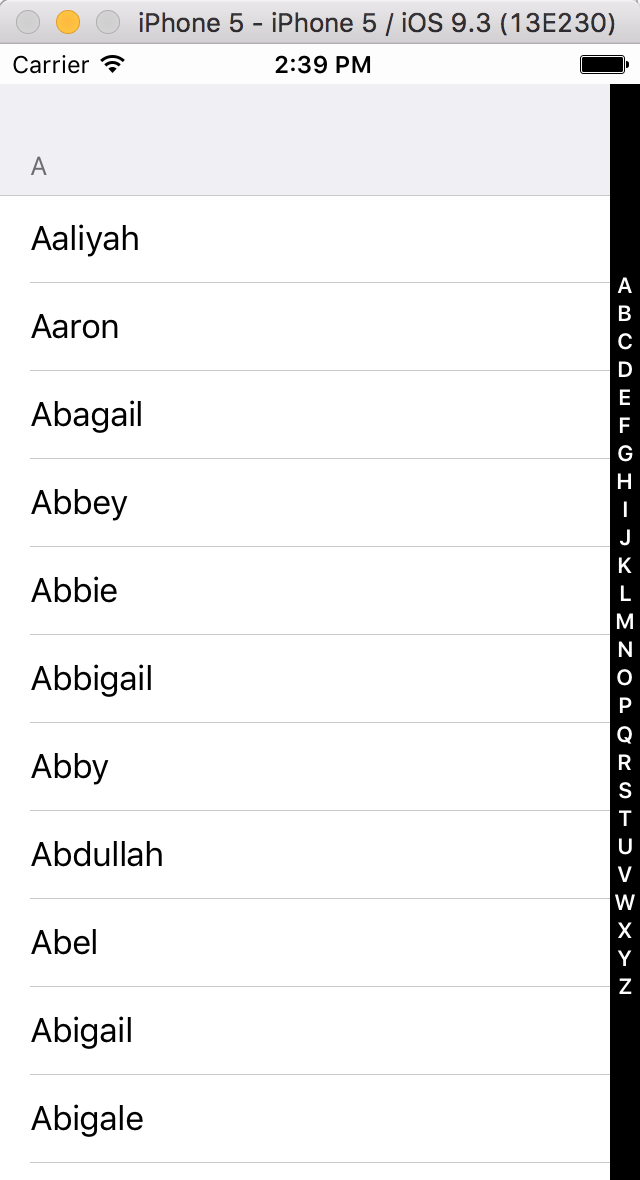
其中第一个是Plain风格的,第二个是Grouped风格,这个区别还是很明显的。
UITableView有两个委托分别为:dataSource和delegate。
dataSource是UITableViewDataSource类型,主要为UITableView提供显示用的数据(UITableViewCell),指定UITableViewCell支持的编辑操作类型(insert,delete和reordering),并根据用户的操作进行相应的数据更新操作。如果数据没有更具操作进行正确的更新,可能会导致显示异常,甚至crush。
delegate是UITableViewDelegate类型,主要提供一些可选的方法,用来控制tableView的选择、指定section的头和尾的显示以及协助完成cell的删除和排序等功能。
二、UITableViewCell介绍
UITableView中显示的每一个单元都是一个UITableViewCell对象,其初始化函数dequeueReusableCellWithIdentifier: forIndexPath: 或者initWithStyle: reuseIdentifier:比较特别,跟我们平时看到的UIView的初始化函数不同。这个主要是为了效率考虑,因为在tableView快速滑动的滑动的过程中,频繁的alloc对象是比较费时的,于是引入了cell的重用机制,这个也是我们在dataSource中要重点注意的地方,用好重用机制会让我们的tableView滑动起来更加流畅。
我们可以通过cell的selectionStyle属性指定cell选中时的显示风格,以及通过accessoryType来指定cell右边的显示的内容,或者直接指定accessoryView来定制右边显示的view。
系统提供的UITableView也包含了四种风格的布局,分别是:
typedef enum {
    UITableViewCellStyleDefault,
    UITableViewCellStyleValue1,
    UITableViewCellStyleValue2,
    UITableViewCellStyleSubtitle
} UITableViewCellStyle;
UITableViewCell中有个很重要的参数NSIndexPath。UITableView声明了一个NSIndexPath的类别,主要用来标识当前cell的在tableView中的位置,该类别有section和row两个属性,前者标识当前cell处于第几个section中,后者代表在该section中的第几行。
UITableView只能有一列数据(cell),且只支持纵向滑动,当创建好的tablView第一次显示的时候,我们需要调用其reloadData方法,强制刷新一次,从而使tableView的数据更新到最新状态。
UITableViewCell有三种方式可使用:1.使用系统UITbleViewCell ;2.自定义类继承UITbleViewCell 定制单元格 ;3.从nib文件加载UItableViewCell
1、使用系统UITbleViewCell
通过代码设定有所参数,选择cell类型、图片、字体等。
下面看一个例子:
- (UITableViewCell *)tableView:(UITableView *)tableView
         cellForRowAtIndexPath:(NSIndexPath *)indexPath
{
    //标识
    static NSString *SimpleTableIdentifier = @"SimpleTableIdentifier";

    UITableViewCell *cell = [tableView dequeueReusableCellWithIdentifier:
                             SimpleTableIdentifier];
    //设定类型
    if (cell == nil) {
        cell = [[UITableViewCell alloc]
                initWithStyle:UITableViewCellStyleDefault
                reuseIdentifier:SimpleTableIdentifier];
    }
    //设定图片
    UIImage *image = [UIImage imageNamed:@"star"];
    cell.imageView.image = image;
    //设定字体
    cell.textLabel.text = self.dwarves[indexPath.row];
    cell.textLabel.font = [UIFont boldSystemFontOfSize:50];
    //设定内容
    if (indexPath.row < 7) {
        cell.detailTextLabel.text = @"Mr. Disney";
    } else {
        cell.detailTextLabel.text = @"Mr. Tolkien";
    }
    return cell;
}
2、自定义类继承UITbleViewCell 定制单元格
往往系统给出的单元格类型无法满足实际要求,这时我们可以自定义单元格类型。
2.1 创建UITableViewCell子类,在- (id)initWithStyle:(UITableViewCellStyle)style reuseIdentifier:(NSString *)reuseIdentifier方法中创建我们想要的视图,再添加至子视图,subView都是添加在cell的contentView上面的,而非直接加在cell上面 。
下面看一个例子:
- (id)initWithStyle:(UITableViewCellStyle)style reuseIdentifier:(NSString *)reuseIdentifier
{
self = [super initWithStyle:style reuseIdentifier:reuseIdentifier];
if (self) {
// Initialization code
CGRect nameLabelRect = CGRectMake(0, 5, 70, 15);
UILabel *nameMarker = [[UILabel alloc] initWithFrame:nameLabelRect];
nameMarker.textAlignment = NSTextAlignmentRight;
nameMarker.text = @"Name:";
nameMarker.font = [UIFont boldSystemFontOfSize:12];
[self.contentView addSubview:nameMarker];
}
return self;
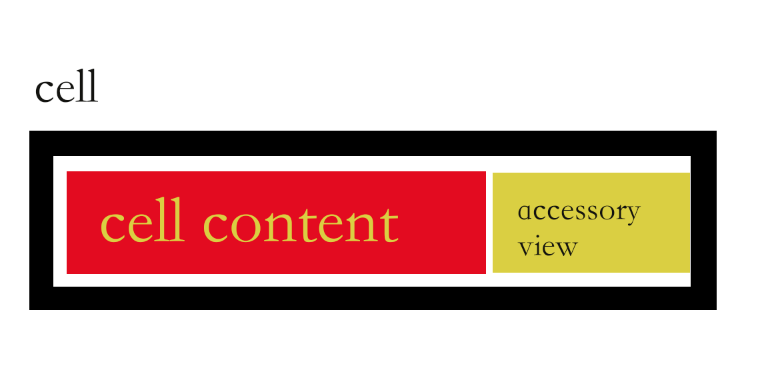
}在cell的contentView中添加了一个Label。
cell的组成如下图,知道为何是是在contentView中添加了。
2.2 实现控制器代码,控制器中引用新UITableViewCell子类,并注册 tableview,依次实现tableview委托。
[tableView registerClass:[nameOftableViewCellSubClass class]
 forCellReuseIdentifier:CellTableIdentifier];//注册
 nameOftableViewCellSubClass *cell = [tableView dequeueReusableCellWithIdentifier:CellTableIdentifier forIndexPath:indexPath];//cell 声明
3.从nib文件加载UItableViewCell
我们可以使用xcode中的GUI编译工具来设计cell,从nib文件加载UItableViewCell。新建User Interface,选择cell,在GUI中设计所需要的cell,新增控件、布局,设定identifier,即可重用标示符。
设计好cell之后,实现控制器,
UINib *nib = [UINib nibWithNibName:@"cell的名字" bundle:nil];注册tableview:
 [tableView registerNib:nib forCellReuseIdentifier:CellTableIdentifier]
三、delegate和datasource介绍
tableview的强大功能都是通过两个委托实现,系统提供了丰富的方法给予选择使用。
3.1 UITableViewDataSource有两个必选方法,引用了datasource 协议就必须添加一下两个方法,否则会引起错误。
添加实现UITableViewDataSource内必选函数
设定每个section 行数:- (NSInteger)tableView:(UITableView *)tableView numberOfRowsInSection(NSInteger)section
设定cell所在的行数:- (UITableViewCell *)tableView:(UITableView *)tableView cellForRowAtIndexPath:(NSIndexPath *)indexPath
还有可选的方法:
设定分组数目:- (NSInteger)numberOfSectionsInTableView:(UITableView *)tableView;
设定每组头标题:- (NSString *)tableView:(UITableView *)tableView titleForHeaderInSection:(NSInteger)section;
设定每组尾标题:- (NSString *)tableView:(UITableView *)tableView titleForFooterInSection:(NSInteger)section;
设定索引:- (NSArray *)sectionIndexTitlesForTableView:(UITableView *)tableView,使用较多,返回一组数组;
3.2 UITableViewDelegate协议提供了一系列可选方法,触发事件的一些方法实现。
设置行高
- ( CGFloat )tableView:( UITableView *)tableView heightForRowAtIndexPath:( NSIndexPath *)indexPath选中cell时触发事件:
- ( void )tableView:( UITableView *)tableView didSelectRowAtIndexPath:( NSIndexPath *)indexPath
设置 tableViewCell 的编辑样式 ( 插入 / 删除 ):
- ( UITableViewCellEditingStyle )tableView:( UITableView *)tableView editingStyleForRowAtIndexPath:( NSIndexPath *)indexPath设置当点击编辑按钮时 上面显示的文字,如显示删除:- ( NSString *)tableView:( UITableView *)tableView titleForDeleteConfirmationButtonForRowAtIndexPath:( NSIndexPath *)indexPath NS_AVAILABLE_IOS ( 3 _0) { return @" 删除 " ; }
- 设置 cell 移动的位置:
- ( NSIndexPath *)tableView:( UITableView *)tableView targetIndexPathForMoveFromRowAtIndexPath:( NSIndexPath *)sourceIndexPath toProposedIndexPath:( NSIndexPath *)proposedDestinationIndexPath四、总结
tableview内容非常重要,基本上我们可以看到的APP都用到。这一章节使用到UITableViewDatasource协议方法更多,旨在更好的搭建起完整的tableview,UITableViewDelegate协议中的方法暂未使用到,在后面的实践中会更加重视委托方法的使用。


 2430
2430

 被折叠的 条评论
为什么被折叠?
被折叠的 条评论
为什么被折叠?
 到【灌水乐园】发言


