


1 实现思路
本节通过边缘检测和直线检测来实现文档图像的自动剪切与几何校正。具体来说,首先通过图像处理技术提取出图像的边缘,然后通过霍夫变换检测到图像的直线,将水平和垂直线分开存储,若直线在x轴方向上的差值绝对值大于y轴方向,则认为其更接近水平线,反之为垂直线。当检测到的水平或垂直边缘线少于两条时,使用源图像的上下边缘和左右边缘进行补全。并根据线段中心点的坐标,对水平线按y坐标进行排序,对垂直线按x坐标进行排序。接着计算文档水平和垂直边缘线的交点,最后通过透视变换将图像调整为正视图,校正文档图像中的透视畸变。
2 实现流程
- 图像预处理:读取图像后,通过灰度转换、双边模糊、二值化等操作进行预处理。
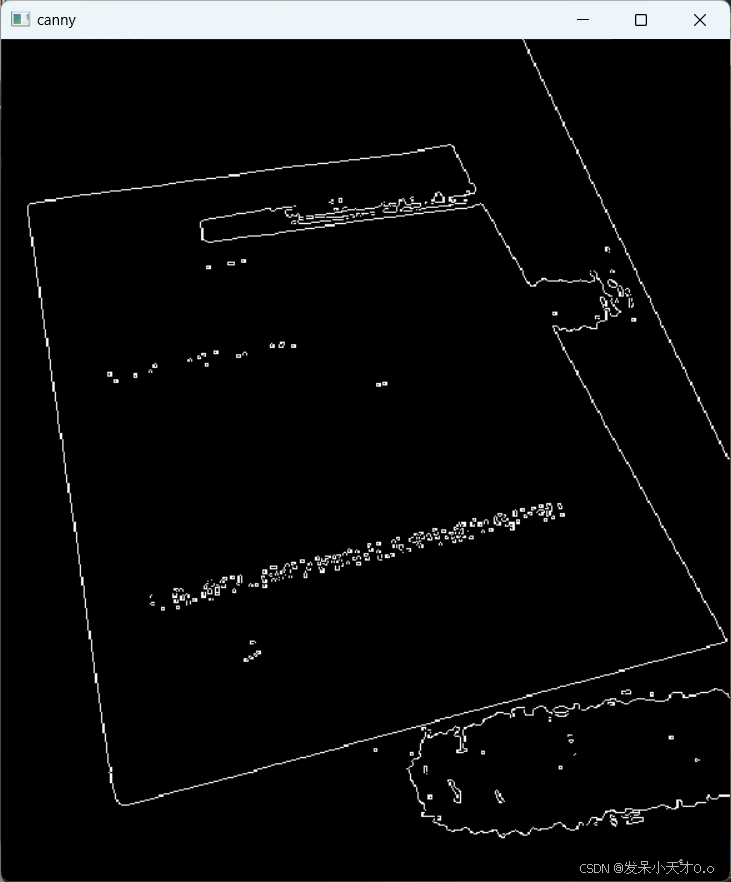
- 边缘检测:使用Otsu方法计算高低阈值,再通过Canny算法进行边缘检测。
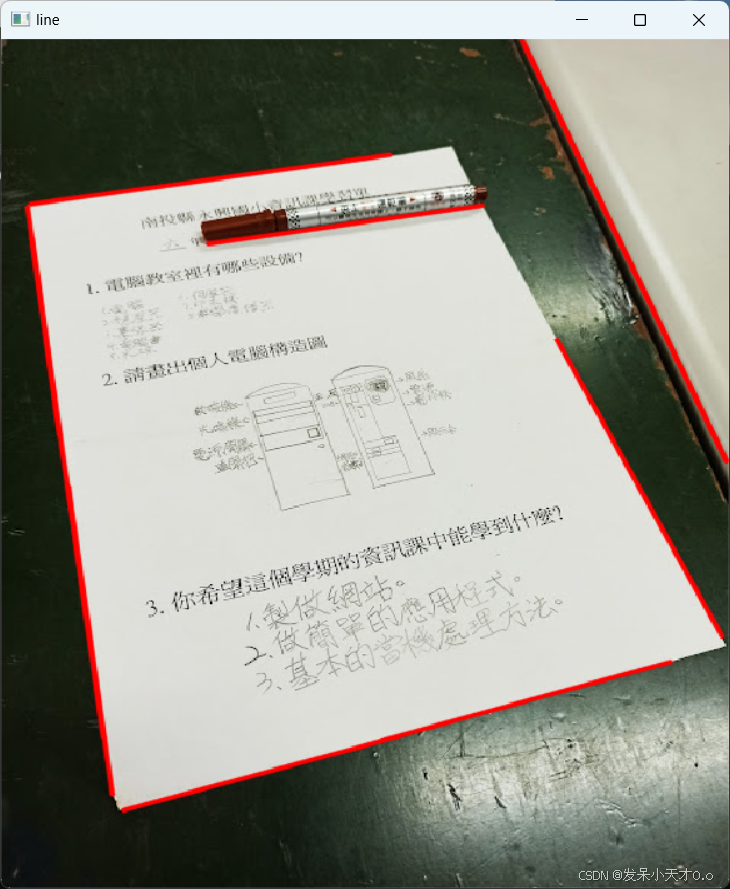
- 直线检测:使用HoughLinesP方法检测直线,将水平和垂直线分类存储。根据检测到的线段数量,补充缺少的边缘。
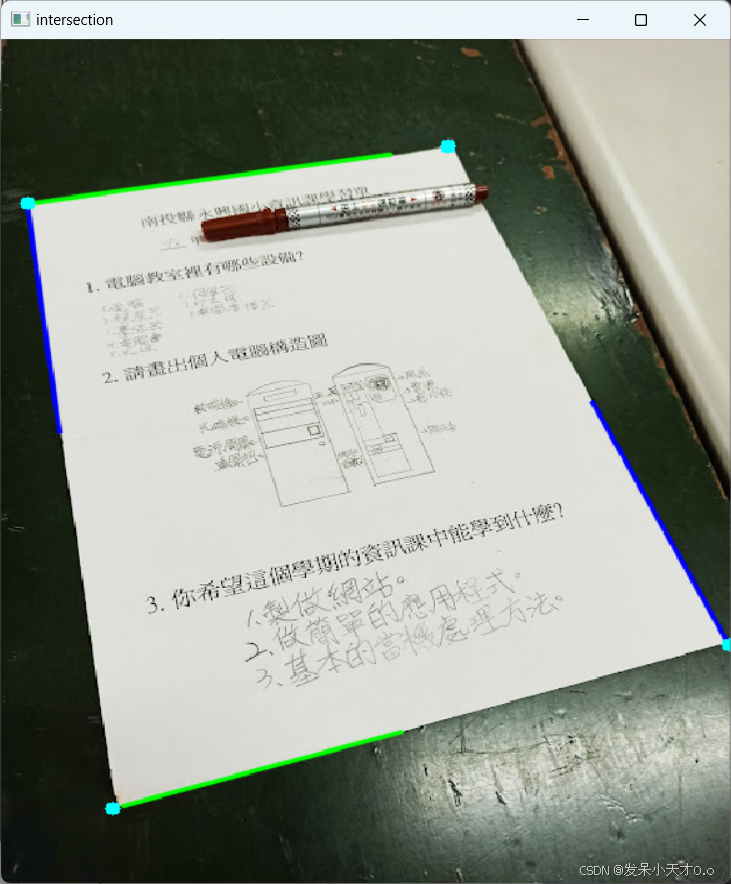
- 计算交点:根据线段中心点的坐标进行排序,并计算水平线和垂直线的交点,确定文档的四个角。
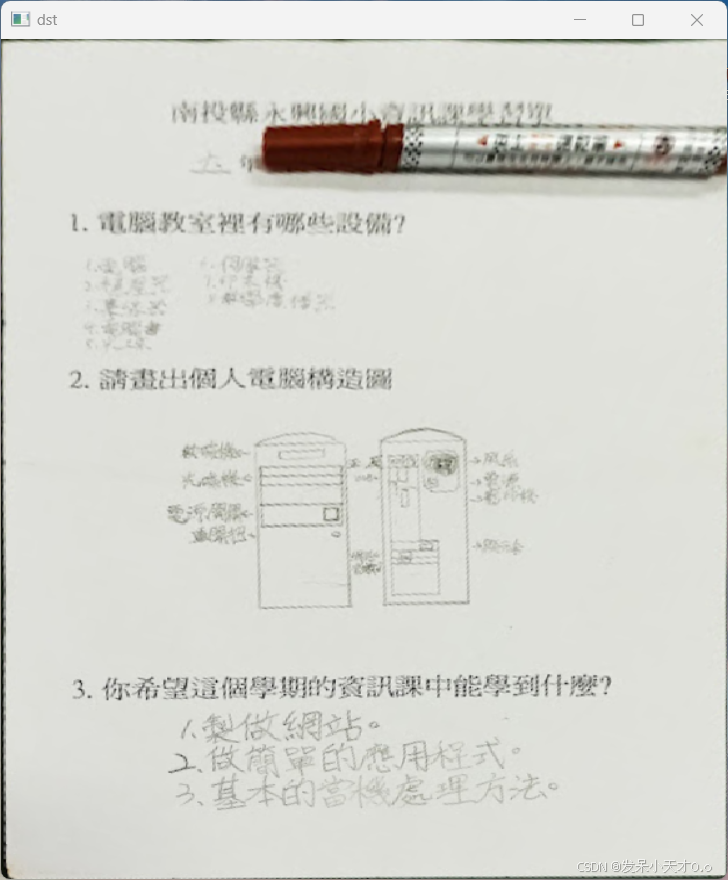
- 透视变换:根据源图像文档的四角点和目标图像的四角点,计算透视变换矩阵,并对源图像进行透视变换得到矫正图像。
3 透视变换
透视变换(Perspective Transformation)是一种在图像处理中使用的几何变换,用于模拟物体在三维空间中由于视角变化而产生的变形效果。通过透视变换,可以将图像中的一个四边形区域映射到另一个四边形区域。例如将将斜拍的文档或书籍图片调整为正面视角。
实现步骤:
- 定义四个源点:在原始图像中选择待转换区域的四个顶点。
- 定义四个目标点:在目标图像中指定对应的四个顶点,定义变换后的区域形状。
- 计算透视变换矩阵:使用 cv::getPerspectiveTransform 函数,根据源点和目标点计算出 3x3 透视变换矩阵。
- 应用透视变换:使用 cv::warpPerspective 函数,将原图像转换到目标图像上。
3.1 透视变换矩阵
cv::getPerspectiveTransform 是 OpenCV 库中的一个函数,用于计算一个 3x3 的透视变换矩阵。它能够根据四个对应点,将一个平面上的区域映射到另一个平面上,实现透视变换效果。
cv::Mat cv::getPerspectiveTransform(const Point2f src[], const Point2f dst[]);
参数:
- src[]:输入图像中的四个顶点坐标。
- dst[]:输出图像中的四个顶点坐标(目标平面上的对应点)。
在Python中,cv2.getPerspectiveTransform 的坐标类型是 np.float32 的 4x2 矩阵。
3.2 透视变换
cv::warpPerspective 是 OpenCV 中用于执行透视变换的函数。它通过将源图像中的一个四边形区域映射到目标图像的另一个四边形区域,实现视角和形状的变化。
void cv::warpPerspective(InputArray src, OutputArray dst, InputArray M, Size dsize, int flags = INTER_LINEAR, int borderMode = BORDER_CONSTANT, const Scalar& borderValue = Scalar());
参数:
- src:输入图像。
- dst:输出图像,结果图像会包含透视变换后的内容。
- M:3x3 的透视变换矩阵,通常由 cv::getPerspectiveTransform 或 cv::findHomography 得到。
- dsize:输出图像的尺寸,即变换后的图像宽度和高度。
- flags:插值方法,默认为 INTER_LINEAR,可以选择 INTER_NEAREST、INTER_LINEAR、INTER_CUBIC 等。
- borderMode:边界模式,控制超出图像边界的像素填充方式,常用 BORDER_CONSTANT 和 BORDER_REPLICATE。
- borderValue:边界填充值,仅在 borderMode 为 BORDER_CONSTANT 时有效。
4 C++代码实现
#include<iostream>
#include<opencv2/opencv.hpp>
#include<algorithm>

struct Line
{
	cv::Point _p1;
	cv::Point _p2;
	cv::Point _center;

	Line(cv::Point p1, cv::Point p2)
	{
		_p1 = p1;
		_p2 = p2;
		_center = cv::Point((p1.x + p2.x) / 2, (p1.y + p2.y) / 2);
	}
};

bool camp_y(Line l1, Line l2)
{
	return l1._center.y < l2._center.y;
}

bool camp_x(Line l1, Line l2)
{
	return l1._center.x < l2._center.x;
}

cv::Point2f computeIntersect(Line l1, Line l2)
{
	int x1 = l1._p1.x, y1 = l1._p1.y, x2 = l1._p2.x, y2 = l1._p2.y;
	int x3 = l2._p1.x, y3 = l2._p1.y, x4 = l2._p2.x, y4 = l2._p2.y;
	if (float d=(x1 - x2) * (y3 - y4) - (y1 - y2) * (x3 - x4))//判断两条线是否平行
	{
		//d 不为零,不平行,有交点
		cv::Point2f pt;
		pt.x = ((x1 * y2 - y1 * x2) * (x3 - x4) - (x1 - x2) * (x3 * y4 - y3 * x4)) / d;
		pt.y = ((x1 * y2 - y1 * x2) * (y3 - y4) - (y1 - y2) * (x3 * y4 - y3 * x4)) / d;
		return pt;
	}
	return cv::Point2f(-1, -1);
}


int main()
{
	cv::Mat src = cv::imread("../2.jpg");
	if (src.empty())
	{
		std::cerr << "Could not read the image" << std::endl;
		return -1;
	}
	int w_src = src.size().width;
	int h_src = src.size().height;

	cv::Mat gray, filter, bin, edges;
	cv::cvtColor(src, gray, cv::COLOR_BGR2GRAY);//灰度图
	cv::bilateralFilter(gray, filter, 5, 75, 75);//双边模糊
	cv::threshold(filter, bin, 127, 255, cv::THRESH_BINARY);//二值化

	cv::Mat thres;
	double high_thres = cv::threshold(filter, thres, 0, 255, cv::THRESH_BINARY | cv::THRESH_OTSU);
	//0:此处设置为 0,因为使用了 Otsu’s 方法,不需要手动设置阈值。
	//cv::THRESH_BINARY | cv::THRESH_OTSU:表示使用二值化操作,并启用 Otsu’s 自适应阈值算法。
	//通过 cv::THRESH_OTSU,threshold 会自动计算出一个合适的阈值(在代码中赋值给 high_thres),并用于二值化图像。
	double low_thres = high_thres / 2;

	cv::Canny(bin, edges, low_thres, high_thres);//Canny 边缘检测,其中建议低阈值约为高阈值的一半。

	//直线检测
	std::vector<cv::Vec4i> lines;
	std::vector<Line> horizontals, verticals;
	cv::HoughLinesP(edges, lines, 1, CV_PI / 180, 10, 150, 10);
	for (int i = 0; i < lines.size(); i++)
	{
		double x1 = lines[i][0];
		int y1 = lines[i][1];
		int x2 = lines[i][2];
		int y2 = lines[i][3];
		int delta_x = x1 - x2;
		int delta_y = y1 - y2;
		Line l(cv::Point(x1, y1), cv::Point(x2, y2));
		if (fabs(delta_x) > fabs(delta_y))
		{
			horizontals.push_back(l);
		}
		else
		{
			verticals.push_back(l);
		}
		//cv::line(src, cv::Point(x1, y1), cv::Point(x2, y2), cv::Scalar(0, 0, 255), 2, cv::LINE_AA);
	}

	// 检测不到全部边缘时的处理方式
	if (horizontals.size() < 2)
	{
		if (horizontals.size() == 0 || horizontals[0]._center.y > h_src / 2)
		{
			horizontals.push_back(Line(cv::Point(0, 0), cv::Point(w_src - 1, 0)));
		}
		if (horizontals.size() == 0 || horizontals[0]._center.y <= h_src / 2)
		{
			horizontals.push_back(Line(cv::Point(0, h_src - 1), cv::Point(w_src - 1, h_src - 1)));
		}
	}
	if (verticals.size() < 2)
	{
		if (verticals.size() == 0 || verticals[0]._center.x > w_src / 2)
		{
			verticals.push_back(Line(cv::Point(0, 0), cv::Point(0, h_src - 1)));
		}
		if (verticals.size() == 0 || verticals[0]._center.x <= w_src / 2)
		{
			verticals.push_back(Line(cv::Point(w_src - 1, 0), cv::Point(w_src - 1, h_src - 1)));
		}
	}

	// 按线的中心坐标排序
	std::sort(horizontals.begin(), horizontals.end(), camp_y);//对容器中的元素进行排序
	std::sort(verticals.begin(), verticals.end(), camp_x);

	//画边缘的四条线
	//cv::line(src, horizontals[0]._p1, horizontals[0]._p2, cv::Scalar(0, 255, 0), 2, cv::LINE_AA);
	//cv::line(src, horizontals[horizontals.size() - 1]._p1, horizontals[horizontals.size() - 1]._p2, cv::Scalar(0, 255, 0), 2, cv::LINE_AA);
	//cv::line(src, verticals[0]._p1, verticals[0]._p2, cv::Scalar(255, 0, 0), 2, cv::LINE_AA);
	//cv::line(src, verticals[verticals.size() - 1]._p1, verticals[verticals.size() - 1]._p2, cv::Scalar(255, 0, 0), 2, cv::LINE_AA);

	//矫正
	//边缘四条线的交叉点
	std::vector<cv::Point2f> src_pts;
	src_pts.push_back(computeIntersect(horizontals[0], verticals[0]));
	src_pts.push_back(computeIntersect(horizontals[0], verticals[verticals.size() - 1]));
	src_pts.push_back(computeIntersect(horizontals[horizontals.size() - 1], verticals[0]));
	src_pts.push_back(computeIntersect(horizontals[horizontals.size() - 1], verticals[verticals.size() - 1]));
	for (int i = 0; i < src_pts.size(); i++)
	{
		//cv::circle(src, src_pts[i], 5, cv::Scalar(255, 255, 0), -1);
	}

	//矫正后的图像
	cv::Mat dst = cv::Mat::zeros(cv::Size(w_src, h_src), CV_8UC3);
	//矫正后的图像的角点
	std::vector<cv::Point2f> dst_pts;
	dst_pts.push_back(cv::Point2f(0, 0));
	dst_pts.push_back(cv::Point2f(w_src - 1, 0));
	dst_pts.push_back(cv::Point2f(0, h_src - 1));
	dst_pts.push_back(cv::Point2f(w_src - 1, h_src - 1));

	//变换矩阵
	cv::Mat transmtx= cv::getPerspectiveTransform(src_pts, dst_pts);
	//透视变换
	cv::warpPerspective(src, dst, transmtx, dst.size());


	cv::namedWindow("src", 0);
	cv::namedWindow("dst", 0);
	cv::imshow("src", src);
	cv::imshow("dst", dst);
	cv::waitKey(0);
	cv::destroyAllWindows();

	return 0;
}
5 Python代码实现
import cv2
import numpy as np


class Line:
    def __init__(self, p1, p2):
        super(Line, self).__init__()
        self._p1 = p1
        self._p2 = p2
        self._center = (int((p1[0] + p2[0]) / 2), int((p1[1] + p2[1]) / 2))


def computeIntersect(l1, l2):
    x1, y1 = l1._p1
    x2, y2 = l1._p2
    x3, y3 = l2._p1
    x4, y4 = l2._p2
    d = (x1 - x2) * (y3 - y4) - (y1 - y2) * (x3 - x4)
    if d != 0:
        x = ((x1 * y2 - y1 * x2) * (x3 - x4) - (x1 - x2) * (x3 * y4 - y3 * x4)) / d
        y = ((x1 * y2 - y1 * x2) * (y3 - y4) - (y1 - y2) * (x3 * y4 - y3 * x4)) / d
        return (x, y)
    else:
        return (-1, -1)


if __name__ == '__main__':
    src = cv2.imread("../2.jpg")
    if src is None:
        print("Could not read the image")
    h_src, w_src, c_src = src.shape

    gray = cv2.cvtColor(src, cv2.COLOR_BGR2GRAY)
    filter = cv2.bilateralFilter(gray, 5, 75, 75)
    _, bin = cv2.threshold(filter, 127, 255, cv2.THRESH_BINARY)

    high_thres, binary_img = cv2.threshold(filter, 0, 255, cv2.THRESH_BINARY | cv2.THRESH_OTSU)
    low_thres = high_thres / 2
    edges = cv2.Canny(bin, low_thres, high_thres)

    # 直线检测
    lines = cv2.HoughLinesP(edges, 1, np.pi / 180, 10, None, 150, 10)
    horizontals = []
    verticals = []
    if lines is not None:
        for line in lines:
            x1, y1, x2, y2 = line[0]
            delta_x = x1 - x2
            delta_y = y1 - y2
            l = Line((x1, y1), (x2, y2))
            # 水平、垂直
            if abs(delta_x) > abs(delta_y):
                horizontals.append(l)
            else:
                verticals.append(l)
            # cv2.line(src,(x1,y1),(x2,y2),(0,0,255),2,cv2.LINE_AA)

    # 检测不到全部边缘时的处理方式
    if len(horizontals) < 2:
        if len(horizontals) == 0 or horizontals[0]._center[1] > h_src / 2:
            horizontals.append(Line((0, 0), (w_src - 1, 0)))
        if len(horizontals) == 0 or horizontals[0]._center[1] <= h_src / 2:
            horizontals.append(Line((0, h_src - 1), (w_src - 1, h_src - 1)))
    if len(verticals) < 2:
        if len(verticals) == 0 or verticals[0]._center[0] > w_src / 2:
            verticals.append(Line((0, 0), (0, h_src - 1)))
        if len(verticals) == 0 or verticals[0]._center[0] <= w_src / 2:
            verticals.append(Line((w_src - 1, 0), (w_src - 1, h_src - 1)))

    # 按线的中心坐标排序
    horizontals.sort(key=lambda l: l._center[1])
    verticals.sort(key=lambda l: l._center[0])

    # cv2.line(src, horizontals[0]._p1, horizontals[0]._p2, (0, 255, 0), 2, cv2.LINE_AA)
    # cv2.line(src, horizontals[len(horizontals) - 1]._p1, horizontals[len(horizontals) - 1]._p2, (0, 255, 0), 2, cv2.LINE_AA)
    # cv2.line(src, verticals[0]._p1, verticals[0]._p2, (255, 0, 0), 2, cv2.LINE_AA)
    # cv2.line(src, verticals[len(verticals) - 1]._p1, verticals[len(verticals) - 1]._p2, (255, 0, 0), 2, cv2.LINE_AA)

    # 文档边缘四条线的交叉点
    pts = []
    pts.append(computeIntersect(horizontals[0], verticals[0]))
    pts.append(computeIntersect(horizontals[0], verticals[len(verticals) - 1]))
    pts.append(computeIntersect(horizontals[len(horizontals) - 1], verticals[0]))
    pts.append(computeIntersect(horizontals[len(horizontals) - 1], verticals[len(verticals) - 1]))

    src_pts = np.array(pts, dtype=np.float32)
    for point in src_pts:
        cv2.circle(src, (int(point[0]), int(point[1])), 5, (255, 255, 0), -1)

    # 矫正后图像与角点
    dst = np.zeros((h_src, w_src, 3), dtype=np.uint8)  # (height, width, channels)
    dst_pts = np.array([[0, 0], [w_src - 1, 0], [0, h_src - 1], [w_src - 1, h_src - 1]], dtype=np.float32)

    # 透视变换
    transmtx = cv2.getPerspectiveTransform(src_pts, dst_pts)
    dst = cv2.warpPerspective(src, transmtx, (dst.shape[1], dst.shape[0]))  # (width, height)

    cv2.namedWindow("src", 0)
    cv2.namedWindow("dst", 0)
    cv2.imshow("src", src)
    cv2.imshow("dst", dst)
    cv2.waitKey(0)
    cv2.destroyAllWindows()
6 实现效果
源图像:

边缘检测图像:
直线检测图像:
交叉点图像:
剪切矫正图像:


 1583
1583

 被折叠的 条评论
为什么被折叠?
被折叠的 条评论
为什么被折叠?
 到【灌水乐园】发言


