


FreeRTOS分析三 — 任务的切换
我们带着三个问题开始了对 FreeRTOS 代码的探究。
1. FreeRTOS 是如何建立任务的呢?
2. FreeRTOS 是调度和切换任务的呢?
3. FreeRTOS 是如何保证实时性呢?
前两篇文章分别从代码的层面分析了 FreeRTOS 是如何建立任务以及建立的任务是怎么样被调用,“跑”起来的。
FreeRTOS从代码层面进行原理分析(1 任务的建立)
FreeRTOS从代码层面进行原理分析(2 任务的启动)
本篇继续上个博文中的提到的有官任务的切换问题,继续从代码的逻辑上来分析,FreeRTOS 是如何做到的。
FreeRTOS 中任务切换的细粒度
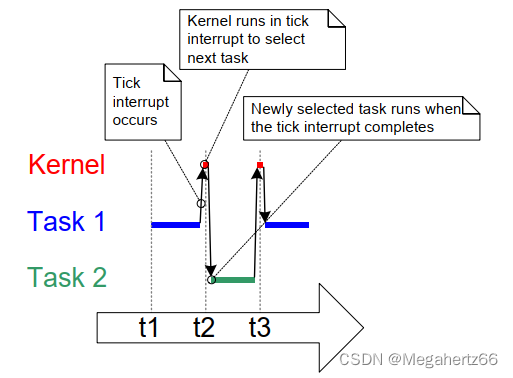
在 FreeRTOS 中称其为时间片(Time Slicing),如果两个 FreeRTOS 的任务具有相同的优先级那么实际执行起来的样子就像下面的图片一样,两个任务各自交替运行,每次每个任务可以一个时间片。
这个时间片的能力实际上就是来自 Systick 产生的中断。再上一篇博文中,咱们提到了使用 vPortSetupTimerInterrupt 函数配置 SysTick的过程。
这细粒度的具体时间就是由一行代码来控制的。
portNVIC_SYSTICK_LOAD_REG = ( configSYSTICK_CLOCK_HZ / configTICK_RATE_HZ ) - 1UL;
每次时钟脉冲都会使得 reload 里面的值减 1,这样通过对时钟的设置和 reload 寄存器的初始值设置,就可以对 FreeRTOS 的时间片进行设置了。
这里没有很详细的讲解 Systick,因为那不是这篇博文的重点,而且有大把介绍 Systick 的文章有呢~
任务切换的触发
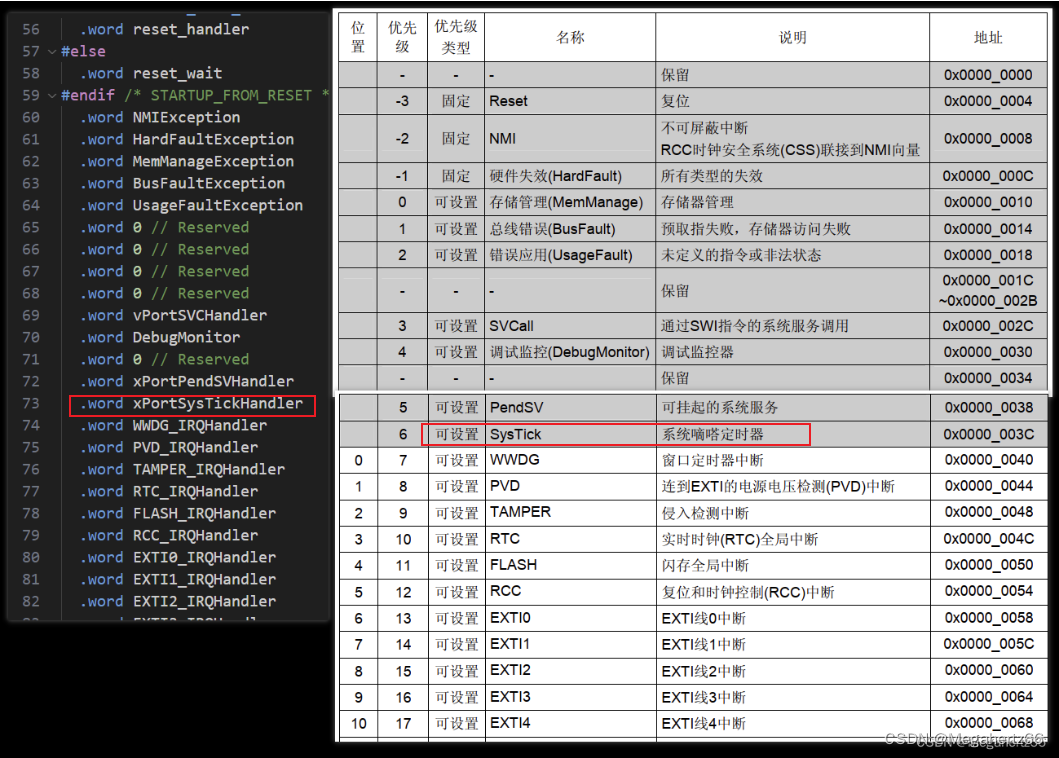
根据 STM32F10x_Startup.s 文件中对中断向量表的配置来看,当发生 SysTick 中断时 xPortSysTickHandler 函数将会被调用。
自己盗自己个图~ hhhh
在 xPortSysTickHandler 函数中的逻辑其实很简单。就是通过增加时间的形式,看看是不是真的有任务需要进行切换,如果切换的话就再触发另一个 PendSV(可挂起的系统服务) 中断 。
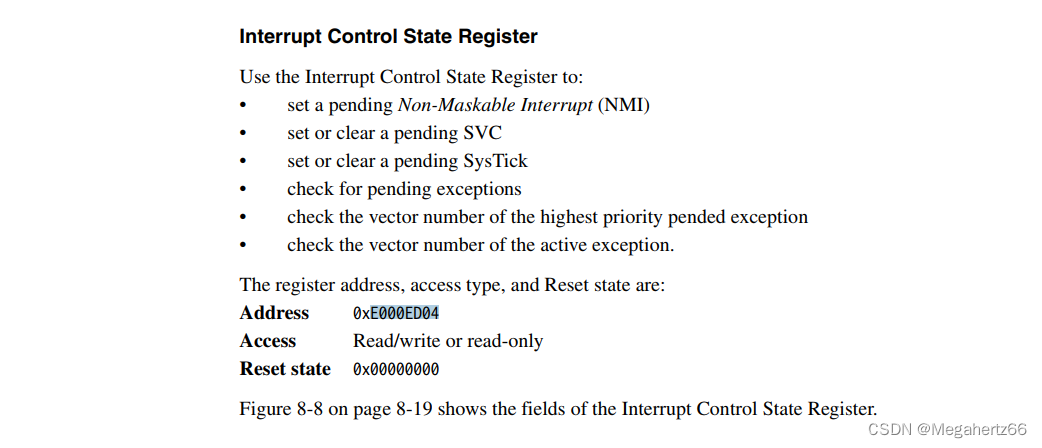
#define portNVIC_INT_CTRL_REG ( *( ( volatile uint32_t * ) 0xe000ed04 ) )
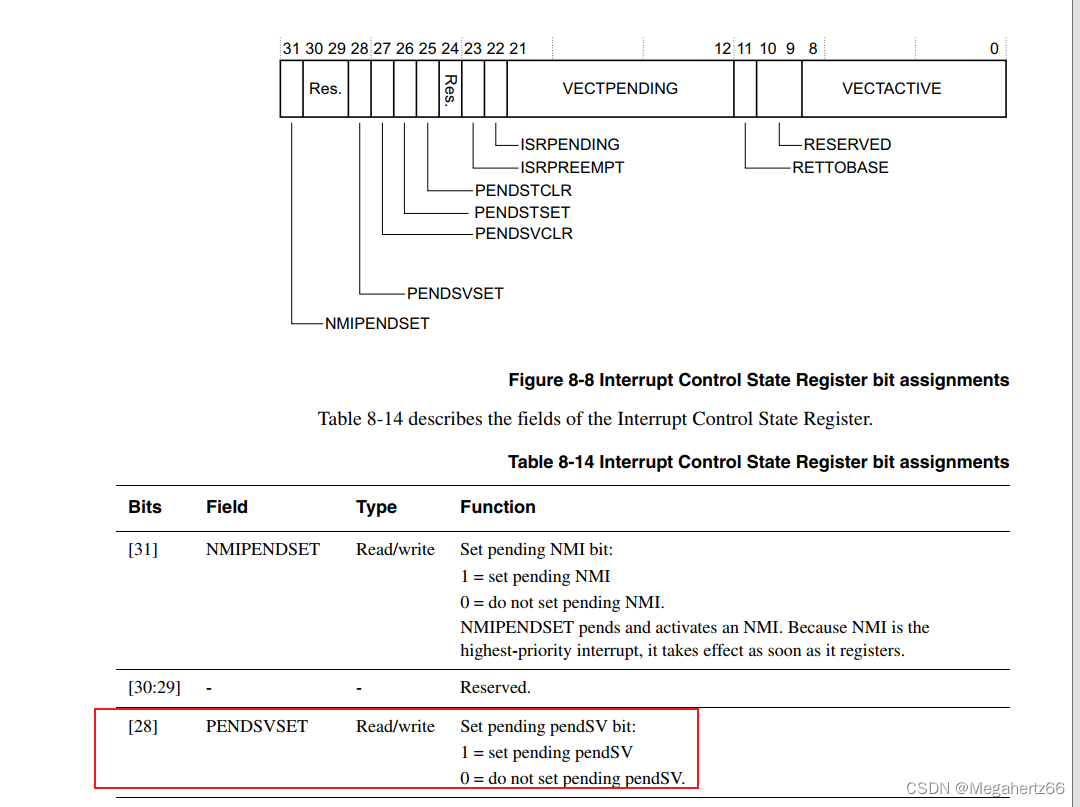
#define portNVIC_PENDSVSET_BIT ( 1UL << 28UL )
void xPortSysTickHandler( void )
{
portDISABLE_INTERRUPTS();
{
/* Increment the RTOS tick. */
if( xTaskIncrementTick() != pdFALSE )
{
/* A context switch is required. Context switching is performed in
* the PendSV interrupt. Pend the PendSV interrupt. */
portNVIC_INT_CTRL_REG = portNVIC_PENDSVSET_BIT;
}
}
portENABLE_INTERRUPTS();
}
就这个文档的图片一贴~ 直接就明白了。 那我们先忽略 xTaskIncrementTick 函数,直扑关键逻辑,直接看 xPortPendSVHandler 函数。 这个函数是触发 pendSV 后执行的中断函数。
任务切换的执行
void xPortPendSVHandler( void )
{
    /* This is a naked function. */

    __asm volatile
    (
        "	mrs r0, psp							\n"
        "	isb									\n"
        "										\n"
        "	ldr	r3, pxCurrentTCBConst			\n"/* Get the location of the current TCB. */
        "	ldr	r2, [r3]						\n"
        "										\n"
        "	stmdb r0!, {r4-r11}					\n"/* Save the remaining registers. */
        "	str r0, [r2]						\n"/* Save the new top of stack into the first member of the TCB. */
        "										\n"
        "	stmdb sp!, {r3, r14}				\n"
        "	mov r0, %0							\n"
        "	msr basepri, r0						\n"
        "	bl vTaskSwitchContext				\n"
        "	mov r0, #0							\n"
        "	msr basepri, r0						\n"
        "	ldmia sp!, {r3, r14}				\n"
        "										\n"/* Restore the context, including the critical nesting count. */
        "	ldr r1, [r3]						\n"
        "	ldr r0, [r1]						\n"/* The first item in pxCurrentTCB is the task top of stack. */
        "	ldmia r0!, {r4-r11}					\n"/* Pop the registers. */
        "	msr psp, r0							\n"
        "	isb									\n"
        "	bx r14								\n"
        "										\n"
        "	.align 4							\n"
        "pxCurrentTCBConst: .word pxCurrentTCB	\n"
        ::"i" ( configMAX_SYSCALL_INTERRUPT_PRIORITY )
    );
}
ok~ 现在开始回忆上一篇博文的内容,Cortex-m3 在进入中断前会自动将 8 个寄存器压栈。并在创建任务的博文中提到,在创建任务堆栈的时候也将 r4-r11 寄存器在堆栈上的位置做了预留。
这段代码的大致翻译过来的意思就是:
- 将切换前的任务堆栈上压入 r4-r11 寄存器,并将新的栈顶位置也压入任务堆栈中;
- 因为要在 handler 模式中进行对接下来要切换的任务进行挑选,需要借助
vTaskSwitchContext函数,所以对可能被破坏的 r3、r14 两个寄存器进行压栈,这里的压栈中的 SP 由于在 handler 模式下为 MSP。 - 在 ·vTaskSwitchContext· 函数后,实际上 r3 已经被替换成最合适切换的新任务了。然后恢复r3、r14 。 再将新的任务的 r4-r11 进行出栈, 设置好新的任务的 PSP ,Cortex-m3 在推出中断后会自动将 8 个寄存器弹栈。如果忘记了,赶紧回去看看上一篇博文回忆一下吧。
- 已经切换完毕啦,在新的任务上运行中~
切换任务的选择
选择任务就是依靠上面汇编代码中的 vTaskSwitchContext 函数。这个函数在 FreeRTOS 中有两种实现方式。一种是通用的就是用 C 函数写的,另一种是对目标单片机架构进行优化过的也就是用汇编代码写的。
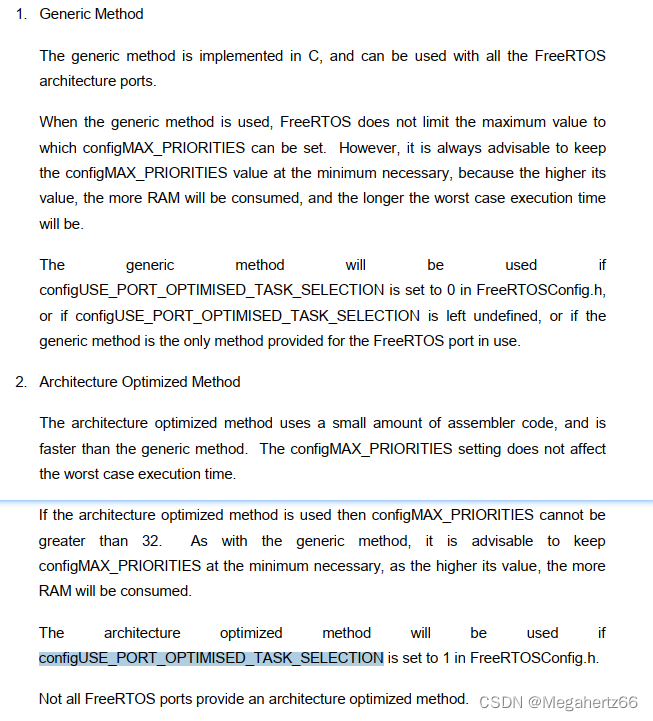
但是这两中代码的目的是一致的,在上面的代码中不是将 pxCurrentTCBConst 存入 r3 寄存器了么。 vTaskSwitchContext 函数就会将最高优先级的任务的堆栈找到,并且把找到任务替换到当前的任务中。也就是用新的任务将 r3 替换掉。这样就完成了任务的切换。
使用 C 语言写的一般方法:
#define taskSELECT_HIGHEST_PRIORITY_TASK()								\
	{																	\
		while( listLIST_IS_EMPTY( &( pxReadyTasksLists[ uxTopReadyPriority ] ) ) )		\
		{																\
			configASSERT( uxTopReadyPriority );								\
			--uxTopReadyPriority;											\
		}																\
		listGET_OWNER_OF_NEXT_ENTRY(pxCurrentTCB, &( pxReadyTasksLists[ uxTopReadyPriority ] ) );   \
	}
对 Cortex-m3 架构进行优化使用汇编写的函数:
#define portGET_HIGHEST_PRIORITY( uxTopPriority, uxReadyPriorities )    uxTopPriority = ( 31 - __clz( ( uxReadyPriorities ) ) )

#define taskSELECT_HIGHEST_PRIORITY_TASK()								\
{																	\
	UBaseType_t uxTopPriority;												\
																	\
	portGET_HIGHEST_PRIORITY( uxTopPriority, uxTopReadyPriority );			\
	listGET_OWNER_OF_NEXT_ENTRY(pxCurrentTCB, &( pxReadyTasksLists[ uxTopPriority ] ) ); \
}
这里的 __clz() 会被替换为 汇编指令 CLZ,这个指令用来计算一个变量从最高位开始的连续零的个数,在用 31 这么一减。 1 的位置也就被得出了。 也就是说 uxTopPriority 的值就是最低位置到达最高位是 1 的位数。
那么 pxReadyTasksLists[ uxTopPriority ] 也就是 pxReadyTasksLists 中最高优先级的任务了。
下面的一个宏 listGET_OWNER_OF_NEXT_ENTRY 字面意思已经很清晰了,直接返回 pxReadyTasksLists[ uxTopPriority ] 到 pxCurrentTCB。至此替换 r3 的内容已经完成了。 后面无论是自动弹栈的 8 个寄存器,还是利用汇编 ldmia r0!, {r4-r11} 弹出 r4~r11 全部是来自于新的任务堆栈!
这个函数我留下了全部的注释,大家觉得好奇可以研究一下。
/*
 * Access function to obtain the owner of the next entry in a list.
 *
 * The list member pxIndex is used to walk through a list.  Calling
 * listGET_OWNER_OF_NEXT_ENTRY increments pxIndex to the next item in the list
 * and returns that entry's pxOwner parameter.  Using multiple calls to this
 * function it is therefore possible to move through every item contained in
 * a list.
 *
 * The pxOwner parameter of a list item is a pointer to the object that owns
 * the list item.  In the scheduler this is normally a task control block.
 * The pxOwner parameter effectively creates a two way link between the list
 * item and its owner.
 *
 * @param pxTCB pxTCB is set to the address of the owner of the next list item.
 * @param pxList The list from which the next item owner is to be returned.
 *
 * \page listGET_OWNER_OF_NEXT_ENTRY listGET_OWNER_OF_NEXT_ENTRY
 * \ingroup LinkedList
 */
#define listGET_OWNER_OF_NEXT_ENTRY( pxTCB, pxList )                                           \
    {                                                                                          \
        List_t * const pxConstList = ( pxList );                                               \
        /* Increment the index to the next item and return the item, ensuring */               \
        /* we don't return the marker used at the end of the list.  */                         \
        ( pxConstList )->pxIndex = ( pxConstList )->pxIndex->pxNext;                           \
        if( ( void * ) ( pxConstList )->pxIndex == ( void * ) &( ( pxConstList )->xListEnd ) ) \
        {                                                                                      \
            ( pxConstList )->pxIndex = ( pxConstList )->pxIndex->pxNext;                       \
        }                                                                                      \
        ( pxTCB ) = ( pxConstList )->pxIndex->pvOwner;                                         \
    }
至此~ 再回头看一下对于 FreeRTOS 的三个问题,前两个是不是已经搞懂了呢~
1. FreeRTOS 是如何建立任务的呢?
2. FreeRTOS 是调度和切换任务的呢?
3. FreeRTOS 是如何保证实时性呢?
下一步让咱们来探索第三个问题。FreeRTOS 究竟有多 RTOS? 切换任务究竟有没有开销?开销是多大?


 924
924


 被折叠的 条评论
为什么被折叠?
被折叠的 条评论
为什么被折叠?
 到【灌水乐园】发言


