


文章目录
一、彩色图像文件转为灰度文件
1. 使用opencv
代码:
import cv2 as cv
img = cv.imread('./pic/lena.png',1)
img_1 = cv.cvtColor(img,cv.COLOR_BGR2GRAY)
cv.imshow('gray',img_1)
cv.imshow('colour',img)
cv.waitKey(0)
效果:

2. 不使用opencv
代码:
from PIL import Image
I = Image.open('./pic/lena.png')
L = I.convert('L')
L.show()
效果:

二、将彩色图像转为HSV、HSI格式
1. 转HSV
HSV 格式: H 代表色彩,S 代表颜色的深浅,V 代表着颜色的明暗程度。
HSV 颜色空间可以很好地把颜色信息和亮度信息分开,将它们放在不同的通道中,减小了光线对于特定颜色识别的影响。
在阴影检测算法中经常需要将RGB格式的图像转化为HSV格式,对于阴影区域而言,它的色度和饱和度相对于原图像而言变化不大,主要是亮度信息变化较大,,将RGB格式转化为HSV格式,就可以得到H、S、V分量,从而得到色度、饱和度、亮度得值;
代码:
import cv2 as cv

img = cv.imread('./pic/lena.png', 1)
cv.imshow('original image', img)
hsv = cv.cvtColor(img, cv.COLOR_BGR2HSV)
cv.imshow('HSV format image', hsv)
cv.waitKey(0)
效果:

2. 转HSI
HSL (色相hue, 饱和度saturation, 亮度lightness/luminance),
也称HLS 或 HSI (I指intensity)
与 HSV非常相似,仅用亮度(lightness)替代了明度(brightness)。
人的视觉对亮度的敏感程度远强于对颜色浓淡的敏感程度,为了便于颜色处理和识别,人的市局系统经常采用HSI彩色空间,它比RGB空间更符合人的视觉特性。此外,由于HSI空间中亮度和色度具有可分离性,使得图像处理和机器视觉中大量灰度处理算法都可在HSI空间方便进行
HSI颜色空间:

代码:
import cv2
import numpy as np

def rgbtohsi(rgb_lwpImg):
  rows = int(rgb_lwpImg.shape[0])
  cols = int(rgb_lwpImg.shape[1])
  b, g, r = cv2.split(rgb_lwpImg)
  # 归一化到[0,1]
  b = b / 255.0
  g = g / 255.0
  r = r / 255.0
  hsi_lwpImg = rgb_lwpImg.copy()
  H, S, I = cv2.split(hsi_lwpImg)
  for i in range(rows):
    for j in range(cols):
      num = 0.5 * ((r[i, j]-g[i, j])+(r[i, j]-b[i, j]))
      den = np.sqrt((r[i, j]-g[i, j])**2+(r[i, j]-b[i, j])*(g[i, j]-b[i, j]))
      theta = float(np.arccos(num/den))

      if den == 0:
          H = 0
      elif b[i, j] <= g[i, j]:
        H = theta
      else:
        H = 2*3.14169265 - theta

      min_RGB = min(min(b[i, j], g[i, j]), r[i, j])
      sum = b[i, j]+g[i, j]+r[i, j]
      if sum == 0:
        S = 0
      else:
        S = 1 - 3*min_RGB/sum

      H = H/(2*3.14159265)
      I = sum/3.0
      # 输出HSI图像,扩充到255以方便显示,一般H分量在[0,2pi]之间,S和I在[0,1]之间
      hsi_lwpImg[i, j, 0] = H*255
      hsi_lwpImg[i, j, 1] = S*255
      hsi_lwpImg[i, j, 2] = I*255
  return hsi_lwpImg
if __name__ == '__main__':
  rgb_lwpImg = cv2.imread("./pic/lena.png")
  hsi_lwpImg = rgbtohsi(rgb_lwpImg)
  cv2.imshow('lena.jpg', rgb_lwpImg)
  cv2.imshow('hsi_lwpImg', hsi_lwpImg)
  key = cv2.waitKey(0) & 0xFF
  if key == ord('q'):
    cv2.destroyAllWindows()
效果:

三、车牌数字分割为单个的字符图片
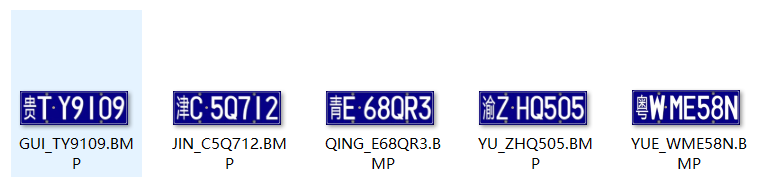
1.图片准备
2. 代码实现
1. 读取图片
file_path = "./pic/License/"
licenses = os.listdir(file_path)
for license in licenses:
    path = file_path+license
    output_path = "./pic/"+license # 图片输出路径
    # 如果该路径存在则删除
    if os.path.isdir(output_path):
        shutil.rmtree(output_path)
    # 创建文件夹
    os.mkdir(output_path)

    # 1.读取图片
    src = cv2.imread(path)
    img = src.copy()
2. 图片预处理
- 去除车牌螺丝点
 # 去除车牌上螺丝,将其替换为车牌底色
    cv2.circle(img, (145, 20), 10, (255, 0, 0), thickness=-1)
    cv2.circle(img, (430, 20), 10, (255, 0, 0), thickness=-1)
    cv2.circle(img, (145, 170), 10, (255, 0, 0), thickness=-1)
    cv2.circle(img, (430, 170), 10, (255, 0, 0), thickness=-1)
    cv2.circle(img, (180, 90), 10, (255, 0, 0), thickness=-1)
- 图片灰度处理
# 3.灰度
    gray = cv2.cvtColor(img,cv2.COLOR_BGR2GRAY)
- 高斯滤波
# 4.高斯滤波
    GSblurred = cv2.GaussianBlur(gray, (5, 5), 12) # 参数自行调节
- 二值化
# 5.将灰度图二值化设定阈值
    ret, thresh = cv2.threshold(GSblurred , 127, 255, cv2.THRESH_BINARY_INV + cv2.THRESH_OTSU)
    print("ret",ret)
- 闭运算
# 6. 闭运算
    kernel = np.ones((3, 3), int)
    closed = cv2.morphologyEx(thresh, cv2.MORPH_CLOSE, kernel,iterations=2)
- 分割字符
# 7.分割字符
    white = [] # 记录每一列的白色像素总和
    black = [] # ..........黑色.......
    height = thresh.shape[0]
    width = thresh.shape[1]
    white_max = 0
    black_max = 0
    # 计算每一列的黑白色像素总和
    for i in range(width):
      s = 0 # 这一列白色总数
      t = 0 # 这一列黑色总数
      for j in range(height):
        if thresh[j][i] == 255:
          s += 1
        if thresh[j][i] == 0:
          t += 1
      white_max = max(white_max, s)
      black_max = max(black_max, t)
      white.append(s)
      black.append(t)
- 分割图像
arg = False  # False表示白底黑字;True表示黑底白字
    if black_max > white_max:
        arg = True


    # 分割图像
    def find_end(start_):
        end_ = start_ + 1
        for m in range(start_ + 1, width - 1):
            if (black[m] if arg else white[m]) > (0.95 * black_max if arg else 0.95 * white_max):  # 0.95这个参数请多调整,对应下面的0.05
                end_ = m
                break
        return end_


    n = 1
    start = 1
    end = 2
    i=0;
    cj=[]

    while n < width - 2:
        n += 1
        if (white[n] if arg else black[n]) > (0.05 * white_max if arg else 0.05 * black_max):
            # 上面这些判断用来辨别是白底黑字还是黑底白字
            # 0.05这个参数请多调整,对应上面的0.95
            start = n
            end = find_end(start)
            n = end
            if end - start > 5:
                cj.append(thresh[1:height, start:end])
                cv2.imwrite(output_path + '/' + str(i) + '.jpg', cj[i])
                i = i + 1;
3. 输出结果
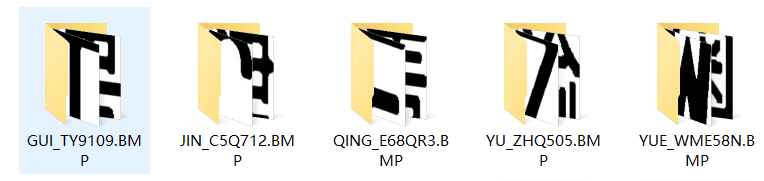
部分展示

4. 源码
#!/usr/bin/env python3
# -*- coding: utf-8 -*-
"""
    项目主题:车牌检测将车牌数字分割为单个的字符图片
"""
import os
import shutil

import cv2
import numpy as np


file_path = "./pic/License/"
licenses = os.listdir(file_path)
for license in licenses:
    path = file_path+license
    output_path = "./pic/"+license
    # 如果该路径存在则删除
    if os.path.isdir(output_path):
        shutil.rmtree(output_path)
    # 创建文件夹
    os.mkdir(output_path)

    # 1.读取图片
    src = cv2.imread(path)
    img = src.copy()
    # 2.去除车牌上螺丝,将其替换为车牌底色
    cv2.circle(img, (145, 20), 10, (255, 0, 0), thickness=-1)
    cv2.circle(img, (430, 20), 10, (255, 0, 0), thickness=-1)
    cv2.circle(img, (145, 170), 10, (255, 0, 0), thickness=-1)
    cv2.circle(img, (430, 170), 10, (255, 0, 0), thickness=-1)
    cv2.circle(img, (180, 90), 10, (255, 0, 0), thickness=-1)

    # 3.灰度
    gray = cv2.cvtColor(img,cv2.COLOR_BGR2GRAY)

    # 4.高斯滤波
    GSblurred = cv2.GaussianBlur(gray, (5, 5), 12)

    # 5.将灰度图二值化设定阈值
    ret, thresh = cv2.threshold(GSblurred , 127, 255, cv2.THRESH_BINARY_INV + cv2.THRESH_OTSU)
    print("ret",ret)

    # 6. 闭运算
    kernel = np.ones((3, 3), int)
    closed = cv2.morphologyEx(thresh, cv2.MORPH_CLOSE, kernel,iterations=2)
    二值化
    ret, thresh = cv2.threshold(closed, 127, 255, cv2.THRESH_BINARY+ cv2.THRESH_OTSU)
    # 7.分割字符
    white = [] # 记录每一列的白色像素总和
    black = [] # ..........黑色.......
    height = thresh.shape[0]
    width = thresh.shape[1]
    white_max = 0
    black_max = 0
    # 计算每一列的黑白色像素总和
    for i in range(width):
      s = 0 # 这一列白色总数
      t = 0 # 这一列黑色总数
      for j in range(height):
        if thresh[j][i] == 255:
          s += 1
        if thresh[j][i] == 0:
          t += 1
      white_max = max(white_max, s)
      black_max = max(black_max, t)
      white.append(s)
      black.append(t)
      # print(s)
      # print(t)

    arg = False  # False表示白底黑字;True表示黑底白字
    if black_max > white_max:
        arg = True


    # 分割图像
    def find_end(start_):
        end_ = start_ + 1
        for m in range(start_ + 1, width - 1):
            if (black[m] if arg else white[m]) > (0.95 * black_max if arg else 0.95 * white_max):  # 0.95这个参数请多调整,对应下面的0.05
                end_ = m
                break
        return end_


    n = 1
    start = 1
    end = 2
    i=0;
    cj=[]

    while n < width - 2:
        n += 1
        if (white[n] if arg else black[n]) > (0.05 * white_max if arg else 0.05 * black_max):
            # 上面这些判断用来辨别是白底黑字还是黑底白字
            # 0.05这个参数请多调整,对应上面的0.95
            start = n
            end = find_end(start)
            n = end
            if end - start > 5:
                cj.append(thresh[1:height, start:end])
                cv2.imwrite(output_path + '/' + str(i) + '.jpg', cj[i])
                i += 1;
四、参考
https://www.cnblogs.com/datou-swag/articles/10672207.html
https://blog.csdn.net/qq_47281915/article/details/121705585


 1253
1253


 被折叠的 条评论
为什么被折叠?
被折叠的 条评论
为什么被折叠?
 到【灌水乐园】发言


