


目录
前言
上一篇博文中,我们扩充了线条对象(fabric.Line)的属性列表,使用户可以修改画布中选中的线条的宽度和样式(实线、虚线、点线等)。
这篇博文是《前端canvas项目实战——简历制作网站》付费专栏系列博文的第四篇——右侧属性栏(线条端点样式),主要的内容有:
- 针对线条对象: 扩充属性列表,使用户可以为画布中选中的线条增加或修改端点样式。
如有需要,你可以:
一、效果展示
-
动手体验
CodeSandbox会自动对代码进行编译,并提供地址以供体验代码效果
由于CSDN的链接跳转有问题,会导致页面无法工作,请复制以下链接在浏览器打开:
https://qgt4m4.csb.app/ -
动态效果演示
- 本节之后,我们的简历能做成什么样子
本节所做的改动是线条的扩展能力,对我们目标中的简历没有影响。
二、实现步骤
为线条添加端点并不是fabric.Line自带的基础能力,要实现这样的功能,我们需要用到fabric.Group。即通过let pointedLine = new fabric.Group([线条, 左端点, 右端点])这样的形式让多个对象构成一个组。这样用户所做的拖拽、缩放、旋转等操作就可以直接施加在整个组上,对其中的所有对象同时生效。
1. 实现线条和端点的组装模块
基于上述目的,我们新建一个代码模块complex-line.js。这里的代码会在用户为线条添加第一个端点时创建一个Group,在为线条去除最后一个端点时将Group恢复为Line。
import { fabric } from "fabric";

const pointPathsMap = {
    arrow1: "M 0 0 L 10 5 L 0 10 z",
    ...
};

const pointPathsList = [
    { name: "无", fill: null },
    { name: "arrow1", fill: "black" },
    { name: "arrow1", fill: "transparent" },
    ...
];

const newPoint = (line, pointType, isStartPoint) => {
    let lineACoords = line.calcACoords();

    let angle = line.angle,
        left = (lineACoords.tr.x + lineACoords.br.x) / 2,
        top = (lineACoords.tr.y + lineACoords.br.y) / 2;

    if (isStartPoint) {
        angle = (angle + 180) % 360;
        left = (lineACoords.tl.x + lineACoords.bl.x) / 2;
        top = (lineACoords.tl.y + lineACoords.bl.y) / 2;
    }

    let scale = (line.strokeWidth + 7) * 0.125;
    let pointParams = pointPathsList[pointType];
    let point = new fabric.Path(pointPathsMap[pointParams.name], {
        left,
        top,
        originX: "center",
        originY: "center",
        angle,
        fill: pointParams.fill === "transparent" ? "transparent" : line.stroke,
        stroke: line.stroke,
        strokeWidth: line.strokeWidth,
        scaleX: scale,
        scaleY: scale,
    });

    // 调整端点位置,避免线条总长被改变
    let factor = isStartPoint ? -1 : 1;
    let offsetLeft = point.width / 2;

    point.set({
        left: left + offsetLeft * factor,
        top,
    });
    return point;
};

const operateLineWithAngle = (fn) => {
    return function (...args) {
        let line = args[0];
        let angle = line.angle;
        line.set({ angle: 0 });
        line = fn(args) || line;
        line.set({ angle });
        return line;
    };
};

const handleScalingGroup = operateLineWithAngle((args) => {
    let [group, startPointType, endPointType] = args;
    let groupObjects = group.getObjects();
    for (let i = 1; i < groupObjects.length; i++) {
        group.remove(groupObjects[i]);
    }
    if (startPointType && 0 !== startPointType) {
        group.add(newPoint(groupObjects[0], startPointType, true));
    }
    if (endPointType && 0 !== endPointType) {
        group.add(newPoint(groupObjects[0], endPointType, false));
    }
    group.addWithUpdate();
    group.setCoords();
});

const refreshLine = operateLineWithAngle((args) => {
    let [line, startPointType, endPointType] = args;
    let groupArray;
    if (line.type === "line") {
        groupArray = [line];
    } else {
        line.getObjects()[0].clone((newLine) => {
            groupArray = [newLine];
        });
    }

    if (startPointType && 0 !== startPointType) {
        groupArray.push(newPoint(groupArray[0], startPointType, true));
    }

    if (endPointType && 0 !== endPointType) {
        groupArray.push(newPoint(groupArray[0], endPointType, false));
    }

    if (groupArray.length > 1) {
        line = new fabric.Group(groupArray, { startPointType, endPointType });

        line.on("scaling", (event) => {
            let { original, target, corner } = event.transform;
            let { left, top } = original;
            let aCoordsBefore = target.calcACoords();

            // 让两个端点保持不被拉伸和压缩
            handleScalingGroup(target, startPointType, endPointType);

            if (corner === "ml") {
                let aCoordsAfter = target.calcACoords();
                let offsetX = aCoordsAfter.tr.x - aCoordsBefore.tr.x;
                let offsetY = aCoordsAfter.tr.y - aCoordsBefore.tr.y;
                left = target.left - offsetX;
                top = target.top - offsetY;
            }
            target.set({ left, top });
        });
    } else {
        line = groupArray[0];
    }
    return line;
});

const assembleLine = (line, startPointType, endPointType) => {
    let oldCenterPoint = line.getCenterPoint();
    line = refreshLine(line, startPointType, endPointType);
    let newCenterPoint = line.getCenterPoint();

    // 计算 left 和 top 的位移
    const deltaX = newCenterPoint.x - oldCenterPoint.x;
    const deltaY = newCenterPoint.y - oldCenterPoint.y;

    // 以中心点作为变换前后的基准
    line.set({
        top: line.top - deltaY,
        left: line.left - deltaX,
    });
    return line;
};

export { assembleLine, pointPathsMap, pointPathsList };
可见,这个模块的功能比较复杂。我们将其拆分为6个部分进行讲解:
pointPathsMap和pointPathsList: 由于我们通过svg来绘制线条的端点,因此前者以字典的形式存储各种图形的path信息;后者以列表的形式存储各种端点类型的属性信息。newPoint方法: 该方法用于为传入的线条生成指定的端点。通过fabric.Path来绘制自定义的图形,即为线条的端点。operateLineWithAngle方法: 一个增强方法,参数是另一个方法。其流程为:- 执行传入的方法
fn之前记录线条当前的角度angle,并把angle设为0。 - 执行方法
fn。 - 在执行方法
fn之后再把angle设置回之前记录的值。 - 这样做的好处是: 避免了各种情况下计算/更新线条和端点相对位置时,需要时刻考虑
angle不为0带来的偏移量,即对各种sin/cos三角函数的计算。
- 执行传入的方法
handleScalingGroup方法: 经过了上述增强的方法。用于用户缩放Group时,重新绘制端点,避免端点跟随着一起被缩放。refreshLine方法: 经过了上述增强的方法。用于在用户想要对线条增删端点时刷新线条的样式。区分Group和Line两种状态。如果当前要为Line增加端点,就会返回一个Group;如果当前要为Group去掉最后一个端点,就会返回一个Line。assembleLine方法: 主方法。用于为线条增删端点,同时消除坐标上的偏移。暴露出去供属性编辑模块调用。
2. 修复一个fabric自身的bug
请先设想,有两条长度相同、位置相同的线条上下重叠。上面的线条为绿色,下面的线条为黑色。当我们把上面的那条线的宽度strokeWidth提高到5,预期它可以在水平和竖直两个方向上都保持居中。但实际表现如下图所示:
 --->
--->
可以看到,线条加粗后会在右和下两个方向上有误差偏移。 因此,在wrap-line.js中添加一下代码进行修正:
fabric.Line.prototype._adjustPosition = function (originalCenter) {
  // 获取变化后的中心点坐标
  const newCenter = this.getCenterPoint();

  // 计算 left 和 top 的位移
  const deltaX = newCenter.x - originalCenter.x;
  const deltaY = newCenter.y - originalCenter.y;

  // 更新 left 和 top 值
  this.set({
    left: this.left - deltaX,
    top: this.top - deltaY,
  });
};

fabric.Line.prototype.set = (function (fn) {
  return function (key, value) {
    // 获取变化前的中心点坐标
    const originalCenter = this.getCenterPoint();

    // 调用父类的 set 方法
    const result = fn.call(this, key, value);

    // 如果 key 是一个对象,检查 strokeWidth 是否在其中
    if (typeof key === "object" && "strokeWidth" in key) {
      this._adjustPosition(originalCenter);
    }

    // 如果 key 是字符串,检查是否等于 'strokeWidth'
    if (typeof key === "string" && key === "strokeWidth") {
      this._adjustPosition(originalCenter);
    }

    return result;
  };
})(fabric.Line.prototype.set);
共分为两个部分:
- 为
fabric.Line的原型添加一个_adjustPosition方法,用于调整线条的位置 - 重新封装
fabric.Line原型的set方法,当调用set方法编辑线条的宽度strokeWidth后,调用_adjustPosition方法修正位置
经过调整后,再次加粗线条,位置就正确了:
--->
3. 实现属性栏中的编辑模块
我们继续在object-props.js中添加以下代码:
  const LinePointWrapperTemplate = (props) => {
    const { title, optionViews, handleChange, pointType } = props;
    return (
      <div className="property-row">
        <span className="property-title">{title}</span>
        <div className="property-container">
          <Select value={pointType} bordered={false} style={{width:"100%"}} onChange={handleChange}>
            {optionViews}
          </Select>
        </div>
      </div>
    );
  };

  const LineStartPointWrapper = (props) => {
    const newProps = {
      title: "始端样式",
      handleChange: (newValue) => {
        handleChange("pointsType", [newValue, endPointType]);
      },
      optionViews: pointPathsList.map((pointParams, index) => {
        let menuItem;
        if (0 === index) {
          menuItem = <span>无</span>;
        } else {
          menuItem = (
            <svg width="26" height="11" viewBox="-1 -0.5 25 11">
              <path d={pointPathsMap[pointParams.name]} fill={pointParams.fill}
                stroke="black" strokeWidth="1" transform="rotate(180 5 5)" />
              <line x1="11" y1="5" x2="25" y2="5" stroke="black" strokeWidth="1" />
            </svg>
          );
        }

        return (
          <Option className="property-stroke-width" value={index} title={pointParams.name}
            key={`line-point-${pointParams.name}-${pointParams.fill}`}>
            <div className="property-line-point">{menuItem}</div>
          </Option>
        );
      }),
      pointType: startPointType,
    };

    return <LinePointWrapperTemplate {...newProps} key={props.key} />;
  };

  const LineEndPointWrapper = (props) => {
    ···
  };
显而易见,代码分为3个部分:
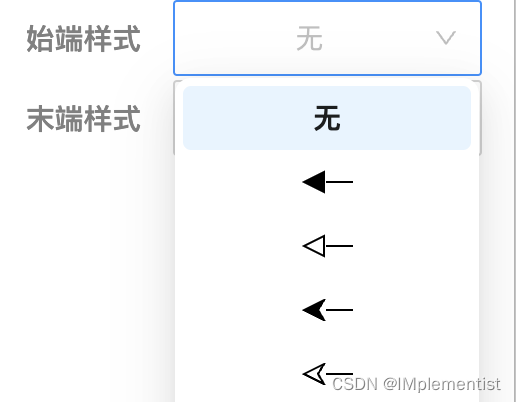
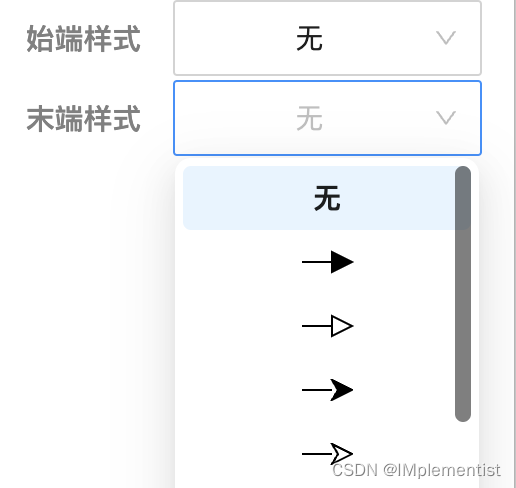
LinePointWrapperTemplate: 端点属性模块的模板。由于线条两端可以添加不同的端点,所以需要两个编辑模块。而这两个编辑模块大部分的内容都是相同的,因此提取出一个模板模块,复用代码。LineStartPointWrapper: 线条始端的编辑模块,调用了上述模板。LineEndPointWrapper: 线条末端的编辑模块,调用了上述模板,与LineStartPointWrapper类似,此处省略代码。
两个属性编辑模块实现的效果:
4. 把UI操作和画布更新连接起来
在前面的博文中,我没有可以提及这个部分,现在有必要讲一讲了,真正去更新画布中对象属性的是下面这个方法:
const updateProperty = (object, key, newValue) => {
    let objectList;
    if (object.type === "group") {
      objectList = [object.getObjects()[0]];
    } else {
      objectList = [object];
    }

    let { canvas } = store.getState();
    for (let i = 0; i < objectList.length; i++) {
      let _object = objectList[i];
      if (typeof newValue !== "object" || key === "strokeDashArray") {
        _object.set(key, newValue);
      } else if (key === "pointsType") {
        let newLine = assembleLine(object, newValue[0], newValue[1]);
        canvas.remove(object);
        canvas.add(newLine);
        canvas.setActiveObject(newLine);
      } else {
        _object.set(key, newValue[_object.id][key]);
      }
    }

    canvas.renderAll();
  }
代码逻辑很简单:
- 遇到普通属性,就直接使用
set方法对对象进行更新 - 遇到
pointsType线条端点类型:- 调用前文中提到的
assembleLine方法重新创建一个新的线条对象 - 从画布中移除旧的线条对象
- 将新的线条对象添加到画布中
- 调用画布的
renderAll方法重新渲染画布
- 调用前文中提到的
三、Show u the code
按照惯例,本节的完整代码我也托管在了CodeSandbox中,点击前往,查看完整代码
后记
本节看似不复杂的功能,却实实在在耗费了我近一个月的空闲时间。基础的实现并不难,难在解决各种各样的bug,包括自己写的,还有fabric框架自身的。
我写代码注重细节,而这个功能又是要全面考虑缩放、旋转等情况下Group中的几个子对象相对位置是否正确。所以用时良久,呕心沥血。
这里在修正各种位移偏差时得到一个经验: 如果一个operation()方法会使操作的对象产生不必要的位移,可以先选定一个调用A()前后坐标都不应该变化的点P
  let oldP = line.getP();
  operation(line);
  let newP = line.getP();

  // 计算位移偏差
  let offsetX = newP.x - oldP.x;
  let offsetY = newP.y - oldP.y;

  // 消除位移偏差
  line.set({
    left: line.left - offsetX,
    top: line.top - offsetY
  })
这种方法在我的实现中多次用到,有兴趣的小伙伴可以翻翻前文中列出的代码。这样做可以消除原本需要考虑的sin/cos等三角函数计算,屡试不爽!
如有需要,你可以:


 1022
1022


 被折叠的 条评论
为什么被折叠?
被折叠的 条评论
为什么被折叠?
 到【灌水乐园】发言


