


Mac上使用MPS加速PyTorch代码训练
一、在 APPLE 芯片上训练的优势
在Mac芯片刚刚问世时,Mac 上的 PyTorch 训练仅能利用 CPU,但随着发布的 PyTorch v1.12 版本,开发者和研究人员可以利用 Apple 芯片的GPU 进行显著更快的模型训练。这使得在本地、直接在 Mac 上进行诸如原型设计和微调等机器学习工作流程成为可能。
在Mac电脑的M系列芯片上,可以使用 Apple 的 Metal Performance Shaders (MPS) 作为 PyTorch 的后端,可以实现 GPU 加速训练。MPS类似于NVIDIA显卡的CUDA,可以实现Mac系统上编程的加速运算。MPS 后端扩展了 PyTorch 框架,提供了在 Mac 上设置和运行操作的脚本和功能。MPS 通过针对每个 Metal GPU 系列的独特特性进行微调的内核(kernels)来优化计算性能。新设备将机器学习计算图和原语映射到 MPS Graph 框架以及 MPS 提供的经过调优的内核上。
每台配备 Apple 芯片的 Mac 都采用统一内存架构,使 GPU 能够直接访问全部内存存储。这使得 Mac 成为一个出色的机器学习平台,用户可以在本地训练更大的网络或批处理大小。这降低了与基于云的开发相关的成本或对额外本地 GPU 的需求。统一内存架构还减少了数据检索延迟,提高了端到端性能。
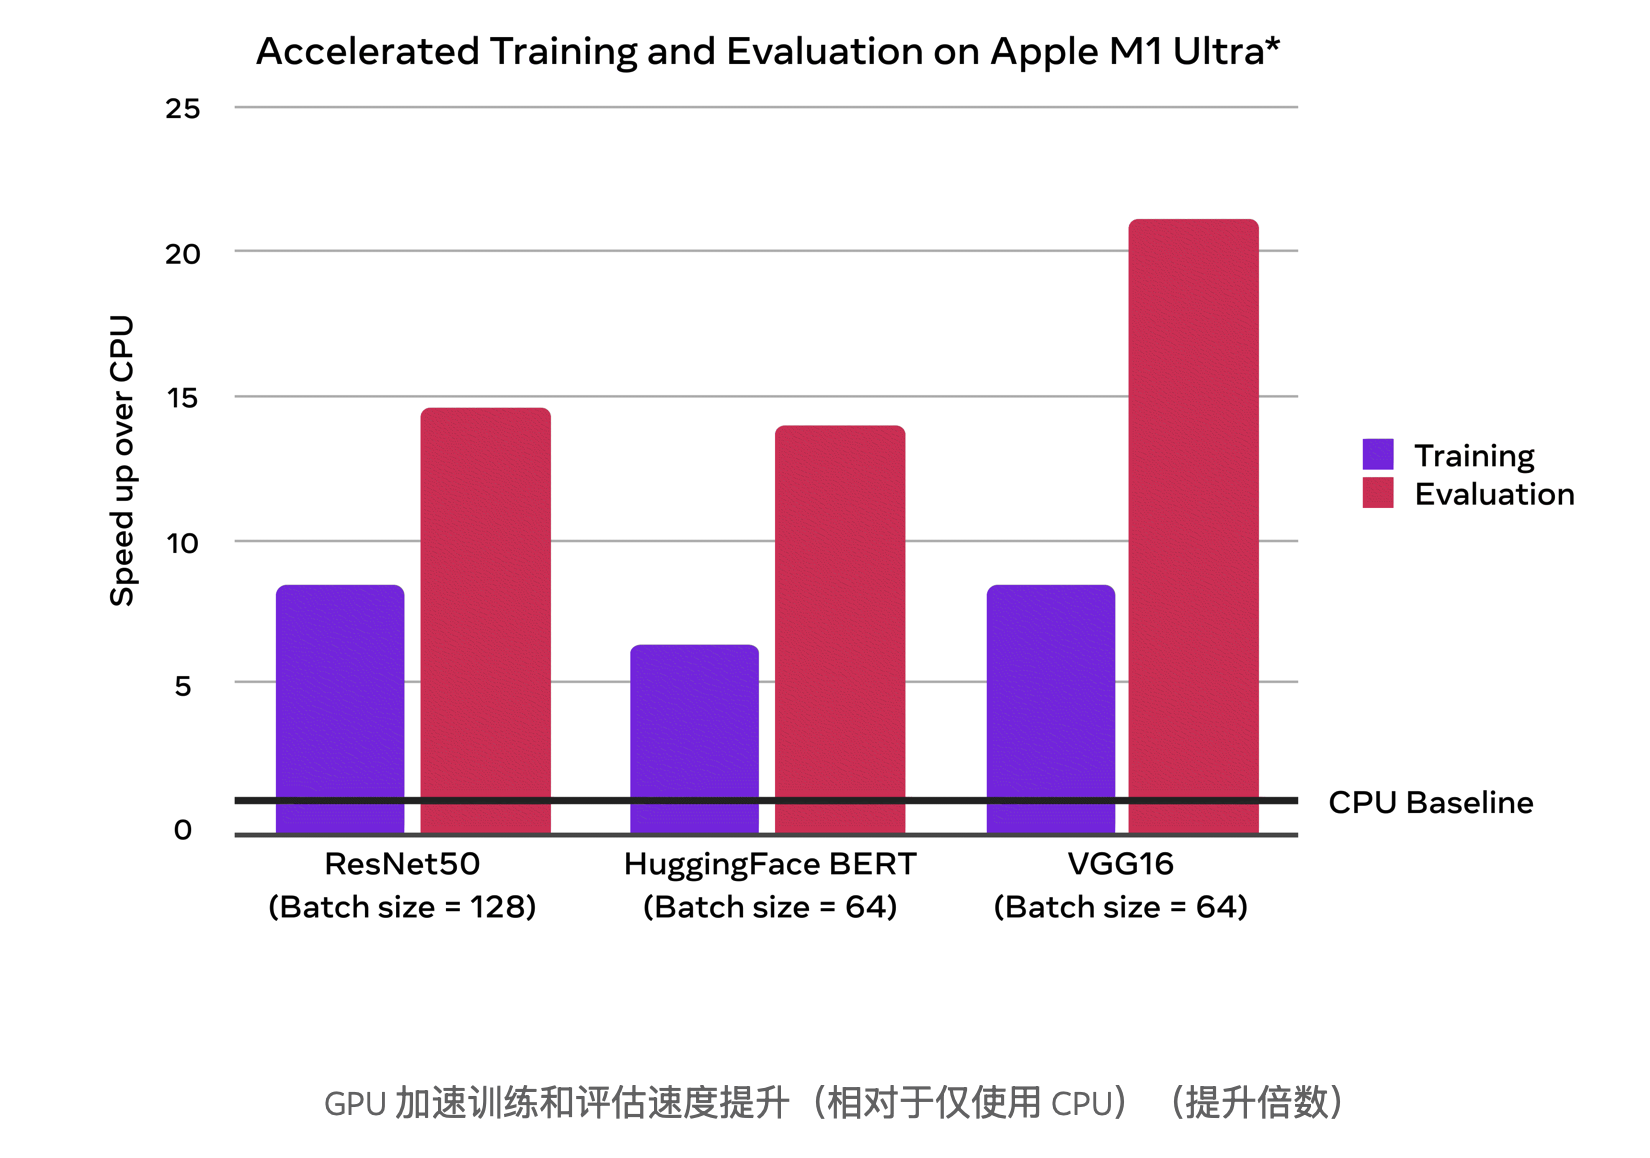
在下方的图表中,可以看到与仅使用 CPU 基准相比,GPU 加速训练和评估带来的性能提升。
二、测试代码
以下是一个使用 PyTorch 在 M4 芯片上测试使用 MPS 加速和不使用 MPS 加速性能差异的代码示例:
import torch
import time

# 定义一个简单的神经网络模型
class SimpleModel(torch.nn.Module):
    def __init__(self):
        super(SimpleModel, self).__init__()
        self.fc1 = torch.nn.Linear(1024, 512)
        self.fc2 = torch.nn.Linear(512, 256)
        self.fc3 = torch.nn.Linear(256, 10)

    def forward(self, x):
        x = torch.relu(self.fc1(x))
        x = torch.relu(self.fc2(x))
        x = self.fc3(x)
        return x

# 创建模型实例
model = SimpleModel()

# 定义输入数据
input_data = torch.randn(1024, 1024)

# 测试 CPU 性能
def test_cpu():
    model_cpu = model.to("cpu")
    input_data_cpu = input_data.to("cpu")
    start_time = time.time()
    for _ in range(100000):
        output = model_cpu(input_data_cpu)
        loss = torch.mean(output)
        loss.backward()
    end_time = time.time()
    print(f"CPU Time: {end_time - start_time:.4f} seconds")

# 测试 MPS 性能
def test_mps():
    if torch.backends.mps.is_available():
        model_mps = model.to("mps")
        input_data_mps = input_data.to("mps")
        start_time = time.time()
        for _ in range(100000):
            output = model_mps(input_data_mps)
            loss = torch.mean(output)
            loss.backward()
        end_time = time.time()
        print(f"MPS Time: {end_time - start_time:.4f} seconds")
    else:
        print("MPS device not found.")

# 执行测试
test_cpu()
test_mps()
最终的运行时间差异如下:
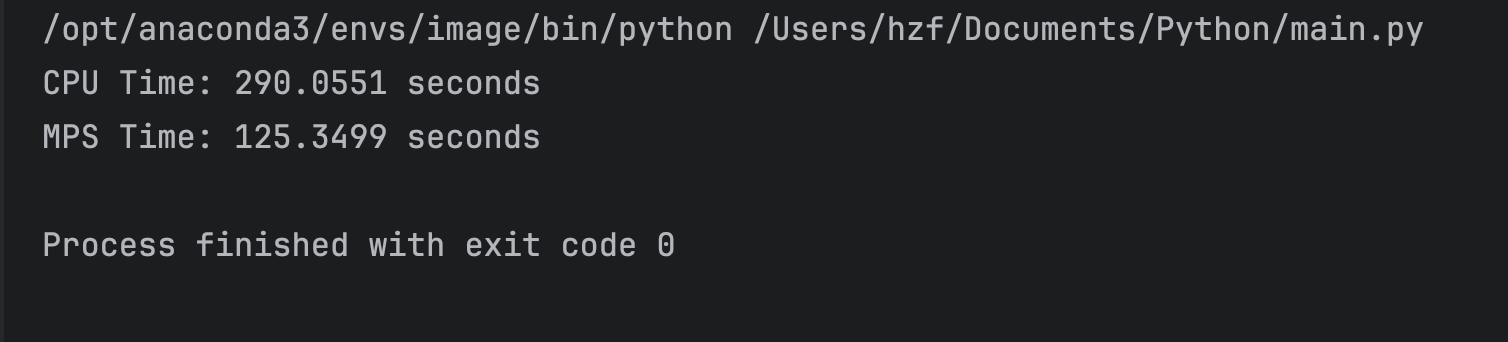
可以看到,通过MPS加速后,可以看到相对比较显著的效果,随着代码和程序的复杂化,这种时间效率上的提升也会更加明显。
三、总结
MPS 能够在 Apple Silicon 上加速 PyTorch 的原因在于其针对 Apple GPU 的优化设计、Apple Silicon 的硬件特性(如集成 GPU 和统一内存架构)以及 PyTorch 对 MPS 后端的良好支持。这些因素共同作用,使得在 M 系列等 Apple 芯片上使用 MPS 加速能够显著提高计算效率,降低训练和推理时间。
下面时一段使用CUDA和MPS加速的比较代码,具体如下:
# 测试 CUDA 性能(如果可用)
if torch.cuda.is_available():
    test_device("cuda")
else:
    print("CUDA device not found.")

# 测试 MPS 性能(如果可用)
if torch.backends.mps.is_available():
    test_device("mps")
else:
    print("MPS device not found.")


 7204
7204

 被折叠的 条评论
为什么被折叠?
被折叠的 条评论
为什么被折叠?
 到【灌水乐园】发言


