


摘要:Yolov8学习笔记,详细内容参考目录。
主要讲解:1、模型结构、模块、计算、原理。2、自定义数据集制作、训练。4、训练。5、推理
github项目地址:YoloV8项目地址
目录:
一、网络结构代码解析
1.1 网络总结构
模型结构yaml文件路径: ./ultralytics/cfg/models/v8/yolov8.yaml
主要是每一层结构及参数,注释了每一层得输入、输出通道数以及尺寸大小
# Ultralytics YOLO 🚀, AGPL-3.0 license
# YOLOv8 object detection model with P3-P5 outputs. For Usage examples see https://docs.ultralytics.com/tasks/detect

# Parameters
nc: 80  # number of classes
scales: # model compound scaling constants, i.e. 'model=yolov8n.yaml' will call yolov8.yaml with scale 'n'
  # [depth, width, max_channels]
  n: [0.33, 0.25, 1024]  # YOLOv8n summary: 225 layers,  3157200 parameters,  3157184 gradients,   8.9 GFLOPs
  s: [0.33, 0.50, 1024]  # YOLOv8s summary: 225 layers, 11166560 parameters, 11166544 gradients,  28.8 GFLOPs
  m: [0.67, 0.75, 768]   # YOLOv8m summary: 295 layers, 25902640 parameters, 25902624 gradients,  79.3 GFLOPs
  l: [1.00, 1.00, 512]   # YOLOv8l summary: 365 layers, 43691520 parameters, 43691504 gradients, 165.7 GFLOPs
  x: [1.00, 1.25, 512]   # YOLOv8x summary: 365 layers, 68229648 parameters, 68229632 gradients, 258.5 GFLOPs

# from(输入位置,-1表示自身所在的特征层的位置.),repeats(叠加层数),module(模块),args([输出通道数,卷积核大小,步距,padding])
# 其中c2f传两个参数,一个是输出通道,一个是shortcut,默认False,决定经过c2f后是否加上输入x
# 为True得时候:x + self.cv2(self.cv1(x)) ; 为False: self.cv2(self.cv1(x))
# YOLOv8.0n backbone  计算size的公式:out_size =( in_size - k +2 * p)/ s + 1
backbone:
  # [from, repeats, module, args]                                         in_channel:3                                 size:640*640
  - [-1, 1, Conv, [64, 3, 2]]  # 0-P1/2                                   in_channel:3      out_channel: 64            size:320*320
  - [-1, 1, Conv, [128, 3, 2]]  # 1-P2/4                                  in_channel:64     out_channel: 128           size:160*160
  - [-1, 3, C2f, [128, True]]   # 2                                 *3    in_channel:128    out_channel: 128           size:160*160
  - [-1, 1, Conv, [256, 3, 2]]  # 3-P3/8                                  in_channel:128    out_channel: 256           size:80*80
  - [-1, 6, C2f, [256, True]]   # 4                                 *6    in_channel:256    out_channel: 256           size:80*80
  - [-1, 1, Conv, [512, 3, 2]]  # 5-P4/16                                 in_channel:256    out_channel: 512           size:40*40
  - [-1, 6, C2f, [512, True]]   # 6                                 *6    in_channel:512    out_channel: 512           size:40*40
  - [-1, 1, Conv, [1024, 3, 2]]  # 7-P5/32                                in_channel:512    out_channel: 1024          size:20*20
  - [-1, 3, C2f, [1024, True]]   # 8                                *3    in_channel:1024   out_channel: 1024          size:20*20
  - [-1, 1, SPPF, [1024, 5]]  # 9                                         in_channel:1024   out_channel: 1024          size:20*20

# YOLOv8.0n head
head:
  - [-1, 1, nn.Upsample, [None, 2, 'nearest']]   # 10                                                                   size:40*40
  - [[-1, 6], 1, Concat, [1]]  # cat backbone P4   11                     in_channel:1024   out_channel: 1536          size:40*40
  - [-1, 3, C2f, [512]]                          # 12                     in_channel:1536   out_channel: 512           size:40*40

  - [-1, 1, nn.Upsample, [None, 2, 'nearest']]   # 13                                                                   size:80*80
  - [[-1, 4], 1, Concat, [1]]  # cat backbone P3   14                     in_channel:1536   out_channel: 768           size:80*80
  - [-1, 3, C2f, [256]]  # 15 (P3/8-small)         15                     in_channel:768    out_channel: 256           size:80*80

  - [-1, 1, Conv, [256, 3, 2]]                   # 16                     in_channel:256    out_channel: 256           size:80*80
  - [[-1, 12], 1, Concat, [1]]  # cat head P4      17                     in_channel:256    out_channel: 768            size:320*320
  - [-1, 3, C2f, [512]]  # 18 (P4/16-medium)       18                     in_channel:768    out_channel: 512            size:320*320

  - [-1, 1, Conv, [512, 3, 2]]                   # 19                     in_channel:512    out_channel: 512            size:320*320
  - [[-1, 9], 1, Concat, [1]]  # cat head P5       20                     in_channel:512    out_channel: 1536           size:320*320
  - [-1, 3, C2f, [1024]]  # 21 (P5/32-large)       21                     in_channel:1536   out_channel: 1024            size:320*320

  - [[15, 18, 21], 1, Detect, [nc]]  # Detect(P3, P4, P5)
1.2 Backbone
1.2.1 Conv(CBS)
Conv代码路径: ./ultralytics/nn/modules/conv.py
作用:该模块主要用于提取特征、整理特征图。主要由Conv2d、BatchNorm2d、SiLu组成。
- Conv2d:在backbone中Conv模块的stride全部为2,kernel均为3。因此Conv每次会将特征图的宽高减半,下采样特征图,同时提取到目标特征。
- BatchNorm2d:归一化层。
- SiLu激活函数:SiLU的激活是通过sigmoid函数乘以其输入来计算的,即xσ(x)。
其中:forward训练,forward_fuse推理。

class Conv(nn.Module):
    """Standard convolution with args(ch_in, ch_out, kernel, stride, padding, groups, dilation, activation)."""

    default_act = nn.SiLU()  # default activation

    def __init__(self, c1, c2, k=1, s=1, p=None, g=1, d=1, act=True):
        """Initialize Conv layer with given arguments including activation."""
        super().__init__()
        self.conv = nn.Conv2d(c1, c2, k, s, autopad(k, p, d), groups=g, dilation=d, bias=False)
        self.bn = nn.BatchNorm2d(c2)
        self.act = self.default_act if act is True else act if isinstance(act, nn.Module) else nn.Identity()

    def forward(self, x):
        """Apply convolution, batch normalization and activation to input tensor."""
        return self.act(self.bn(self.conv(x)))

    def forward_fuse(self, x):
        """Perform transposed convolution of 2D data."""
        return self.act(self.conv(x))
1.2.2 C2f
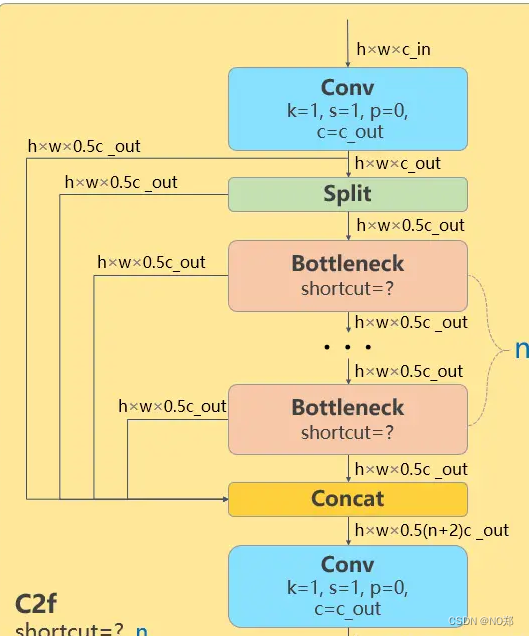
C2f代码路径:./ultralytics/nn/modules/block.py
作用:增强了backbone的学习能力、消除了计算瓶颈、降低了内存成本。
- c2f中spilt将卷积后的特征图(h,w,c)中的通道数c分割成两半。
- Bottleneck之前的特征图(deature map)和Bottleneck之后的特征图进行concat拼接操作。这叫做残差连接。
- n个Bottleneck穿行,并将每一个Bottleneck都和最后的Bottleneck拼接起来,类似于完成了特征融合。
class C2f(nn.Module):
    """Faster Implementation of CSP Bottleneck with 2 convolutions."""

    def __init__(self, c1, c2, n=1, shortcut=False, g=1, e=0.5):
        """Initialize CSP bottleneck layer with two convolutions with arguments ch_in, ch_out, number, shortcut, groups,
        expansion.
        """
        super().__init__()
        self.c = int(c2 * e)  # hidden channels
        self.cv1 = Conv(c1, 2 * self.c, 1, 1)
        self.cv2 = Conv((2 + n) * self.c, c2, 1)  # optional act=FReLU(c2)
        self.m = nn.ModuleList(Bottleneck(self.c, self.c, shortcut, g, k=((3, 3), (3, 3)), e=1.0) for _ in range(n))

    def forward(self, x):
        """Forward pass through C2f layer."""
        y = list(self.cv1(x).chunk(2, 1))
        y.extend(m(y[-1]) for m in self.m)
        return self.cv2(torch.cat(y, 1))

    def forward_split(self, x):
        """Forward pass using split() instead of chunk()."""
        y = list(self.cv1(x).split((self.c, self.c), 1))
        y.extend(m(y[-1]) for m in self.m)
        return self.cv2(torch.cat(y, 1))

class Bottleneck(nn.Module):
    """Standard bottleneck."""

    def __init__(self, c1, c2, shortcut=True, g=1, k=(3, 3), e=0.5):
        """Initializes a bottleneck module with given input/output channels, shortcut option, group, kernels, and
        expansion.
        """
        super().__init__()
        c_ = int(c2 * e)  # hidden channels
        self.cv1 = Conv(c1, c_, k[0], 1)
        self.cv2 = Conv(c_, c2, k[1], 1, g=g)
        self.add = shortcut and c1 == c2

    def forward(self, x):
        """'forward()' applies the YOLO FPN to input data."""
        return x + self.cv2(self.cv1(x)) if self.add else self.cv2(self.cv1(x))
1.2.3 SPPF
SPPF路径:./ultralytics/nn/modules/block.py
作用:提高模型处理在不同输入尺寸时的速度和精度。将将不同尺度的特征图转为尺度上。

class SPPF(nn.Module):
    """Spatial Pyramid Pooling - Fast (SPPF) layer for YOLOv5 by Glenn Jocher."""

    def __init__(self, c1, c2, k=5):
        """
        Initializes the SPPF layer with given input/output channels and kernel size.

        This module is equivalent to SPP(k=(5, 9, 13)).
        """
        super().__init__()
        c_ = c1 // 2  # hidden channels
        self.cv1 = Conv(c1, c_, 1, 1)
        self.cv2 = Conv(c_ * 4, c2, 1, 1)
        self.m = nn.MaxPool2d(kernel_size=k, stride=1, padding=k // 2)

    def forward(self, x):
        """Forward pass through Ghost Convolution block."""
        x = self.cv1(x)
        y1 = self.m(x)
        y2 = self.m(y1)
        return self.cv2(torch.cat((x, y1, y2, self.m(y2)), 1))
1.4 Neck
PAN-FPN:是指的在在YOLOv8的neck部分模仿PANet里面的backbone,也就是FPN网络(feature pyramid network)进行组织。PAN-FPN这个网络的特点进行简单概括,就是先下采样,然后再上采样,上采样和下采样的这两个分支之间还有两个跨层融合连接。(也可以反过来,先上采样,再下采样)
为什么:从model的yaml文件中可知:在backbone后,通过Upsample上采样的方式,向特征图中插值,使特征图的尺度变大,以便于融合来自backbone的特征图(图像channl减少,size增加)。与在backbone相同尺寸层进行拼接,分别是6、4、12、9。使浅层的图形特征与深层的语义特征做更好的融合,而不仅仅是简单的concat。
作用:就是将浅层的图形特征和深层的语义特征相结合,以获取更为完整的特征。

head:
  - [-1, 1, nn.Upsample, [None, 2, "nearest"]]
  - [[-1, 6], 1, Concat, [1]] # cat backbone P4
  - [-1, 3, C2f, [512]] # 12

  - [-1, 1, nn.Upsample, [None, 2, "nearest"]]
  - [[-1, 4], 1, Concat, [1]] # cat backbone P3
  - [-1, 3, C2f, [256]] # 15 (P3/8-small)

  - [-1, 1, Conv, [256, 3, 2]]
  - [[-1, 12], 1, Concat, [1]] # cat head P4
  - [-1, 3, C2f, [512]] # 18 (P4/16-medium)

  - [-1, 1, Conv, [512, 3, 2]]
  - [[-1, 9], 1, Concat, [1]] # cat head P5
  - [-1, 3, C2f, [1024]] # 21 (P5/32-large)

  - [[15, 18, 21], 1, Detect, [nc]] # Detect(P3, P4, P5)
1.4.1 Detect
代码路径:./ultralytics/nn/modules/head.py
检测头作用:主要负责在图像或特征图上执行目标检测的任务,将输入图像或特征图划分成多个区域,并为每个区域生成检测框和对应的类别概率。
class Detect(nn.Module):
    """YOLOv8 Detect head for detection models."""

    dynamic = False  # force grid reconstruction
    export = False  # export mode
    shape = None
    anchors = torch.empty(0)  # init
    strides = torch.empty(0)  # init

    def __init__(self, nc=80, ch=()):
        """Initializes the YOLOv8 detection layer with specified number of classes and channels."""
        super().__init__()
        self.nc = nc  # number of classes
        self.nl = len(ch)  # number of detection layers
        self.reg_max = 16  # DFL channels (ch[0] // 16 to scale 4/8/12/16/20 for n/s/m/l/x)
        self.no = nc + self.reg_max * 4  # number of outputs per anchor
        self.stride = torch.zeros(self.nl)  # strides computed during build
        c2, c3 = max((16, ch[0] // 4, self.reg_max * 4)), max(ch[0], min(self.nc, 100))  # channels
        self.cv2 = nn.ModuleList(
            nn.Sequential(Conv(x, c2, 3), Conv(c2, c2, 3), nn.Conv2d(c2, 4 * self.reg_max, 1)) for x in ch
        )
        self.cv3 = nn.ModuleList(nn.Sequential(Conv(x, c3, 3), Conv(c3, c3, 3), nn.Conv2d(c3, self.nc, 1)) for x in ch)
        self.dfl = DFL(self.reg_max) if self.reg_max > 1 else nn.Identity()

    def forward(self, x):
        """Concatenates and returns predicted bounding boxes and class probabilities."""
        for i in range(self.nl):
            x[i] = torch.cat((self.cv2[i](x[i]), self.cv3[i](x[i])), 1)
        if self.training:  # Training path
            return x

        # Inference path
        shape = x[0].shape  # BCHW
        x_cat = torch.cat([xi.view(shape[0], self.no, -1) for xi in x], 2)
        if self.dynamic or self.shape != shape:
            self.anchors, self.strides = (x.transpose(0, 1) for x in make_anchors(x, self.stride, 0.5))
            self.shape = shape

        if self.export and self.format in ("saved_model", "pb", "tflite", "edgetpu", "tfjs"):  # avoid TF FlexSplitV ops
            box = x_cat[:, : self.reg_max * 4]
            cls = x_cat[:, self.reg_max * 4 :]
        else:
            box, cls = x_cat.split((self.reg_max * 4, self.nc), 1)
        dbox = self.decode_bboxes(box)

        if self.export and self.format in ("tflite", "edgetpu"):
            # Precompute normalization factor to increase numerical stability
            # See https://github.com/ultralytics/ultralytics/issues/7371
            img_h = shape[2]
            img_w = shape[3]
            img_size = torch.tensor([img_w, img_h, img_w, img_h], device=box.device).reshape(1, 4, 1)
            norm = self.strides / (self.stride[0] * img_size)
            dbox = dist2bbox(self.dfl(box) * norm, self.anchors.unsqueeze(0) * norm[:, :2], xywh=True, dim=1)

        y = torch.cat((dbox, cls.sigmoid()), 1)
        return y if self.export else (y, x)

    def bias_init(self):
        """Initialize Detect() biases, WARNING: requires stride availability."""
        m = self  # self.model[-1]  # Detect() module
        # cf = torch.bincount(torch.tensor(np.concatenate(dataset.labels, 0)[:, 0]).long(), minlength=nc) + 1
        # ncf = math.log(0.6 / (m.nc - 0.999999)) if cf is None else torch.log(cf / cf.sum())  # nominal class frequency
        for a, b, s in zip(m.cv2, m.cv3, m.stride):  # from
            a[-1].bias.data[:] = 1.0  # box
            b[-1].bias.data[: m.nc] = math.log(5 / m.nc / (640 / s) ** 2)  # cls (.01 objects, 80 classes, 640 img)

    def decode_bboxes(self, bboxes):
        """Decode bounding boxes."""
        return dist2bbox(self.dfl(bboxes), self.anchors.unsqueeze(0), xywh=True, dim=1) * self.strides
二、自定义数据集制作
2.1 数据集路径
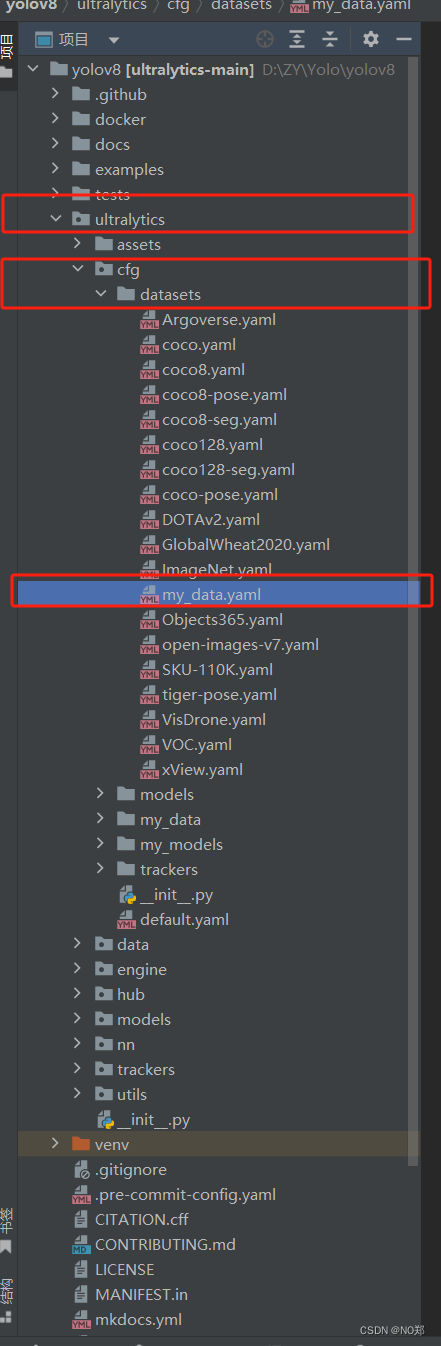
原数据路径:ultralytics/cfg/datasets
创建自定义数据的yaml文件,放在ultralytics/cfg/datasets下面
2.2 编译data的yaml文件
Path:自定义数据集路径:里面包含两个个文件:images、labels,image中放图片(包含train、test、val三个文件),labels中放标签(包含train、test、val三个文件)

train:训练集(图片训练集的路径,在image下)

val:验证集(图片测试集的路径)
test:测试集

2.2 标签制作
通过labelimg或者labelme标注图片
2.3 标签格式转换
由于YOLO的标签是txt格式,需转换label格式为txt。
此处提供XML转TXT脚本
import os
from xml.dom.minidom import parse
from tqdm import tqdm

def set_txt(root_path, img_root_path):
    txt_root_path = root_path + "/labels"
    if not os.path.exists(txt_root_path):
        os.makedirs(txt_root_path)

    imgs_name = os.listdir(img_root_path)
    i = 0
    for img_name in imgs_name:
        i += 1
        txtname = img_name.split('.')[0] + ".txt"
        txt_path =os.path.join(txt_root_path, txtname)
        if not os.path.exists(txt_path):
            open(txt_path, 'w').close()
    print("txt numbel: ", i)

def xml_to_txt(xml_root_path, classes):
    xmls_name = os.listdir(xml_root_path)
    numbel = 0
    for xml_name in tqdm(xmls_name):
        numbel += 1
        xml_path = os.path.join(xml_root_path, xml_name)
        txt_name = xml_name[:-4] + ".txt"
        txt_root_path = os.path.join(root_path, "labels")
        if not os.path.exists(txt_root_path):
            os.makedirs(txt_root_path)
        txt_path = os.path.join(txt_root_path, txt_name)

        dom = parse(xml_path)
        root = dom.documentElement
        width = root.getElementsByTagName("width")[0].childNodes[0].nodeValue
        hidth = root.getElementsByTagName("height")[0].childNodes[0].nodeValue

        objs = root.getElementsByTagName('object')

        with open(txt_path, "w") as file:
            for obj in objs:
                label = obj.getElementsByTagName("name")[0].childNodes[0].nodeValue
                xmin = obj.getElementsByTagName("xmin")[0].childNodes[0].nodeValue
                ymin = obj.getElementsByTagName("ymin")[0].childNodes[0].nodeValue
                xmax = obj.getElementsByTagName("xmax")[0].childNodes[0].nodeValue
                ymax = obj.getElementsByTagName("ymax")[0].childNodes[0].nodeValue

                x_center = (int(xmin) + int(xmax)) / (2 * int(width))
                y_center = (int(ymin) + int(ymax)) / (2 * int(hidth))

                w = (int(xmax) - int(xmin)) / int(width)
                h = (int(ymax) - int(ymin)) / int(hidth)

                index = classes.index(label)
                # if label == 'warning_signsw':
                #     print(xml_name)
                file.write(str(index) + " " + str(x_center) + " " + str(y_center) + " " + str(w) + " " + str(h) + "\n")

    print(numbel)

if __name__ == "__main__":
    classes = ['类别1', '类别2']
    root_path = r"根路径"                # 根路径需要包含images,val
    img_root_path = os.path.join(root_path, "images")
    xml_root_path = os.path.join(root_path, "val")

    set_txt(root_path, img_root_path)
    xml_to_txt(xml_root_path, classes)
三、训练
if __name__ == '__main__':
    # Load a model
    model = YOLO('yolov8n.pt')  # load a pretrained model (recommended for training)

    # Train the model with 2 GPUs
results = model.train(data='ultralytics/cfg/my_data/huangjinbu.yaml', epochs=2, imgsz=640, device=[0], batch=4)| 参数名 | 参数值 | 注释 |
| model | None | 模型文件的路径,即yolov8n.pt,yolov8n.yaml |
| data | None | 数据文件的路径,即 coco128.yaml |
| epochs | 100 | 训练的数 |
| time | None | 训练的小时数,如果已提供,则覆盖纪元数 |
| patience | 50 | 在没有明显改善的情况下,提前停止训练的等待时间 |
| batch | 16 | 每批图像数(-1 表示自动批次) |
| imgsz | 640 | 输入图像的整数大小 |
| save | True | 保存列车检查点并预测结果 |
| save_period | -1 | Save checkpoint every x epochs (disabled if < 1) |
| cache | False | true/ram,磁盘或 False。使用缓存加载数据 |
| device | None | 设备上运行,即 cuda device=0 或 device=0,1,2,3 或 device=cpu |
| workers | 8 | 加载数据的工作线程数(如果是 DDP,则为每个 RANK) |
| project | None | 项目名称 |
| name | None | 实验名称 |
| exist_ok | False | 是否覆盖现有实验 |
| pretrained | True | (bool或str)是使用预训练模型(bool)还是使用模型加载权重(str) |
| optimizer | 'auto' | 使用的优化器,选择=[SGD、Adam、Adamax、AdamW、NAdam、RAdam、RMSProp、auto] |
| verbose | False | 是否打印冗余输出 |
| seed | 0 | 随机种子 |
| deterministic | True | 是否启用确定性模式 |
| single_cls | False | 将多类数据训练为单类数据 |
| rect | False | 矩形训练,每批都经过整理,以减少填充物 |
| cos_lr | False | 使用余弦学习率调度器 |
| close_mosaic | 10 | (int)禁用最后历时的马赛克增强(0 表示禁用)。 |
| resume | False | 从上一个检查站恢复训练 |
| amp | True | 自动混合精度 (AMP) 训练,选择=[真,假] |
| fraction | 1.0 | 要训练的数据集分数(默认为 1.0,训练集中的所有图像) |
| profile | False | 记录仪训练期间的ONNX 和TensorRT 速度剖面图 |
| freeze | None | (int 或 list,可选)在训练过程中冻结前 n 层,或冻结层索引列表 |
| lr0 | 0.01 | 初始学习率(即 SGD=1E-2, Adam=1E-3) |
| lrf | 0.01 | 最终学习率 (lr0 * lrf) |
| momentum | 0.937 | 新元动量/亚当贝塔1 |
| weight_decay | 0.0005 | 优化器权重衰减 5e-4 |
| warmup_epochs | 3.0 | 预热时间(可以是分数) |
| warmup_momentum | 0.8 | 热身 初始动力 |
| warmup_bias_lr | 0.1 | 预热初始偏置 |
| box | 7.5 | 箱内损失收益 |
| cls | 0.5 | CLS 损耗增益(按像素缩放) |
| dfl | 1.5 | DFL 损失收益 |
| pose | 12.0 | 姿势损失增益(仅姿势) |
| kobj | 2.0 | 关键点对象损失增益(仅姿势) |
| label_smoothing | 0.0 | 标签平滑(分数) |
| nbs | 64 | 标称批量 |
| overlap_mask | True | 遮罩应在训练期间重叠(仅分段训练) |
| mask_ratio | 4 | 掩码下采样率(仅限段列车) |
| dropout | 0.0 | 使用 dropout 正则化(仅对火车进行分类) |
| val | True | 在培训期间验证/测试 |
| plots | False | 在训练/评估过程中保存绘图和图像 |
四、推理
推理参数根据模型与权重选择检测、分割、关键点。
| 名称 | 类型 | 默认值 | 说明 |
| source | str | 'ultralytics/assets' | 图像或视频的源目录 |
| conf | float | 0.25 | 检测对象置信度阈值 |
| iou | float | 0.7 | NMS 的 "相交大于结合"(IoU)阈值 |
| imgsz | int or tuple | 640 | 图像尺寸标量或(高,宽)列表,即(640,480) |
| half | bool | False | 使用半精度 (FP16) |
| device | None or str | None | 设备上运行,如 cuda device=0/1/2/3 或 device=cpu |
| max_det | int | 300 | 每幅图像的最大检测次数 |
| vid_stride | bool | False | 视频帧速率跨度 |
| stream_buffer | bool | False | 缓冲所有流媒体帧(真)或返回最新帧(假) |
| visualize | bool | False | 可视化模型特征 |
| augment | bool | False | 对预测源进行图像增强 |
| agnostic_nms | bool | False | 不分等级的 NMS |
| classes | list[int] | None | 按类别筛选结果,即 classes=0,或 classes=[0,2,3] |
| retina_masks | bool | False | 使用高分辨率分割掩膜 |
| embed | list[int] | None | 返回给定层的特征向量/嵌入值 |


 1万+
1万+


 被折叠的 条评论
为什么被折叠?
被折叠的 条评论
为什么被折叠?
 到【灌水乐园】发言


