


转载https://blog.csdn.net/m0_51530640/article/details/129975257
1.利用labelme进行数据标注
1.1Labelme 安装方法
首先安装 Anaconda,然后运行下列命令:
-
######
######
######
-
## for Python 2 ##
-
######
######
######
-
conda create --name=labelme python=
2.7
-
source activate labelme
-
# conda install -c conda-forge pyside2
-
conda install pyqt
-
pip install labelme
-
# 如果想安装最新版本,请使用下列命令安装:
-
# pip install git+https://github.com/wkentaro/labelme.git
-
-
######
######
######
-
## for Python 3 ##
-
######
######
######
-
conda create --name=labelme python=
3.6
-
source activate labelme
-
# conda install -c conda-forge pyside2
-
# conda install pyqt
-
pip install pyqt5
# pyqt5 can be installed via pip on python3
-
pip install labelme
-
输入以下指令打开
-
labelme
1.2Labelme 使用教程
使用 labelme 进行场景分割标注的教程详见:labelme
2.转换划分数据集
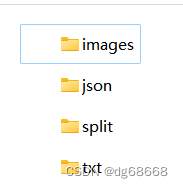
对数据集进行转换和划分。注意:在数据标注的时候将图片和json文件放在不同的文件夹里。如下图所示,另外新建两个文件夹txt 和split。
2.1将json格式文件转换为txt格式
新建json2txt.py文件,修改文件路径为自己的路径
-
# -
*- coding: utf-
8 -
*-
-
import json
-
import os
-
import argparse
-
from tqdm import tqdm
-
-
-
def convert_label_json(json_dir, save_dir, classes):
-
json_paths
= os.listdir(json_dir)
-
classes
= classes.split(
',')
-
-
for json_path
in tqdm(json_paths):
-
#
for json_path
in json_paths:
-
path
= os.path.join(json_dir, json_path)
-
with
open(path,
'r')
as load_f:
-
json_dict
= json.load(load_f)
-
h, w
= json_dict[
'imageHeight'], json_dict[
'imageWidth']
-
-
# save txt path
-
txt_path
= os.path.join(save_dir, json_path.
replace(
'json',
'txt'))
-
txt_
file
=
open(txt_path,
'w')
-
-
for shape_dict
in json_dict[
'shapes']:
-
label
= shape_dict[
'label']
-
label_
index
= classes.
index(label)
-
points
= shape_dict[
'points']
-
-
points_nor_list
= []
-
-
for point
in points:
-
points_nor_list.append(point[
0]
/ w)
-
points_nor_list.append(point[
1]
/ h)
-
-
points_nor_list
= list(map(lambda x: str(x), points_nor_list))
-
points_nor_str
=
' '.join(points_nor_list)
-
-
label_str
= str(label_
index)
+
' '
+ points_nor_str
+
'\n'
-
txt_
file.writelines(label_str)
-
-
-
if __name__
=
=
"__main__":
-
""
"
-
python json2txt_nomalize.py --json-dir my_datasets/color_rings/jsons --save-dir my_datasets/color_rings/txts --classes "cat,dogs
"
-
"
""
-
parser
= argparse.ArgumentParser(description
=
'json convert to txt params')
-
parser.
add_argument(
'--json-dir',
type
=str,
default
=
'D:/ultralytics-main/data/json', help
=
'json path dir')
-
parser.
add_argument(
'--save-dir',
type
=str,
default
=
'D:/ultralytics-main/data/txt' ,help
=
'txt save dir')
-
parser.
add_argument(
'--classes',
type
=str,
default
=
'ccc,ccc1',help
=
'classes')
-
args
= parser.parse_args()
-
json_dir
= args.json_dir
-
save_dir
= args.save_dir
-
classes
= args.classes
-
convert_label_json(json_dir, save_dir, classes)
2.2划分数据集
新建split.py,修改文件路径为自己的路径
-
# 将图片和标注数据按比例切分为 训练集和测试集
-
import shutil
-
import
random
-
import os
-
import argparse
-
-
-
# 检查文件夹是否存在
-
def mkdir(path):
-
if
not os.path.exists(path):
-
os.makedirs(path)
-
-
def main(image_dir, txt_dir, save_dir):
-
# 创建文件夹
-
mkdir(save_dir)
-
images_dir
= os.path.join(save_dir,
'images')
-
labels_dir
= os.path.join(save_dir,
'labels')
-
-
img_train_path
= os.path.join(images_dir,
'train')
-
img_
test_path
= os.path.join(images_dir,
'test')
-
img_val_path
= os.path.join(images_dir,
'val')
-
-
label_train_path
= os.path.join(labels_dir,
'train')
-
label_
test_path
= os.path.join(labels_dir,
'test')
-
label_val_path
= os.path.join(labels_dir,
'val')
-
-
mkdir(images_dir);
-
mkdir(labels_dir);
-
mkdir(img_train_path);
-
mkdir(img_
test_path);
-
mkdir(img_val_path);
-
mkdir(label_train_path);
-
mkdir(label_
test_path);
-
mkdir(label_val_path);
-
-
# 数据集划分比例,训练集
75%,验证集
15%,测试集
15%,按需修改
-
train_percent
=
0.8
-
val_percent
=
0.1
-
test_percent
=
0.1
-
-
total_txt
= os.listdir(txt_dir)
-
num_txt
= len(total_txt)
-
list_
all_txt
= range(num_txt) # 范围 range(
0, num)
-
-
num_train
= int(num_txt
* train_percent)
-
num_val
= int(num_txt
* val_percent)
-
num_
test
= num_txt
- num_train
- num_val
-
-
train
=
random.sample(list_
all_txt, num_train)
-
# 在全部数据集中取出train
-
val_
test
= [i
for i
in list_
all_txt
if
not i
in train]
-
# 再从val_
test取出num_val个元素,val_
test剩下的元素就是
test
-
val
=
random.sample(val_
test, num_val)
-
-
print(
"训练集数目:{}, 验证集数目:{},测试集数目:{}".
format(len(train), len(val), len(val_
test)
- len(val)))
-
for i
in list_
all_txt:
-
name
= total_txt[i][:-
4]
-
-
srcImage
= os.path.join(image_dir, name
+
'.jpg')
-
srcLabel
= os.path.join(txt_dir, name
+
'.txt')
-
-
if i
in train:
-
dst_train_Image
= os.path.join(img_train_path, name
+
'.jpg')
-
dst_train_Label
= os.path.join(label_train_path, name
+
'.txt')
-
shutil.copyfile(srcImage, dst_train_Image)
-
shutil.copyfile(srcLabel, dst_train_Label)
-
elif i
in val:
-
dst_val_Image
= os.path.join(img_val_path, name
+
'.jpg')
-
dst_val_Label
= os.path.join(label_val_path, name
+
'.txt')
-
shutil.copyfile(srcImage, dst_val_Image)
-
shutil.copyfile(srcLabel, dst_val_Label)
-
else:
-
dst_
test_Image
= os.path.join(img_
test_path, name
+
'.jpg')
-
dst_
test_Label
= os.path.join(label_
test_path, name
+
'.txt')
-
shutil.copyfile(srcImage, dst_
test_Image)
-
shutil.copyfile(srcLabel, dst_
test_Label)
-
-
-
if __name__
=
=
'__main__':
-
""
"
-
python split_datasets.py --image-dir my_datasets/color_rings/imgs --txt-dir my_datasets/color_rings/txts --save-dir my_datasets/color_rings/train_data
-
"
""
-
parser
= argparse.ArgumentParser(description
=
'split datasets to train,val,test params')
-
parser.
add_argument(
'--image-dir',
type
=str,
default
=
'D:/ultralytics-main/data', help
=
'image path dir')
-
parser.
add_argument(
'--txt-dir',
type
=str,
default
=
'D:/ultralytics-main/data/txt' , help
=
'txt path dir')
-
parser.
add_argument(
'--save-dir',
default
=
'D:/ultralytics-main/data/split',
type
=str, help
=
'save dir')
-
args
= parser.parse_args()
-
image_dir
= args.image_dir
-
txt_dir
= args.txt_dir
-
save_dir
= args.save_dir
-
-
main(image_dir, txt_dir, save_dir)
运行完后得到如下文件
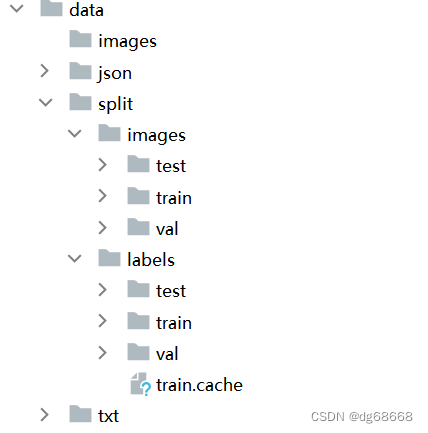
3.训练设置
3.1新建seg.yaml文件 ,按照下列格式创建 我一般写成绝对路径,方便一点。
-
train: D:\ultralytics-main\
data\split\images\train # train images (
relative
to
'path')
128 images
-
val: D:\ultralytics-main\
data\split\images\val # val images (
relative
to
'path')
128 images
-
test: D:\ultralytics-main\
data\split\images\
test #
test images (
optional)
-
-
# Classes
-
names:
-
0: ccc
-
1: ccc
1
-
3.2训练参数设置
-
task: segment # YOLO task, i.e. detect, segment, classify, pose
-
mode: train # YOLO
mode, i.e. train, val, predict, export, track, benchmark
-
-
# Train settings -------------------------------------------------------------------------------------------------------
-
model: yolov
8s-seg.yaml # path
to model
file, i.e. yolov
8n.pt, yolov
8n.yaml
-
#model:runs
/detect
/yolov
8s
/weights
/best.pt
-
data: seg.yaml # path
to
data
file, i.e. coco
128.yaml
-
epochs:
10 #
number
of epochs
to train
for
-
patience:
50 # epochs
to wait
for
no observable improvement
for early stopping
of training
-
batch:
16 #
number
of images per batch (-
1
for AutoBatch)
然后开始训练即可。
参考:
(52条消息) 数据标注软件labelme详解_黑暗星球的博客-CSDN博客
(52条消息) YOLOv5-7.0实例分割训练自己的数据,切分mask图并摆正_yolo 图像分割_jin__9981的博客-CSDN博客


 285
285


 被折叠的 条评论
为什么被折叠?
被折叠的 条评论
为什么被折叠?
 到【灌水乐园】发言


