


任务描述
本关任务:掌握DGCN生成对抗网络的基本思想和网络结构。
相关知识
为了完成本关任务,你需要掌握:1.深度卷积神经网络,2.深度卷积生成对抗网络。
深度卷积神经网络
CNN卷积神经网络可以说是传统神经网络的一个改进,它依然采用层次结构,只是层的功能和形式做了变化。与传统神经网络不同,CNN使用卷积构建网络层来进行信息提取。 一个典型的卷积神经网络层包括如下的结构: • 数据输入层/ Input layer • 卷积计算层/ CONV layer • ReLU激励层 / ReLU layer • 池化层 / Pooling layer • 全连接层 / FC layer 在这个层级中最重要且与之前网络不同的表示卷积层,这也是“卷积神经网络”的名字来源。 在卷积层中,有两个关键操作:局部关联。每个神经元看做一个滤波器(filter);窗口(receptive field)滑动,filter对局部数据计算。下面是它进行计算的过程示意图:
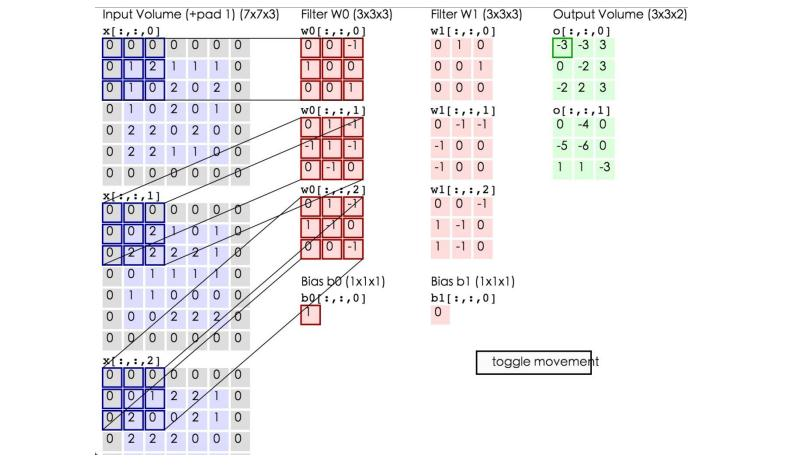
上图中蓝色矩阵就是输入的图像,粉色矩阵就是卷积层的神经元,这里表示了有两个神经元(w0,w1)。绿色矩阵就是经过卷积运算后的输出矩阵,这里的步长设置为2。 蓝色的矩阵(输入图像)对粉色的矩阵(filter)进行矩阵内积计算并将三个内积运算的结果与偏置值b相加(比如上面图的计算:2+(-2+1-2)+(1-2-2) + 1= 2 - 3 - 3 + 1 = -3),计算后的值就是绿框矩阵的一个元素。 我们正是使用了这样的一种计算方式对输入进行特征提取,并不断加深,加宽网络从而获取更有效的特征表示。 与此同时,卷积还存在另一种特殊结构,反卷积transport-convolution。反卷积对于一个2x2的输入信号,经过3x3 的filters,产生了4x4的feature map。从小的维度产生大的维度,所以transport-convolution又称为上采样卷积。它通常被用来恢复特征的图的大小时使用。 下图为使用多层卷积构成的深度卷积神经网络VGG:
深度卷积生成对抗网络
深度卷积生成对抗网络就是将生成式对抗网络GAN中的生成器G和判别器D中的多层感知机用改进后的卷积神经网络CNN替代形成的。与普通的卷积神经网络不同,它具有如下的特点:
- 用步长卷积(判别器)和微步长卷积(生成器)替代任何池化层;
- 在生成器和判别器中均使用批规范化;
- 为更深层次的架构移除全连接的隐藏层;
- 在生成器中,输出层使用Tanh,其余层均使用ReLU激活;
- 在判别器中,所有层均使用LeakyReLU激活。
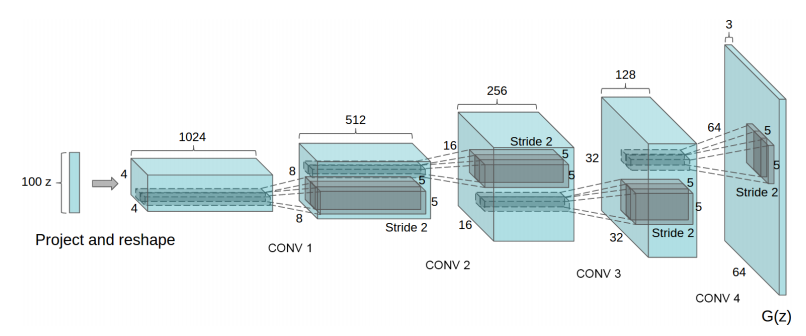
它的生成器结构如图:
我们下面使用pytorch构成DCGANs生成器结构:
class Generator(nn.Module):def __init__(self, len_Z, hidden_channal, output_channal):super(Generator, self).__init__()self.layer1 = nn.Sequential(nn.ConvTranspose2d(in_channels=len_Z,out_channels=hidden_channal * 4,kernel_size=4,),nn.BatchNorm2d(hidden_channal * 4),nn.ReLU())# [BATCH, hidden_channal * 4 , 4, 4]self.layer2 = nn.Sequential(nn.ConvTranspose2d(in_channels=hidden_channal * 4,out_channels=hidden_channal * 2,kernel_size=3, # 保证生成图像大小为28stride=2,padding=1),nn.BatchNorm2d(hidden_channal * 2),nn.ReLU())#self.layer3 = nn.Sequential(nn.ConvTranspose2d(in_channels=hidden_channal * 2,out_channels=hidden_channal,kernel_size=4,stride=2,padding=1),nn.BatchNorm2d(hidden_channal),nn.ReLU())self.layer4 = nn.Sequential(nn.ConvTranspose2d(in_channels=hidden_channal,out_channels=output_channal,kernel_size=4,stride=2,padding=1),nn.Tanh())def forward(self, x):# [50, 100, 1, 1]out = self.layer1(x)# [50, 256, 4, 4]# print(out.shape)out = self.layer2(out)# [50, 128, 7, 7]# print(out.shape)out = self.layer3(out)# [50, 64, 14, 14]# print(out.shape)out = self.layer4(out)# print(out.shape)# [50, 1, 28, 28]return out
判别器网络结构为生成器的反向结构,使用卷积完成网络构建,我们给出关键代码:
class Discriminator(nn.Module):def __init__(self, input_channal, hidden_channal):super(Discriminator, self).__init__()self.layer1 = nn.Sequential(nn.Conv2d(in_channels=input_channal,out_channels=hidden_channal,kernel_size=4,stride=2,padding=1),nn.BatchNorm2d(hidden_channal),nn.LeakyReLU(0.2))self.layer2 = nn.Sequential(nn.Conv2d(in_channels=hidden_channal,out_channels=hidden_channal * 2,kernel_size=4,stride=2,padding=1),nn.BatchNorm2d(hidden_channal * 2),nn.LeakyReLU(0.2))self.layer3 = nn.Sequential(nn.Conv2d(in_channels=hidden_channal * 2,out_channels=hidden_channal * 4,kernel_size=3,stride=2,padding=1),nn.BatchNorm2d(hidden_channal * 4),nn.LeakyReLU(0.2))self.layer4 = nn.Sequential(nn.Conv2d(in_channels=hidden_channal * 4,out_channels=1,kernel_size=4,stride=1,padding=0),nn.Sigmoid())# [BATCH, 1, 1, 1]def forward(self, x):# print(x.shape)out = self.layer1(x)# print(out.shape)out = self.layer2(out)# print(out.shape)out = self.layer3(out)# print(out.shape)out = self.layer4(out)return out
编程要求
根据提示,在右侧编辑器填写判别器,生成器函数,过程包括:
- 使用卷积神经网络构建生成器网络
- 使用卷积神经网络构建判别器网路
- 调用生成器和判别器,并打印网络模型
注,参数设置如下:
# 生成器输入的通道len_Z = 100# 生成器的隐藏层通道g_hidden_channal = 64# 判别器的隐藏层通道d_hidden_channal = 64# 图片的通道image_channal = 1# 调用使用cpudevice = torch.device("cpu")print(G)print(D)
测试说明
平台会对你编写的代码进行测试:
预期输出:
Generator(
  (layer1): Sequential(
    (0): ConvTranspose2d(100, 256, kernel_size=(4, 4), stride=(1, 1))
    (1): BatchNorm2d(256, eps=1e-05, momentum=0.1, affine=True, track_running_stats=True)
    (2): ReLU()
  )
  (layer2): Sequential(
    (0): ConvTranspose2d(256, 128, kernel_size=(3, 3), stride=(2, 2), padding=(1, 1))
    (1): BatchNorm2d(128, eps=1e-05, momentum=0.1, affine=True, track_running_stats=True)
    (2): ReLU()
  )
  (layer3): Sequential(
    (0): ConvTranspose2d(128, 64, kernel_size=(4, 4), stride=(2, 2), padding=(1, 1))
    (1): BatchNorm2d(64, eps=1e-05, momentum=0.1, affine=True, track_running_stats=True)
    (2): ReLU()
  )
  (layer4): Sequential(
    (0): ConvTranspose2d(64, 1, kernel_size=(4, 4), stride=(2, 2), padding=(1, 1))
    (1): Tanh()
  )
)
Discriminator(
  (layer1): Sequential(
    (0): Conv2d(1, 64, kernel_size=(4, 4), stride=(2, 2), padding=(1, 1))
    (1): BatchNorm2d(64, eps=1e-05, momentum=0.1, affine=True, track_running_stats=True)
    (2): LeakyReLU(negative_slope=0.2)
  )
  (layer2): Sequential(
    (0): Conv2d(64, 128, kernel_size=(4, 4), stride=(2, 2), padding=(1, 1))
    (1): BatchNorm2d(128, eps=1e-05, momentum=0.1, affine=True, track_running_stats=True)
    (2): LeakyReLU(negative_slope=0.2)
  )
  (layer3): Sequential(
    (0): Conv2d(128, 256, kernel_size=(3, 3), stride=(2, 2), padding=(1, 1))
    (1): BatchNorm2d(256, eps=1e-05, momentum=0.1, affine=True, track_running_stats=True)
    (2): LeakyReLU(negative_slope=0.2)
  )
  (layer4): Sequential(
    (0): Conv2d(256, 1, kernel_size=(4, 4), stride=(1, 1))
    (1): Sigmoid()
  )
)
参考代码:
import torch
import torch.nn as nn
import torchvision

#########Begin########
# 生成器模型
class Generator(nn.Module):
##########End#########
    def __init__(self, len_z, hidden_channal, output_channal):
        super(Generator, self).__init__()
        self.layer1 = nn.Sequential(
            nn.ConvTranspose2d(
                in_channels = len_z,
                out_channels = hidden_channal * 4,
                kernel_size = 4
            ),
            nn.BatchNorm2d(hidden_channal * 4),
            nn.ReLU()
        )
        self.layer2 = nn.Sequential(
            nn.ConvTranspose2d(
                in_channels=hidden_channal * 4,
                out_channels=hidden_channal * 2,
                kernel_size=3,  # 保证生成图像大小为28
                stride=2,
                padding=1
            ),
            nn.BatchNorm2d(hidden_channal * 2),
            nn.ReLU()
        )
        self.layer3 = nn.Sequential(
            nn.ConvTranspose2d(
                in_channels=hidden_channal * 2,
                out_channels=hidden_channal,
                kernel_size=4,
                stride=2,
                padding=1
            ),
            nn.BatchNorm2d(hidden_channal),
            nn.ReLU()
        )
        self.layer4 = nn.Sequential(
            nn.ConvTranspose2d(
                in_channels=hidden_channal,
                out_channels=output_channal,
                kernel_size=4,
                stride=2,
                padding=1
            ),
            nn.Tanh()
        )

    def forward(self, x):
        out = self.layer1(x)
        out = self.layer2(x)
        out = self.layer3(x)
        out = self.layer4(x)
        return out

#########Begin########
# 判别器模型
class Discriminator(nn.Module):
    def __init__(self, input_channal, hidden_channal):
        super(Discriminator, self).__init__()
        self.layer1 = nn.Sequential(
            nn.Conv2d(
                in_channels = input_channal,
                out_channels = hidden_channal,
                kernel_size = 4,
                stride = 2,
                padding = 1
            ),
            nn.BatchNorm2d(hidden_channal),
            nn.LeakyReLU(0.2)
        )
        self.layer2 = nn.Sequential(
            nn.Conv2d(
                in_channels=hidden_channal,
                out_channels=hidden_channal * 2,
                kernel_size=4,
                stride=2,
                padding=1
            ),
            nn.BatchNorm2d(hidden_channal * 2),
            nn.LeakyReLU(0.2)
        )
        self.layer3 = nn.Sequential(
            nn.Conv2d(
                in_channels=hidden_channal * 2,
                out_channels=hidden_channal * 4,
                kernel_size=3,
                stride=2,
                padding=1
            ),
            nn.BatchNorm2d(hidden_channal * 4),
            nn.LeakyReLU(0.2)
        )
        self.layer4 = nn.Sequential(
            nn.Conv2d(
                in_channels=hidden_channal * 4,
                out_channels=1,
                kernel_size=4,
                stride=1,
                padding=0
            ),
            nn.Sigmoid()
        )

    def forward(self, x):
        out = self.layer1(x)
        out = self.layer2(x)
        out = self.layer3(x)
        out = self.layer4(x)
        return out

##########End#########

# 参数设置
len_Z = 100  # random input.channal for Generator
g_hidden_channal = 64
d_hidden_channal = 64
image_channal = 1  # mnist数据为黑白的只有一维

#########Begin########
# 调用模型
G = Generator(len_Z, g_hidden_channal, image_channal)
D = Discriminator(image_channal, d_hidden_channal)
##########End#########
device = torch.device("cpu")
print(G)
print(D)


 3221
3221


 被折叠的 条评论
为什么被折叠?
被折叠的 条评论
为什么被折叠?
 到【灌水乐园】发言


