


1 路线图
【Caffe是什么?】
Caffe是一个深度学习框架,以代码整洁、可读性强、运行速度快著称。代码地址为:https://github.com/BVLC/caffe
【博客目的】
从接触Caffe、编译运行、阅读代码、修改代码一路走来,学习到不少内容,包括深度学习理论,卷积神经网络算法实现,数学库MKL,计算机视觉库OpenCV,C++模板类使用,CUDA程序编写……
本博客目的是为初学者清除代码阅读中的障碍,结合官网文档、融入个人理解、注重动手实践。
【如何开始】
在开始阅读Caffe代码之前,应该做好下面几件事:
(1)下载Caffe源码;
(2)配置开发环境(安装CUDA、OpenCV、boost、leveldb、lmdb、Python等,安装步骤参考http://blog.csdn.net/Real_Myth/article/details/42672381?locationNum=5);
(3)编译;
(4)运行例子(如MNIST、CIFAR10、ImageNet等);
【路线图】
(1)Caffe源码阅读路线图应该是从CAFFE_ROOT/src/caffe/proto/caffe.proto开始,了解各类数据结构,主要是内存对象和序列化磁盘文件的一一对应关系,知道如何从磁盘Load一个对象到内存,以及如何将内存对象Save到磁盘,中间的过程实现都是由Protobuf自动完成的。
(2)第二步就是看头文件,不用急于去看cpp文件,先理解整个框架。Caffe中类数目众多,但脉络十分清晰。在Testing时,最外层的类是Caffe::Net,包含了多个Caffe::Layer对象,而Layer对象派生出神经网络多种不同层的类(DataLayer, ConvolutionLayer, InnerProductionLayer, AccurancyLayer等),每层会有相应的输入输出(Blob对象)以及层的参数(可选,Blob对象);Blob中包括了SyncedMemory对象,统一了CPU和GPU存储器。自顶向下去看这些类,结合理论知识很容易掌握使用方法。
(3)第三步就是有针对性地去看cpp和cu文件了。一般而言,Caffe框架不需要修改,只需要增加新的层实现即可。例如你想自己实现卷积层,只需从ConvolutionLayer派生一个新类MyConvolutionLayer,然后将几个虚函数改成自己的实现即可。所以这一阶段关注点在算法上,而不是源码本身。
(4)第四步就很自由了,可以编写各类工具,集成到Caffe内部。在CAFFE_ROOT/tools/下面有很多实用工具,可以根据需要修改。例如从训练好的模型中抽取参数进行可视化可以用Python结合matplot实现。
(5)接下来,如果想更深层次学习,最好是自己重新写一遍Caffe(时间充裕的情况)。跳出现有的框架,重新构建自己的框架,通过对比就能学到更多内容。
2 Protobuf
Protobuf是一种可以实现内存与外存交换的协议接口。这是由谷歌开发的开源工具,目前研究Caffe源码时用到。
一个软件项目 = 数据结构 + 算法 + 参数,对于数据结构和算法我们都已经有较多研究,但不同开发者对参数管理却各有千秋。有人喜欢TXT格式化的参数文件,有人喜欢BIN简单高效,也有人喜欢图形化界面的直观。不一致的参数管理带来很多问题,例如一个项目组内不同成员必须约定一套统一的参数方案,或者称为通信协议,这样便于模块集成。而Protobuf工具就完美解决了这个问题,关键部分代码自动生成,节省了大量的开发、调试时间。
首先下载protobuf,地址(打不开?……不解释)
这里用Linux版本2.5.0
解压:
tar zxvf protobuf-2.5.0.tar.gz
切到主目录:
cd protobuf-2.5.0
编译:
./configure
make
sudo make install
添加环境变量:
export PKG_CONFIG_PATH=$(pwd)
编译examples:
cd examples/
make cpp
这里我们只编译C++代码。
编译完成,生成了以下可执行文件:
add_person_cpp
list_people_cpp
这是个通讯录的例子。我们首先运行add_person_cpp:
- ./add_person_cpp zyk
- zyk: File not found. Creating a new file.
- Enter person ID number: 123
- Enter name: zhaoyongke
- Enter email address (blank for none): zhaoyongke@yeah.net
- Enter a phone number (or leave blank to finish): 188188188
- Is this a mobile, home, or work phone?(回车)
- Unknown phone type. Using default.
- Enter a phone number (or leave blank to finish):(回车)
然后运行list_people_cpp:
- ./list_people_cpp zyk
- Person ID: 123
- Name: zhaoyongke
- E-mail address: zhaoyongke@yeah.net
- Home phone #: 188188188
可见我们生成了新的通讯录zyk,里面保存了相应的信息。
例子运行结束了,我们看下代码是如何生成的。
protobuf使用前,先编写proto文件,这是描述我们需要配置参数的数据结构。这个例子里面的proto如下:
- // See README.txt for information and build instructions.
- package tutorial;
- option java_package = "com.example.tutorial";
- option java_outer_classname = "AddressBookProtos";
- message Person {
- required string name = 1;
- required int32 id = 2; // Unique ID number for this person.
- optional string email = 3;
- enum PhoneType {
- MOBILE = 0;
- HOME = 1;
- WORK = 2;
- }
- message PhoneNumber {
- required string number = 1;
- optional PhoneType type = 2 [default = HOME];
- }
- repeated PhoneNumber phone = 4;
- }
- // Our address book file is just one of these.
- message AddressBook {
- repeated Person person = 1;
- }
前几行是定义包的,可以忽略。
message Person{...}定义了一个需要传输的参数结构体,可见包括这么几个单元:name(string类型)、id(int32类型)、email(string类型)、phone(PhoneNumber类型,嵌套在Person内的类)。前面标记为“required”是必须有值的,而“optional“则为可选项,”repeated“表示后面单元为相同类型的一组向量。
有了如上定义,我们可以用protobuf工具生成接口代码,命令如下:
- protoc --cpp_out=. addressbook.proto
运行后生成了两个文件:addressbook.pb.cc 和addressbook.pb.h,代码比较长就不贴了。我们的应用程序可以通过自动生成的接口实现参数的序列化/反序列化,代码如下:
- //add_person.c
- #include <iostream>
- #include <fstream>
- #include <string>
- #include "addressbook.pb.h"
- using namespace std;
- // This function fills in a Person message based on user input.
- void PromptForAddress(tutorial::Person* person) {
- cout << "Enter person ID number: ";
- int id;
- cin >> id;
- person->set_id(id);
- cin.ignore(256, '\n');
- cout << "Enter name: ";
- getline(cin, *person->mutable_name());
- cout << "Enter email address (blank for none): ";
- string email;
- getline(cin, email);
- if (!email.empty()) {
- person->set_email(email);
- }
- while (true) {
- cout << "Enter a phone number (or leave blank to finish): ";
- string number;
- getline(cin, number);
- if (number.empty()) {
- break;
- }
- tutorial::Person::PhoneNumber* phone_number = person->add_phone();
- phone_number->set_number(number);
- cout << "Is this a mobile, home, or work phone? ";
- string type;
- getline(cin, type);
- if (type == "mobile") {
- phone_number->set_type(tutorial::Person::MOBILE);
- } else if (type == "home") {
- phone_number->set_type(tutorial::Person::HOME);
- } else if (type == "work") {
- phone_number->set_type(tutorial::Person::WORK);
- } else {
- cout << "Unknown phone type. Using default." << endl;
- }
- }
- }
- // Main function: Reads the entire address book from a file,
- // adds one person based on user input, then writes it back out to the same
- // file.
- int main(int argc, char* argv[]) {
- // Verify that the version of the library that we linked against is
- // compatible with the version of the headers we compiled against.
- GOOGLE_PROTOBUF_VERIFY_VERSION;
- if (argc != 2) {
- cerr << "Usage: " << argv[0] << " ADDRESS_BOOK_FILE" << endl;
- return -1;
- }
- tutorial::AddressBook address_book;
- {
- // Read the existing address book.
- fstream input(argv[1], ios::in | ios::binary);
- if (!input) {
- cout << argv[1] << ": File not found. Creating a new file." << endl;
- } else if (!address_book.ParseFromIstream(&input)) {
- cerr << "Failed to parse address book." << endl;
- return -1;
- }
- }
- // Add an address.
- PromptForAddress(address_book.add_person());
- {
- // Write the new address book back to disk.
- fstream output(argv[1], ios::out | ios::trunc | ios::binary);
- if (!address_book.SerializeToOstream(&output)) {
- cerr << "Failed to write address book." << endl;
- return -1;
- }
- }
- // Optional: Delete all global objects allocated by libprotobuf.
- google::protobuf::ShutdownProtobufLibrary();
- return 0;
- }
可见只需要调用addressbook.pb.h中声明的tutorial::AddressBook类、Person类中的接口(add_person(), add_phone(), set_number(), set_email()等)就能操作相应的参数,最后将内存中的参数序列化为文件只需要执行SerializeToOstream()。相应的读取参数文件的操作为ParseFromIstream()。这里贴出例子中的第二个程序如下:
- // list_people.c
- #include <iostream>
- #include <fstream>
- #include <string>
- #include "addressbook.pb.h"
- using namespace std;
- // Iterates though all people in the AddressBook and prints info about them.
- void ListPeople(const tutorial::AddressBook& address_book) {
- for (int i = 0; i < address_book.person_size(); i++) {
- const tutorial::Person& person = address_book.person(i);
- cout << "Person ID: " << person.id() << endl;
- cout << " Name: " << person.name() << endl;
- if (person.has_email()) {
- cout << " E-mail address: " << person.email() << endl;
- }
- for (int j = 0; j < person.phone_size(); j++) {
- const tutorial::Person::PhoneNumber& phone_number = person.phone(j);
- switch (phone_number.type()) {
- case tutorial::Person::MOBILE:
- cout << " Mobile phone #: ";
- break;
- case tutorial::Person::HOME:
- cout << " Home phone #: ";
- break;
- case tutorial::Person::WORK:
- cout << " Work phone #: ";
- break;
- }
- cout << phone_number.number() << endl;
- }
- }
- }
- // Main function: Reads the entire address book from a file and prints all
- // the information inside.
- int main(int argc, char* argv[]) {
- // Verify that the version of the library that we linked against is
- // compatible with the version of the headers we compiled against.
- GOOGLE_PROTOBUF_VERIFY_VERSION;
- if (argc != 2) {
- cerr << "Usage: " << argv[0] << " ADDRESS_BOOK_FILE" << endl;
- return -1;
- }
- tutorial::AddressBook address_book;
- {
- // Read the existing address book.
- fstream input(argv[1], ios::in | ios::binary);
- if (!address_book.ParseFromIstream(&input)) {
- cerr << "Failed to parse address book." << endl;
- return -1;
- }
- }
- ListPeople(address_book);
- // Optional: Delete all global objects allocated by libprotobuf.
- google::protobuf::ShutdownProtobufLibrary();
- return 0;
- }
相信做完这个实验,你将不再对Caffe代码中的参数初始化、参数保存操作感到陌生,一切都很自然。
除了上述简单功能,Protobuf还可以用来传递不同语言(C/C++与Java、Python)之间的参数,省去了自己手动维护数据结构的繁琐工作。也可以支持客户端/服务器模式,在主机/从机之间传递参数。
闪电般的内存映射型数据库管理(LMDB)
简介
LMDB是基于二叉树的数据库管理库,建模基于伯克利数据库的应用程序接口,但做了大幅精简。整个数据库都是内存映射型的,所有数据获取返回数据都是直接从映射的内存中返回,所以获取数据时没有malloc或memcpy发生。因此该数据库仍是非常简单的,因为它不需要自己的页面缓存层,并且非常高效、省内存。它在语义上完全符合ACID(原子性、一致性、隔离性、持久性)。当内存映射为只读时,数据库完整性不会被应用程序的迷失指针写破坏。
该库也是线程可见的,支持来自多进程/线程的并发读/写访问。数据页使用写时复制策略,故没有活动数据页被覆盖写入。这也提供了保护机制,经历系统崩溃后不需要特殊恢复过程。写入过程为完全串行的;一次只有一个写会话是活动的,这保证了写入者不可能死锁。数据库结构是多个版本,所以读出者运行时不加锁。写入这不会阻塞读出者,读出者也不会阻塞写入者。
不像其他熟知的数据库机制(使用写前会话日志或数据仅追加写),LMDB操作时不需要保持会话。前面两种都需要周期性地检查或者压缩他们的日志或数据库文件,否则会无限增长。LMDB记录数据库内的空页面,在新的写入操作时重用他们,所以正常使用时数据库尺寸不会无限增加。
内存映射可以用作只读映射或读写映射。默认为只读映射,这提供了对破坏完全的免疫力。使用读写模式提供了更高的写性能,但增加了被恶意写入破坏数据库的可能性。当然如果你的应用代码是已知无bug的,那么这不是个严重的问题。
4 Level DB
Caffe自带例子Cifar10中使用leveldb存储输入数据,为此我们研究一下怎样使用它。安装步骤可以参考http://blog.csdn.net/kangqing2003/article/details/6658345
Leveldb库提供了一种持续的键值对存储方式。键和值可以为任意字节数组。键存储顺序可由用户定义的比较函数决定。
打开一个数据库
Leveldb数据库有个与文件系统目录相对应的名字。数据库的所有内容都保存在这个目录中。下面例子展示了怎样打开一个数据库,必要时创建它:
- #include <assert>
- #include "leveldb/db.h"
- leveldb::DB* db;
- leveldb::Options options;
- options.create_if_missing = true;
- leveldb::Status status = leveldb::DB::Open(options,"/tmp/testdb", &db);
- assert(status.ok());
如果你想在数据库已经存在情况下报错,只需要在leveldb::DB::Open调用前增加以下代码
- options.error_if_exists = true;
状态
你可能注意到了上面的leveldb::Status类型。Leveldb中大多数可能遇到错误的函数返回该类型的值。你可以检查返回值是否为ok,必要时可打印相应的错误信息:
- leveldb::Status s = ...;
- if(!s.ok()) cerr << s.ToString() << endl;
关闭数据库
当你操作完一个数据库,只需delete掉数据库对象。例子:
- ...open the db as described above ...
- ... dosomething with db ...
- deletedb;
读和写
数据库提供Put,Delete和Get方法来修改/检索数据库。例如,下面代码将key1键下的值value移动到key2键下:
- std::string value;
- leveldb::Status s = db->Get(leveldb::ReadOptions(), key1,&value);
- if(s.ok()) s = db->Put(leveldb::WriteOptions(), key2, value);
- if(s.ok()) s = db->Delete(leveldb::WriteOptions(), key1);
原子更新
注意到如果进程在key2 Put操作后、key1 delete操作前终止,那么相同的值value可能留存在多个键下。这类问题可以使用WriteBatch类避免,该类可以原子地应用一系列更新:
- #include "leveldb/write_batch.h"
- ...
- std::string value;
- leveldb::Status s = db->Get(leveldb::ReadOptions(), key1,&value);
- if(s.ok()) {
- leveldb::WriteBatch batch;
- batch.Delete(key1);
- batch.Put(key2, value);
- s =db->Write(leveldb::WriteOptions(), &batch);
- }
WriteBatch持有一系列针对数据库的编辑操作,这些操作将在一个batch内顺序执行。注意到我们在Put前调用Delete,这样如果key1恰好等于key2时,最终我们不会错误地丢掉整个value。
除了原子操作的优点,WriteBatch也可以用于加速批量更新操作,只需要将大量独立的改动操作放到同一个batch中。
同步写
默认情况下,每次写到leveldb都是异步的:进程一旦将写操作推送给操作系统就返回。操作系统内存到非易失存储的传输将异步发生。在某次写入中可将标志位sync使能,这样会使写操作直到数据写入非易失存储后才返回。(在采用了Posix的系统中,写操作返回前调用fsync(), fdatasync(),msync(…,MS_SYNC))。
- leveldb::WriteOptions write_options;
- write_options.sync = true;
- db->Put(write_options, ...);
Caffe上面有两个比较简单的例子:MNIST和CIFAR-10,前者是用于手写数字识别的,后者用于小图片分类。这两个数据集可以在Caffe源码框架中用脚本(CAFFE_ROOT/data/mnist/get_mnist.sh和CAFFE_ROOT/data/cifar10/get_cifar10.sh)下载,如下图所示:
- $ ./get_cifar10.sh
- Downloading...
- --2014-12-02 01:20:12-- http://www.cs.toronto.edu/~kriz/cifar-10-binary.tar.gz
- Resolving www.cs.toronto.edu... 128.100.3.30
- Connecting to www.cs.toronto.edu|128.100.3.30|:80... connected.
- HTTP request sent, awaiting response... 200 OK
- Length: 170052171 (162M) [application/x-gzip]
- Saving to: “cifar-10-binary.tar.gz”
- 100%[===========================================================================================================================================================>] 170,052,171 859K/s in 2m 16s
- 2014-12-02 01:22:28 (1.20 MB/s) - “cifar-10-binary.tar.gz” saved [170052171/170052171]
- Unzipping...
- Done.
- $ ls
- batches.meta.txt data_batch_1.bin data_batch_2.bin data_batch_3.bin data_batch_4.bin data_batch_5.bin get_cifar10.sh readme.html test_batch.bin
- $ ./get_mnist.sh
- Downloading...
- --2014-12-02 01:24:25-- http://yann.lecun.com/exdb/mnist/train-images-idx3-ubyte.gz
- Resolving yann.lecun.com... 128.122.47.89
- Connecting to yann.lecun.com|128.122.47.89|:80... connected.
- HTTP request sent, awaiting response... 200 OK
- Length: 9912422 (9.5M) [application/x-gzip]
- Saving to: “train-images-idx3-ubyte.gz”
- 100%[===========================================================================================================================================================>] 9,912,422 2.09M/s in 6.7s
- 2014-12-02 01:24:33 (1.42 MB/s) - “train-images-idx3-ubyte.gz” saved [9912422/9912422]
- --2014-12-02 01:24:33-- http://yann.lecun.com/exdb/mnist/train-labels-idx1-ubyte.gz
- Resolving yann.lecun.com... 128.122.47.89
- Connecting to yann.lecun.com|128.122.47.89|:80... connected.
- HTTP request sent, awaiting response... 200 OK
- Length: 28881 (28K) [application/x-gzip]
- Saving to: “train-labels-idx1-ubyte.gz”
- 100%[===========================================================================================================================================================>] 28,881 42.0K/s in 0.7s
- 2014-12-02 01:24:34 (42.0 KB/s) - “train-labels-idx1-ubyte.gz” saved [28881/28881]
- --2014-12-02 01:24:34-- http://yann.lecun.com/exdb/mnist/t10k-images-idx3-ubyte.gz
- Resolving yann.lecun.com... 128.122.47.89
- Connecting to yann.lecun.com|128.122.47.89|:80... connected.
- HTTP request sent, awaiting response... 200 OK
- Length: 1648877 (1.6M) [application/x-gzip]
- Saving to: “t10k-images-idx3-ubyte.gz”
- 100%[===========================================================================================================================================================>] 1,648,877 552K/s in 2.9s
- 2014-12-02 01:24:39 (552 KB/s) - “t10k-images-idx3-ubyte.gz” saved [1648877/1648877]
- --2014-12-02 01:24:39-- http://yann.lecun.com/exdb/mnist/t10k-labels-idx1-ubyte.gz
- Resolving yann.lecun.com... 128.122.47.89
- Connecting to yann.lecun.com|128.122.47.89|:80... connected.
- HTTP request sent, awaiting response... 200 OK
- Length: 4542 (4.4K) [application/x-gzip]
- Saving to: “t10k-labels-idx1-ubyte.gz”
- 100%[===========================================================================================================================================================>] 4,542 19.8K/s in 0.2s
- 2014-12-02 01:24:40 (19.8 KB/s) - “t10k-labels-idx1-ubyte.gz” saved [4542/4542]
- Unzipping...
- Done.
- $ ls
- get_mnist.sh t10k-images-idx3-ubyte t10k-labels-idx1-ubyte train-images-idx3-ubyte train-labels-idx1-ubyte
如果你下载出现问题可以从我的资源处获取,网址http://download.csdn.net/detail/kkk584520/8213463。
原始数据集为二进制文件,需要转换为leveldb或lmdb才能被Caffe识别。转换格式的工具已经集成在Caffe代码中,见CAFFE_ROOT/examples/mnist/convert_mnist_data.cpp
和CAFFE_ROOT/examples/cifar10/convert_cifar_data.cpp,如果对leveldb或lmdb操作不熟悉可以从这两个源代码中学习。我们只需要在CAFFE_ROOT目录中执行两条命令即可:
./examples/mnist/create_mnist.sh
./examples/cifar10/create_cifar10.sh
上一篇介绍了如何准备数据集,做好准备之后我们先看怎样对训练好的模型进行Testing。
先用手写体识别例子,MNIST是数据集(包括训练数据和测试数据),深度学习模型采用LeNet(具体介绍见http://yann.lecun.com/exdb/lenet/),由Yann LeCun教授提出。
如果你编译好了Caffe,那么在CAFFE_ROOT下运行如下命令:
- $ ./build/tools/caffe.bin test -model=examples/mnist/lenet_train_test.prototxt -weights=examples/mnist/lenet_iter_10000.caffemodel -gpu=0
就可以实现Testing。参数说明如下:
test:表示对训练好的模型进行Testing,而不是training。其他参数包括train, time, device_query。
-model=XXX:指定模型prototxt文件,这是一个文本文件,详细描述了网络结构和数据集信息。我用的prototxt内容如下:
- name: "LeNet"
- layers {
- name: "mnist"
- type: DATA
- top: "data"
- top: "label"
- data_param {
- source: "examples/mnist/mnist_train_lmdb"
- backend: LMDB
- batch_size: 64
- }
- transform_param {
- scale: 0.00390625
- }
- include: { phase: TRAIN }
- }
- layers {
- name: "mnist"
- type: DATA
- top: "data"
- top: "label"
- data_param {
- source: "examples/mnist/mnist_test_lmdb"
- backend: LMDB
- batch_size: 100
- }
- transform_param {
- scale: 0.00390625
- }
- include: { phase: TEST }
- }
- layers {
- name: "conv1"
- type: CONVOLUTION
- bottom: "data"
- top: "conv1"
- blobs_lr: 1
- blobs_lr: 2
- convolution_param {
- num_output: 20
- kernel_size: 5
- stride: 1
- weight_filler {
- type: "xavier"
- }
- bias_filler {
- type: "constant"
- }
- }
- }
- layers {
- name: "pool1"
- type: POOLING
- bottom: "conv1"
- top: "pool1"
- pooling_param {
- pool: MAX
- kernel_size: 2
- stride: 2
- }
- }
- layers {
- name: "conv2"
- type: CONVOLUTION
- bottom: "pool1"
- top: "conv2"
- blobs_lr: 1
- blobs_lr: 2
- convolution_param {
- num_output: 50
- kernel_size: 5
- stride: 1
- weight_filler {
- type: "xavier"
- }
- bias_filler {
- type: "constant"
- }
- }
- }
- layers {
- name: "pool2"
- type: POOLING
- bottom: "conv2"
- top: "pool2"
- pooling_param {
- pool: MAX
- kernel_size: 2
- stride: 2
- }
- }
- layers {
- name: "ip1"
- type: INNER_PRODUCT
- bottom: "pool2"
- top: "ip1"
- blobs_lr: 1
- blobs_lr: 2
- inner_product_param {
- num_output: 500
- weight_filler {
- type: "xavier"
- }
- bias_filler {
- type: "constant"
- }
- }
- }
- layers {
- name: "relu1"
- type: RELU
- bottom: "ip1"
- top: "ip1"
- }
- layers {
- name: "ip2"
- type: INNER_PRODUCT
- bottom: "ip1"
- top: "ip2"
- blobs_lr: 1
- blobs_lr: 2
- inner_product_param {
- num_output: 10
- weight_filler {
- type: "xavier"
- }
- bias_filler {
- type: "constant"
- }
- }
- }
- layers {
- name: "accuracy"
- type: ACCURACY
- bottom: "ip2"
- bottom: "label"
- top: "accuracy"
- include: { phase: TEST }
- }
- layers {
- name: "loss"
- type: SOFTMAX_LOSS
- bottom: "ip2"
- bottom: "label"
- top: "loss"
- }
里面定义的网络结构如下图所示:

-weights=XXX:指定训练好的caffemodel二进制文件。如果你手头没有训练好的可以下载这个(http://download.csdn.net/detail/kkk584520/8219443)。
-gpu=0:指定在GPU上运行,GPUID=0。如果你没有GPU就去掉这个参数,默认在CPU上运行。
运行输出如下:
- I1203 18:47:00.073052 4610 caffe.cpp:134] Use GPU with device ID 0
- I1203 18:47:00.367065 4610 net.cpp:275] The NetState phase (1) differed from the phase (0) specified by a rule in layer mnist
- I1203 18:47:00.367269 4610 net.cpp:39] Initializing net from parameters:
- name: "LeNet"
- layers {
- top: "data"
- top: "label"
- name: "mnist"
- type: DATA
- data_param {
- source: "examples/mnist/mnist_test_lmdb"
- batch_size: 100
- backend: LMDB
- }
- include {
- phase: TEST
- }
- transform_param {
- scale: 0.00390625
- }
- }
- layers {
- bottom: "data"
- top: "conv1"
- name: "conv1"
- type: CONVOLUTION
- blobs_lr: 1
- blobs_lr: 2
- convolution_param {
- num_output: 20
- kernel_size: 5
- stride: 1
- weight_filler {
- type: "xavier"
- }
- bias_filler {
- type: "constant"
- }
- }
- }
- layers {
- bottom: "conv1"
- top: "pool1"
- name: "pool1"
- type: POOLING
- pooling_param {
- pool: MAX
- kernel_size: 2
- stride: 2
- }
- }
- layers {
- bottom: "pool1"
- top: "conv2"
- name: "conv2"
- type: CONVOLUTION
- blobs_lr: 1
- blobs_lr: 2
- convolution_param {
- num_output: 50
- kernel_size: 5
- stride: 1
- weight_filler {
- type: "xavier"
- }
- bias_filler {
- type: "constant"
- }
- }
- }
- layers {
- bottom: "conv2"
- top: "pool2"
- name: "pool2"
- type: POOLING
- pooling_param {
- pool: MAX
- kernel_size: 2
- stride: 2
- }
- }
- layers {
- bottom: "pool2"
- top: "ip1"
- name: "ip1"
- type: INNER_PRODUCT
- blobs_lr: 1
- blobs_lr: 2
- inner_product_param {
- num_output: 500
- weight_filler {
- type: "xavier"
- }
- bias_filler {
- type: "constant"
- }
- }
- }
- layers {
- bottom: "ip1"
- top: "ip1"
- name: "relu1"
- type: RELU
- }
- layers {
- bottom: "ip1"
- top: "ip2"
- name: "ip2"
- type: INNER_PRODUCT
- blobs_lr: 1
- blobs_lr: 2
- inner_product_param {
- num_output: 10
- weight_filler {
- type: "xavier"
- }
- bias_filler {
- type: "constant"
- }
- }
- }
- layers {
- bottom: "ip2"
- bottom: "label"
- top: "accuracy"
- name: "accuracy"
- type: ACCURACY
- include {
- phase: TEST
- }
- }
- layers {
- bottom: "ip2"
- bottom: "label"
- top: "loss"
- name: "loss"
- type: SOFTMAX_LOSS
- }
- I1203 18:47:00.367391 4610 net.cpp:67] Creating Layer mnist
- I1203 18:47:00.367409 4610 net.cpp:356] mnist -> data
- I1203 18:47:00.367435 4610 net.cpp:356] mnist -> label
- I1203 18:47:00.367451 4610 net.cpp:96] Setting up mnist
- I1203 18:47:00.367571 4610 data_layer.cpp:68] Opening lmdb examples/mnist/mnist_test_lmdb
- I1203 18:47:00.367609 4610 data_layer.cpp:128] output data size: 100,1,28,28
- I1203 18:47:00.367832 4610 net.cpp:103] Top shape: 100 1 28 28 (78400)
- I1203 18:47:00.367849 4610 net.cpp:103] Top shape: 100 1 1 1 (100)
- I1203 18:47:00.367863 4610 net.cpp:67] Creating Layer label_mnist_1_split
- I1203 18:47:00.367873 4610 net.cpp:394] label_mnist_1_split <- label
- I1203 18:47:00.367892 4610 net.cpp:356] label_mnist_1_split -> label_mnist_1_split_0
- I1203 18:47:00.367908 4610 net.cpp:356] label_mnist_1_split -> label_mnist_1_split_1
- I1203 18:47:00.367919 4610 net.cpp:96] Setting up label_mnist_1_split
- I1203 18:47:00.367929 4610 net.cpp:103] Top shape: 100 1 1 1 (100)
- I1203 18:47:00.367938 4610 net.cpp:103] Top shape: 100 1 1 1 (100)
- I1203 18:47:00.367950 4610 net.cpp:67] Creating Layer conv1
- I1203 18:47:00.367959 4610 net.cpp:394] conv1 <- data
- I1203 18:47:00.367969 4610 net.cpp:356] conv1 -> conv1
- I1203 18:47:00.367982 4610 net.cpp:96] Setting up conv1
- I1203 18:47:00.392133 4610 net.cpp:103] Top shape: 100 20 24 24 (1152000)
- I1203 18:47:00.392204 4610 net.cpp:67] Creating Layer pool1
- I1203 18:47:00.392217 4610 net.cpp:394] pool1 <- conv1
- I1203 18:47:00.392231 4610 net.cpp:356] pool1 -> pool1
- I1203 18:47:00.392247 4610 net.cpp:96] Setting up pool1
- I1203 18:47:00.392273 4610 net.cpp:103] Top shape: 100 20 12 12 (288000)
- I1203 18:47:00.392297 4610 net.cpp:67] Creating Layer conv2
- I1203 18:47:00.392307 4610 net.cpp:394] conv2 <- pool1
- I1203 18:47:00.392318 4610 net.cpp:356] conv2 -> conv2
- I1203 18:47:00.392330 4610 net.cpp:96] Setting up conv2
- I1203 18:47:00.392669 4610 net.cpp:103] Top shape: 100 50 8 8 (320000)
- I1203 18:47:00.392729 4610 net.cpp:67] Creating Layer pool2
- I1203 18:47:00.392756 4610 net.cpp:394] pool2 <- conv2
- I1203 18:47:00.392768 4610 net.cpp:356] pool2 -> pool2
- I1203 18:47:00.392781 4610 net.cpp:96] Setting up pool2
- I1203 18:47:00.392793 4610 net.cpp:103] Top shape: 100 50 4 4 (80000)
- I1203 18:47:00.392810 4610 net.cpp:67] Creating Layer ip1
- I1203 18:47:00.392819 4610 net.cpp:394] ip1 <- pool2
- I1203 18:47:00.392832 4610 net.cpp:356] ip1 -> ip1
- I1203 18:47:00.392844 4610 net.cpp:96] Setting up ip1
- I1203 18:47:00.397348 4610 net.cpp:103] Top shape: 100 500 1 1 (50000)
- I1203 18:47:00.397372 4610 net.cpp:67] Creating Layer relu1
- I1203 18:47:00.397382 4610 net.cpp:394] relu1 <- ip1
- I1203 18:47:00.397394 4610 net.cpp:345] relu1 -> ip1 (in-place)
- I1203 18:47:00.397407 4610 net.cpp:96] Setting up relu1
- I1203 18:47:00.397420 4610 net.cpp:103] Top shape: 100 500 1 1 (50000)
- I1203 18:47:00.397434 4610 net.cpp:67] Creating Layer ip2
- I1203 18:47:00.397442 4610 net.cpp:394] ip2 <- ip1
- I1203 18:47:00.397456 4610 net.cpp:356] ip2 -> ip2
- I1203 18:47:00.397469 4610 net.cpp:96] Setting up ip2
- I1203 18:47:00.397532 4610 net.cpp:103] Top shape: 100 10 1 1 (1000)
- I1203 18:47:00.397547 4610 net.cpp:67] Creating Layer ip2_ip2_0_split
- I1203 18:47:00.397557 4610 net.cpp:394] ip2_ip2_0_split <- ip2
- I1203 18:47:00.397565 4610 net.cpp:356] ip2_ip2_0_split -> ip2_ip2_0_split_0
- I1203 18:47:00.397583 4610 net.cpp:356] ip2_ip2_0_split -> ip2_ip2_0_split_1
- I1203 18:47:00.397593 4610 net.cpp:96] Setting up ip2_ip2_0_split
- I1203 18:47:00.397603 4610 net.cpp:103] Top shape: 100 10 1 1 (1000)
- I1203 18:47:00.397611 4610 net.cpp:103] Top shape: 100 10 1 1 (1000)
- I1203 18:47:00.397622 4610 net.cpp:67] Creating Layer accuracy
- I1203 18:47:00.397631 4610 net.cpp:394] accuracy <- ip2_ip2_0_split_0
- I1203 18:47:00.397640 4610 net.cpp:394] accuracy <- label_mnist_1_split_0
- I1203 18:47:00.397650 4610 net.cpp:356] accuracy -> accuracy
- I1203 18:47:00.397661 4610 net.cpp:96] Setting up accuracy
- I1203 18:47:00.397673 4610 net.cpp:103] Top shape: 1 1 1 1 (1)
- I1203 18:47:00.397687 4610 net.cpp:67] Creating Layer loss
- I1203 18:47:00.397696 4610 net.cpp:394] loss <- ip2_ip2_0_split_1
- I1203 18:47:00.397706 4610 net.cpp:394] loss <- label_mnist_1_split_1
- I1203 18:47:00.397714 4610 net.cpp:356] loss -> loss
- I1203 18:47:00.397725 4610 net.cpp:96] Setting up loss
- I1203 18:47:00.397737 4610 net.cpp:103] Top shape: 1 1 1 1 (1)
- I1203 18:47:00.397745 4610 net.cpp:109] with loss weight 1
- I1203 18:47:00.397776 4610 net.cpp:170] loss needs backward computation.
- I1203 18:47:00.397785 4610 net.cpp:172] accuracy does not need backward computation.
- I1203 18:47:00.397794 4610 net.cpp:170] ip2_ip2_0_split needs backward computation.
- I1203 18:47:00.397801 4610 net.cpp:170] ip2 needs backward computation.
- I1203 18:47:00.397809 4610 net.cpp:170] relu1 needs backward computation.
- I1203 18:47:00.397816 4610 net.cpp:170] ip1 needs backward computation.
- I1203 18:47:00.397825 4610 net.cpp:170] pool2 needs backward computation.
- I1203 18:47:00.397832 4610 net.cpp:170] conv2 needs backward computation.
- I1203 18:47:00.397843 4610 net.cpp:170] pool1 needs backward computation.
- I1203 18:47:00.397851 4610 net.cpp:170] conv1 needs backward computation.
- I1203 18:47:00.397860 4610 net.cpp:172] label_mnist_1_split does not need backward computation.
- I1203 18:47:00.397867 4610 net.cpp:172] mnist does not need backward computation.
- I1203 18:47:00.397874 4610 net.cpp:208] This network produces output accuracy
- I1203 18:47:00.397884 4610 net.cpp:208] This network produces output loss
- I1203 18:47:00.397905 4610 net.cpp:467] Collecting Learning Rate and Weight Decay.
- I1203 18:47:00.397915 4610 net.cpp:219] Network initialization done.
- I1203 18:47:00.397923 4610 net.cpp:220] Memory required for data: 8086808
- I1203 18:47:00.432165 4610 caffe.cpp:145] Running for 50 iterations.
- I1203 18:47:00.435849 4610 caffe.cpp:169] Batch 0, accuracy = 0.99
- I1203 18:47:00.435879 4610 caffe.cpp:169] Batch 0, loss = 0.018971
- I1203 18:47:00.437434 4610 caffe.cpp:169] Batch 1, accuracy = 0.99
- I1203 18:47:00.437471 4610 caffe.cpp:169] Batch 1, loss = 0.0117609
- I1203 18:47:00.439000 4610 caffe.cpp:169] Batch 2, accuracy = 1
- I1203 18:47:00.439020 4610 caffe.cpp:169] Batch 2, loss = 0.00555977
- I1203 18:47:00.440551 4610 caffe.cpp:169] Batch 3, accuracy = 0.99
- I1203 18:47:00.440575 4610 caffe.cpp:169] Batch 3, loss = 0.0412139
- I1203 18:47:00.442105 4610 caffe.cpp:169] Batch 4, accuracy = 0.99
- I1203 18:47:00.442126 4610 caffe.cpp:169] Batch 4, loss = 0.0579313
- I1203 18:47:00.443619 4610 caffe.cpp:169] Batch 5, accuracy = 0.99
- I1203 18:47:00.443639 4610 caffe.cpp:169] Batch 5, loss = 0.0479742
- I1203 18:47:00.445159 4610 caffe.cpp:169] Batch 6, accuracy = 0.98
- I1203 18:47:00.445179 4610 caffe.cpp:169] Batch 6, loss = 0.0570176
- I1203 18:47:00.446712 4610 caffe.cpp:169] Batch 7, accuracy = 0.99
- I1203 18:47:00.446732 4610 caffe.cpp:169] Batch 7, loss = 0.0272363
- I1203 18:47:00.448249 4610 caffe.cpp:169] Batch 8, accuracy = 1
- I1203 18:47:00.448269 4610 caffe.cpp:169] Batch 8, loss = 0.00680142
- I1203 18:47:00.449801 4610 caffe.cpp:169] Batch 9, accuracy = 0.98
- I1203 18:47:00.449821 4610 caffe.cpp:169] Batch 9, loss = 0.0288398
- I1203 18:47:00.451352 4610 caffe.cpp:169] Batch 10, accuracy = 0.98
- I1203 18:47:00.451372 4610 caffe.cpp:169] Batch 10, loss = 0.0603264
- I1203 18:47:00.452883 4610 caffe.cpp:169] Batch 11, accuracy = 0.98
- I1203 18:47:00.452903 4610 caffe.cpp:169] Batch 11, loss = 0.0524943
- I1203 18:47:00.454407 4610 caffe.cpp:169] Batch 12, accuracy = 0.95
- I1203 18:47:00.454427 4610 caffe.cpp:169] Batch 12, loss = 0.106648
- I1203 18:47:00.455955 4610 caffe.cpp:169] Batch 13, accuracy = 0.98
- I1203 18:47:00.455976 4610 caffe.cpp:169] Batch 13, loss = 0.0450225
- I1203 18:47:00.457484 4610 caffe.cpp:169] Batch 14, accuracy = 1
- I1203 18:47:00.457504 4610 caffe.cpp:169] Batch 14, loss = 0.00531614
- I1203 18:47:00.459038 4610 caffe.cpp:169] Batch 15, accuracy = 0.98
- I1203 18:47:00.459056 4610 caffe.cpp:169] Batch 15, loss = 0.065209
- I1203 18:47:00.460577 4610 caffe.cpp:169] Batch 16, accuracy = 0.98
- I1203 18:47:00.460597 4610 caffe.cpp:169] Batch 16, loss = 0.0520317
- I1203 18:47:00.462123 4610 caffe.cpp:169] Batch 17, accuracy = 0.99
- I1203 18:47:00.462143 4610 caffe.cpp:169] Batch 17, loss = 0.0328681
- I1203 18:47:00.463656 4610 caffe.cpp:169] Batch 18, accuracy = 0.99
- I1203 18:47:00.463676 4610 caffe.cpp:169] Batch 18, loss = 0.0175973
- I1203 18:47:00.465188 4610 caffe.cpp:169] Batch 19, accuracy = 0.97
- I1203 18:47:00.465208 4610 caffe.cpp:169] Batch 19, loss = 0.0576884
- I1203 18:47:00.466749 4610 caffe.cpp:169] Batch 20, accuracy = 0.97
- I1203 18:47:00.466769 4610 caffe.cpp:169] Batch 20, loss = 0.0850501
- I1203 18:47:00.468278 4610 caffe.cpp:169] Batch 21, accuracy = 0.98
- I1203 18:47:00.468298 4610 caffe.cpp:169] Batch 21, loss = 0.0676049
- I1203 18:47:00.469805 4610 caffe.cpp:169] Batch 22, accuracy = 0.99
- I1203 18:47:00.469825 4610 caffe.cpp:169] Batch 22, loss = 0.0448538
- I1203 18:47:00.471328 4610 caffe.cpp:169] Batch 23, accuracy = 0.97
- I1203 18:47:00.471349 4610 caffe.cpp:169] Batch 23, loss = 0.0333992
- I1203 18:47:00.487124 4610 caffe.cpp:169] Batch 24, accuracy = 1
- I1203 18:47:00.487180 4610 caffe.cpp:169] Batch 24, loss = 0.0281527
- I1203 18:47:00.489002 4610 caffe.cpp:169] Batch 25, accuracy = 0.99
- I1203 18:47:00.489048 4610 caffe.cpp:169] Batch 25, loss = 0.0545881
- I1203 18:47:00.490890 4610 caffe.cpp:169] Batch 26, accuracy = 0.98
- I1203 18:47:00.490932 4610 caffe.cpp:169] Batch 26, loss = 0.115576
- I1203 18:47:00.492620 4610 caffe.cpp:169] Batch 27, accuracy = 1
- I1203 18:47:00.492640 4610 caffe.cpp:169] Batch 27, loss = 0.0149555
- I1203 18:47:00.494161 4610 caffe.cpp:169] Batch 28, accuracy = 0.98
- I1203 18:47:00.494181 4610 caffe.cpp:169] Batch 28, loss = 0.0398991
- I1203 18:47:00.495693 4610 caffe.cpp:169] Batch 29, accuracy = 0.96
- I1203 18:47:00.495713 4610 caffe.cpp:169] Batch 29, loss = 0.115862
- I1203 18:47:00.497226 4610 caffe.cpp:169] Batch 30, accuracy = 1
- I1203 18:47:00.497246 4610 caffe.cpp:169] Batch 30, loss = 0.0116793
- I1203 18:47:00.498785 4610 caffe.cpp:169] Batch 31, accuracy = 1
- I1203 18:47:00.498817 4610 caffe.cpp:169] Batch 31, loss = 0.00451814
- I1203 18:47:00.500329 4610 caffe.cpp:169] Batch 32, accuracy = 0.98
- I1203 18:47:00.500349 4610 caffe.cpp:169] Batch 32, loss = 0.0244668
- I1203 18:47:00.501878 4610 caffe.cpp:169] Batch 33, accuracy = 1
- I1203 18:47:00.501899 4610 caffe.cpp:169] Batch 33, loss = 0.00285445
- I1203 18:47:00.503411 4610 caffe.cpp:169] Batch 34, accuracy = 0.98
- I1203 18:47:00.503429 4610 caffe.cpp:169] Batch 34, loss = 0.0566256
- I1203 18:47:00.504940 4610 caffe.cpp:169] Batch 35, accuracy = 0.95
- I1203 18:47:00.504961 4610 caffe.cpp:169] Batch 35, loss = 0.154924
- I1203 18:47:00.506500 4610 caffe.cpp:169] Batch 36, accuracy = 1
- I1203 18:47:00.506520 4610 caffe.cpp:169] Batch 36, loss = 0.00451233
- I1203 18:47:00.508111 4610 caffe.cpp:169] Batch 37, accuracy = 0.97
- I1203 18:47:00.508131 4610 caffe.cpp:169] Batch 37, loss = 0.0572309
- I1203 18:47:00.509635 4610 caffe.cpp:169] Batch 38, accuracy = 0.99
- I1203 18:47:00.509655 4610 caffe.cpp:169] Batch 38, loss = 0.0192229
- I1203 18:47:00.511181 4610 caffe.cpp:169] Batch 39, accuracy = 0.99
- I1203 18:47:00.511200 4610 caffe.cpp:169] Batch 39, loss = 0.029272
- I1203 18:47:00.512725 4610 caffe.cpp:169] Batch 40, accuracy = 0.99
- I1203 18:47:00.512745 4610 caffe.cpp:169] Batch 40, loss = 0.0258552
- I1203 18:47:00.514317 4610 caffe.cpp:169] Batch 41, accuracy = 0.99
- I1203 18:47:00.514338 4610 caffe.cpp:169] Batch 41, loss = 0.0752082
- I1203 18:47:00.515854 4610 caffe.cpp:169] Batch 42, accuracy = 1
- I1203 18:47:00.515873 4610 caffe.cpp:169] Batch 42, loss = 0.0283319
- I1203 18:47:00.517379 4610 caffe.cpp:169] Batch 43, accuracy = 0.99
- I1203 18:47:00.517398 4610 caffe.cpp:169] Batch 43, loss = 0.0112394
- I1203 18:47:00.518925 4610 caffe.cpp:169] Batch 44, accuracy = 0.98
- I1203 18:47:00.518946 4610 caffe.cpp:169] Batch 44, loss = 0.0413653
- I1203 18:47:00.520457 4610 caffe.cpp:169] Batch 45, accuracy = 0.98
- I1203 18:47:00.520478 4610 caffe.cpp:169] Batch 45, loss = 0.0501227
- I1203 18:47:00.521989 4610 caffe.cpp:169] Batch 46, accuracy = 1
- I1203 18:47:00.522009 4610 caffe.cpp:169] Batch 46, loss = 0.0114459
- I1203 18:47:00.523540 4610 caffe.cpp:169] Batch 47, accuracy = 1
- I1203 18:47:00.523561 4610 caffe.cpp:169] Batch 47, loss = 0.0163504
- I1203 18:47:00.525075 4610 caffe.cpp:169] Batch 48, accuracy = 0.97
- I1203 18:47:00.525095 4610 caffe.cpp:169] Batch 48, loss = 0.0450363
- I1203 18:47:00.526633 4610 caffe.cpp:169] Batch 49, accuracy = 1
- I1203 18:47:00.526651 4610 caffe.cpp:169] Batch 49, loss = 0.0046898
- I1203 18:47:00.526662 4610 caffe.cpp:174] Loss: 0.041468
- I1203 18:47:00.526674 4610 caffe.cpp:186] accuracy = 0.9856
- I1203 18:47:00.526687 4610 caffe.cpp:186] loss = 0.041468 (* 1 = 0.041468 loss)
8 LRN层的实现
LRN全称为Local Response Normalization,即局部响应归一化层,具体实现在CAFFE_ROOT/src/caffe/layers/lrn_layer.cpp和同一目录下lrn_layer.cu中。
该层需要参数有:
norm_region: 选择对相邻通道间归一化还是通道内空间区域归一化,默认为ACROSS_CHANNELS,即通道间归一化;
local_size:两种表示(1)通道间归一化时表示求和的通道数;(2)通道内归一化时表示求和区间的边长;默认值为5;
alpha:缩放因子(详细见后面),默认值为1;
beta:指数项(详细见后面), 默认值为5;
局部响应归一化层完成一种“临近抑制”操作,对局部输入区域进行归一化。
在通道间归一化模式中,局部区域范围在相邻通道间,但没有空间扩展(即尺寸为 local_size x 1 x 1);
在通道内归一化模式中,局部区域在空间上扩展,但只针对独立通道进行(即尺寸为 1 x local_size x local_size);
每个输入值都将除以
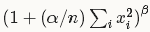
其中n为局部尺寸大小local_size, alpha和beta前面已经定义。
求和将在当前值处于中间位置的局部区域内进行(如果有必要则进行补零)。
下面我们看Caffe代码如何实现。打开CAFFE_ROOT/include/caffe/vision_layers.hpp,从第242行开始看起:
- // Forward declare PoolingLayer and SplitLayer for use in LRNLayer.
- template <typename Dtype> class PoolingLayer;
- template <typename Dtype> class SplitLayer;
- /**
- * @brief Normalize the input in a local region across or within feature maps.
- *
- * TODO(dox): thorough documentation for Forward, Backward, and proto params.
- */
- template <typename Dtype>
- class LRNLayer : public Layer<Dtype> {
- public:
- explicit LRNLayer(const LayerParameter& param)
- : Layer<Dtype>(param) {}
- virtual void LayerSetUp(const vector<Blob<Dtype>*>& bottom,
- vector<Blob<Dtype>*>* top);
- virtual void Reshape(const vector<Blob<Dtype>*>& bottom,
- vector<Blob<Dtype>*>* top);
- virtual inline LayerParameter_LayerType type() const {
- return LayerParameter_LayerType_LRN;
- }
- virtual inline int ExactNumBottomBlobs() const { return 1; }
- virtual inline int ExactNumTopBlobs() const { return 1; }
- protected:
- virtual void Forward_cpu(const vector<Blob<Dtype>*>& bottom,
- vector<Blob<Dtype>*>* top);
- virtual void Forward_gpu(const vector<Blob<Dtype>*>& bottom,
- vector<Blob<Dtype>*>* top);
- virtual void Backward_cpu(const vector<Blob<Dtype>*>& top,
- const vector<bool>& propagate_down, vector<Blob<Dtype>*>* bottom);
- virtual void Backward_gpu(const vector<Blob<Dtype>*>& top,
- const vector<bool>& propagate_down, vector<Blob<Dtype>*>* bottom);
- virtual void CrossChannelForward_cpu(const vector<Blob<Dtype>*>& bottom,
- vector<Blob<Dtype>*>* top);
- virtual void CrossChannelForward_gpu(const vector<Blob<Dtype>*>& bottom,
- vector<Blob<Dtype>*>* top);
- virtual void WithinChannelForward(const vector<Blob<Dtype>*>& bottom,
- vector<Blob<Dtype>*>* top);
- virtual void CrossChannelBackward_cpu(const vector<Blob<Dtype>*>& top,
- const vector<bool>& propagate_down, vector<Blob<Dtype>*>* bottom);
- virtual void CrossChannelBackward_gpu(const vector<Blob<Dtype>*>& top,
- const vector<bool>& propagate_down, vector<Blob<Dtype>*>* bottom);
- virtual void WithinChannelBackward(const vector<Blob<Dtype>*>& top,
- const vector<bool>& propagate_down, vector<Blob<Dtype>*>* bottom);
- int size_;
- int pre_pad_;
- Dtype alpha_;
- Dtype beta_;
- int num_;
- int channels_;
- int height_;
- int width_;
- // Fields used for normalization ACROSS_CHANNELS
- // scale_ stores the intermediate summing results
- Blob<Dtype> scale_;
- // Fields used for normalization WITHIN_CHANNEL
- shared_ptr<SplitLayer<Dtype> > split_layer_;
- vector<Blob<Dtype>*> split_top_vec_;
- shared_ptr<PowerLayer<Dtype> > square_layer_;
- Blob<Dtype> square_input_;
- Blob<Dtype> square_output_;
- vector<Blob<Dtype>*> square_bottom_vec_;
- vector<Blob<Dtype>*> square_top_vec_;
- shared_ptr<PoolingLayer<Dtype> > pool_layer_;
- Blob<Dtype> pool_output_;
- vector<Blob<Dtype>*> pool_top_vec_;
- shared_ptr<PowerLayer<Dtype> > power_layer_;
- Blob<Dtype> power_output_;
- vector<Blob<Dtype>*> power_top_vec_;
- shared_ptr<EltwiseLayer<Dtype> > product_layer_;
- Blob<Dtype> product_input_;
- vector<Blob<Dtype>*> product_bottom_vec_;
- };
内容较多,可能看一眼记不住所有的成员变量和函数,但记住一点,凡是Layer类型肯定都包含Forward()和Backward(),以及LayerSetUp()和Reshape(),这些在头文件中不必细看。关注的是以“_”结尾的成员变量,这些是和算法息息相关的。
很高兴看到了num_, height_, width_, channels_,这四个变量定义了该层输入图像的尺寸信息,是一个num_ x channels_ x height_ x width_的四维Blob矩阵(想不通?就当作视频流吧,前两维是宽高,第三维是颜色,第四维是时间)。
另外看到了alpha_, beta_, 这两个就是我们上面公式中的参数。
公式中的n(local_size)在类中用size_表示。
上面提到过需要补零,所以定义了pre_pad_变量。
在ACROSS_CHANNELS模式下,我们只需要用到scale_这个Blob矩阵,后面定义都可以忽略了~~好开森~~
读完了头文件中的声明,是不是觉得挺简单?我们接着看下实现细节,打开CAFFE_ROOT/src/caffe/layers/lrn_layer.cpp,从头看起,第一个实现函数为LayerSetUp(),代码如下:
- template <typename Dtype>
- void LRNLayer<Dtype>::LayerSetUp(const vector<Blob<Dtype>*>& bottom,
- vector<Blob<Dtype>*>* top) {
- size_ = this->layer_param_.lrn_param().local_size();
- CHECK_EQ(size_ % 2, 1) << "LRN only supports odd values for local_size";
- pre_pad_ = (size_ - 1) / 2;
- alpha_ = this->layer_param_.lrn_param().alpha();
- beta_ = this->layer_param_.lrn_param().beta();
- if (this->layer_param_.lrn_param().norm_region() ==
- LRNParameter_NormRegion_WITHIN_CHANNEL) {
- // Set up split_layer_ to use inputs in the numerator and denominator.
- split_top_vec_.clear();
- split_top_vec_.push_back(&product_input_);
- split_top_vec_.push_back(&square_input_);
- LayerParameter split_param;
- split_layer_.reset(new SplitLayer<Dtype>(split_param));
- split_layer_->SetUp(bottom, &split_top_vec_);
- // Set up square_layer_ to square the inputs.
- square_bottom_vec_.clear();
- square_top_vec_.clear();
- square_bottom_vec_.push_back(&square_input_);
- square_top_vec_.push_back(&square_output_);
- LayerParameter square_param;
- square_param.mutable_power_param()->set_power(Dtype(2));
- square_layer_.reset(new PowerLayer<Dtype>(square_param));
- square_layer_->SetUp(square_bottom_vec_, &square_top_vec_);
- // Set up pool_layer_ to sum over square neighborhoods of the input.
- pool_top_vec_.clear();
- pool_top_vec_.push_back(&pool_output_);
- LayerParameter pool_param;
- pool_param.mutable_pooling_param()->set_pool(
- PoolingParameter_PoolMethod_AVE);
- pool_param.mutable_pooling_param()->set_pad(pre_pad_);
- pool_param.mutable_pooling_param()->set_kernel_size(size_);
- pool_layer_.reset(new PoolingLayer<Dtype>(pool_param));
- pool_layer_->SetUp(square_top_vec_, &pool_top_vec_);
- // Set up power_layer_ to compute (1 + alpha_/N^2 s)^-beta_, where s is
- // the sum of a squared neighborhood (the output of pool_layer_).
- power_top_vec_.clear();
- power_top_vec_.push_back(&power_output_);
- LayerParameter power_param;
- power_param.mutable_power_param()->set_power(-beta_);
- power_param.mutable_power_param()->set_scale(alpha_);
- power_param.mutable_power_param()->set_shift(Dtype(1));
- power_layer_.reset(new PowerLayer<Dtype>(power_param));
- power_layer_->SetUp(pool_top_vec_, &power_top_vec_);
- // Set up a product_layer_ to compute outputs by multiplying inputs by the
- // inverse demoninator computed by the power layer.
- product_bottom_vec_.clear();
- product_bottom_vec_.push_back(&product_input_);
- product_bottom_vec_.push_back(&power_output_);
- LayerParameter product_param;
- EltwiseParameter* eltwise_param = product_param.mutable_eltwise_param();
- eltwise_param->set_operation(EltwiseParameter_EltwiseOp_PROD);
- product_layer_.reset(new EltwiseLayer<Dtype>(product_param));
- product_layer_->SetUp(product_bottom_vec_, top);
- }
- }
这个函数实现了参数的初始化过程。首先从layer_param_对象中提取出size_的值,并检查是否为奇数,如果不是则报错;之后用size_计算pre_pad_的值,在前后各补一半0。接着alpha_和beta_也被初始化。如果是WITHIN_CHANNEL模式,那么还需要初始化一系列中间子层,这里我们不关心,因为我们用 ACROSS_CHANNELS 模式。这么简单,还是好开森~~
接下来看Reshape()函数的实现:
- template <typename Dtype>
- void LRNLayer<Dtype>::Reshape(const vector<Blob<Dtype>*>& bottom,
- vector<Blob<Dtype>*>* top) {
- num_ = bottom[0]->num();
- channels_ = bottom[0]->channels();
- height_ = bottom[0]->height();
- width_ = bottom[0]->width();
- switch (this->layer_param_.lrn_param().norm_region()) {
- case LRNParameter_NormRegion_ACROSS_CHANNELS:
- (*top)[0]->Reshape(num_, channels_, height_, width_);
- scale_.Reshape(num_, channels_, height_, width_);
- break;
- case LRNParameter_NormRegion_WITHIN_CHANNEL:
- split_layer_->Reshape(bottom, &split_top_vec_);
- square_layer_->Reshape(square_bottom_vec_, &square_top_vec_);
- pool_layer_->Reshape(square_top_vec_, &pool_top_vec_);
- power_layer_->Reshape(pool_top_vec_, &power_top_vec_);
- product_layer_->Reshape(product_bottom_vec_, top);
- break;
- }
- }
首先根据bottom的尺寸初始化了num_, channels_, height_, width_这四个尺寸参数,之后根据归一化模式进行不同设置。在 ACROSS_CHANNELS 模式中,将top尺寸设置为和bottom一样大(num_, channels_, height_, width_),然后将scale_的尺寸也设置为一样大,这样我们在进行归一化时,只要逐点将scale_值乘以bottom值,就得到相应的top值。scale_值需要根据文章开头的计算公式得到,我们进一步考察怎么实现。
看下一个函数:
- template <typename Dtype>
- void LRNLayer<Dtype>::Forward_cpu(const vector<Blob<Dtype>*>& bottom,
- vector<Blob<Dtype>*>* top) {
- switch (this->layer_param_.lrn_param().norm_region()) {
- case LRNParameter_NormRegion_ACROSS_CHANNELS:
- CrossChannelForward_cpu(bottom, top);
- break;
- case LRNParameter_NormRegion_WITHIN_CHANNEL:
- WithinChannelForward(bottom, top);
- break;
- default:
- LOG(FATAL) << "Unknown normalization region.";
- }
- }
很简单,根据归一化模式调用相应的Forward函数。我们这里看CrossChannelForward_cpu()这个函数,代码如下:
- template <typename Dtype>
- void LRNLayer<Dtype>::CrossChannelForward_cpu(
- const vector<Blob<Dtype>*>& bottom, vector<Blob<Dtype>*>* top) {
- const Dtype* bottom_data = bottom[0]->cpu_data();
- Dtype* top_data = (*top)[0]->mutable_cpu_data();
- Dtype* scale_data = scale_.mutable_cpu_data();//用指针获取每个Blob对象的内存地址,便于后面操作
- // start with the constant value
- for (int i = 0; i < scale_.count(); ++i) {//初始化值为1.0
- scale_data[i] = 1.;
- }
- Blob<Dtype> padded_square(1, channels_ + size_ - 1, height_, width_);//补零后的Blob,第三维尺寸比bottom大了size_ - 1;
- Dtype* padded_square_data = padded_square.mutable_cpu_data();
- caffe_set(padded_square.count(), Dtype(0), padded_square_data);//先清零
- Dtype alpha_over_size = alpha_ / size_;//预先计算公式中的alpha/n
- // go through the images
- for (int n = 0; n < num_; ++n) {//bottom的第四维尺寸num_,需要分解为单个来做归一化
- // compute the padded square
- caffe_sqr(channels_ * height_ * width_,
- bottom_data + bottom[0]->offset(n),
- padded_square_data + padded_square.offset(0, pre_pad_));//计算bottom的平方,放入padded_square矩阵中,前pre_pad_个位置依旧0
- // Create the first channel scale
- for (int c = 0; c < size_; ++c) {//对n个通道平方求和并乘以预先算好的(alpha/n),累加至scale_中(实现计算 1 + sum_under_i(x_i^2))
- caffe_axpy<Dtype>(height_ * width_, alpha_over_size,
- padded_square_data + padded_square.offset(0, c),
- scale_data + scale_.offset(n, 0));
- }
- for (int c = 1; c < channels_; ++c) {//这里使用了类似FIFO的形式计算其余scale_参数,每次向后移动一个单位,加头去尾,避免重复计算求和
- // copy previous scale
- caffe_copy<Dtype>(height_ * width_,
- scale_data + scale_.offset(n, c - 1),
- scale_data + scale_.offset(n, c));
- // add head
- caffe_axpy<Dtype>(height_ * width_, alpha_over_size,
- padded_square_data + padded_square.offset(0, c + size_ - 1),
- scale_data + scale_.offset(n, c));
- // subtract tail
- caffe_axpy<Dtype>(height_ * width_, -alpha_over_size,
- padded_square_data + padded_square.offset(0, c - 1),
- scale_data + scale_.offset(n, c));
- }
- }
- // In the end, compute output
- caffe_powx<Dtype>(scale_.count(), scale_data, -beta_, top_data);//计算求指数,由于将除法转换为乘法,故指数变负
- caffe_mul<Dtype>(scale_.count(), top_data, bottom_data, top_data);//bottom .* scale_ -> top
- }
可能你对caffe_axpy, caffe_sqr, caffe_powx, caffe_mul还不熟悉,其实都是很简单的数学计算,在CAFFE_ROOT/include/caffe/util/math_functions.hpp中有声明。
- template <typename Dtype>
- void caffe_axpy(const int N, const Dtype alpha, const Dtype* X,
- Dtype* Y);
实现如下操作:Y = alpha * X + Y;其中X, Y为N个元素的向量。
- template <typename Dtype>
- void caffe_powx(const int n, const Dtype* a, const Dtype b, Dtype* y);
实现如下操作:y = a^b, 其中a, y为n个元素的向量,b为标量。
其余请自己推导。


 1万+
1万+


 被折叠的 条评论
为什么被折叠?
被折叠的 条评论
为什么被折叠?
 到【灌水乐园】发言


