


 超级会员免费看
目录
Scrapy
- 继续爬虫进阶基础部分
- Scrapy 是一个为了爬取网站数据,提取结构性数据而编写的应用框架,非常出名
- 所谓的框架就是一个已经被集成了各种功能(高性能异步下载,队列,分布式,解析,持久化等)的具有很强通用性的项目模板
- 直接帮我们搭建出个爬虫项目来,避免了很多底层的繁琐工作;当然,一般对于大一些的项目才会用
- 对于框架的学习,重点是要学习其框架的特性、各个功能的用法即可
- 安装(Windows)
pip install wheel # 为了安装离线包 # 下载对应版本的 twisted 文件 http://www.lfd.uci.edu/~gohlke/pythonlibs/#twisted pip install Twisted-xxx pip install pywin32 # Windows用户需要 pip install scrapy - 创建项目
- 命令行:
scrapy startproject 项目名称 - 进入项目目录:
scrapy genspider first www.xxx.com就会生成名为 first 的爬虫文件 - 启动爬虫(项目内),命令行:
scrapy crawl first --nolog,--nolog一般不用
- 命令行:
- 一般会修改配置文件 settings
# Obey robots.txt rules ROBOTSTXT_OBEY = False # 只看错误日志 LOG_LEVEL = 'ERROR' USER_AGENT = 'Mozilla/5.0 (Macintosh; Intel Mac OS X 10_15_7) AppleWebKit/537.36 (KHTML, like Gecko) Chrome/98.0.4758.109 Safari/537.36' - 推荐文章,看一遍就知道主要内容了
数据解析
- scrapy 对于文本和图片的解析是不一样的,先看文本
- 获取到的是数据对象,提取数据需要用
extract_first()import scrapy class FirstSpider(scrapy.Spider): name = 'first' # allowed_domains = ['www.xxx.com'] #对首页进行网络请求 #scrapy会对列表中的url发起get请求 start_urls = ['https://www.wogif.com/duanzi/'] # https://ishuo.cn/duanzi def parse(self, response): #获取响应数据 #调用xpath方法对响应数据进行xpath形式的数据解析 li_list = response.xpath('/html/body/div[2]/div[2]/div') for li in li_list: # content = li.xpath('./div[1]/text()')[0] # title = li.xpath('./div[2]/a/text()')[0] # #<Selector xpath='./div[2]/a/text()' data='一年奔波,尘缘遇了谁'> # print(title) #selector的对象,且我们想要的字符串内容存在于该对象的data参数里 #解析方案1: # title = li.xpath('./div[2]/a/text()')[0] # content = li.xpath('./div[1]/text()')[0] # #extract()可以将selector对象中data参数的值取出 # print(title.extract()) # print(content.extract()) #解析方案2: #title和content为列表,列表只要一个列表元素 title = li.xpath('./div/h2/a/text()') #content = li.xpath('./div[1]/text()') #extract_first()可以将列表中第0个列表元素表示的selector对象中data的参数值取出 print(title.extract_first()) #print(content.extract_first())
持久化存储
- 基于终端命令的持久化存储
- 需要在
parse中将爬取到的数据全部封装到返回值class FirstSpider(scrapy.Spider): name = 'first' # allowed_domains = ['www.xxx.com'] start_urls = ['https://www.wogif.com/duanzi/'] # https://ishuo.cn/duanzi def parse(self, response): li_list = response.xpath('/html/body/div[2]/div[2]/div') # 全部封装到这里 all = [] for li in li_list: title = li.xpath('./div/h2/a/text()') # print(title.extract_first()) # 每条数据用字典格式装每个字段 dic = { 'title': title.extract_first() } all.append(dic) return all - 命令:
scrapy crawl first -o title.csv - 优点:简单,便捷
- 缺点:局限性强
- 只可以将数据存储到文本文件无法写入数据库
- 数据文件后缀是指定好的,通常使用
.csv - 需要将存储的数据封装到 parse 方法的返回值中
- 一般小问题才会用指令方式
- 需要在
- 基于管道实现持久化存储(推荐)
- 步骤复杂一些,为了灵活嘛
- 在爬虫文件中进行数据解析
- 在
items.py文件中定义相关的字段,解析到的数据将封装到 Item 类型的对象中 - 在爬虫文件中,将 item 对象提交给管道
- 在管道
pipelines.py中接收 item 类型对象 - 对接收到的数据进行任意形式的持久化存储操作
- 在配置文件中开启管道机制
- first.py
import scrapy from ..items import FirstprojectItem class FirstSpider(scrapy.Spider): name = 'first' # allowed_domains = ['www.xxx.com'] start_urls = ['https://www.wogif.com/duanzi/'] # https://ishuo.cn/duanzi def parse(self, response): li_list = response.xpath('/html/body/div[2]/div[2]/div') for li in li_list: title = li.xpath('./div/h2/a/text()').extract_first() item = FirstprojectItem() # 一条数据一个对象 item['title'] = title yield item # 提交给管道 - items.py
import scrapy class FirstprojectItem(scrapy.Item): # define the fields for your item here like: # name = scrapy.Field() title = scrapy.Field() - pipelines.py,灵活保存数据
# Define your item pipelines here # # Don't forget to add your pipeline to the ITEM_PIPELINES setting # See: https://docs.scrapy.org/en/latest/topics/item-pipeline.html # useful for handling different item types with a single interface from itemadapter import ItemAdapter class FirstprojectPipeline: # 重写父类的方法 fp = None def open_spider(self, spider): print('open_spider方法,我在项目开始运行环节,只会被执行一次!') self.fp = open('tit.txt', 'w', encoding='utf-8') # process_item方法调用的次数取决于爬虫文件给其提交item的次数 def process_item(self, item, spider): # 管道接收到first传来的 item 对象 title = item['title'] self.fp.write(title+'\n') print(title, ':爬取保存成功!') return item def close_spider(self, spider): print('在爬虫结束的时候会被执行一次!') self.fp.close() - settings.py,开启管道模式
ITEM_PIPELINES = {
   'firstproject.pipelines.FirstprojectPipeline': 300,
}
- 步骤复杂一些,为了灵活嘛
深入管道
- 将爬取到的数据存到三种数据库
- 通过编写并配置不同管道实现
ITEM_PIPELINES = {
   # 依次通过各管道,数字越小,优先级越高
   'xiaoshuo.pipelines.MySQLPipeline': 300,
   'xiaoshuo.pipelines.RedisPipeline': 301,
   'xiaoshuo.pipelines.MongoPipeline': 302,
}
- 通过编写并配置不同管道实现
- MySQL
- 新建表
CREATE table xiaoshuo( id INT PRIMARY KEY auto_increment, title VARCHAR(100) ) - 编写管道
import pymysql

class MySQLPipeline:
    # 连接数据库
    conn = None     # mysql的链接对象
    cursor = None   # 游标
    def open_spider(self,spider):
        self.conn = pymysql.Connect(
            host='127.0.0.1',
            port=3306,
            user='root',
            p_w_d='',
            db='scrapy',
            charset='utf8'
        )
        self.cursor = self.conn.cursor()
    #爬虫文件每向管道提交一个item,则process_item方法就会被调用一次
    def process_item(self, item, spider):
        title = item['title']
        sql = 'insert into xiaoshuo (title) values ("%s")'%title
        self.cursor.execute(sql)
        self.conn.commit()
        print('成功写入一条数据!')
        return item # 高级管道,需要return item给低级管道
    def close_spider(self,spider):
        # 关闭连接
        self.cursor.close()
        self.conn.close()
- 新建表
- Redis
- 爬虫文件只会将 item 提交给优先级最高的那一个管道类
- 优先级最高的管道类的 process_item 中需要写
return item操作,将 item 对象传递给下一个管道类 - 编写管道
# 将数据持久化存储到redis中 class RedisPipeline: conn = None def open_spider(self, spider): # 在连接需要手动启动redis的服务 self.conn = redis.Redis( host='192.168.109.128', port=6379 ) def process_item(self,item, spider): #注意:如果想要将一个python字典直接写入到redis中,则redis模块的版本务必是2.10.6 #如果redis模块的版本不是2.10.6则重新安装:pip install redis==2.10.6 # self.conn.lpush('xiaoshuo',item) # xiaoshuo 是个列表,直接存字典元素进去 self.conn.lpush('xiaoshuo', item['title']) print('数据存储redis成功!') return item - 启动 Redis 前要修改配置
# 注释掉
# bind 127.0.0.1
# 改为 no
protected-mode no
- MongoDB
- 编写管道
# 将数据持久化存储到mongo中
class MongoPipeline:
    conn = None
    db_sanqi = None #数据仓库
    def open_spider(self,spider):
        self.conn = pymongo.MongoClient(
            host='127.0.0.1',
            port=27017
        )
        self.db_sanqi = self.conn['sanqi']
    def process_item(self,item,spider):
        # collection:xiaoshuo
        self.db_sanqi['xiaoshuo'].insert_one({'title':item['title']})   # 不能直接插入字典
        print('插入成功!')
        return item
- 编写管道
- 任务结束!注意不同数据库的核心概念不一样~
爬取图片
- scrapy 中爬取图片数据需要继承它的
ImagesPipeline类 - 先获取图片地址,在方法重写时发起 Request 请求
- Item 对象
class ImageSpider(scrapy.Spider): name = 'image' allowed_domains = ['www.example.com'] start_urls = ['https://pic.netbian.com/'] def parse(self, response): addr = response.xpath('//*[@id="main"]/div[3]/ul/li') for i in addr: src = 'https://pic.netbian.com/'+i.xpath('./a/span/img/@src').extract_first() # print(src) # 每个图片都需要一个item对象 item = ImgItem() item['src'] = src yield item - 编写管道
import scrapy from scrapy.pipelines.images import ImagesPipeline # 自定义的管道类一定要继承ImagesPipeline class ImgPipeline(ImagesPipeline): # 重写三个父类的方法来完成图片二进制数据的请求和持久化存储 # 可以根据图片地址,对其发起请求,获取图片数据 # 参数item:爬虫文件传过来的item对象 def get_media_requests(self, item, info): img_src = item['src'] # 爬取图片 yield scrapy.Request(img_src) # 只需指定图片的保存名称即可! def file_path(self, request, response=None, info=None, *, item=None): imgName = request.url.split('/')[-1] print(imgName, '下载保存成功!') return imgName # 如果没有下一个管道类,该方法可以不写 def item_completed(self, results, item, info): return item # 传递给下一个管道类 - 配置保存地址
IMAGES_STORE = 'imgs'
爬取多页
- scrapy 默认在 start_urls 中发起请求,但如果将多个页面加到这里,不好管理(太low)
- 直接在 parse 中操作,修改请求地址,解析函数还是回调
parseimport scrapy from ..items import ImgItem class ImageSpider(scrapy.Spider): name = 'image' allowed_domains = ['www.example.com'] start_urls = ['https://pic.netbian.com/'] # 请求多页 _url = 'https://pic.netbian.com/index_%d.html' _page_num = 1 def parse(self, response): addr = response.xpath('//*[@id="main"]/div[3]/ul/li') for i in addr: # //*[@id="main"]/div[3]/ul/li[1]/a/img if self._page_num == 1: src = 'https://pic.netbian.com/'+i.xpath('./a/span/img/@src').extract_first() else: src = 'https://pic.netbian.com/' + i.xpath('./a/img/@src').extract_first() # print(src) item = ImgItem() item['src'] = src print(src) yield item if self._page_num < 3: # 请求新地址,并回调函数解析 self._page_num += 1 new = self._url%(self._page_num) print("新地址:", new) yield scrapy.Request(url=new, callback=self.parse, dont_filter=True) # dont_filter,和 allowed_domains 有关 - 如果遇到问题,可以调整日志级别,查看详细信息
请求传参
- 很多页面标题和详情是分开的,我们获取 title 之后进入详情页的 parse_detail 方法,如何把已经实例化的 Item 对象带过去呢?就需要用到
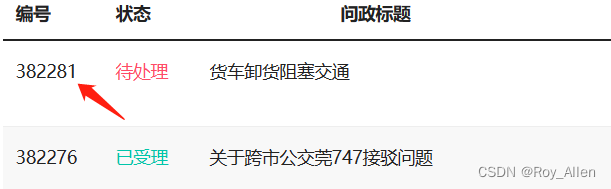
meta请求传参import scrapy from ..items import ArticleItem class ArtiSpider(scrapy.Spider): name = 'arti' # allowed_domains = ['www.xxx.com'] start_urls = ['https://wz.sun0769.com/political/index/politicsNewest'] # 多页 page_url = 'https://wz.sun0769.com/political/index/politicsNewest?id=1&page=%d' page_num = 1 # 解析首页数据 def parse(self, response): li_list = response.xpath('/html/body/div[2]/div[3]/ul[2]/li') # 解析每一篇文章 for li in li_list: title = li.xpath('./span[3]/a/text()').extract_first() detail_url = 'https://wz.sun0769.com' + li.xpath('./span[3]/a/@href').extract_first() # print(title) item = ArticleItem() item['title'] = title # 对详情页的url发起请求 # 参数meta可以将自身这个字典传递给callback指定的回调函数 yield scrapy.Request(meta={'item': item}, url=detail_url, callback=self.parse_detail) if self.page_num < 3: self.page_num += 1 new_url = self.page_url%self.page_num print("新的一页:", new_url) # 对新的一页发起请求 yield scrapy.Request(url=new_url, callback=self.parse) # 解析文章详情页数据 def parse_detail(self, response): meta = response.meta # 接收请求传参过来的meta字典 item = meta['item'] content = response.xpath('/html/body/div[3]/div[2]/div[2]/div[2]//text()').extract() content = ''.join(content) item['content'] = content yield item - 即请求传参是在不同解析函数之间
post 请求
scrapy.Request()发起 get 请求scrapy.FormRequest()发起 post 请求- 请求百度翻译的接口
import scrapy
class FanyiSpider(scrapy.Spider):
    name = 'fanyi'
    # allowed_domains = ['www.xxx.com']
    start_urls = ['https://fanyi.baidu.com/sug']
    #父类Spider中的方法:该方法是用来给起始的url列表中的每一个url发请求
    def start_requests(self):
    	# 封装参数
        data = {
            'kw':'dog'
        }
        for url in self.start_urls:
            # formdata是用来指定请求参数
            yield scrapy.FormRequest(url=url,callback=self.parse,formdata=data)
    def parse(self, response):
        result = response.json()
        print(result)
提升效率
- 增加并发:
- 默认scrapy开启的并发线程为32个,可以适当进行增加。在settings配置文件中修改
CONCURRENT_REQUESTS = 100,并发设置成了为100
- 默认scrapy开启的并发线程为32个,可以适当进行增加。在settings配置文件中修改
- 降低日志级别:
- 在运行scrapy时,会有大量日志信息的输出,为了减少CPU的使用率。可以设置log输出信息为WORNING或者ERROR即可。在配置文件中编写:
LOG_LEVEL = 'ERROR'
- 在运行scrapy时,会有大量日志信息的输出,为了减少CPU的使用率。可以设置log输出信息为WORNING或者ERROR即可。在配置文件中编写:
- 禁止cookie:
- 如果不是真的需要cookie,则在scrapy爬取数据时可以禁止cookie从而减少CPU的使用率,提升爬取效率。在配置文件中编写:
COOKIES_ENABLED = False
- 如果不是真的需要cookie,则在scrapy爬取数据时可以禁止cookie从而减少CPU的使用率,提升爬取效率。在配置文件中编写:
- 禁止重试:
- 对失败的HTTP进行重新请求(重试)会减慢爬取速度,因此可以禁止重试。在配置文件中编写:
RETRY_ENABLED = False
- 对失败的HTTP进行重新请求(重试)会减慢爬取速度,因此可以禁止重试。在配置文件中编写:
- 减少下载超时:
- 如果对一个非常慢的链接进行爬取,减少下载超时可以能让卡住的链接快速被放弃,从而提升效率。在配置文件中进行编写:
DOWNLOAD_TIMEOUT = 10超时时间为10s
- 如果对一个非常慢的链接进行爬取,减少下载超时可以能让卡住的链接快速被放弃,从而提升效率。在配置文件中进行编写:
核心组件
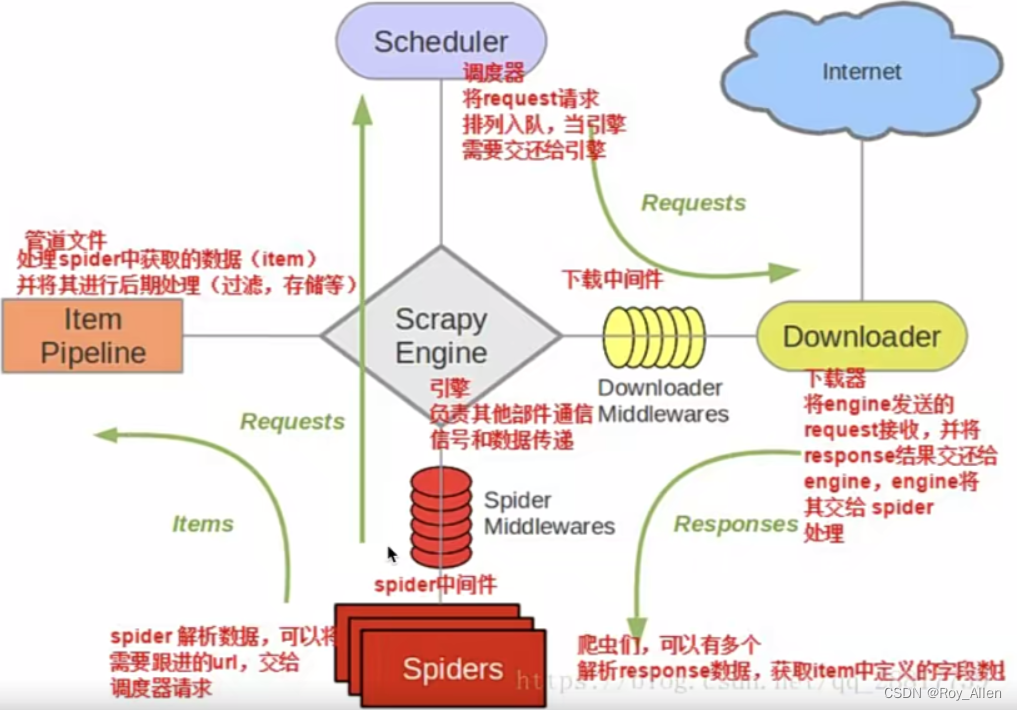
- scrapy 五大核心组件
- 引擎(Scrapy)
- 用来处理整个系统的数据流处理, 触发事务(框架核心)
- 调度器(Scheduler)
- 用来接受引擎发过来的请求, 压入队列中, 并在引擎再次请求的时候返回. 可以想像成一个URL(抓取网页的网址或者说是链接)的优先队列, 由它来决定下一个要抓取的网址是什么, 同时去除重复的网址
- 下载器(Downloader)
- 用于下载网页内容, 并将网页内容返回给蜘蛛(Scrapy下载器是建立在twisted这个高效的异步模型上的)
- 爬虫(Spiders)
- 爬虫是主要干活的, 用于从特定的网页中提取自己需要的信息, 即所谓的实体(Item)。用户也可以从中提取出链接,让Scrapy继续抓取下一个页面
- 项目管道(Pipeline)
- 负责处理爬虫从网页中抽取的实体,主要的功能是持久化、验证实体的有效性、清除不需要的信息。当页面被爬虫解析后,将被发送到项目管道,并经过几个特定的次序处理数据
- 引擎(Scrapy)
- 背会这张图,要考!
中间件
- 上图有两个 Middlewares,爬虫中间件和下载器中间件,我们重点看 DownloaderMiddleware
- 重要方法
from scrapy import signals # useful for handling different item types with a single interface from itemadapter import is_item, ItemAdapter class MiddleproDownloaderMiddleware: #类方法:作用是返回一个下载器对象(忽略) @classmethod def from_crawler(cls, crawler): # This method is used by Scrapy to create your spiders. s = cls() crawler.signals.connect(s.spider_opened, signal=signals.spider_opened) return s #拦截处理所有的请求对象 #参数:request就是拦截到的请求对象,spider爬虫文件中爬虫类实例化的对象,别管在哪实例化的,很有用!类似解析函数之间的请求传参,spider让中间件能轻松获取爬虫文件的所有对象 #spider参数的作用可以实现爬虫类和中间类的数据交互 def process_request(self, request, spider): return None #拦截处理所有的响应对象 #参数:response就是拦截到的响应对象,request就是被拦截到响应对象对应的唯一的一个请求对象 def process_response(self, request, response, spider): return response #拦截和处理发生异常的请求对象 #参数:reqeust就是拦截到的发生异常的请求对象 def process_exception(self, request, exception, spider): pass #控制日志数据的(忽略) def spider_opened(self, spider): spider.logger.info('Spider opened: %s' % spider.name) - 借助中间件,我们可以引入很多爬虫需要的操作,但要注意,在合适的方法中引入才能提高效率
- 使用代理
from scrapy import signals # useful for handling different item types with a single interface from itemadapter import is_item, ItemAdapter from scrapy import Request class MiddleproDownloaderMiddleware: #类方法:作用是返回一个下载器对象(忽略) @classmethod def from_crawler(cls, crawler): # This method is used by Scrapy to create your spiders. s = cls() crawler.signals.connect(s.spider_opened, signal=signals.spider_opened) return s #拦截处理所有的请求对象 #spider参数的作用可以实现爬虫类和中间类的数据交互 def process_request(self, request, spider): # 如果所有的请求都是用代理,则代理操作可以写在该方法中 request.meta['proxy'] = 'http://ip:port' #弊端:会使得整体的请求效率变低 print(request.url+':请求对象拦截成功!') return None # 如果发生异常,再使用代理 def process_exception(self, request, exception, spider): print(request.url+':发生异常的请求对象被拦截到!') #修正操作 #只有发生了异常的请求才使用代理机制,则可以写在该方法中 request.meta['proxy'] = 'https://ip:port' return request #对请求对象进行重新发送 #控制日志数据的(忽略) def spider_opened(self, spider): spider.logger.info('Spider opened: %s' % spider.name) - 使用 UA
def process_request(self, request, spider): # 多搞点UA在这 request.headers['User-Agent'] = '从列表中随机选择的一个UA值' print(request.url+':请求对象拦截成功!') return None - 使用 cookie
def process_request(self, request, spider): request.headers['cookie'] = 'xxx' #request.cookies = 'xxx' print(request.url+':请求对象拦截成功!') return None - 如何动态获取 cookie 呢?让 cookie 在每次启动爬虫时能自动更新;这个我们可以通过 selenium + scrapy 结合解决
- 中间件还可以帮助获取动态加载的数据
- 使用代理
selenium
- 配合上 selenium,让 scrapy 框架更强悍!
- 爬取网易新闻,先分析:需要请求哪些地址,流程如何,是否为动态加载数据等
- 对于新闻列表页的动态加载数据,就要用到中间件和 spider 参数了
- selenium 的初始化放在爬虫文件
- 中间件中用 selenium 重新发起请求,获取动态加载后的完整页面数据,封装成新的 response,交给爬虫文件解析
- middlewares.py
# Define here the models for your spider middleware # # See documentation in: # https://docs.scrapy.org/en/latest/topics/spider-middleware.html from scrapy.http import HtmlResponse from time import sleep class WangyiDownloaderMiddleware: # 拦截到下载器传递给Spider的响应对象 # request:响应对象对应的请求对象 # response:拦截到的响应对象 # spider:爬虫文件中对应的爬虫类的实例,里面的数据都能拿到! # 因为要返回 response,所以不能放在 process_request def process_response(self, request, response, spider): # 拦截响应并篡改,因为动态加载,目前的response不能解析 # if判断,只用selenium获取四个新闻列表页(只有这里动态) if request.url in ['https://news.163.com/domestic/', 'https://news.163.com/world/', 'https://news.163.com/air/', 'https://war.163.com/']: print("改之~") spider.bro.get(url=request.url) js = 'window.scrollTo(0,document.body.scrollHeight)' spider.bro.execute_script(js) sleep(5) # 一定要给与浏览器一定的缓冲加载数据的时间 # 页面数据就是包含了动态加载出来的新闻列表 page_text = spider.bro.page_source # 这里有没有 cookie 呢? # 篡改响应对象 return HtmlResponse(url=spider.bro.current_url, body=page_text, encoding='utf-8', request=request) else: print("啥也没改") return response - 爬虫文件
import scrapy from selenium import webdriver from ..items import WangyiItem class XinwenSpider(scrapy.Spider): name = 'xinwen' # allowed_domains = ['www.example.com'] start_urls = ['https://news.163.com/'] def __init__(self): option = webdriver.ChromeOptions() # 防止打印一些无用的日志 option.add_experimental_option("excludeSwitches", ['enable-automation', 'enable-logging']) #实例化一个浏览器对象(实例化一次) self.bro = webdriver.Chrome(chrome_options=option, executable_path='D:\pythonDemo\pycWorks\spider\scrapy\wangyi\chromedriver.exe') def parse(self, response): module_index = [1,2,4,5] # //*[@id="index2016_wrap"]/div[3]/div[2]/div[2]/div[2]/div/ul/li[2]/a result = response.xpath('//*[@id="index2016_wrap"]/div[3]/div[2]/div[2]/div[2]/div/ul/li') # 请求四个板块 # 会在中间件被拦截并重新封装response for index in module_index: module_url = result[index].xpath('./a/@href').extract_first() print("module:", module_url) yield scrapy.Request(url=module_url, callback=self.parse_list) # 解析四个板块 # 这里得到的是中间件重新封装过的response def parse_list(self, response): print(response) list = response.xpath('/html/body/div/div[3]/div[3]/div[1]/div[1]/div/ul/li/div/div') print("list:", list) content_url = None # 请求每个新闻的具体内容 for div in list: # 遇到广告,可能会解析异常 # 能否放在中间件 process_exception 处理?效果是一样的! try: title = div.xpath('./div/div[1]/h3/a/text()').extract_first() content_url = div.xpath('./div/div[1]/h3/a/@href').extract_first() item = WangyiItem() item['title'] = title except Exception as e: print("遇到广告,跳过!") if content_url != None: yield scrapy.Request(url=content_url, callback=self.detail_parse, meta={'item':item}) # 解析每个新闻的具体内容 def detail_parse(self, response): # 多段 content = response.xpath('//*[@id="content"]/div[2]/text()').extract() content = ''.join(content).strip() item = response.meta['item'] item['content'] = content yield item #在整个爬虫结束后,关闭浏览器 def closed(self,spider): print('爬虫结束') self.bro.quit() - 记得打开管道和中间件,定义 Item
- 记得注释掉
allowed_domains
百度API
- 借助百度的 API,结合 scrapy,帮助我们实现 NLP 的相关需求!
CrawlSpider
- 使用crawlspider,爬取全站数据
- 其实之前的多页爬取,请求传参已经实现了全站爬取,只不过 scrapy 提供了封装好的类
- 使用
scrapy startproject quanzhanscrapy genspider -t crawl allsite www.xxx.com加上-t参数即可
- 项目里面自动调用了链接提取器
LinkExtractor- 其实爬取全站的关键就是获取全部页面的连接,通过正则匹配到各页面的链接,剩下的就和之前一样了!
follow=True,可以让当前链接作为起始 URL,帮助我们匹配到所有页的链接

allow=''可以递归获取站内所有 URL,但一般不这么干rules = ( # 这个正则只需要关注变化的部分,以 / 为分割 Rule(LinkExtractor(allow=r'free_\d+\.html'), callback='parse_item', follow=True), )
- 上面 LinkExtractor 只是提取页码链接(列表页),如何请求详情页链接呢?很简单,在 rules 加
Rule,再配上对应的 parse 方法- 这里有个问题,不同的 Rule 是异步的,那我们在列表页和详情页爬取到的数据怎么对应上呢?这里是不能用 Item 对象请求传参的!
- 一般情况下,我们只用一个 Rule,在这个 Rule 的 parse 方法里手动发起其他请求
import scrapy from scrapy.linkextractors import LinkExtractor from scrapy.spiders import CrawlSpider, Rule from ..items import QuanzhanItem class AllsiteSpider(CrawlSpider): name = 'allsite' # allowed_domains = ['www.xxx.com'] start_urls = ['https://sc.chinaz.com/jianli/free.html'] # https://www.kuaidaili.com/free/inha/1 rules = ( # 这个正则只需要关注变化的部分,以 / 为分割 Rule(LinkExtractor(allow=r'free_\d+\.html'), callback='parse_item', follow=False), ) def parse_item(self, response): jianli = response.xpath('//*[@id="container"]/div') for li in jianli: title = li.xpath('./a/img/@alt').extract_first() item = QuanzhanItem() item['title'] = title detail_url = li.xpath('./a/@href').extract_first() yield scrapy.Request(url=detail_url, callback=self.detail_parse, meta={'item':item}) def detail_parse(self, response): down_url = response.xpath('//*[@id="down"]/div[2]/ul/li[1]/a/@href').extract_first() item = response.meta['item'] item['down_url'] = down_url yield item - 或者,不同的 Rule 页面(列表页中的项和详情页)之间有联系,比如:

分布式
- 分布式在日常开发中并不常用!因为效率太高很容易触发反爬升级,一般也就爬取公司内部数据用一下,更多的是面试问一问,考一考技术深浅
- 任何分布式技术的核心都是任务调度器,因为要分配任务,否则所有机器都从头开始干,分布毛线
- 这里使用
scrapy-redis,需要安装
- 这里使用
- 编程重点
- 创建基于 CrawlSpider 的爬虫文件,并修改
from scrapy_redis.spiders import RedisCrawlSpider并继承- 将
start_urls替换成redis_key字符串,该字符串表示任务队列的名称 - 进行常规的请求操作和数据解析
- 修改 settings.py
- 被共享的管道类,存放任务队列的任务
ITEM_PIPELINES = { 'scrapy_redis.pipelines.RedisPipeline': 400 } - 被共享的调度器,分配管道中的任务
# 使用scrapy-redis组件的去重队列 DUPEFILTER_CLASS = "scrapy_redis.dupefilter.RFPDupeFilter" # 使用scrapy-redis组件自己的调度器 SCHEDULER = "scrapy_redis.scheduler.Scheduler" # 是否允许暂停 SCHEDULER_PERSIST = True - 指定数据库,注意要修改配置文件,前面说过
REDIS_HOST = '127.0.0.1'	# 可以是其他机器的ip
REDIS_PORT = 6379
- 被共享的管道类,存放任务队列的任务
- 启动 redis
- 运行项目,等待爬取任务
- 向任务队列中放入一个起始的 URL
lpush queueTask https://wz.sun0769.com/political/index/politicsNewest?id=1&page=1
- 创建基于 CrawlSpider 的爬虫文件,并修改
增量式
- 意思就是爬取网站更新的那部分数据,以前爬过的不需要
- 当然,这里不是通过记录上次爬取到的点然后接着爬,因为这样就比较麻烦了
- 普遍的做法是:全部再爬一遍,然后和之前爬过的比较,去重!
- 方案:使用记录表,记录已经爬取过的数据的指纹
- 这个表可以使用 redis 的 set,如果
sadd返回的是 1,说明是新数据,就在管道里持久化到列表
- 看两个例子
- 无需深度数据爬取
#爬虫文件
import scrapy
import redis
from ..items import ZlsItem
class DuanziSpider(scrapy.Spider):
    name = 'duanzi'
    # allowed_domains = ['www.xxxx.com']
    start_urls = ['https://ishuo.cn/']
    #Redis的链接对象
    conn = redis.Redis(host='127.0.0.1',port=6379)

    def parse(self, response):
        li_list = response.xpath('//*[@id="list"]/ul/li')
        for li in li_list:
            content = li.xpath('./div[1]/text()').extract_first()
            title = li.xpath('./div[2]/a/text()').extract_first()
            all_data = title+content
            #生成该数据的数据指纹
            import hashlib  # 导入一个生成数据指纹的模块
            m = hashlib.md5()
            m.update(all_data.encode('utf-8'))
            data_id = m.hexdigest()

            ex = self.conn.sadd('data_id',data_id)
            if ex == 1:#sadd执行成功(数据指纹在set集合中不存在)
                print('有最新数据的更新,正在爬取中......')
                item = ZlsItem()
                item['title'] = title
                item['content'] = content
                yield item	# 交给管道做持久化
            else:#sadd没有执行成功(数据指纹已在set集合中)
                print('暂无最新数据更新......')
class DuanziPipeline: def process_item(self, item, spider): conn = spider.conn conn.lpush('duanzi', item) # redis=2.10.6 return item - 深度爬取,即需要爬取详情页;以详情页 URL 作为指纹
import scrapy
import redis
from ..items import Zlsdemo2ProItem
class JianliSpider(scrapy.Spider):
    name = 'jianli'
    # allowed_domains = ['www.xxx.com']
    start_urls = ['https://sc.chinaz.com/jianli/free.html']
    conn = redis.Redis(host='127.0.0.1',port=6379)
    def parse(self, response):
        div_list = response.xpath('//*[@id="container"]/div')
        for div in div_list:
            title = div.xpath('./p/a/text()').extract_first()
            #作为数据指纹
            detail_url = 'https:'+div.xpath('./p/a/@href').extract_first()
            ex = self.conn.sadd('data_id', detail_url)
            item = Zlsdemo2ProItem()
            item['title'] = title
            if ex == 1:
                print('有最新数据的更新,正在采集......')
                yield scrapy.Request(url=detail_url, callback=self.parse_detail, meta={'item':item})
            else:
                print('暂无数据更新!')

    def parse_detail(self,response):
        item = response.meta['item']
        download_url = response.xpath('//*[@id="down"]/div[2]/ul/li[1]/a/@href').extract_first()
        item['download_url'] = download_url

        yield item
- 无需深度数据爬取
scrapyd
- scrapyd 是一个用于部署和运行 scrapy 爬虫项目的程序,允许你通过 JSON API 来部署爬虫项目和控制爬虫运行
- 在你要部署爬虫的 server 安装并启动
pip install scrapydpip install scrapyd-client(可不装)scrapyd,访问 server 的6800端口,可以看到管理界面
- 部署
- 创建的 scrapy 项目中有个
scrapy.cfg配置文件# deploy 后面的部署名随便起 [deploy:firstproject] url = http://192.168.109.128:6800/ # 部署到这里,我的一个Linux虚拟机 project = article scrapyd-deploy firstproject -p articlearticle 是 scrapy startproject 时定义的项目名

- 要修改:
python3.7/site-packages/scrapyd/default_scrapyd.conf将bind换为0.0.0.0,让本地局域网均可访问(计网,路由中的知识) - 检查部署结果:
scrapyd-deploy -L firstproject
- 创建的 scrapy 项目中有个
- 管理
- 安装 curl 命令行工具(Windows)
- 启动 Job:
curl http://192.168.109.128:6800/schedule.json -d project=article -d spider=arti,这些操作直接在虚拟机上就行,因为已经部署上去了;注意:需要将爬虫用到的服务,比如 Redis,提前安装好
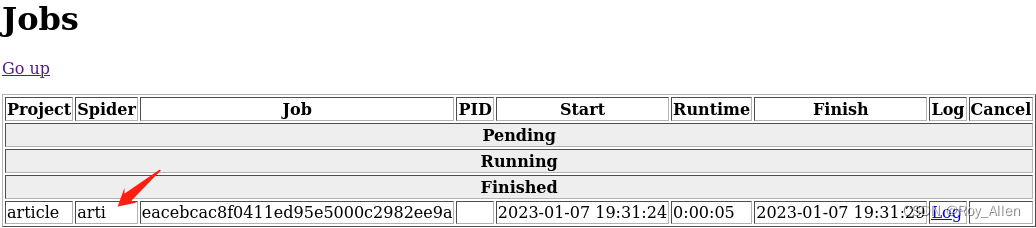
- 停止 Job:
curl http://192.168.109.128:6800/cancel.json -d project=article -d job=eacebcac8f0411ed95e5000c2982ee9a - 删除 Job:
curl http://192.168.109.128:6800/delproject.json -d project=article
- 也可以使用 requests 控制
import requests

# 启动爬虫
url = 'http://localhost:6800/schedule.json'
data = {
	'project': 项目名,
	'spider': 爬虫名,
}
resp = requests.post(url, data=data)

# 停止爬虫
url = 'http://localhost:6800/cancel.json'
data = {
	'project': 项目名,
	'job': 启动爬虫时返回的jobid,
}
resp = requests.post(url, data=data)
生产者消费者模式
- 了解一下 python 多线程编程即可
import requests
import threading
from lxml import etree
from queue import Queue
from urllib.request import urlretrieve
from time import sleep
headers = {
        "User-Agent": "Mozilla/5.0 (Macintosh; Intel Mac OS X 10_12_6) AppleWebKit/537.36 (KHTML, like Gecko) Chrome/81.0.4044.138 Safari/537.36",
    }

#生产数据:解析提取图片地址
class Producer(threading.Thread):#生产者线程
    def __init__(self,page_queue,img_queue):
        super().__init__()
        self.page_queue = page_queue
        self.img_queue = img_queue
    def run(self):
        while True:
            if self.page_queue.empty():
                print('Producer任务结束')
                break
            #从page_queue中取出一个页码链接
            url = self.page_queue.get()
            #从当前的页码对应的页面中解析出更多的图片地址
            self.parse_detail(url)
    def parse_detail(self,url):
        response = requests.get(url,headers=headers)
        response.encoding = 'gbk'
        page_text = response.text
        tree = etree.HTML(page_text)
        li_list = tree.xpath('//*[@id="main"]/div[3]/ul/li')
        for li in li_list:
            img_src = 'https://pic.netbian.com'+li.xpath('./a/img/@src')[0]
            img_title = li.xpath('./a/b/text()')[0]+'.jpg'
            dic = {
                'title':img_title,
                'src':img_src
            }
            self.img_queue.put(dic)

#消费数据:对图片地址进行数据请求
class Consumer(threading.Thread):#消费者线程
    def __init__(self,page_queue,img_queue):
        super().__init__()
        self.page_queue = page_queue
        self.img_queue = img_queue
    def run(self):
        while True:
            if self.img_queue.empty() and self.page_queue.empty():
                print('Consumer任务结束')
                break
            dic = self.img_queue.get()
            title = dic['title']
            src = dic['src']
            print(src)
            urlretrieve(src,'imgs/'+title)
            print(title,'下载完毕!')

def main():
    #该队列中存储即将要要去的页面页码链接
    page_queue = Queue(20)
    #该队列存储生产者生产出来的图片地址
    img_queue = Queue(60)

    #该循环可以将2,3,4这三个页码链接放入page_queue中
    for x in range(2,10):
        url = 'https://pic.netbian.com/4kmeinv/index_%d.html'%x
        page_queue.put(url)

    #生产者
    for x in range(3):
        t = Producer(page_queue,img_queue)
        t.start()
    #消费者
    for x in range(3):
        t = Consumer(page_queue,img_queue)
        t.start()

main()
小结
- 至此,回顾了爬虫的基础知识,也对 scrapy 有了更多的了解
- 下一阶段将进入 js 常见加密算法的学习,为后续的逆向、实战部分打下基础


 866
866


 被折叠的 条评论
为什么被折叠?
被折叠的 条评论
为什么被折叠?
 到【灌水乐园】发言


