


【参考链接】
自定义控件之绘图篇http://blog.csdn.net/harvic880925/article/details/38875149
画布用于控制形状。
要画图,必须要先创建一个画布
画布Canvas的创建需要传递一个Bitmap对象,并且这个Bitmap得是可修改的,即需要来自Bitmap.createBitmap(),而不能来自BitmapFactory.decode()。
Bitmap bmp=Bitmap.createBitmap(800, 800, Bitmap.Config.ARGB_8888);
Canvas canvas=new Canvas(bmp);
canvas.drawColor(Color.parseColor("#FF0000"));
ImageView iv =(ImageView) findViewById(R.id.iv);
iv.setImageBitmap(bmp);
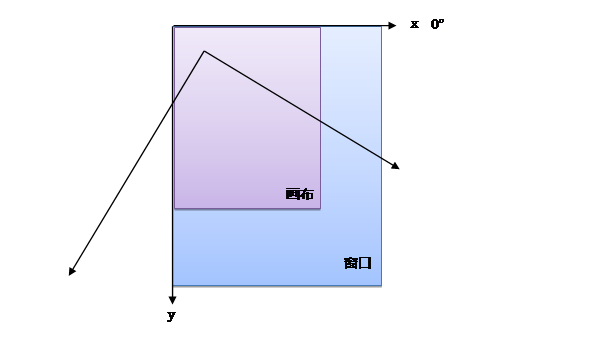
创建画布的时候还需要指定大小,当绘制元素位于画布以外时,自然也不会绘制出来。
在进行绘图之前,需要先了解画布的坐标系
下面的画图函数中,所指定的坐标,都是相对于画布坐标系的坐标。
初始情况下,画布坐标系的原点在画布的左上角,但是也可以移动/旋转/缩放画布坐标系。
Canvas对象提供了很多方法来画图,在画图之前,需要先指定画笔。
用Paint对象来描述一个画笔,下面使用的画笔样式如下
//默认画笔
Paint paintAll=new Paint();
paintAll.setAlpha(255);//不透明度//完全不透明
paintAll.setAntiAlias(true);
paintAll.setColor(Color.parseColor("#000000"));//黑色//默认就是黑色
paintAll.setStyle(Paint.Style.STROKE);
paintAll.setStrokeWidth(2);
后续会改变画笔的样式来了解不同样式对绘画元素的影响
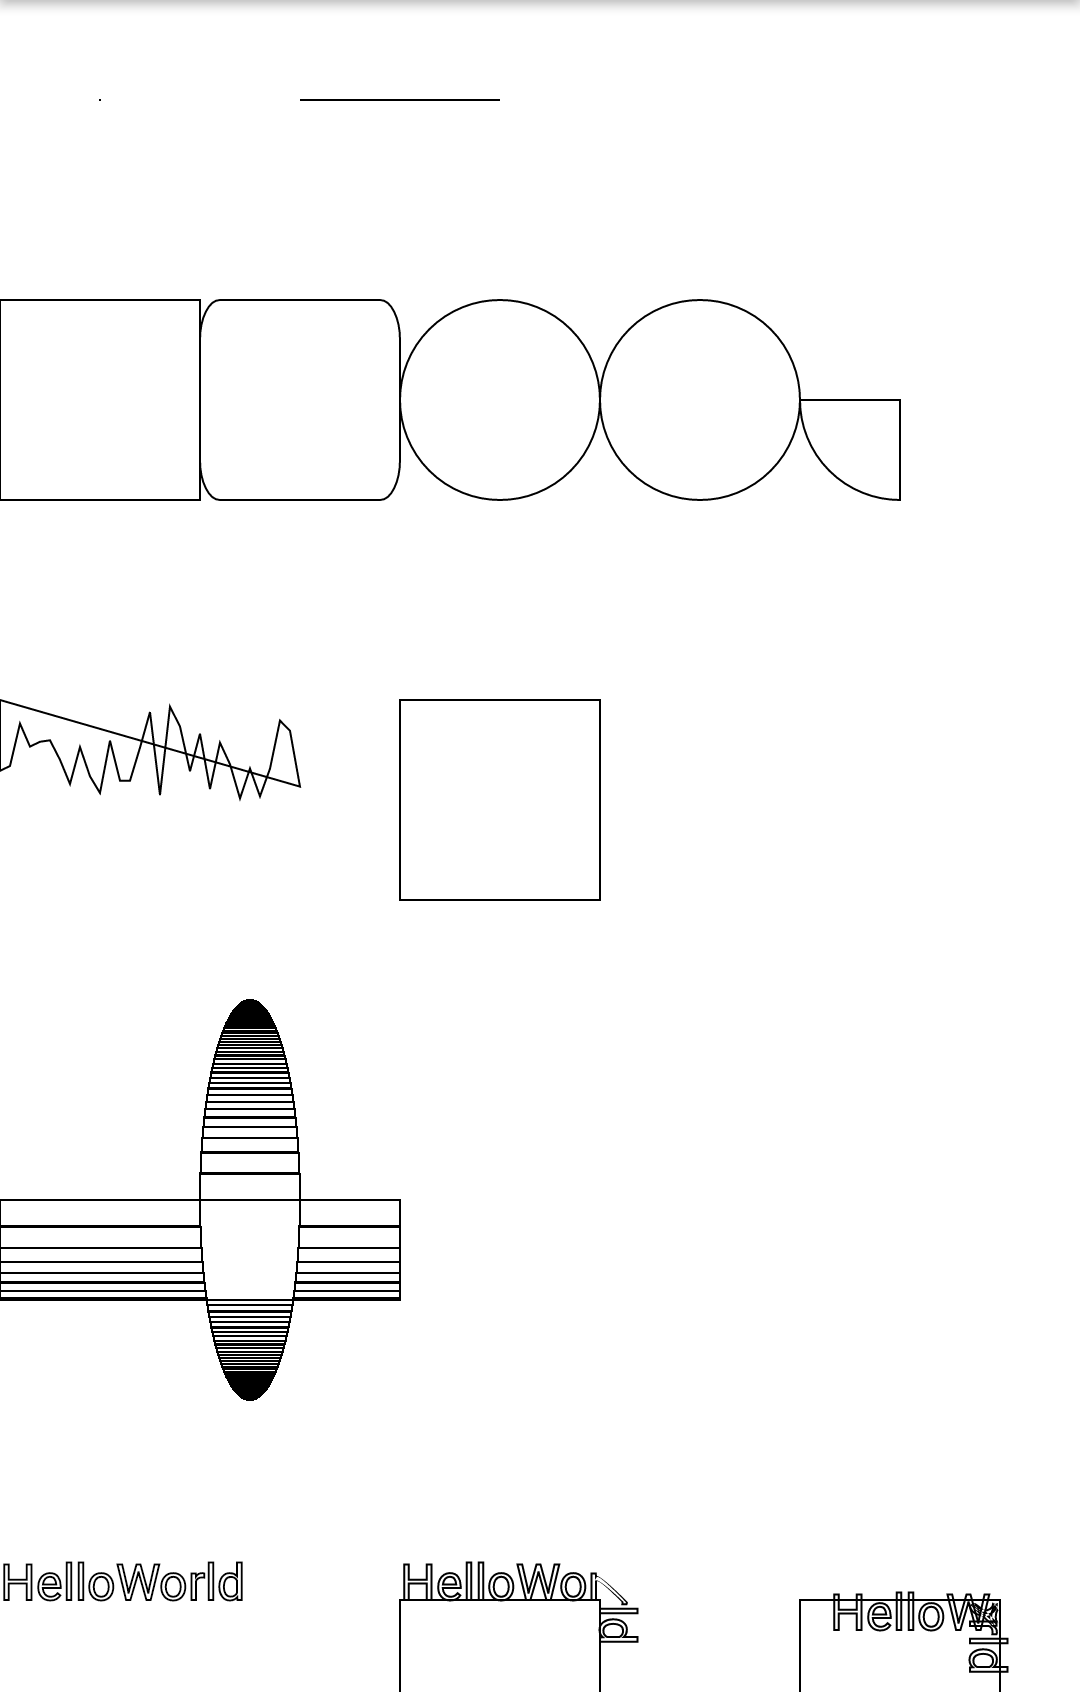
下面代码的各种绘画的效果如下
1.
drawPoint、drawLine可以看作一类
drawPoint(float x, float y, Paint paint)
在位置(x, y)绘制一个点
canvas.drawPoint(x, y, paintAll);
drawLine(float startX, float startY, float stopX, floatstopY, Paint paint)
canvas.drawLine(x, y, x+200, y, paintAll);
2.
drawRect、drawRoundRect、drawCircle、drawOval、drawArc可以看作一类
drawRect(float left, float top, float right, float bottom,Paint paint)
canvas.drawRect(x, y, x+200, y+200, paintAll);
drawRoundRect(RectF rect, float rx, float ry, Paint paint)
canvas.drawRoundRect(x, y, x+200, y+200, 20, 40, paintAll);
drawCircle(float cx, float cy, float radius, Paint paint)
canvas.drawCircle(x+100, y+100, 100, paintAll);
drawOval(float left, float top, float right, float bottom,Paint paint)
(left,top, right, bottom)所表示的矩形的内切圆
canvas.drawOval(x, y, x+200, y+200, paintAll);
drawArc(float left, float top, float right, float bottom,float startAngle, float sweepAngle, boolean useCenter, Paint paint)
矩形的内切圆的一段弧,从startAngle角度开始,划过sweepAngle角度
userCenter=true表示画扇形,userCenter=false表示画弧形
canvas.drawArc(x, y, x+200, y+200, 90, 90, true, paintAll);//useCenter=true
canvas.drawArc(x, y, x+200, y+200, 0, 90, false, paintAll);//useCenter=false
3.
drawPath(Path path, Paint paint)
画一段路径
path既可以来自添加点moveTo()、lineTo()、quadTo()、close()等
也可以来自添加其他图形addRect()、addRoundRect()、addCircle()、addOval()、addArc(),添加其他图形是还需要设置方向。并且,不同的图形,起始点也不同。方向和起始点会影响后面的drawTextOnPath().
Path path = new Path();
path.moveTo(x, y);
for (int i = x; i <= 30; i++) {
path.lineTo(i * 10, (float) (Math.random() * 100)+y);
}
path.close();
canvas.drawPath(path, paintAll);
path.reset();
RectF rect=new RectF(x, y, x+200, y+200);
//还可以添加不同的形状
path.addRect(rect, Path.Direction.CW);//顺时针
//不同的形状,起始点也不同
canvas.drawPath(path, paintAll);
4.
drawRegion
Region表示一块区域
可以通过一个Rect创建一块区域,也可以通过一个Path创建一块区域
//从Rect创建一个Region
Rect rect1=new Rect(x, y+200, x+400, y+300);
Region region1=new Region(rect1);
//从Path创建一个Region
Rect rect2=new Rect(x+200, y, x+300, y+400);
Path path2=new Path();
path2.addOval(new RectF(rect2), Path.Direction.CW);//这个Region是个椭圆
Region region2=new Region();
region2.setPath(path2, new Region(rect2));//第二个参数需要传递一个Rect,取Path和这个Rect的交集
多块区域之间可以通过op()函数进行取交集、取并集等操作
//取两个Region的并集
region1.op(region2, Region.Op.UNION);
借助RegionIterator类和drawRect()函数来绘制区域
RegionIterator iter= new RegionIterator(region1);
Rect rect3 = new Rect();
while (iter.next(rect3)){
canvas.drawRect(rect3, paintAll);
}
5.
drawText(String text, float x, float y, Paint paint)
paintAll.setTextSize(50);
canvas.drawText("HelloWorld", x, y, paintAll);
drawTextOnPath(String text, Path path, float hOffset,float vOffset, Paint paint)
还可以沿路径绘制文字,不过好像效果有点着急
hOffset影响文字对路径的贴近程度(如下图蓝色),vOffset影响文字的起始点的偏移(如下图红色)

path.reset();
rect=new RectF(x, y, x+200, y+200);
canvas.drawRect(rect, paintAll);
path.addRect(rect, Path.Direction.CW);//顺时针
canvas.drawTextOnPath("HelloWorld", path, 0, 0, paintAll);
x+=400;
path.reset();
rect=new RectF(x, y, x+200, y+200);
canvas.drawRect(rect, paintAll);
path.addRect(rect, Path.Direction.CW);//顺时针
canvas.drawTextOnPath("HelloWorld", path, 30, 30, paintAll);
x+=400;
path.reset();
canvas.drawCircle(x+100, y+100,100, paintAll);
path.addCircle(x+100, y+100,100, Path.Direction.CCW);//逆时针
canvas.drawTextOnPath("HelloWorld", path, 0, 0, paintAll);
x+=400;
path.reset();
canvas.drawCircle(x+100, y+100,100, paintAll);
path.addCircle(x+100, y+100,100, Path.Direction.CCW);//逆时针
canvas.drawTextOnPath("HelloWorld", path, 30, 30, paintAll);
6.
drawBitmap(Bitmap bitmap, float left, float top, Paintpaint)
在(left、top)上绘制一张与原图大小相同的图片
Bitmap bmp2=BitmapFactory.decodeResource(getResources(), R.mipmap.ic_launcher);
canvas.drawBitmap(bmp2, x, y, paintAll);
drawBitmap(Bitmap bitmap, Rect src, Rect dst, Paint paint)
将原图的src区域取出来,画到画布坐标系的dst区域去
canvas.drawBitmap(bmp2,
new Rect(0, 0, bmp2.getWidth(), bmp2.getHeight()),
new Rect(x, y, x+200, y+200),
paintAll);
drawBitmap(Bitmap bitmap, Matrix matrix, Paint paint)
还可以结合Matrix
使用Matrix的时候,不用指定要绘制到的左上角的坐标,是因为其原理为
假设原图的左上角位于画布坐标系的原点,对于原图上的每一点,应用Matrix变换,将其画到画布上去
当然,在Matrix中也讲过,如果Matrix中有多次变换,是计算出结果来以后只进行一次绘图,所以可能translate()、rotate()的效果并不是先平移再旋转。
所以也不建议使用多次变换,如果需要实现这种效果可以考虑操作画布坐标系。
Matrix matrix=new Matrix();
matrix.setTranslate(x, y);
printMatrix(matrix);
// canvas.save();
// canvas.translate(200, 200);
canvas.drawBitmap(bmp2, matrix, paintAll);
// canvas.restore();


 1545
1545

 被折叠的 条评论
为什么被折叠?
被折叠的 条评论
为什么被折叠?
 到【灌水乐园】发言


