


这篇文章接着上一篇,分析一下Netty4的ServerBootstrp是如何工作的。
EchoServer
先看看Netty自带的EchoServer例子:
/**
 * Echoes back any received data from a client.
 */
public class EchoServer {

    private final int port;

    public EchoServer(int port) {
        this.port = port;
    }

    public void run() throws Exception {
        // Configure the server.
        EventLoopGroup bossGroup = new NioEventLoopGroup();
        EventLoopGroup workerGroup = new NioEventLoopGroup();
        try {
            ServerBootstrap b = new ServerBootstrap();
            b.group(bossGroup, workerGroup)
             .channel(NioServerSocketChannel.class)
             .option(ChannelOption.SO_BACKLOG, 100)
             .handler(new LoggingHandler(LogLevel.INFO))
             .childHandler(new ChannelInitializer<SocketChannel>() {
                 @Override
                 public void initChannel(SocketChannel ch) throws Exception {
                     ch.pipeline().addLast(
                             //new LoggingHandler(LogLevel.INFO),
                             new EchoServerHandler());
                 }
             });

            // Start the server.
            ChannelFuture f = b.bind(port).sync();

            // Wait until the server socket is closed.
            f.channel().closeFuture().sync();
        } finally {
            // Shut down all event loops to terminate all threads.
            bossGroup.shutdownGracefully();
            workerGroup.shutdownGracefully();
        }
    }

    public static void main(String[] args) throws Exception {
        int port;
        if (args.length > 0) {
            port = Integer.parseInt(args[0]);
        } else {
            port = 8080;
        }
        new EchoServer(port).run();
    }
}
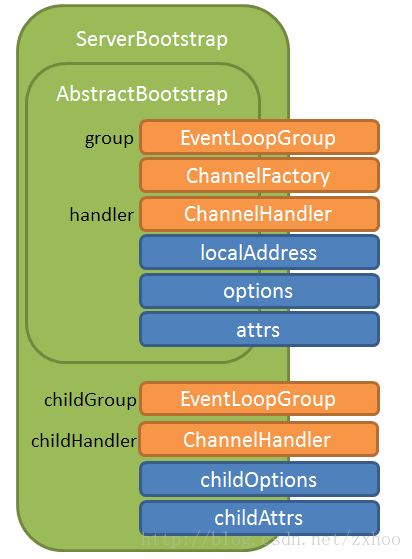
作为Builder的ServerBootstrap
public final class ServerBootstrap extends AbstractBootstrap<ServerBootstrap, ServerChannel> {

    private final Map<ChannelOption<?>, Object> childOptions = new LinkedHashMap<ChannelOption<?>, Object>();
    private final Map<AttributeKey<?>, Object> childAttrs = new LinkedHashMap<AttributeKey<?>, Object>();
    private volatile EventLoopGroup childGroup;
    private volatile ChannelHandler childHandler;
    // ...
}
从bind()方法入手
bind()方法实际上是在AbstractBootstrap里定义的,bind()先调用validate()方法检查各个Part是否准备就绪,然后把工作交给了doBind()方法。doBind()方法首先调用initAndRegister()方法,然后把工作交给doBind0()。initAndRegister()会调用模板方法init()来初始化Channel,initAndRegister()方法的细节上篇文章分析过了,这里不再复述。下面是整个方法调用过程的示意图:

init()方法
    @Override
    void init(Channel channel) throws Exception {
        final Map<ChannelOption<?>, Object> options = options();
        synchronized (options) {
            channel.config().setOptions(options);
        }

        final Map<AttributeKey<?>, Object> attrs = attrs();
        synchronized (attrs) {
            for (Entry<AttributeKey<?>, Object> e: attrs.entrySet()) {
                @SuppressWarnings("unchecked")
                AttributeKey<Object> key = (AttributeKey<Object>) e.getKey();
                channel.attr(key).set(e.getValue());
            }
        }

        ChannelPipeline p = channel.pipeline();
        if (handler() != null) {
            p.addLast(handler());
        }

        final EventLoopGroup currentChildGroup = childGroup;
        final ChannelHandler currentChildHandler = childHandler;
        final Entry<ChannelOption<?>, Object>[] currentChildOptions;
        final Entry<AttributeKey<?>, Object>[] currentChildAttrs;
        synchronized (childOptions) {
            currentChildOptions = childOptions.entrySet().toArray(newOptionArray(childOptions.size()));
        }
        synchronized (childAttrs) {
            currentChildAttrs = childAttrs.entrySet().toArray(newAttrArray(childAttrs.size()));
        }

        p.addLast(new ChannelInitializer<Channel>() {
            @Override
            public void initChannel(Channel ch) throws Exception {
                ch.pipeline().addLast(new ServerBootstrapAcceptor(
                        currentChildGroup, currentChildHandler, currentChildOptions, currentChildAttrs));
            }
        });
    }
ServerBootstrap类的init()方法虽然很长,但是却不难理解。首先是给Channel设置options和attrs,然后把User提供的针对NioServerSocketChannel的Handler添加到Pipeline的末尾。接下来复制childOptions和childAttrs,最后实例化一个ChannelInitializer,添加到Pipeline的末尾。init()方法执行完毕之后,AbstractBootstrap的initAndRegister()方法会将NioServerSocketChannel注册到group里。到此为止,NioServerSocketChannel的状态如下图所示:

ChannelInitializer在channelRegistered事件触发后会调用initChannel()方法,随后把自己从Pipeline里删除:
@Sharable
public abstract class ChannelInitializer<C extends Channel> extends ChannelInboundHandlerAdapter {

    private static final InternalLogger logger = InternalLoggerFactory.getInstance(ChannelInitializer.class);

    /**
     * This method will be called once the {@link Channel} was registered. After the method returns this instance
     * will be removed from the {@link ChannelPipeline} of the {@link Channel}.
     *
     * @param ch            the {@link Channel} which was registered.
     * @throws Exception    is thrown if an error occurs. In that case the {@link Channel} will be closed.
     */
    protected abstract void initChannel(C ch) throws Exception;

    @SuppressWarnings("unchecked")
    @Override
    public final void channelRegistered(ChannelHandlerContext ctx)
            throws Exception {
        boolean removed = false;
        boolean success = false;
        try {
            initChannel((C) ctx.channel());
            ctx.pipeline().remove(this);
            removed = true;
            ctx.fireChannelRegistered();
            success = true;
        } catch (Throwable t) {
            logger.warn("Failed to initialize a channel. Closing: " + ctx.channel(), t);
        } finally {
            if (!removed) {
                ctx.pipeline().remove(this);
            }
            if (!success) {
                ctx.close();
            }
        }
    }
}
所以注册之后的NioServerSocketChannel状态如下图所示:

ServerBootstrapAcceptor
    private static class ServerBootstrapAcceptor extends ChannelInboundHandlerAdapter {

        private final EventLoopGroup childGroup;
        private final ChannelHandler childHandler;
        private final Entry<ChannelOption<?>, Object>[] childOptions;
        private final Entry<AttributeKey<?>, Object>[] childAttrs;

        @SuppressWarnings("unchecked")
        ServerBootstrapAcceptor(
                EventLoopGroup childGroup, ChannelHandler childHandler,
                Entry<ChannelOption<?>, Object>[] childOptions, Entry<AttributeKey<?>, Object>[] childAttrs) {
            this.childGroup = childGroup;
            this.childHandler = childHandler;
            this.childOptions = childOptions;
            this.childAttrs = childAttrs;
        }

        @Override
        @SuppressWarnings("unchecked")
        public void channelRead(ChannelHandlerContext ctx, Object msg) {
            Channel child = (Channel) msg;

            child.pipeline().addLast(childHandler);

            for (Entry<ChannelOption<?>, Object> e: childOptions) {
                try {
                    if (!child.config().setOption((ChannelOption<Object>) e.getKey(), e.getValue())) {
                        logger.warn("Unknown channel option: " + e);
                    }
                } catch (Throwable t) {
                    logger.warn("Failed to set a channel option: " + child, t);
                }
            }

            for (Entry<AttributeKey<?>, Object> e: childAttrs) {
                child.attr((AttributeKey<Object>) e.getKey()).set(e.getValue());
            }

            try {
                childGroup.register(child);
            } catch (Throwable t) {
                child.unsafe().closeForcibly();
                logger.warn("Failed to register an accepted channel: " + child, t);
            }
        }
        // ...
    }
ServerBootstrapAcceptor在channelRead事件触发的时候(也就有客户端连接的时候),把childHandler加到childChannel Pipeline的末尾,设置childHandler的options和attrs,最后把childHandler注册进childGroup,如下图所示:


 8万+
8万+


 被折叠的 条评论
为什么被折叠?
被折叠的 条评论
为什么被折叠?
 到【灌水乐园】发言


