算法原理请参看:http://ufldl.stanford.edu/wiki/index.php/Self-Taught_Learning
Step 1: Generate the input and test data sets
Download and decompress stl_exercise.zip, which contains starter code for this exercise. Additionally, you will need to download the datasets from the MNIST Handwritten Digit Database for this project.
Step 2: Train the sparse autoencoder
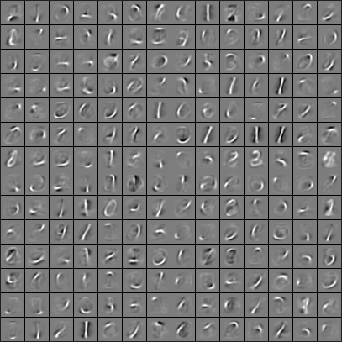
Next, use the unlabeled data (the digits from 5 to 9) to train a sparse autoencoder, using the same sparseAutoencoderCost.mfunction as you had written in the previous exercise. (From the earlier exercise, you should have a working and vectorized implementation of the sparse autoencoder.) For us, the training step took less than 25 minutes on a fast desktop. When training is complete, you should get a visualization of pen strokes like the image shown below:
Informally, the features learned by the sparse autoencoder should correspond to penstrokes.
addpath minFunc/
options.Method = 'lbfgs'; % Here, we use L-BFGS to optimize our cost
                          % function. Generally, for minFunc to work, you
                          % need a function pointer with two outputs: the
                          % function value and the gradient. In our problem,
                          % sparseAutoencoderCost.m satisfies this.
options.maxIter = maxIter;	  % Maximum number of iterations of L-BFGS to run
options.display = 'on';


[opttheta, cost] = minFunc( @(p) sparseAutoencoderCost(p, ...
                                   inputSize, hiddenSize, ...
                                   lambda, sparsityParam, ...
                                   beta, unlabeledData), ...
                              theta, options);
Step 3: Extracting features
After the sparse autoencoder is trained, you will use it to extract features from the handwritten digit images.
Complete feedForwardAutoencoder.m to produce a matrix whose columns correspond to activations of the hidden layer for each example, i.e., the vector a(2) corresponding to activation of layer 2. (Recall that we treat the inputs as layer 1).
After completing this step, calling feedForwardAutoencoder.m should convert the raw image data to hidden unit activations a(2).
代码实现:
activation=sigmoid(W1*data+repmat(b1,1,size(data,2)));
Step 4: Training and testing the logistic regression model
Use your code from the softmax exercise (softmaxTrain.m) to train a softmax classifier using the training set features (trainFeatures) and labels (trainLabels).
代码实现:
numClasses=5;% 0-4
inputSize=size(trainFeatures,1);
lambda=1e-4;
%train sftmax regression
options.maxIter = 100;
softmaxModel = softmaxTrain(inputSize, numClasses, lambda, ...
                            trainFeatures, trainLabels, options);
Step 5: Classifying on the test set
Finally, complete the code to make predictions on the test set (testFeatures) and see how your learned features perform! If you've done all the steps correctly, you should get an accuracy of about 98% percent.
As a comparison, when raw pixels are used (instead of the learned features), we obtained a test accuracy of only around 96% (for the same train and test sets).
代码实现:
[pred] = softmaxPredict(softmaxModel, testFeatures);最终的分类精度:98.607%
源代码下载:http://download.csdn.net/detail/suan2014/9884205


 143
143


 被折叠的 条评论
为什么被折叠?


