


翻译
布兰森汉姆绘制线算法
1 第一次尝试
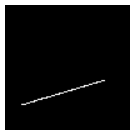
第一课的目标是渲染金属丝网。要做到这一点,我们应该学习如何绘制线段。我们可以简单地读懂Bresenham的行算法,但是让我们自己写代码。在(x0, y0)点和(x1, y1)点之间绘制线段的最简单代码是什么样子的?
显然,是这样的:
void line(int x0, int y0, int x1, int y1, TGAImage &image, TGAColor color) {
    for (float t=0.; t<1.; t+=.01) {
        int x = x0 + (x1-x0)*t;
        int y = y0 + (y1-y0)*t;
        image.set(x, y, color);
    }
}
可用代码片段here
2 第二次尝试
这段代码的问题(除了效率低下)是选择常数,我取它等于.01。
如果取它为.1,线段就会像这样
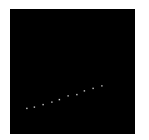
我们可以很容易地找到必要的步骤:它就是要绘制的像素数。
最简单的(但错误的)代码看起来像以下:
void line(int x0, int y0, int x1, int y1, TGAImage &image, TGAColor color) {
    for (int x=x0; x<=x1; x++) {
        float t = (x-x0)/(float)(x1-x0);
        int y = y0*(1.-t) + y1*t;
        image.set(x, y, color);
    }
}
注意!
在我的学生的代码中,第一个错误的来源是整数除法,比如’ (x-x0)/(x1-x0) '。
然后,如果我们尝试用这段代码绘制以下线条:
line(13, 20, 80, 40, image, white);
line(20, 13, 40, 80, image, red);
line(80, 40, 13, 20, image, red);
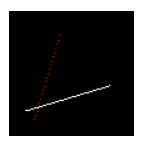
原来一条线是好的,第二条是有孔的,第三条线根本就没有。
注意,第一行和第三行(在代码中)以不同的颜色和不同的方向绘制了同一条线(源点和目标点翻转了)。
我们已经看过白色的了,画得很好。
我希望把白线的颜色改成红色,但是我做不到。
这是对对称性的测试:绘制线段的结果不应该依赖于点的顺序:(a,b)线段应该与(b,a)线段完全相同。
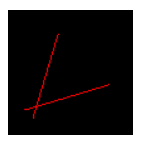
3 第三次尝试
我们通过交换点来修复缺失的红线,使x0总是小于x1。
在其中一个线段上有洞,这是由于它的高度大于宽度。
我的学生经常提出以下解决办法:
if (dx>dy) {for (int x)} else {for (int y)}
马萨卡!
void line(int x0, int y0, int x1, int y1, TGAImage &image, TGAColor color) {
    bool steep = false;
    if (std::abs(x0-x1)<std::abs(y0-y1)) { // if the line is steep, we transpose the image
        std::swap(x0, y0);
        std::swap(x1, y1);
        steep = true;
    }
    if (x0>x1) { // make it left−to−right
        std::swap(x0, x1);
        std::swap(y0, y1);
    }
    for (int x=x0; x<=x1; x++) {
        float t = (x-x0)/(float)(x1-x0);
        int y = y0*(1.-t) + y1*t;
        if (steep) {
            image.set(y, x, color); // if transposed, de−transpose
        } else {
            image.set(x, y, color);
        }
    }
}
4 第四次尝试
_警告:编译器的优化器(g++ -O3)往往比你(和我)在创建一个快速代码。这一部分是出于历史/文化原因。
这段代码效果很好。这正是我希望在最终版本或我们的渲染器中看到的那种复杂性。它绝对是低效的(多分区等),但它简短易读。请注意,它没有声明,也没有检查越界,这很糟糕。在这些文章中,我尽量不重载这个特定的代码,因为它会被大量阅读。同时,我系统地提醒进行检查的必要性。
所以,前面的代码工作正常,但我们可以优化它。优化是一件危险的事情。我们应该清楚代码将在哪个平台上运行。为显卡或仅为 CPU 优化代码是完全不同的事情。在任何优化之前和期间,必须对代码进行概要分析。试着猜一下,这里哪个操作是最耗费资源的操作?
对于测试,我绘制了我们之前绘制的 3 条线段 1,000,000 次。我的 CPU 是 Intel® Core™ i5-3450 CPU @ 3.10GHz。对于每个像素,此代码调用 TGAColor 复制构造函数。即 1000000 * 3 条线段 * 每条线段大约 50 个像素。引起了很多问题,不是吗?从哪里开始优化?分析器会告诉我们。
I compiled the code with g++ -ggdb -g -pg -O0 keys, and then ran gprof:
我用g++ -ggdb -g -pg -O0命令编译代码,然后运行 gprof:
%   cumulative   self              self     total
 time   seconds   seconds    calls  ms/call  ms/call  name
 69.16      2.95     2.95  3000000     0.00     0.00  line(int, int, int, int, TGAImage&, TGAColor)
 19.46      3.78     0.83 204000000     0.00     0.00  TGAImage::set(int, int, TGAColor)
  8.91      4.16     0.38 207000000     0.00     0.00  TGAColor::TGAColor(TGAColor const&)
  1.64      4.23     0.07        2    35.04    35.04  TGAColor::TGAColor(unsigned char, unsigned char, unsigned char, unsigned char)
  0.94      4.27     0.04                             TGAImage::get(int, int)
10% 的时间花在复制颜色上。 但是随后 70% 的时间都花在了调用 line() 上! 这就是我们要优化的地方。
5 第四次尝试+
我们应该注意到每个部门都有相同的除数。 让我们把它排除在外。 误差变量为我们提供了从当前 (x, y) 像素到最佳直线的距离。 每次误差大于一个像素时,我们将 y 增加(或减少)1,并将误差也减少 1。
可用代码here.
void line(int x0, int y0, int x1, int y1, TGAImage &image, TGAColor color) {
    bool steep = false;
    if (std::abs(x0-x1)<std::abs(y0-y1)) {
        std::swap(x0, y0);
        std::swap(x1, y1);
        steep = true;
    }
    if (x0>x1) {
        std::swap(x0, x1);
        std::swap(y0, y1);
    }
    int dx = x1-x0;
    int dy = y1-y0;
    float derror = std::abs(dy/float(dx));
    float error = 0;
    int y = y0;
    for (int x=x0; x<=x1; x++) {
        if (steep) {
            image.set(y, x, color);
        } else {
            image.set(x, y, color);
        }
        error += derror;
        if (error>.5) {
            y += (y1>y0?1:-1);
            error -= 1.;
        }
    }
}
这是 gprof 的输出:
%   cumulative   self              self     total
 time   seconds   seconds    calls  ms/call  ms/call  name
 38.79      0.93     0.93  3000000     0.00     0.00  line(int, int, int, int, TGAImage&, TGAColor)
 37.54      1.83     0.90 204000000     0.00     0.00  TGAImage::set(int, int, TGAColor)
 19.60      2.30     0.47 204000000     0.00     0.00  TGAColor::TGAColor(int, int)
  2.09      2.35     0.05        2    25.03    25.03  TGAColor::TGAColor(unsigned char, unsigned char, unsigned char, unsigned char)
  1.25      2.38     0.03                             TGAImage::get(int, int)
6 第五次和最后一次尝试
为什么我们需要浮点数? 唯一的原因是 dx 除以 dx 并与循环体中的 .5 进行比较。 我们可以通过用另一个变量替换错误变量来摆脱浮点数。 我们称之为error2,假设它等于error * dx * 2。这是等效的代码:
void line(int x0, int y0, int x1, int y1, TGAImage &image, TGAColor color) {
    bool steep = false;
    if (std::abs(x0-x1)<std::abs(y0-y1)) {
        std::swap(x0, y0);
        std::swap(x1, y1);
        steep = true;
    }
    if (x0>x1) {
        std::swap(x0, x1);
        std::swap(y0, y1);
    }
    int dx = x1-x0;
    int dy = y1-y0;
    int derror2 = std::abs(dy)*2;
    int error2 = 0;
    int y = y0;
    for (int x=x0; x<=x1; x++) {
        if (steep) {
            image.set(y, x, color);
        } else {
            image.set(x, y, color);
        }
        error2 += derror2;
        if (error2 > dx) {
            y += (y1>y0?1:-1);
            error2 -= dx*2;
        }
    }
}
%   cumulative   self              self     total
 time   seconds   seconds    calls  ms/call  ms/call  name
 42.77      0.91     0.91 204000000     0.00     0.00  TGAImage::set(int, int, TGAColor)
 30.08      1.55     0.64  3000000     0.00     0.00  line(int, int, int, int, TGAImage&, TGAColor)
 21.62      2.01     0.46 204000000     0.00     0.00  TGAColor::TGAColor(int, int)
  1.88      2.05     0.04        2    20.02    20.02  TGAColor::TGAColor(unsigned char, unsigned char, unsigned char, unsigned char)
现在,通过引用传递颜色(或仅启用编译标志 -O3),在函数调用期间删除不必要的副本就足够了,就大功告成了。 代码中没有一个乘法或除法。 执行时间从 2.95 秒减少到 0.64 秒。
我还建议检查 this issue。 优化很棘手!
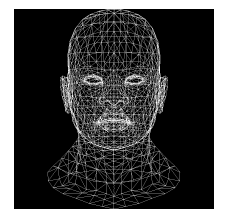
7 线框渲染
所以现在我们准备好创建一个线渲染。 你可以在这里找到代码和测试模型的快照。
我使用文件的 wavefront obj 格式来存储模型。 我们渲染所需的全部内容是从文件中读取以下类型的顶点数组:
v 0.608654 -0.568839 -0.416318
是 x,y,z 坐标,每个文件行一个顶点和面孔
f 1193/1240/1193 1180/1227/1180 1179/1226/1179
我们对每个空格后的第一个数字感兴趣。 它是我们之前读过的数组中顶点的编号。 因此,这条线表示 1193、1180 和 1179 个顶点形成一个三角形。 请注意,在 obj 文件中,索引从 1 开始,这意味着您应该分别查找 1192、1179 和 1178 个顶点。
model.cpp 文件包含一个简单的解析器。 将以下循环写入我们的 main.cpp 和 voilà,我们的线渲染器已准备就绪。
for (int i=0; i<model->nfaces(); i++) {
    std::vector<int> face = model->face(i);
    for (int j=0; j<3; j++) {
        Vec3f v0 = model->vert(face[j]);
        Vec3f v1 = model->vert(face[(j+1)%3]);
        int x0 = (v0.x+1.)*width/2.;
        int y0 = (v0.y+1.)*height/2.;
        int x1 = (v1.x+1.)*width/2.;
        int y1 = (v1.y+1.)*height/2.;
        line(x0, y0, x1, y1, image, white);
    }
}
下次我们将绘制 2D 三角形并改进我们的渲染器。
实操效果


 1731
1731


 被折叠的 条评论
为什么被折叠?
被折叠的 条评论
为什么被折叠?
 到【灌水乐园】发言


