


13542
序列式容器:1 3 5 4 2
关联式容器:12345
质变算法:改变原数据
非质变算法:不改变原数据
迭代器类似于指针
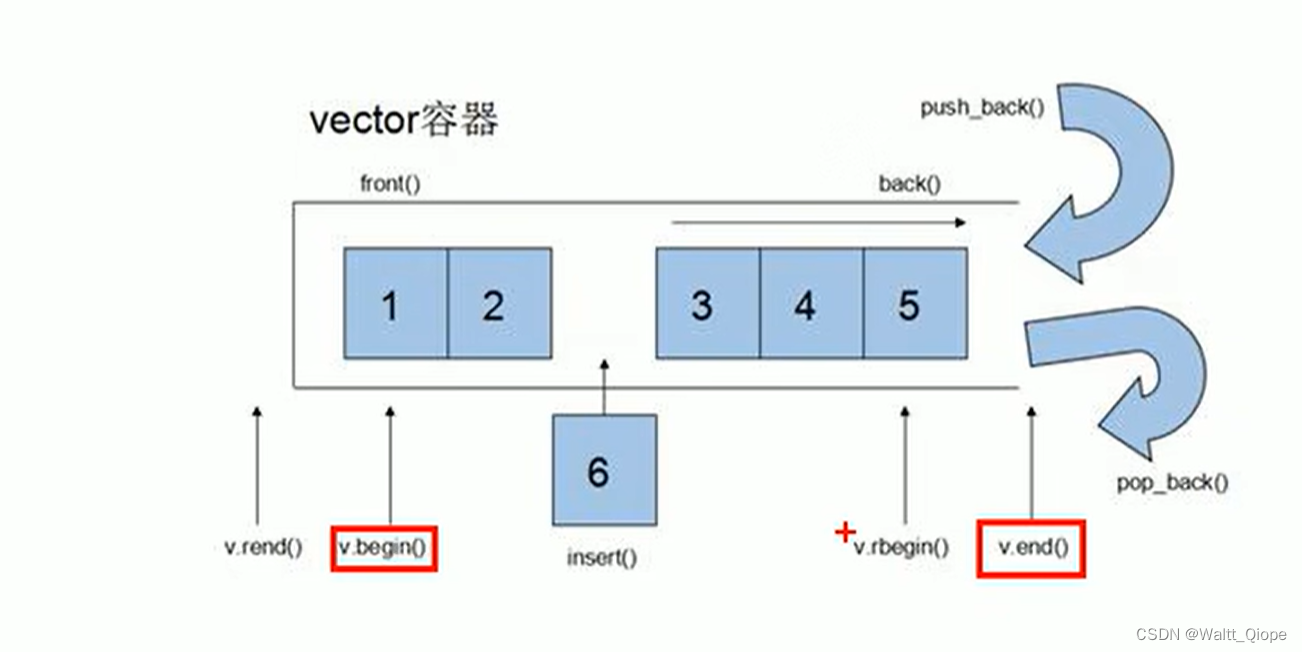
Vector
算法:for_each
迭代器:iterator
v.end()使得迭代器指向最后一个数下一位
for(vector<int>::iterator Begin=v.begin();Begin!=v.end();Begin++){
	cout<<*Begin<<endl;
	}
使用for循环进行遍历
void myprint(int val){
	cout<<val<<endl;
}

for_each(v.begin(),v.end(),myprint);
for_each遍历
我们也可以使用多层vector进行嵌套:
void test01(){
	vector<vector<int>> v;
	vector<int> p1;
	vector<int> p2;

	for(int i=1;i<4;i++){
	p1.push_back(i);
	p2.push_back(i+1);
	}

	v.push_back(p1);
	v.push_back(p2);

	for(vector<vector<int>>::iterator i=v.begin();i<v.end();i++){
		for(vector<int>::iterator j=(*i).begin();j<(*i).end();j++){
			cout<<*j<<endl;
		}
	}

}
string容器:
string实际上就是char*的封装
构造函数:
std::string str1; // 创建一个空字符串
    std::string str2("Hello, World!"); // 使用字符串字面值初始化
    std::string str3(str2); // 拷贝构造
    std::string str4(5, 'a'); // 创建一个包含5个字符 'a' 的字符串

    std::cout << str1 << std::endl; // 输出:
    std::cout << str2 << std::endl; // 输出: Hello, World!
    std::cout << str3 << std::endl; // 输出: Hello, World!
    std::cout << str4 << std::endl; // 输出: aaaaa
由于=已经被重载了,所以也能起到构造的效果
std::string str = "Hello";也可以起到赋值的效果
string a="hello"
atring b=a;
也可以使用assign方法赋值:
 // 1. 基本用法
    std::string str;
    str.assign("Hello, World!");
    std::cout << str << std::endl; // 输出: Hello, World!

    // 2. 从另一个 std::string 赋值
    std::string str1 = "Hello";
    std::string str2;
    str2.assign(str1);
    std::cout << str2 << std::endl; // 输出: Hello

    // 3. 从 const char* 赋值
    std::string str3;
    str3.assign("Hello, World!", 5);
    std::cout << str3 << std::endl; // 输出: Hello

    // 4. 从迭代器范围赋值
    std::string str4;
    str4.assign(str1.begin(), str1.begin() + 5);
    std::cout << str4 << std::endl; // 输出: Hello

    // 5. 重复某个字符若干次
    std::string str5;
    str5.assign(10, 'x');
    std::cout << str5 << std::endl; // 输出: xxxxxxxxxx
连接字符串可以使用+,+=以及append方法
std::string str1 = "Hello, ";
std::string str2 = "World!";
std::string str3 = str1 + str2; // str3 = "Hello, World!"
str1.append(str2); // str1 = "Hello, World!"
str5+=str5;
str5.append("hallo",1,4);
//1是指向下标为1的指针,4是往后取四个字符
find方法
 std::string str = "Hello, World!";

    // 1. 从字符串末尾查找子字符串
    size_t pos = str.rfind("World");
    if (pos != std::string::npos) {
        std::cout << "Found 'World' at position: " << pos << std::endl; // 输出: Found 'World' at position: 7
    } else {
        std::cout << "'World' not found" << std::endl;
    }

    // 2. 从字符串末尾查找字符
    pos = str.rfind('o');
    if (pos != std::string::npos) {
        std::cout << "Found 'o' at position: " << pos << std::endl; // 输出: Found 'o' at position: 8
    } else {
        std::cout << "'o' not found" << std::endl;
    }

    // 3. 指定起始位置(从右向左数)进行查找
    pos = str.rfind('o', 7); // 从位置7开始从右向左查找
    if (pos != std::string::npos) {
        std::cout << "Found 'o' at position: " << pos << std::endl; // 输出: Found 'o' at position: 4
    } else {
        std::cout << "'o' not found" << std::endl;
    }
如果没有find到输出-1;
replace方法:
string& replace(size_t pos, size_t len, const string& str);
string& replace(size_t pos, size_t len, const char* s);
string& replace(size_t pos, size_t len, const char* s, size_t n);
string& replace(size_t pos, size_t len, size_t n, char c);
compare方法:
#include <iostream>
#include <string>

int main() {
    std::string str1 = "Hello, World!";
    std::string str2 = "Hello, Universe!";

    // 比较 str1 和 str2 的前 5 个字符
    int result = str1.compare(0, 5, str2, 0, 5);
    if (result == 0) {
        std::cout << "The substrings are equal" << std::endl;
    } else if (result > 0) {
        std::cout << "The substring of str1 is greater than the substring of str2" << std::endl;
    } else {
        std::cout << "The substring of str1 is less than the substring of str2" << std::endl;
    }

    return 0;
}
最大用处是campare结果为0表示相等。
通过[]访问字符串:
#include <iostream>
#include <string>

int main() {
    std::string str = "Hello, World!";

    // 访问字符
    char ch = str[7];
    std::cout << "Character at position 7: " << ch << std::endl; // 输出: W

    // 修改字符
    str[7] = 'w';
    std::cout << "Modified string: " << str << std::endl; // 输出: Hello, world!

    return 0;
}
通过at访问字符串
#include <iostream>
#include <string>

int main() {
    std::string str = "Hello, World!";

    try {
        // 访问字符
        char ch = str.at(7);
        std::cout << "Character at position 7: " << ch << std::endl; // 输出: W

        // 修改字符
        str.at(7) = 'w';
        std::cout << "Modified string: " << str << std::endl; // 输出: Hello, world!
    } catch (const std::out_of_range& e) {
        std::cerr << "Out of range error: " << e.what() << std::endl;
    }

    return 0;
}
你甚至可以使用iterator代表指针进行访问和修改
insert插入方法:
#include <iostream>
#include <string>

int main() {
    std::string str = "Hello, World!";

    // 1. 插入子字符串
    str.insert(7, "Beautiful "); // 在位置7插入 "Beautiful "
    std::cout << str << std::endl; // 输出: Hello, Beautiful World!

    // 2. 插入 C 风格字符串
    str.insert(7, "C++ ", 3); // 在位置7插入 "C++" 的前3个字符
    std::cout << str << std::endl; // 输出: Hello, C++ Beautiful World!

    // 3. 插入字符
    str.insert(13, 1, ':'); // 在位置13插入一个 ':'
    std::cout << str << std::endl; // 输出: Hello, C++ :Beautiful World!

    // 4. 插入重复的字符
    str.insert(13, 3, '*'); // 在位置13插入三个 '*'
    std::cout << str << std::endl; // 输出: Hello, C++ ***:Beautiful World!

    return 0;
}
erase方法:
#include <iostream>
#include <string>

int main() {
    std::string str = "Hello, Beautiful World!";

    // 1. 删除指定位置的字符
    str.erase(7, 10); // 从位置7开始删除10个字符
    std::cout << str << std::endl; // 输出: Hello, World!

    // 2. 删除指定范围的字符
    str.erase(str.begin() + 5, str.end() - 1); // 删除从位置5到倒数第二个字符的范围
    std::cout << str << std::endl; // 输出: Hello!

    // 3. 删除从某个位置开始的一定数量的字符
    str = "Hello, World!";
    str.erase(5); // 从位置5开始删除到字符串末尾的所有字符
    std::cout << str << std::endl; // 输出: Hello

    return 0;
}
注意erase必须有起始数字和删除多少字符,如果不指定多少字符会默认从起始数字删完
substr获取字串:
#include <iostream>
#include <string>

int main() {
    std::string str = "Hello, World!";

    // 获取从位置 7 开始的子字符串,长度为 5
    std::string sub = str.substr(7, 5);
    std::cout << "Substring: " << sub << std::endl; // 输出: World

    // 获取从位置 7 开始的子字符串,直到字符串末尾
    std::string sub2 = str.substr(7);
    std::cout << "Substring: " << sub2 << std::endl; // 输出: World!

    return 0;
}
在使用 substr 方法时,需要注意边界检查。如果提供的起始位置超出了字符串的长度,会抛出 std::out_of_range 异常。
和fin一起使用
int pos=str.find('@');
string usr_name=email.substr(0,pos);
vector容器
迭代器支持随机访问
范围 for 循环(range-based for loop)提供了一种简洁的方法来遍历容器中的元素。这种循环的语法如下:
#include <iostream>
#include <vector>

int main() {
    std::vector<int> vec = {1, 2, 3, 4, 5};

    for (int val : vec) {
        std::cout << val << " ";
    }
    std::cout << std::endl;

    return 0;
}
vector构造函数
#include <iostream>
#include <vector>

int main() {
    std::vector<int> vec; // 创建一个空的 vector
    std::cout << "Size: " << vec.size() << std::endl; // 输出: Size: 0
    return 0;
}

#include <iostream>
#include <vector>

int main() {
    std::vector<int> vec(5); // 创建一个包含 5 个元素的 vector,元素默认初始化为 0
    std::cout << "Size: " << vec.size() << std::endl; // 输出: Size: 5
    for (int val : vec) {
        std::cout << val << " "; // 输出: 0 0 0 0 0
    }
    return 0;
}

//使用迭代器构造
#include <iostream>
#include <vector>

int main() {
    std::vector<int> vec1 = {1, 2, 3, 4, 5};
    std::vector<int> vec2(vec1.begin() + 1, vec1.end() - 1); // 使用 vec1 的部分范围创建 vec2
    std::cout << "Size: " << vec2.size() << std::endl; // 输出: Size: 3
    for (int val : vec2) {
        std::cout << val << " "; // 输出: 2 3 4
    }
    return 0;
}

//拷贝构造
#include <iostream>
#include <vector>

int main() {
    std::vector<int> vec1 = {1, 2, 3, 4, 5};
    std::vector<int> vec2(vec1); // 使用 vec1 的拷贝创建 vec2
    std::cout << "Size: " << vec2.size() << std::endl; // 输出: Size: 5
    for (int val : vec2) {
        std::cout << val << " "; // 输出: 1 2 3 4 5
    }
    return 0;
}
在 C++ 中,std::vector 类支持多种赋值操作,用于将一个 vector 对象的内容赋值给另一个 vector 对象。这些操作包括:
- 拷贝赋值操作符(Copy Assignment Operator)
- 移动赋值操作符(Move Assignment Operator)
- 初始化列表赋值(Initializer List Assignment)
assign方法
下面详细解释这些赋值操作及其用法:
1. 拷贝赋值操作符(Copy Assignment Operator)
拷贝赋值操作符将一个 vector 对象的内容复制到另一个 vector 对象中。如果目标 vector 之前已经有内容,这些内容将被替换。
#include <iostream>
#include <vector>

int main() {
    std::vector<int> vec1 = {1, 2, 3, 4, 5};
    std::vector<int> vec2;

    vec2 = vec1; // 使用拷贝赋值操作符
    for (int val : vec2) {
        std::cout << val << " "; // 输出: 1 2 3 4 5
    }
    std::cout << std::endl;

    return 0;
}
2. 移动赋值操作符(Move Assignment Operator)
移动赋值操作符将一个临时 vector 对象的内容移动到另一个 vector 对象中,而不是复制内容。这可以提高性能,因为不需要复制数据。
#include <iostream>
#include <vector>
#include <utility> // for std::move

int main() {
    std::vector<int> vec1 = {1, 2, 3, 4, 5};
    std::vector<int> vec2;

    vec2 = std::move(vec1); // 使用移动赋值操作符
    for (int val : vec2) {
        std::cout << val << " "; // 输出: 1 2 3 4 5
    }
    std::cout << std::endl;

    std::cout << "vec1 size: " << vec1.size() << std::endl; // 输出: vec1 size: 0

    return 0;
}
3. 初始化列表赋值(Initializer List Assignment)
可以使用初始化列表直接为 vector 对象赋值。
#include <iostream>
#include <vector>

int main() {
    std::vector<int> vec;

    vec = {1, 2, 3, 4, 5}; // 使用初始化列表赋值
    for (int val : vec) {
        std::cout << val << " "; // 输出: 1 2 3 4 5
    }
    std::cout << std::endl;

    return 0;
}
4. assign 方法
assign 方法用于将指定范围或指定数量的元素赋值给 vector 对象。
4.1 使用迭代器范围
#include <iostream>
#include <vector>

int main() {
    std::vector<int> vec1 = {1, 2, 3, 4, 5};
    std::vector<int> vec2;

    vec2.assign(vec1.begin(), vec1.end()); // 使用迭代器范围赋值
    for (int val : vec2) {
        std::cout << val << " "; // 输出: 1 2 3 4 5
    }
    std::cout << std::endl;

    return 0;
}
4.2 使用指定数量的相同元素
#include <iostream>
#include <vector>

int main() {
    std::vector<int> vec;

    vec.assign(5, 42); // 使用指定数量的相同元素赋值
    for (int val : vec) {
        std::cout << val << " "; // 输出: 42 42 42 42 42
    }
    std::cout << std::endl;

    return 0;
}
在 C++ 的 std::vector 容器类中,容量和大小操作是非常重要的概念,用于管理和查询向量的存储空间和元素数量。下面详细讲解这些操作的用法及其含义:
1. 大小操作
size
size 方法返回当前 vector 中元素的数量。
#include <iostream>
#include <vector>

int main() {
    std::vector<int> vec = {1, 2, 3, 4, 5};
    std::cout << "Size: " << vec.size() << std::endl; // 输出: Size: 5
    return 0;
}
empty
empty 方法检查 vector 是否为空。如果 vector 为空(即 size 为 0),则返回 true,否则返回 false。
#include <iostream>
#include <vector>

int main() {
    std::vector<int> vec;
    if (vec.empty()) {
        std::cout << "Vector is empty" << std::endl;
    } else {
        std::cout << "Vector is not empty" << std::endl;
    }
    return 0;
}
max_size
max_size 方法返回 vector 能容纳的最大元素数量。这个数量取决于系统或库的实现,是一个很大的值,通常用来了解 vector 的极限容量。
#include <iostream>
#include <vector>

int main() {
    std::vector<int> vec;
    std::cout << "Max Size: " << vec.max_size() << std::endl;
    return 0;
}
2. 容量操作
capacity
capacity 方法返回当前 vector 分配的存储空间,可以容纳的元素数量。这个值总是大于或等于 size。
#include <iostream>
#include <vector>

int main() {
    std::vector<int> vec = {1, 2, 3};
    std::cout << "Capacity: " << vec.capacity() << std::endl; // 输出: Capacity: 3(或更大,取决于实现)
    return 0;
}
resize 方法是 std::vector 类中的一个成员函数,用于调整 vector 的大小。它有两个主要作用:
- 如果新大小比当前大小大,则向
vector中添加新元素。 - 如果新大小比当前大小小,则删除超出部分的元素。
#include <iostream>
#include <vector>

int main() {
    std::vector<int> vec = {1, 2, 3};
    vec.resize(5, 42); // 将 vector 大小调整为 5,新元素初始化为 42
    //vec.resize(5)这样会在末尾默认补0
    for (int val : vec) {
        std::cout << val << " "; // 输出: 1 2 3 42 42
    }
    std::cout << std::endl;

    vec.resize(2); // 将 vector 大小调整为 2,超出的元素被删除
    for (int val : vec) {
        std::cout << val << " "; // 输出: 1 2
    }
    std::cout << std::endl;

    return 0;
}
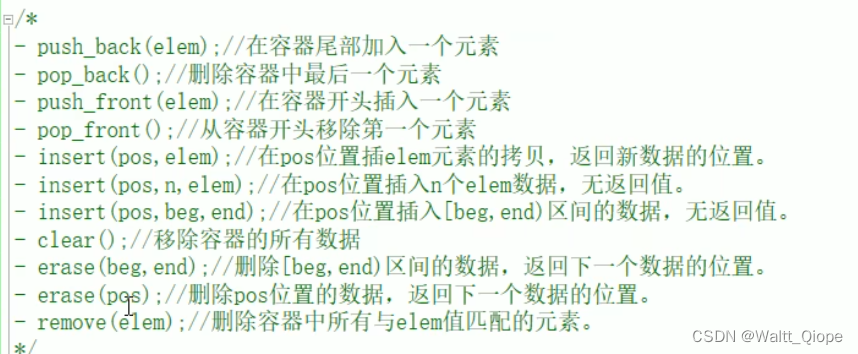
在 C++ 的 std::vector 类中,常用的插入和删除操作有很多,可以用来在不同的位置插入和删除元素。这些操作包括:
1. push_back
push_back 方法用于在 vector 的末尾添加一个元素。
#include <iostream>
#include <vector>

int main() {
    std::vector<int> vec = {1, 2, 3};
    vec.push_back(4); // 在末尾插入 4
    for (int val : vec) {
        std::cout << val << " "; // 输出: 1 2 3 4
    }
    std::cout << std::endl;
    return 0;
}
2. insert
insert 方法用于在 vector 的指定位置插入一个或多个元素。
#include <iostream>
#include <vector>

int main() {
    std::vector<int> vec = {1, 2, 3};

    // 在位置 1 处插入一个元素
    vec.insert(vec.begin()+1,4);
    for (int val : vec) {
        std::cout << val << " "; // 输出: 1 4 2 3
    }
    std::cout << std::endl;

    // 在位置 2 处插入两个元素
    vec.insert(vec.begin()+2,5,6);
    for (int val : vec) {
        std::cout << val << " "; // 输出: 1 4 5 5 2 3
    }
    std::cout << std::endl;

    // 在位置 4 处插入另一个 vector 的所有元素
    std::vector<int> vec2 = {6, 7};
    vec.insert(vec.begin() + 4, vec2.begin(),vec2.end());
    for (int val : vec) {
        std::cout << val << " "; // 输出: 1 4 5 5 6 7 2 3
    }
    std::cout << std::endl;

    return 0;
}
3. erase
erase 方法用于删除 vector 的指定位置的一个或多个元素。
#include <iostream>
#include <vector>

int main() {
    std::vector<int> vec = {1, 2, 3, 4, 5};

    // 删除位置 1 的元素
    vec.erase(vec.begin() + 1);
    for (int val : vec) {
        std::cout << val << " "; // 输出: 1 3 4 5
    }
    std::cout << std::endl;

    // 删除从位置 1 到位置 3(不包括 3)的元素
    vec.erase(vec.begin()+1,vec.end()+3);
    for (int val : vec) {
        std::cout << val << " "; // 输出: 1 5
    }
    std::cout << std::endl;

    return 0;
}
clear
clear 方法用于删除 vector 中的所有元素,使其变为空。
#include <iostream>
#include <vector>

int main() {
    std::vector<int> vec = {1, 2, 3, 4, 5};
    vec.clear(); // 清空 vector
    std::cout << "Size after clear: " << vec.size() << std::endl; // 输出: Size after clear: 0
    return 0;
}
数据存取
【】不再叙述
at 也可以访问
at 方法用于访问或修改 vector 中指定位置的元素,并进行边界检查。如果访问越界,会抛出 std::out_of_range 异常。
#include <iostream>
#include <vector>

int main() {
    std::vector<int> vec = {1, 2, 3, 4, 5};

    try {
        // 访问元素
        int value = vec.at(2); // value 为 3
        std::cout << "Element at index 2: " << value << std::endl;

        // 修改元素
        vec.at(2) = 10;
        std::cout << "Modified element at index 2: " << vec.at(2) << std::endl; // 输出: 10

        // 访问越界
        value = vec.at(10); // 抛出 std::out_of_range 异常
    } catch (const std::out_of_range& e) {
        std::cerr << "Out of range error: " << e.what() << std::endl;
    }

    return 0;
}
front 方法
front 方法用于访问 vector 的第一个元素。
#include <iostream>
#include <vector>

int main() {
    std::vector<int> vec = {1, 2, 3, 4, 5};

    // 访问第一个元素
    int value = vec.front();
    std::cout << "First element: " << value << std::endl; // 输出: 1

    // 修改第一个元素
    vec.front() = 10;
    std::cout << "Modified first element: " << vec.front() << std::endl; // 输出: 10

    return 0;
}
back 方法用于访问 vector 的最后一个元素。
#include <iostream>
#include <vector>

int main() {
    std::vector<int> vec = {1, 2, 3, 4, 5};

    // 访问最后一个元素
    int value = vec.back();
    std::cout << "Last element: " << value << std::endl; // 输出: 5

    // 修改最后一个元素
    vec.back() = 10;
    std::cout << "Modified last element: " << vec.back() << std::endl; // 输出: 10

    return 0;
}
利用swap交换空间
在 C++ 中,互换容器(swap)是指将两个容器的内容交换。对于 std::vector 这样的容器,标准库提供了两种方式来进行交换操作:
- 使用成员函数
swap - 使用全局函数
std::swap
这两种方式都可以高效地交换两个 vector 对象的内容,而不会实际移动元素,从而提高性能。以下是详细的解释和示例:
1. 使用成员函数 swap
vector 提供了一个成员函数 swap,可以直接交换两个 vector 对象的内容。
示例
#include <iostream>
#include <vector>

int main() {
    std::vector<int> vec1 = {1, 2, 3};
    std::vector<int> vec2 = {4, 5, 6, 7};

    // 使用成员函数 swap
    vec1.swap(vec2);

    // 输出交换后的 vec1
    std::cout << "vec1: ";
    for (int val : vec1) {
        std::cout << val << " "; // 输出: 4 5 6 7
    }
    std::cout << std::endl;

    // 输出交换后的 vec2
    std::cout << "vec2: ";
    for (int val : vec2) {
        std::cout << val << " "; // 输出: 1 2 3
    }
    std::cout << std::endl;

    return 0;
}
2. 使用全局函数 std::swap
C++ 标准库提供了全局函数 std::swap,可以用于交换两个容器的内容。std::swap 通常会调用容器的成员函数 swap 来实现交换操作。
#include <iostream>
#include <vector>
#include <algorithm> // 需要包含头文件 <algorithm> 以使用 std::swap

int main() {
    std::vector<int> vec1 = {1, 2, 3};
    std::vector<int> vec2 = {4, 5, 6, 7};

    // 使用全局函数 std::swap
    std::swap(vec1, vec2);

    // 输出交换后的 vec1
    std::cout << "vec1: ";
    for (int val : vec1) {
        std::cout << val << " "; // 输出: 4 5 6 7
    }
    std::cout << std::endl;

    // 输出交换后的 vec2
    std::cout << "vec2: ";
    for (int val : vec2) {
        std::cout << val << " "; // 输出: 1 2 3
    }
    std::cout << std::endl;

    return 0;
}
利用swap实现空间压缩
vector<int> vec;
for(int i=0;i<100000;i++){
vec.push_back(i); // 使用 push_back 而不是 vec[i] = i,因为 vec 尚未分配空间
}
vec.resize(3);
//这里只是删除了3以后的所有的数,capcity依然是100000以上,会占用空间
//考虑使用sawp加匿名函数
vector<int>(vec).swap(vec)
//首先vector<int>(vec)将vec里面剩下的三个值拷贝到匿名对象里面,接下来swap之后vec的capcity就为3
在 C++ 中,std::vector 提供了 reserve 方法,可以预留足够的存储空间,以避免在向 vector 中添加大量元素时频繁地重新分配内存。这样可以提高性能,尤其是在已知大致需要多少存储空间的情况下。
reserve 方法
reserve 方法用于请求 vector 分配至少能够容纳指定数量元素的存储空间。如果新的容量大于当前容量,则会重新分配内存;否则,不进行任何操作。
void reserve(size_t new_cap);
使用 reserve 的好处
- 减少重新分配次数:在
vector需要扩展其容量时,会进行重新分配和拷贝元素,这是一项代价较高的操作。通过预留足够的空间,可以减少重新分配的次数,提高性能。 - 提高性能:避免频繁的内存分配和拷贝操作,可以显著提高程序的性能,特别是在需要大量插入元素的场景中。
比较 resize 和 reserve
resize:调整vector的大小。如果新大小大于当前大小,则添加新元素并初始化;如果新大小小于当前大小,则移除超出部分的元素。reserve:预留存储空间,但不改变vector的大小。只是改变vector的容量(capacity),不改变元素数量(size)。
#include <iostream>
#include <vector>

int main() {
    std::vector<int> vec;

    // 使用 reserve 预留空间
    vec.reserve(10);
    std::cout << "Size after reserve: " << vec.size() << std::endl; // 输出: 0
    std::cout << "Capacity after reserve: " << vec.capacity() << std::endl; // 输出: 10

    // 使用 resize 改变大小
    vec.resize(10);
    std::cout << "Size after resize: " << vec.size() << std::endl; // 输出: 10
    std::cout << "Capacity after resize: " << vec.capacity() << std::endl; // 输出: 10

    // 使用 reserve 增大容量
    vec.reserve(20);
    std::cout << "Size after reserve: " << vec.size() << std::endl; // 输出: 10
    std::cout << "Capacity after reserve: " << vec.capacity() << std::endl; // 输出: 20

    return 0;
}
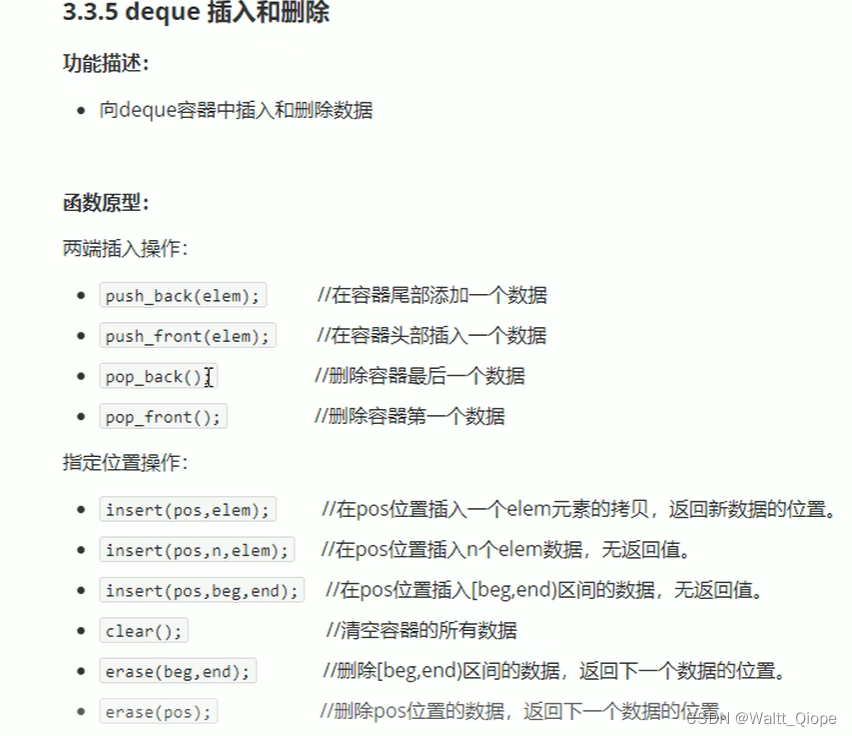
deque容器

deque优势就是可以头部插入,但是它的访问效率不如vector,而且deque没有容量的说法
deque的构造函数和vector基本完全一致
注意如果声明了const deque<int> a;iterator必须也是const iterator。
赋值操作和vector也基本完全一样
插入和删除如下:
数据存取和vector完全一致
std::sort 可以用于 std::vector 和 std::deque。std::sort 是 C++ 标准库中的一个算法,用于对范围内的元素进行排序。它要求排序范围必须是随机访问迭代器(Random Access Iterator)
#include <iostream>
#include <vector>
#include <algorithm> // std::sort

int main() {
    std::vector<int> vec = {5, 3, 1, 4, 2};

    // 使用 std::sort 对 vector 进行排序
    std::sort(vec.begin(), vec.end());

    std::cout << "Sorted vector: ";
    for (int val : vec) {
        std::cout << val << " "; // 输出: 1 2 3 4 5
    }
    std::cout << std::endl;

    return 0;
}

#include <iostream>
#include <deque>
#include <algorithm> // std::sort

int main() {
    std::deque<int> deq = {5, 3, 1, 4, 2};

    // 使用 std::sort 对 deque 进行排序
    std::sort(deq.begin(), deq.end());

    std::cout << "Sorted deque: ";
    for (int val : deq) {
        std::cout << val << " "; // 输出: 1 2 3 4 5
    }
    std::cout << std::endl;

    return 0;
}
C++ 标准库中提供了一个函数 std::reverse,可以直接反转 std::vector 和其他容器(如 std::deque)中的元素顺序。std::reverse 是一个通用算法,可以应用于任何支持随机访问迭代器的容器。
#include <algorithm> // std::reverse
#include <vector>
#include <deque>
#include <iostream>

int main() {
    // 示例 1: 反转 std::vector
    std::vector<int> vec = {1, 2, 3, 4, 5};
    std::reverse(vec.begin(), vec.end());
    std::cout << "Reversed vector: ";
    for (int val : vec) {
        std::cout << val << " "; // 输出: 5 4 3 2 1
    }
    std::cout << std::endl;

    // 示例 2: 反转 std::deque
    std::deque<int> deq = {1, 2, 3, 4, 5};
    std::reverse(deq.begin(), deq.end());
    std::cout << "Reversed deque: ";
    for (int val : deq) {
        std::cout << val << " "; // 输出: 5 4 3 2 1
    }
    std::cout << std::endl;

    return 0;
}
stack容器:
栈不允许有遍历的行为
栈可以判断是否非空
栈可以返回元素个数
//查看栈顶
s.top()
//查看是否为空
s.empty()
//查看栈的大小
s.size()
Queue容器
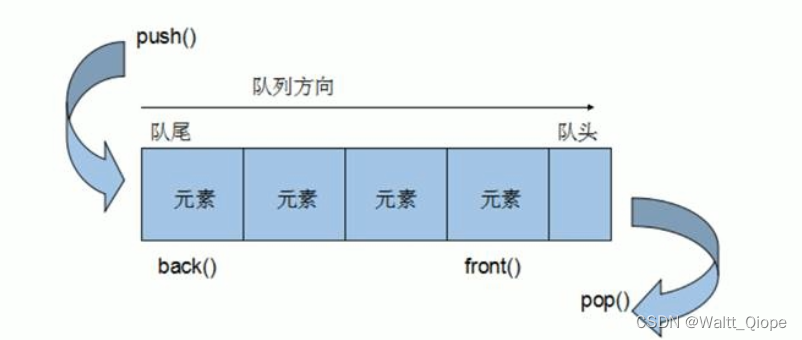
先进去先出的一种数据类型
入队(push)出队(pop)
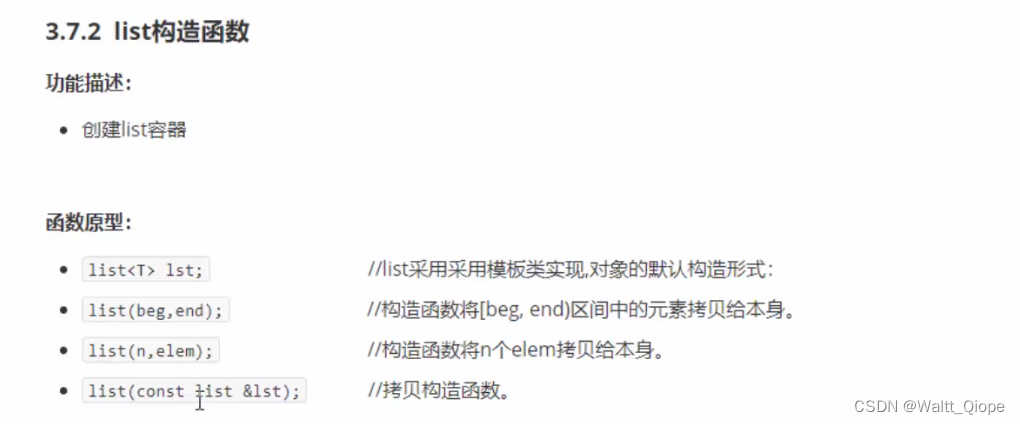
LIST容器

注意是一个双向循环链表
链表中的迭代器是一个双向迭代器
// 打印列表的函数
void printlist(const list<int>& b) {
    for (list<int>::const_iterator i = b.begin(); i != b.end(); ++i) {
        cout << *i << endl;
    }
}

void test01(){
    list<int> l1;
    l1.push_back(10);
    l1.push_back(20);
    l1.push_back(30);

    //也可以这样构造
    list<int> l2(10,100);
    //拷贝构造
    list<int> l3(l1);
    printlist(l1);
    printlist(l2);
    printlist(l3);
}
赋值操作
通过赋值运算符赋值: 可以将一个 std::list 对象赋值给另一个 std::list 对象,这实际上是调用赋值运算符。
std::list<int> list1 = {1, 2, 3, 4, 5};
std::list<int> list2;
list2 = list1; // 使用赋值运算符
通过 assign 函数赋值: 可以使用 assign 函数将一组值赋值给 std::list。
std::list<int> list1;
std::list<int> list2 = {1, 2, 3, 4, 5};
list1.assign(list2.begin(), list2.end()); // 使用范围赋值
全局函数 swap: 还可以使用标准库提供的全局函数 swap。
std::list<int> list1 = {1, 2, 3};
std::list<int> list2 = {4, 5, 6};
std::swap(list1, list2); // 交换 list1 和 list2 的内容
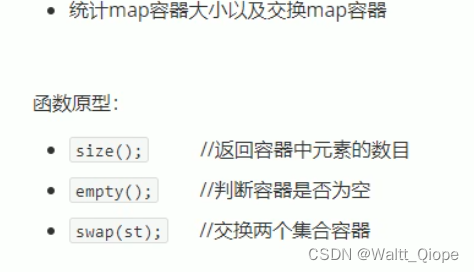
在 C++ 中,std::list 容器提供了一些用于获取列表大小的操作。主要有以下几个操作:
-
获取大小:
size():返回列表中元素的数量。empty():检查列表是否为空。
-
修改大小:
resize():调整列表的大小。clear():清空列表。
修改列表大小
resize(size_type count):将列表的大小调整为count。如果count大于当前大小,则添加默认值为0的元素。如果count小于当前大小,则移除多余的元素。resize(size_type count, const T& value):将列表的大小调整为count。如果count大于当前大小,则添加值为value的元素。如果count小于当前大小,则移除多余的元素。clear():清空列表,移除所有元素。
#include <iostream>
#include <list>

using namespace std;

void printList(const list<int>& lst) {
    for (int value : lst) {
        cout << value << " ";
    }
    cout << endl;
}

int main() {
    list<int> lst = {1, 2, 3, 4, 5};

    // 调整列表大小为3
    lst.resize(3);
    cout << "List after resizing to 3: ";
    printList(lst);

    // 调整列表大小为6,并用默认值0填充
    lst.resize(6);
    cout << "List after resizing to 6 with default value: ";
    printList(lst);

    // 调整列表大小为8,并用值99填充
    lst.resize(8, 99);
    cout << "List after resizing to 8 with value 99: ";
    printList(lst);

    // 清空列表
    lst.clear();
    cout << "List after clear: ";
    printList(lst);

    // 检查列表是否为空
    if (lst.empty()) {
        cout << "The list is empty." << endl;
    } else {
        cout << "The list is not empty." << endl;
    }

    return 0;
}
在 C++ 的 std::list 容器中,插入和删除操作非常灵活。std::list 提供了一系列方法来在任意位置插入和删除元素。以下是插入和删除操作的详细讲解和示例代码。
插入操作
push_back(const T& value):在列表的末尾插入元素。push_front(const T& value):在列表的开头插入元素。insert(iterator pos, const T& value):在指定位置pos插入元素。insert(iterator pos, size_type count, const T& value):在指定位置pos插入count个value。insert(iterator pos, InputIt first, InputIt last):在指定位置pos插入范围[first, last)的元素。
删除操作
pop_back():删除列表末尾的元素。pop_front():删除列表开头的元素。erase(iterator pos):删除指定位置pos的元素。erase(iterator first, iterator last):删除范围[first, last)内的元素。clear():删除列表中的所有元素。
#include <iostream>
#include <list>

using namespace std;

void printList(const list<int>& lst) {
    for (int value : lst) {
        cout << value << " ";
    }
    cout << endl;
}

int main() {
    list<int> lst;

    // push_back 在列表末尾插入元素
    lst.push_back(10);
    lst.push_back(20);
    lst.push_back(30);
    cout << "List after push_back: ";
    printList(lst);

    // push_front 在列表开头插入元素
    lst.push_front(5);
    lst.push_front(1);
    cout << "List after push_front: ";
    printList(lst);

    // insert 在指定位置插入元素
    auto it = lst.begin();
    advance(it, 2); // 将迭代器移动到第三个位置
    lst.insert(it, 15);
    cout << "List after insert at third position: ";
    printList(lst);

    // insert 在指定位置插入多个元素
    it = lst.begin();
    advance(it, 4); // 将迭代器移动到第五个位置
    lst.insert(it, 2, 25);
    cout << "List after inserting two 25s at fifth position: ";
    printList(lst);

    // insert 在指定位置插入另一个范围的元素
    list<int> lst2 = {100, 200, 300};
    it = lst.begin();
    advance(it, 2); // 将迭代器移动到第三个位置
    lst.insert(it, lst2.begin(), lst2.end());
    cout << "List after inserting range at third position: ";
    printList(lst);

    // pop_back 删除列表末尾的元素
    lst.pop_back();
    cout << "List after pop_back: ";
    printList(lst);

    // pop_front 删除列表开头的元素
    lst.pop_front();
    cout << "List after pop_front: ";
    printList(lst);

    // erase 删除指定位置的元素
    it = lst.begin();
    advance(it, 2); // 将迭代器移动到第三个位置
    lst.erase(it);
    cout << "List after erasing third element: ";
    printList(lst);

    // erase 删除范围内的元素
    auto it1 = lst.begin();
    auto it2 = lst.begin();
    advance(it1, 1); // 将第一个迭代器移动到第二个位置
    advance(it2, 3); // 将第二个迭代器移动到第四个位置
    lst.erase(it1, it2);
    cout << "List after erasing range from second to fourth element: ";
    printList(lst);

    // clear 删除所有元素
    lst.clear();
    cout << "List after clear: ";
    printList(lst);

    //remove(1) 删除所有值为1的元素
    lst.remove(1);

    return 0;
}
注意以后iterator可以使用 auto it=ls.begin()代替
在 C++ 中,std::list 是一个双向链表容器,其迭代器是双向迭代器(Bidirectional Iterator),而不是随机访问迭代器(Random Access Iterator)。这意味着 std::list 的迭代器不支持直接的加减操作(如 it += 2 或 it - 2),只能使用 ++it 和 --it 来进行逐一移动,或者使用 std::advance 函数来移动迭代器。
访问:
list容器不能使用[]访问,链表不是连续的线性空间
#include <iostream>
#include <list>

using namespace std;

void printList(const list<int>& lst) {
    for (list<int>::const_iterator it = lst.begin(); it != lst.end(); ++it) {
        cout << *it << " ";
    }
    cout << endl;
}

int main() {
    list<int> lst = {1, 2, 3, 4, 5};

    // 访问头部和尾部元素
    cout << "Front element: " << lst.front() << endl;
    cout << "Back element: " << lst.back() << endl;

    // 使用迭代器遍历并打印所有元素
    cout << "List elements: ";
    printList(lst);

    // 使用迭代器修改元素
    list<int>::iterator it = lst.begin();
    advance(it, 2); // 移动到第三个元素
    *it = 99; // 修改第三个元素的值
    cout << "List after modifying third element: ";
    printList(lst);

    return 0;
}
begin()返回一个迭代器,指向容器的第一个元素。常用于遍历容器。front()返回一个引用,指向容器的第一个元素。常用于直接访问和修改第一个元素。
这两者的主要区别在于返回值类型及其用途。begin() 返回的是迭代器,通常用于遍历整个容器;而 front() 返回的是引用,用于直接访问和修改容器的第一个元素。
auto it = lst.front() 不行,因为 front() 返回的是一个引用,而不是一个迭代器。front() 用于直接访问和修改第一个元素的值,而不是进行迭代器操作。
在 C++ 中,std::list 提供了直接支持反转和排序的方法。以下是对这两种操作的详细讲解及示例代码。
反转操作
std::list 提供了 reverse() 成员函数用于反转列表中的元素顺序。
#include <iostream>
#include <list>

using namespace std;

void printList(const list<int>& lst) {
    for (auto it = lst.begin(); it != lst.end(); ++it) {
        cout << *it << " ";
    }
    cout << endl;
}

int main() {
    list<int> lst = {1, 2, 3, 4, 5};

    cout << "Original list: ";
    printList(lst);

    // 反转列表
    lst.reverse();

    cout << "Reversed list: ";
    printList(lst);

    return 0;
}
排序操作
std::list 提供了 sort() 成员函数用于排序列表中的元素。sort() 可以按默认的升序排序,也可以接受一个自定义比较函数作为参数来进行排序。
#include <iostream>
#include <list>

using namespace std;

void printList(const list<int>& lst) {
    for (auto it = lst.begin(); it != lst.end(); ++it) {
        cout << *it << " ";
    }
    cout << endl;
}

int main() {
    list<int> lst = {5, 2, 3, 1, 4};

    cout << "Original list: ";
    printList(lst);

    // 默认排序(升序)
    lst.sort();

    cout << "Sorted list (ascending): ";
    printList(lst);

    return 0;
}
你也可以使用回调函数:
自定义比较函数的作用
在上一个示例中,自定义比较函数 descending(int a, int b) 的作用是将列表按照降序排序。这个函数的逻辑是:如果 a 应该排在 b 前面,则返回 true,否则返回 false。对于降序排序,函数应该返回 true 当且仅当 a 大于 b。
bool descending(int a, int b) {
    return a > b; // 如果 a 比 b 大,则 a 应该排在 b 前面,因此返回 true
}
你甚至可以自定义排序
struct Person {
string name;
int age;
Person(string n, int a) : name(n), age(a) {}
};
bool compareByAge(const Person &a, const Person &b) {
return a.age > b.age; // 按年龄降序排序
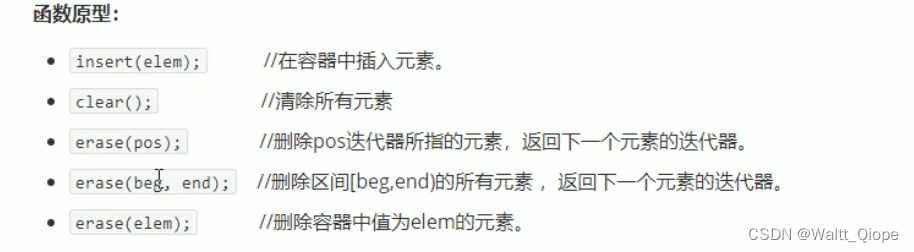
}set 容器
-
特点:
- 存储唯一的键(值),即不允许重复元素。
- 键值自动排序,默认情况下按升序排序。
- 提供高效的元素查找、插入和删除操作,时间复杂度为 O(log n)。
- 基于平衡二叉树(如红黑树)实现。
-
常用操作:
- 插入:
insert() - 删除:
erase() - 查找:
find() - 获取元素数量:
size() - 检查是否为空:
empty()
- 插入:
#include <iostream>
#include <set>

using namespace std;

int main() {
    set<int> s;

    // 插入元素
    s.insert(3);
    s.insert(1);
    s.insert(4);
    s.insert(1); // 重复元素,不会插入

    // 遍历元素
    cout << "Elements in set: ";
    for (auto it = s.begin(); it != s.end(); ++it) {
        cout << *it << " ";
    }
    cout << endl;

    // 查找元素
    auto search = s.find(3);
    if (search != s.end()) {
        cout << "Found 3 in the set." << endl;
    } else {
        cout << "3 not found in the set." << endl;
    }

    // 删除元素
    s.erase(3);

    cout << "Elements in set after erasing 3: ";
    for (auto it = s.begin(); it != s.end(); ++it) {
        cout << *it << " ";
    }
    cout << endl;

    return 0;
}
- 直接提供
find成员函数的容器:关联容器(如std::set,std::map,std::unordered_set等)。 - 不直接提供
find成员函数的容器:序列容器(如std::vector,std::deque,std::list等),但可以使用全局函数std::find。
对于序列容器(如 std::vector, std::deque, std::list 等),它们没有直接提供 find 成员函数,但你可以使用全局函数 std::find 来查找元素。std::find 函数在 <algorithm> 头文件中定义,适用于任何提供迭代器的容器。
#include <iostream>
#include <vector>
#include <algorithm>

using namespace std;

int main() {
    vector<int> v = {1, 2, 3};
    auto it = find(v.begin(), v.end(), 2); // 使用 std::find 函数

    if (it != v.end()) {
        cout << "Found 2 in vector." << endl;
    }

    return 0;
}
set的插入与删除
std::set::find
find 成员函数用于在集合中查找等于指定键的元素。它返回一个指向找到元素的迭代器,如果没有找到该元素,则返回 end()。
std::set::count
count 成员函数用于统计集合中等于指定键的元素的数量。在 std::set 中,由于每个元素都是唯一的,因此 count 的返回值只能是 0 或 1。
pair容器
std::pair 是 C++ 标准模板库(STL)中的一个模板类,用于存储一对值。std::pair 非常有用,它可以将两个不一定相同类型的值组合成一个单独的对象。通常用于返回两个相关值的函数,或在容器中存储键值对。
#include <iostream>
#include <utility>

using namespace std;

int main() {
    pair<int, string> p(1, "Hello");

    // 访问成员
    cout << "First: " << p.first << ", Second: " << p.second << endl;

    // 修改成员
    p.first = 2;
    p.second = "World";

    cout << "First: " << p.first << ", Second: " << p.second << endl;

    return 0;
}
在 C++ 中,std::set 是一个关联容器,它存储唯一的键值,并且默认按照键值的升序进行排序。不过,你可以通过自定义比较函数来改变 std::set 的排序规则。
自定义比较函数
你可以在创建 std::set 时提供一个自定义的比较函数或比较函数对象,来决定 set 中元素的排序顺序。这个自定义的比较函数可以是一个函数、函数对象(仿函数)或 lambda 表达式。
#include <iostream>
#include <set>
#include <string>

using namespace std;

struct Person {
    string name;
    int age;
};

// 自定义比较函数对象
struct ComparePersons {
    bool operator()(const Person& lhs, const Person& rhs) const {
        // 按年龄降序排列,如果年龄相同则按名字升序排列
        if (lhs.age != rhs.age) {
            return lhs.age > rhs.age;
        }
        return lhs.name < rhs.name;
    }
};

// 这里使用class也可以
class ComparePersons {
public:
    bool operator()(const Person& lhs, const Person& rhs) const {
        // 按年龄降序排列,如果年龄相同则按名字升序排列
        if (lhs.age != rhs.age) {
            return lhs.age > rhs.age;
        }
        return lhs.name < rhs.name;
    }
};

int main() {
    // 使用自定义比较函数对象创建 set
    set<Person, ComparePersons> people = {
        {"Alice", 30},
        {"Bob", 25},
        {"Charlie", 30},
        {"Dave", 25}
    };

    cout << "People in set (custom order):" << endl;
    for (const auto& person : people) {
        cout << person.name << " (" << person.age << ")" << endl;
    }

    return 0;
}
map容器
实际上就相当于python中的字典
map中的数据按照pair的结构储存
void printmap(const map<int,int>& a){
    for (auto it=a.begin();it!=a.end();++it){
        cout<<it->first<<' '<<it->second<<endl;
    }
}


void test02(){
    map<int,int> m1;
    m1.insert(pair<int,int>(1,10));
    m1.insert(pair<int,int>(2,20));
    printmap(m1);
    map<int,int> m2(m1);
    printmap(m2);
}
插入操作
std::map 提供了多种插入元素的方法:
-
使用
insert成员函数:- 插入单个键值对。
- 插入范围内的键值对。
-
使用
operator[]:- 如果键存在,返回对应的值的引用。
- 如果键不存在,插入新的键并初始化值。
-
使用
emplace成员函数:- 直接在容器中构造元素,避免不必要的拷贝或移动操作。
#include <iostream>
#include <map>
#include <string>

using namespace std;

void printMap(const map<int, string>& m) {
    for (const auto& pair : m) {
        cout << "Key: " << pair.first << ", Value: " << pair.second << endl;
    }
    cout << endl;
}

int main() {
    map<int, string> m;

    // 使用 insert 插入单个键值对
    m.insert(pair<int, string>(1, "Apple"));
    m.insert(make_pair(2, "Banana"));

    // 使用 operator[]
    m[3] = "Cherry";
    m[4] = "Date";

    // 使用 emplace
    m.emplace(5, "Elderberry");

    cout << "Map after insertions:" << endl;
    printMap(m);

    return 0;
}
insert有主要以上两种,pair以及make_pair
[]不建议插数值,不存在会被创建,但可以用于访问
find以及count:

map默认key值也是从小到大,可以利用仿函数自定义
// 自定义比较函数对象
struct CustomCompare {
    bool operator()(const int& lhs, const int& rhs) const {
        return lhs > rhs; // 降序排列
    }
};

int main() {
    // 使用自定义比较函数对象创建 map
    map<int, string, CustomCompare> m;
    m[1] = "Apple";
    m[2] = "Banana";
    m[3] = "Cherry";
}


 375
375

 被折叠的 条评论
为什么被折叠?
被折叠的 条评论
为什么被折叠?
 到【灌水乐园】发言


