


一开始是在csdn上找的代码,但在pycharm里没有调通,所以又到GitHub上copy的,在jupyter notebook上调通了。
一.准备工作:
1.安装pycocotools库
因为我是在windows下安装的,所以没有用到他的这个,windows10下安装pycocotools:
http://www.mamicode.com/info-detail-2660241.html
此方法安装需电脑上要有visual c++或者visual studio,我下载的是visual studio2019。
%%shell


CURRENT_DIR=`pwd`echo $CURRENT_DIR


# Install pycocotoolsgit clone https://github.com/cocodataset/cocoapi.gitcd cocoapi/PythonAPIpython setup.py build_ext install


cd $CURRENT_DIR


####################################################### TODO remove this once torchvision 0.3 is present by
# default in Colab
######################################################
pip uninstall -y torchvision
git clone https://github.com/pytorch/vision.git
cd vision
git checkout v0.3.0
python setup.py install
# why do we need this?
cp -r build/lib.linux-x86_64-3.6/torchvision /usr/local/lib/python3.6/dist-packages/
这是一个行人图像的数据集,我没有用这个,用的是之前在网上下载的一个肝脏病图像的数据集;
%%shell


# download the Penn-Fudan dataset
wget https://www.cis.upenn.edu/~jshi/ped_html/PennFudanPed.zip .
# extract it in the current folder
unzip PennFudanPed.zip
3.下载其他要用到的包:不能用这种方法下载的话,这些文件也可以直接从GitHub上下载:
https://github.com/pytorch/vision.git
%%shell


# Download TorchVision repo to use some files from
# references/detection
git clone https://github.com/pytorch/vision.git
cd vision
git checkout v0.3.0


cp references/detection/utils.py ../
cp references/detection/transforms.py ../
cp references/detection/coco_eval.py ../
cp references/detection/engine.py ../
cp references/detection/coco_utils.py ../
二.用自己的数据集训练网络
1.看一下数据集里的image和mask
from PIL import Image
Image.open('data/liver/000.png')
mask = Image.open('data/liver_mask/000_mask.png')
# each mask instance has a different color, from zero to N, where
# N is the number of instances. In order to make visualization easier,
# let's adda color palette to the mask.
mask.putpalette([
    0, 0, 0, # black background
    255, 0, 0, # index 1 is red
    255, 255, 0, # index 2 is yellow
    255, 153, 0, # index 3 is orange
])
mask
每一张图像都有对应的mask标注,在训练模型之前,需要写好数据集的载入接口
import os
import numpy as np
import torch
import torch.utils.data
from PIL import Image


class liverDataset(torch.utils.data.Dataset):
    def __init__(self, root, transforms=None):
        self.root = root
        self.transforms = transforms
        # load all image files, sorting them to
        # ensure that they are aligned
        self.imgs = list(sorted(os.listdir(os.path.join(root, "liver"))))
        self.masks = list(sorted(os.listdir(os.path.join(root, "liver_mask"))))


    def __getitem__(self, idx):
        # load images ad masks
        img_path = os.path.join(self.root, "liver", self.imgs[idx])
        mask_path = os.path.join(self.root, "liver_mask", self.masks[idx])
        img = Image.open(img_path).convert("RGB")
        # note that we haven't converted the mask to RGB,
        # because each color corresponds to a different instance
        # with 0 being background
        mask = Image.open(mask_path)


        mask = np.array(mask)
        # instances are encoded as different colors
        obj_ids = np.unique(mask)
        # first id is the background, so remove it
        obj_ids = obj_ids[1:]


        # split the color-encoded mask into a set
        # of binary masks
        masks = mask == obj_ids[:, None, None]


        # get bounding box coordinates for each mask
        num_objs = len(obj_ids)
        boxes = []
        for i in range(num_objs):
            pos = np.where(masks[i])
            xmin = np.min(pos[1])
            xmax = np.max(pos[1])
            ymin = np.min(pos[0])
            ymax = np.max(pos[0])
            boxes.append([xmin, ymin, xmax, ymax])


        boxes = torch.as_tensor(boxes, dtype=torch.float32)
        # there is only one class
        labels = torch.ones((num_objs,), dtype=torch.int64)
        masks = torch.as_tensor(masks, dtype=torch.uint8)


        image_id = torch.tensor([idx])
        area = (boxes[:, 3] - boxes[:, 1]) * (boxes[:, 2] - boxes[:, 0])
        # suppose all instances are not crowd
        iscrowd = torch.zeros((num_objs,), dtype=torch.int64)


        target = {}
        target["boxes"] = boxes
        target["labels"] = labels
        target["masks"] = masks
        target["image_id"] = image_id
        target["area"] = area
        target["iscrowd"] = iscrowd


        if self.transforms is not None:
            img, target = self.transforms(img, target)


        return img, target


    def __len__(self):
        return len(self.imgs)
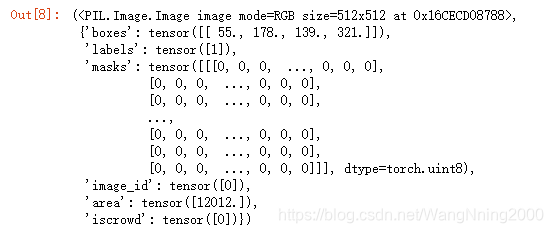
检查一下上面接口返回的dataset的内部结构
dataset = liverDataset('data/')
dataset[0]
2.利用COCO上预训练的模型,为指定类别的任务进行finetune
import torchvision
from torchvision.models.detection.faster_rcnn import FastRCNNPredictor
from torchvision.models.detection.mask_rcnn import MaskRCNNPredictor

def get_instance_segmentation_model(num_classes):
    # load an instance segmentation model pre-trained on COCO
    model = torchvision.models.detection.maskrcnn_resnet50_fpn(pretrained=True)

    # get the number of input features for the classifier
    in_features = model.roi_heads.box_predictor.cls_score.in_features
    # replace the pre-trained head with a new one
    model.roi_heads.box_predictor = FastRCNNPredictor(in_features, num_classes)


    # now get the number of input features for the mask classifier
    in_features_mask = model.roi_heads.mask_predictor.conv5_mask.in_channels
    hidden_layer = 256
    # and replace the mask predictor with a new one
    model.roi_heads.mask_predictor = MaskRCNNPredictor(in_features_mask,
                                                       hidden_layer,
                                                       num_classes)

    return model
在图像输入到网络前,需要对其进行旋转操作(数据增强)。需要注意的是:由于Mask R-CNN模型本身可以处理归一化及尺度变化的问题,因而无需在这里进行mean/std normalization或图像缩放的操作;
from engine import train_one_epoch, evaluate
import utils
import transforms as T


def get_transform(train):
    transforms = []
    # converts the image, a PIL image, into a PyTorch Tensor
    transforms.append(T.ToTensor())
    if train:
        # during training, randomly flip the training images
        # and ground-truth for data augmentation
        transforms.append(T.RandomHorizontalFlip(0.5))
    return T.Compose(transforms)
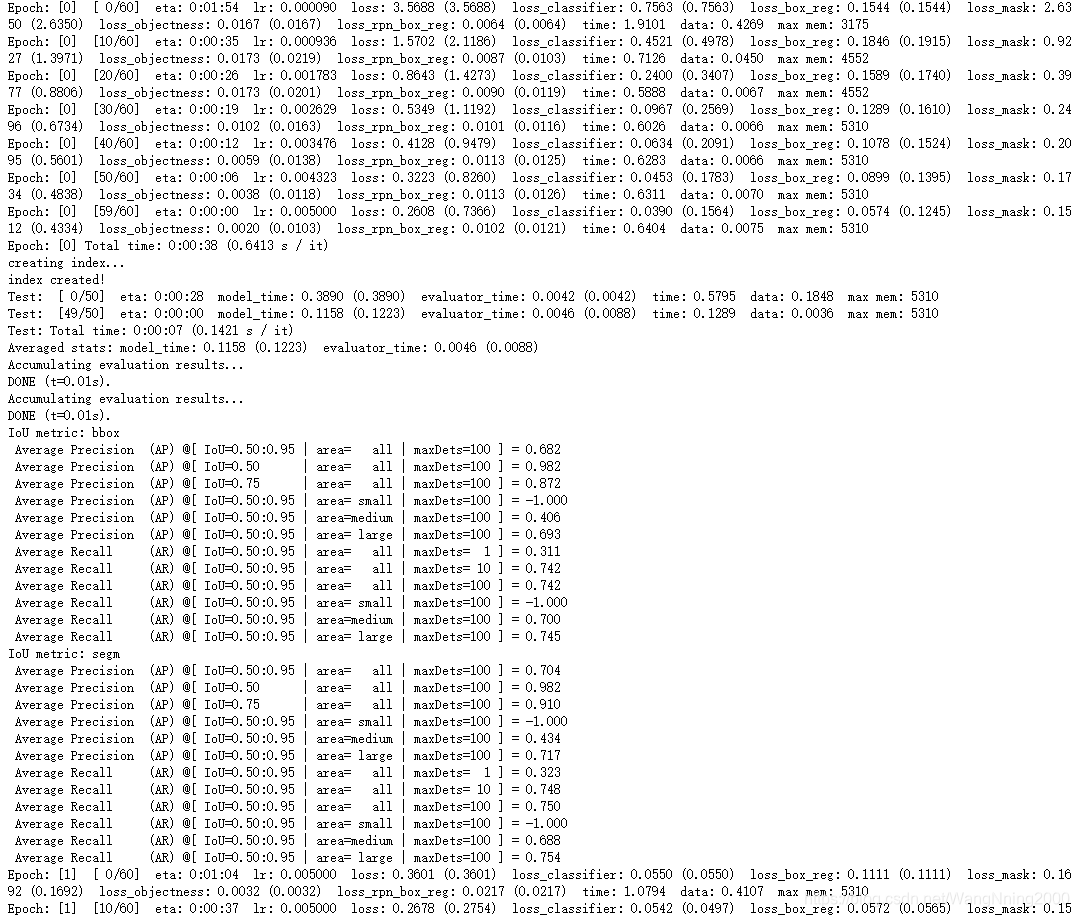
3.开始训练:
这里,设置模型训练10个epochs,并且在每个epoch完成后在测试集上对模型的性能进行评价
# use our dataset and defined transformations
dataset = liverDataset('data', get_transform(train=True))
dataset_test = liverDataset('data', get_transform(train=False))

# split the dataset in train and test set
torch.manual_seed(1)
indices = torch.randperm(len(dataset)).tolist()
dataset = torch.utils.data.Subset(dataset, indices[:-50])
dataset_test = torch.utils.data.Subset(dataset_test, indices[-50:])

# define training and validation data loaders
data_loader = torch.utils.data.DataLoader(
    dataset, batch_size=2, shuffle=True, num_workers=0,
    collate_fn=utils.collate_fn)

data_loader_test = torch.utils.data.DataLoader(
    dataset_test, batch_size=1, shuffle=False, num_workers=0,
    collate_fn=utils.collate_fn)
device = torch.device('cuda') if torch.cuda.is_available() else torch.device('cpu')

# our dataset has two classes only - background and person
num_classes = 2

# get the model using our helper function
model = get_instance_segmentation_model(num_classes)
# move model to the right device
model.to(device)

# construct an optimizer
params = [p for p in model.parameters() if p.requires_grad]
optimizer = torch.optim.SGD(params, lr=0.005,
                            momentum=0.9, weight_decay=0.0005)

# and a learning rate scheduler which decreases the learning rate by
# 10x every 3 epochs
lr_scheduler = torch.optim.lr_scheduler.StepLR(optimizer,
                                               step_size=3,
                                               gamma=0.1)

# let's train it for 10 epochs
num_epochs = 10

for epoch in range(num_epochs):
    # train for one epoch, printing every 10 iterations
    train_one_epoch(model, optimizer, data_loader, device, epoch, print_freq=10)
    # update the learning rate
    lr_scheduler.step()
    # evaluate on the test dataset
    evaluate(model, data_loader_test, device=device)
这里是1个epoch
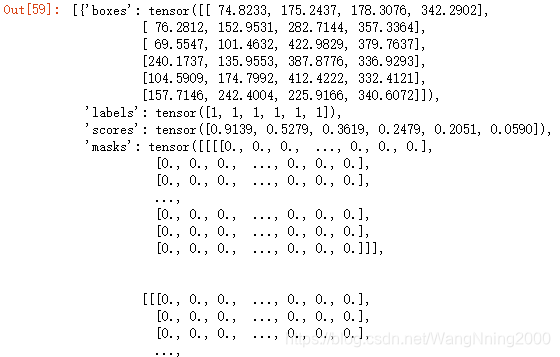
4.检查一下模型在测试图像上预测的结果
# pick one image from the test set
img, _ = dataset_test[2]#选择进行测试的图片
# put the model in evaluation mode
model.eval()
with torch.no_grad():
    prediction = model([img.to(device)])
prediction
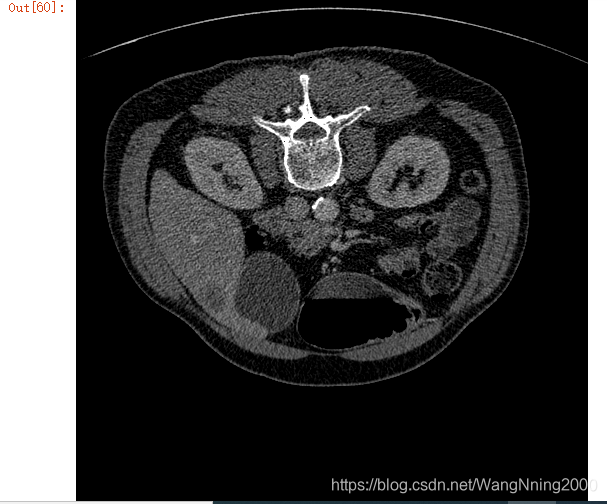
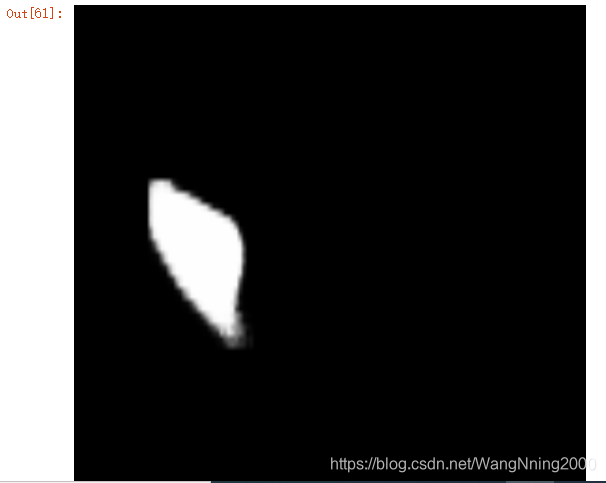
将测试图像及对应的预测结果可视化
Image.fromarray(img.mul(255).permute(1, 2, 0).byte().numpy())

Image.fromarray(prediction[0]['masks'][0, 0].mul(255).byte().cpu().numpy())


 9901
9901

 被折叠的 条评论
为什么被折叠?
被折叠的 条评论
为什么被折叠?
 到【灌水乐园】发言


