


贝塞尔路径(Bezier path)是iOS绘图工具中最重要的部分,它允许你创建和改变形状、建立裁剪路径、定义动画路径等等。无论你构建自定义视图,添加像PS那样的特效,或者执行类似画线、画圆的普通任务,UIBezierPath类会让你的开发更加容易和强大。
一.类便利方法
UIBezierPath类方法用来构建矩形(Rectangle)、椭圆(Oval)、圆角矩形(Rounded Rectangle)和弧形(Arc):
- 矩形:
+ (instancetype)bezierPathWithRect:(CGRect)rect;
- 椭圆和圆:
+ (instancetype)bezierPathWithOvalInRect:(CGRect)rect;
- 圆角矩形:
+ (instancetype)bezierPathWithRoundedRect:(CGRect)rect cornerRadius:(CGFloat)cornerRadius; // 圆化矩形的四个角
- 控制角的圆角矩形:
+ (instancetype)bezierPathWithRoundedRect:(CGRect)rect byRoundingCorners:(UIRectCorner)corners cornerRadii:(CGSize)cornerRadii;//圆化指定的矩形的角
- 弧形:
+ (instancetype)bezierPathWithArcCenter:(CGPoint)center radius:(CGFloat)radius startAngle:(CGFloat)startAngle endAngle:(CGFloat)endAngle clockwise:(BOOL)clockwise;
上面的这些贝塞尔路径类方法为绘画提供了基础的入门点,如果想要绘制复杂的路径,你可以根据逻辑单元把路径划分成多个路径,使用下面方法来连接:
- (void)appendPath:(UIBezierPath *)bezierPath;
路径会同时被绘制,绘制路径时,可以对绘图的相关属性进行设置:
myPath.lineWidth = 4.0f;:路径的绘制宽度[[UIColor blackColor] setStroke];:路径的绘制颜色[[UIColor redColor] setFill];:路径的填充颜色
当然,上述的颜色设置成功后,要进行下面的操作:
[myPath fill];
[myPath stroke];
绘图示例代码:
- (void)drawRect:(CGRect)rect {
    UIBezierPath *path = [UIBezierPath bezierPath];

    UIBezierPath *face = [UIBezierPath bezierPathWithOvalInRect:rect];
    [[UIColor greenColor] set];
    face.lineWidth = 5;
    [path appendPath:face];

    [path stroke];

}
二.构建多路径
当系统提供的路径,比如矩形、椭圆无法满足你的需求时,你可以反复地构建路径,通过布局子路径,添加曲线和直线来构建复杂的路径。
每条贝塞尔路径可以包含许多几何元素,同一条贝塞尔曲线的绘制属性是相同的,如下:
moveToPoint::设置形状的开始点addLineToPoint:绘制一条直线addCurveToPoint:controlPoint1:controlpoint2::绘制三次贝塞尔曲线addQuadCurveToPoint:controlPoint::绘制二次贝塞尔曲线addArcToCenter:radius:startAngle:endAngle:clockwise:绘制弧形

绘制路径时,必须要设定该路径的起始点。示例代码如下:
- (void)drawRect:(CGRect)rect {
    UIBezierPath *path = [UIBezierPath bezierPath];

    UIBezierPath *face = [UIBezierPath bezierPath];
    [face moveToPoint:CGPointMake(100, 100)];
    [face addLineToPoint:CGPointMake(200, 200)];
    [face moveToPoint:CGPointMake(300, 300)];
    [face addLineToPoint:CGPointMake(400, 400)];
    [[UIColor greenColor] set];
    face.lineWidth = 5;
    [face closePath];
    [path appendPath:face];

    UIBezierPath *eys = [UIBezierPath bezierPath];
    [eys moveToPoint:CGPointMake(100, 100)];
    [eys addCurveToPoint:CGPointMake(400, 400) controlPoint1:CGPointMake(200, 0) controlPoint2:CGPointMake(300, 350)];
        eys.lineWidth =6;
    [path appendPath:eys];

    [path stroke];
}
三.绘制贝塞尔路径
创建贝塞尔路径实例后,你通过fill或者stroke来将它们绘制到图形上下文中,fill会填充满路径内的所有区域,而stroke只会绘制路径的边缘,即描边,通过lineWidth属性,下面是典型的绘制模式:
path.lineWidth = 4.0f;
[[UIColor blackColor] setStroke];
[[UIColor redColor] setFill];
[path fill];
[path stroke];
这段代码为路径设置了线的绘制宽度,为当前上下文设置了填充和描边颜色,然后对路径进行填充和描边。
四.填充路径与奇偶填充规则(Even/Odd Fill Rule)
相关填充规则,请看:非零环绕数规则和奇-偶规则(Non-Zero Winding Number Rule&&Odd-even Rule)
在矢量图形中,环绕规则可以确定某个区域是在路径外部还是内部。当你填充路径的时候,这些规则会影响你是否要填充某个区域。Quartz使用奇偶填充规则,来判定某个区域是否在路径内部。
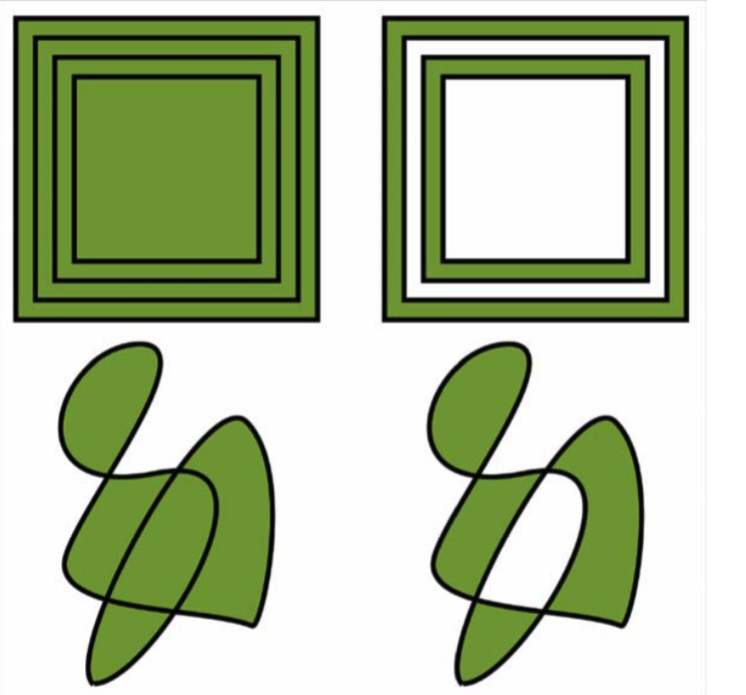
奇偶填充规则会决定Quartz是填充整个路径内(inner path)还是内部区域(inside areas),如上图所示:左侧的形状使用默认的填充规则;右侧的形状使用奇偶填充规则。
当你设置路径的usesEvenOddFillRule属性为YES时,UIKit会使用奇偶规则来填充相关区域。在Quartz中,上下文填充函数CGContextEOFillPath()会按照奇偶规则来执行上下文填充。
示例代码:
- (void)drawRect:(CGRect)rect {

    UIBezierPath *face = [UIBezierPath bezierPath];

    UIBezierPath *one = [UIBezierPath bezierPathWithRect:rect];
    [face appendPath:one];

    UIBezierPath *two = [UIBezierPath bezierPathWithRect:CGRectInset(rect, 40,40)];
    [face appendPath:two];

    UIBezierPath *three = [UIBezierPath bezierPathWithRect:CGRectInset(rect, 80, 80)];
    [face appendPath:three];

    face.lineWidth = 10;
    [[UIColor blackColor] setStroke];
    [[UIColor greenColor] setFill];
    face.usesEvenOddFillRule = YES;

    [face stroke];
    [face fill];

}
五.获取路径的Bounds和Center
UIBezierPath类拥有bounds属性,它返回的矩形包含了路径的所有点,包括控制点,可以把这个属性看做是路径的frame。
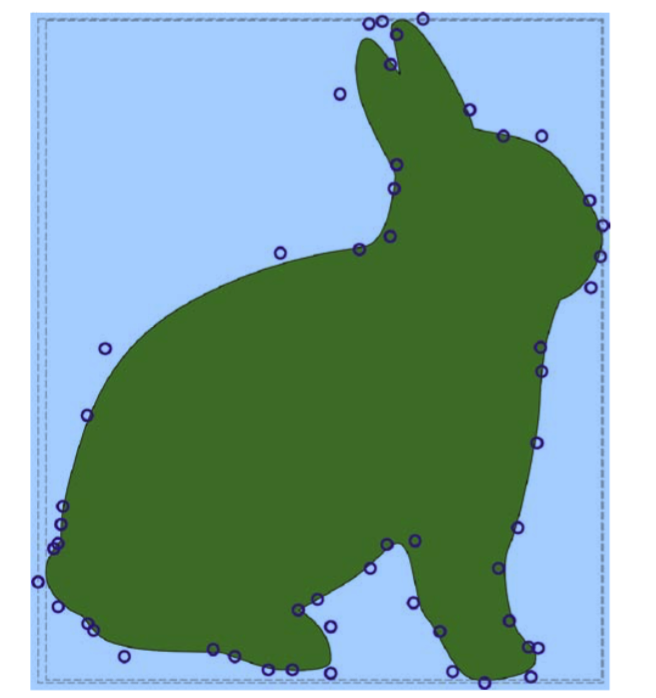
如图,绿色表示的是路径,紫色的圆形代表的是用来构建路径的控制点。虚线的矩形代表的是bounds属性(考虑控制点,更准确外面的那个矩形)和路径真正的边界(不考虑控制点,看上去的边界,里面的那个矩形)。尽管在尺寸上是相似的,但是它们是不一样的。
CGPathGetPathBoundingBox()函数用来获取更好的路径边界,这种途径需要更多的计算,结果是非常准确的,你是在用时间和处理器成本来换取精准度。该结果与bounds是相同的。
CGPathGetBoundingBox()函数返回更近一点的边界,上图的里面那个矩形。
示例代码:
- (void)drawRect:(CGRect)rect {

    UIBezierPath *curve = [UIBezierPath bezierPath];
    [curve moveToPoint:CGPointMake(44, 240)];
    [curve addCurveToPoint:CGPointMake(424, 240) controlPoint1:CGPointMake(196, 44) controlPoint2:CGPointMake(302, 364)];
    curve.lineWidth = 20;
    [[UIColor greenColor]  setStroke];
    [curve stroke];

    [self outputInfo:curve.bounds extra:@"path.bounds"];
    [self outputInfo:CGPathGetPathBoundingBox(curve.CGPath) extra:@"CGPathGetPathBoundingBox(path)"];
    [self outputInfo:CGPathGetBoundingBox(curve.CGPath) extra:@"CGPathGetBoundingBox(path)"];

}

-(void)outputInfo:(CGRect)rect extra:(NSString *)extra{
    NSLog(@"%@------%@",extra,NSStringFromCGRect(rect));
}
运行结果如图:

六.路径变换(Transform Paths)
贝塞尔路径的applyTransform:方法通过应用仿射变换来变换路径的所有点和控制点。例如,下面代码运行后,整个path会缩小:
[path applyTransform:CGAffineTransformMakeScale(0.5f,0.5f)]如果你想要保留原来的路径,创建一个copy,对copy应用变换。
UIBezier *pathCopy = [path copy];
[pathCopy applyTransform: CGAffineTransformMakeScale(0.5f,0.5f)];
应用变换不总是产生预期的结果,例如,创建了一条路径,并且对它应用了旋转变换:
[path applyTransform:CGAffineTransformMakeRotation(M_PI / 9)];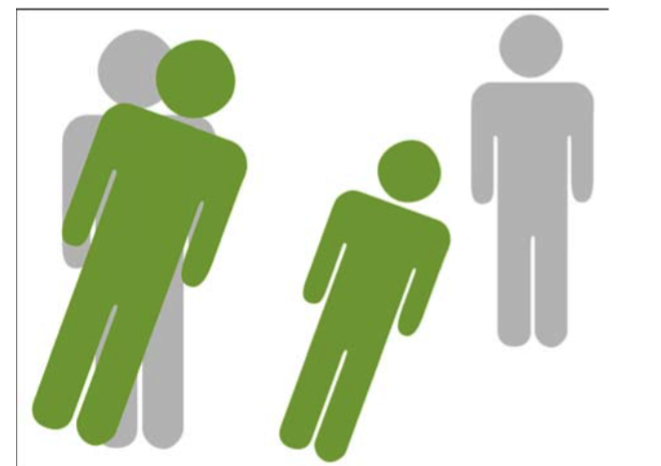
左边的图片显示的是预期的结果,图片围绕它的中心旋转了20度;而右边就是上面的代码运行的结果,因为我们没有控制变换的起始点,路径是围绕当前坐标系统的起始点旋转的。
没有明确将起始点设置为路径的中心点的旋转会产生意料之外的结果。
当然,很容易确保旋转和缩放按照我们的预期来工作。如下面代码:
- (void)drawRect:(CGRect)rect {

    UIBezierPath *bezier = [UIBezierPath bezierPathWithRect:CGRectMake(100, 100, 100, 100)];
    [[UIColor orangeColor] setFill];

    UIBezierPath *copyBezier = [bezier copy];
    [self RotatePath:copyBezier degree:M_PI/9];

    [copyBezier fill];
    [bezier fill];


}

- (CGPoint) pathBoundingCenter:(UIBezierPath *)path {
    CGRect box = CGPathGetPathBoundingBox(path.CGPath);
    return CGPointMake(CGRectGetMaxX(box)/2+CGRectGetMinX(box)/2, CGRectGetMaxY(box)/2 + CGRectGetMinY(box)/2);
}
//对路径应用变换前将路径的起始点平移到中点
-(void) applyCenteredPathTransform:(UIBezierPath *)path transform:(CGAffineTransform)transform{
    CGPoint center = [self pathBoundingCenter:path];
    CGAffineTransform t = CGAffineTransformIdentity;
    t = CGAffineTransformTranslate(t, center.x, center.y);
    t = CGAffineTransformConcat(transform, t);
    t = CGAffineTransformTranslate(t, -center.x, -center.y);
    [path applyTransform:t];

}

-(void) RotatePath:(UIBezierPath *)path degree:(CGFloat)theta{
    CGAffineTransform t = CGAffineTransformMakeRotation(theta);
    [self applyCenteredPathTransform:path transform:t];
}
其中,applyCenteredPathTransform函数首先进行一个平移变换,然后再重新设置坐标系统。
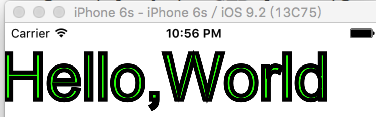
七.使用字符串创建贝塞尔路径
Core Text简化了将字符串变换成贝塞尔路径的处理,将字符串转化为单独的Core Text字形(glyph),而字形则看作是单独的CGPath项,利用CTFontCreatePathForGlyph()函数。将每个字母路径添加到最终的贝塞尔路径上。所有的字母添加好后,路径会被垂直倒置,这会将基于Quartz的输出转化为满足UIKit条件的布局。
八 .添加破折号(Dashes)
UIKit让添加破折号到贝塞尔路径上变得非常容易,你可能添加简单的重复图案,就像这样:
- (void)drawRect:(CGRect)rect {
    UIBezierPath *path = [UIBezierPath bezierPathWithOvalInRect:CGRectMake(10, 10, 120, 120)];
    CGFloat dashes[] = {6,2};
    [path setLineDash:dashes count:2 phase:0];
    path.lineWidth = 10;
     [[UIColor redColor] setStroke];
     [path stroke];
}
结果如下:
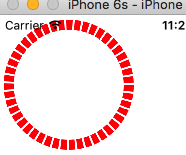
上述代码中,数组声明了描边时打开、关闭的图案(形如:- - - ),单位是point。这个例子绘制长度为6point的线,跟上长度为2point的空白。破折号图案会随着绘图上下文的缩放和视图的压缩而发生变化。参数中的phase表示破折号距离绘画的开始点的距离。
九.构建多边形路径
UIBezierPath提供了椭圆和矩形构造器,但是它并没有提供易用的N边形构造器。而下面的代码可以完成这样的任务,根据你传入的边数返回对应的贝塞尔路径。
其实就是将圆平均划分成N份,然后画线,示例代码:
- (UIBezierPath *)BezierPolygon:(NSUInteger)numberOfSides{
if (numberOfSides < 3) {
NSLog(@"Error:Please supply at least 3 sides");
return nil;
}
UIBezierPath *path = [UIBezierPath bezierPath];
//使用单位矩形作为目标
CGRect destRect = CGRectMake(0, 0, 1, 1);
CGPoint center = CGPointMake(CGRectGetMidX(destRect), CGRectGetMidY(destRect));
CGFloat r = 0.5f;
BOOL firstPoint = YES;
for (int i = 0; i < (numberOfSides - 1); i++) {
CGFloat theta = M_PI + i * M_PI *2 / numberOfSides;
CGFloat dTheta = M_PI * 2 / numberOfSides;
CGPoint p;
if (firstPoint) {
p.x = center.x + r * sin(theta);
p.y = center.y + r * cos(theta);
[path moveToPoint:p];
firstPoint = NO;
}
p.x = center.x + r * sin(theta + dTheta);
p.y = center.y + r * cos(theta + dTheta);
[path addLineToPoint:p];
}
[path closePath];
return path;
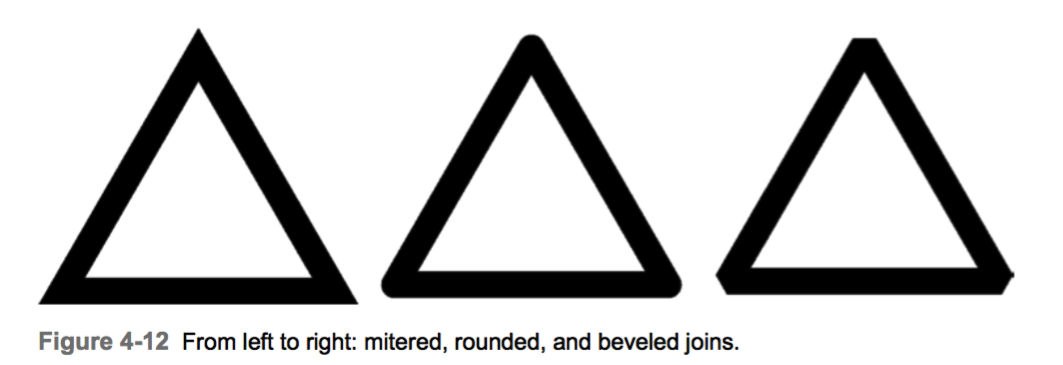
}十.线的连接和”帽子”(Line Joins and Caps)
路径的lineJoinStyle属性决定如何绘制两条线相交处的点,Quartz提供了三种样式,默认是kCGLineJoinMiter,创建尖角。通过选择kCGLineJoinRound来圆化边缘,最后一种是kCGLineJoinBevel,会产生平的效果。如图:
没有与其它线相交的线的点会有自己的样式,叫做”帽子”(cap),下图显示了三种可能的”帽子”样式。kCGLineCapButt样式就以线结束。而剩下的两条线,都会超出最后的点来装饰,即灰色垂直的线的右边,超出的额外距离是线的宽度的一半。


 147
147

 被折叠的 条评论
为什么被折叠?
被折叠的 条评论
为什么被折叠?
 到【灌水乐园】发言


