


 本文主要探讨Android SystemUI的运行机制,从整体架构、视图展示到动态更改状态栏高度。SystemUI启动由SystemServer调用startSystemUI()启动SystemUIService,其中IStatusBar.aidl作为通信接口。重点研究了PhoneStatusBar类,负责状态栏和导航栏的视图管理,以及下拉菜单的交互逻辑。此外,文章介绍了动态修改状态栏高度的实现方法,涉及PhoneWindowManager和WindowManagerService的交互。
序言
17年上半年主要做车机项目SystemUI的工作,一般的来说可以选择在源码的基础上定制,也可以重新编写。具体选择哪种方案,也要根据自身项目的需求和工作量来考虑,但是不管选择哪种,都需要对SystemUI源码有一定的了解。本文主要先从大体上了解整个SystemUI的运行机制,然后再从状态栏的图标如何显示,下拉菜单是如何的实现,来剖析这个模块的运行原理,最后用一个需求来深入的了解SystemUI模块。希望能够帮助有这方面需求的同学,当然了,本文都是笔者自己对代码的理解,如果有不正确的地方,欢迎留言指出!
整体架构
相信很多没有了解过SystemUI的同学都觉得它很神秘,因为这个Application很特殊,它和系统的联系很紧密,而且需要在源码的环境下编译,所以这也是和应用开发者关系比较疏远的原因之一。下图是SystemUI的整体架构图,我看过Android 4.4和6.0的代码,虽然代码变化很大,但是原理和核心代码都是差不多的。
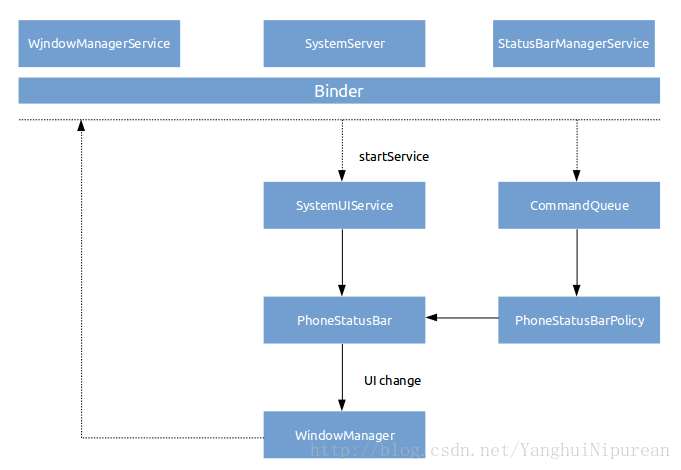
SystemUI的启动是由SystemServer进程来操作的,在整个系统资源,服务加载完成差不多的时候,调用了startSystemUI() 来启动一个服务SystemUIService ,此时就进入了SystemUI的应用程序世界了。
    static final void startSystemUi(Context context) {
        Intent intent = new Intent();
        intent.setComponent(new ComponentName("com.android.systemui",
                    "com.android.systemui.SystemUIService"));
        //Slog.d(TAG, "Starting service: " + intent);
        context.startServiceAsUser(intent, UserHandle.OWNER);
    }
首先来说下一个aidl文件,叫做IStatusBar.aidl,它的路径在frameworks/base/core/java/com/android/internal/statusbar 下。它是framework和SystemUI的通信接口,包括我们的StatusBarManagerService封装的也是这个接口。我们的SystemUI主要是显示系统状态的改变,一般的由内部和外部导致,比如系统电量的改变,SystemUI会接收系统广播来修改,这种一般不会暴露给外部使用,不然就导致显示异常,还有种是外部导致SystemUI显示的变化,像其他应用发来通知,隐藏状态栏等,这个就需要我们的IStatusBar.aidl来承担之间的通信规则了。当我们的SystemSever进程来启动我们的SystemUIService,我们SystemUIService会启动很多的类,而这些类都是继承SystemUI接口的,并且都是有自己的职责所在。
   /**
     * Makes sure that all the SystemUI services are running. If they are already running, this is a
     * no-op. This is needed to conditinally start all the services, as we only need to have it in
     * the main process.
     *
     * <p>This method must only be called from the main thread.</p>
     */
    public void startServicesIfNeeded() {
        if (mServicesStarted) {
            return;
        }

        if (!mBootCompleted) {
            // check to see if maybe it was already completed long before we began
            // see ActivityManagerService.finishBooting()
            if ("1".equals(SystemProperties.get("sys.boot_completed"))) {
                mBootCompleted = true;
                if (DEBUG) Log.v(TAG, "BOOT_COMPLETED was already sent");
            }
        }

        Log.v(TAG, "Starting SystemUI services.");
        final int N = SERVICES.length;
        for (int i=0; i<N; i++) {
            Class<?> cl = SERVICES[i];
            if (DEBUG) Log.d(TAG, "loading: " + cl);
            try {
                mServices[i] = (SystemUI)cl.newInstance();
            } catch (IllegalAccessException ex) {
                throw new RuntimeException(ex);
            } catch (InstantiationException ex) {
                throw new RuntimeException(ex);
            }
            mServices[i].mContext = this;
            mServices[i].mComponents = mComponents;
            if (DEBUG) Log.d(TAG, "running: " + mServices[i]);
            mServices[i].start();

            if (mBootCompleted) {
                mServices[i].onBootCompleted();
            }
        }
        mServicesStarted = true;
    }
下面是启动的所有接口,
    /**
     * The classes of the stuff to start.
     */
    private final Class<?>[] SERVICES = new Class[] {
            com.android.systemui.tuner.TunerService.class,
            com.android.systemui.keyguard.KeyguardViewMediator.class,
            com.android.systemui.recents.Recents.class,
            com.android.systemui.volume.VolumeUI.class,
            com.android.systemui.statusbar.SystemBars.class,
            com.android.systemui.usb.StorageNotification.class,
            com.android.systemui.power.PowerUI.class,
            com.android.systemui.media.RingtonePlayer.class,
            com.android.systemui.keyboard.KeyboardUI.class,
    };
我们这里只研究下主要试图的部分,也就是我们的SystemBars,这个类主要的工作就是通过类加载器生成我们的PhoneStatusBar,然后调用它的start()方法,我们切换到PhoneStatusBar这个类来,PhoneStatusBar这个类承担了最主要的添加,移除,更新视图的重任,它负责解析状态栏,导航栏的布局文件,然后通过WindowManagerService来生成Window对象,它实现了IStatusBar的所有接口,负责接收外界所有的关于SystemUI视图更新的消息。
视图
视图这块主要有三个模块分别是状态栏,导航栏,还有下拉模块。状态栏主要显示系统的状态,导航栏一般提供了快捷Home,最近打开的应用,和回到上一层,下拉菜单提供了一些快捷操作,通知的显示,这里就不讲导航栏了,感兴趣可以自行了解。来看看状态栏吧,小小的一个区域,Google却把它封装成一层又一层的,整个statusbar布局可以说是非常复杂,不花点精力真的不知道哪对哪。
 最低0.47元/天 解锁文章


 1017
1017

 被折叠的 条评论
为什么被折叠?
被折叠的 条评论
为什么被折叠?
 到【灌水乐园】发言


